Gate features in your own application off a purchase. Feature flag entitlements deliver a boolean capability on payment and revoke it automatically on cancellation.
A feature flag entitlement turns Dodo Payments into a billing-aware feature flag store. Attach a flag such as advanced_reports to a product, and every paying customer gets a grant that your application checks through the API or keeps in sync with webhooks. There’s no external platform, OAuth step, or delivery step: the grant itself is the capability.
Nothing leaves Dodo Payments. The grant is the deliverable:
On purchase, Dodo Payments creates the grant directly in Delivered. It never enters Pending, needs no customer action, and has no delivery step that can fail.
The grant carries a typed feature payload: { "feature_type": "boolean", "feature_id": "advanced_reports" }. Your application reads feature_id to decide what to unlock.
Cancellation, refund, or a manual revoke moves the grant to Revoked, and the flag disappears from the customer’s delivered grants.
Common uses include plan-based feature gating (Pro unlocks analytics), add-on capabilities (an “API access” upgrade), and early-access programs sold as one-time purchases.
feature_id is an identifier you choose, and it isn’t unique across entitlements. Two entitlements can confer the same feature_id, for example a monthly and a yearly Pro plan that both grant advanced_reports.
In the Dodo Payments dashboard, go to Entitlements and click + to start a new entitlement, then choose Feature Flags.
2
Name the Flag
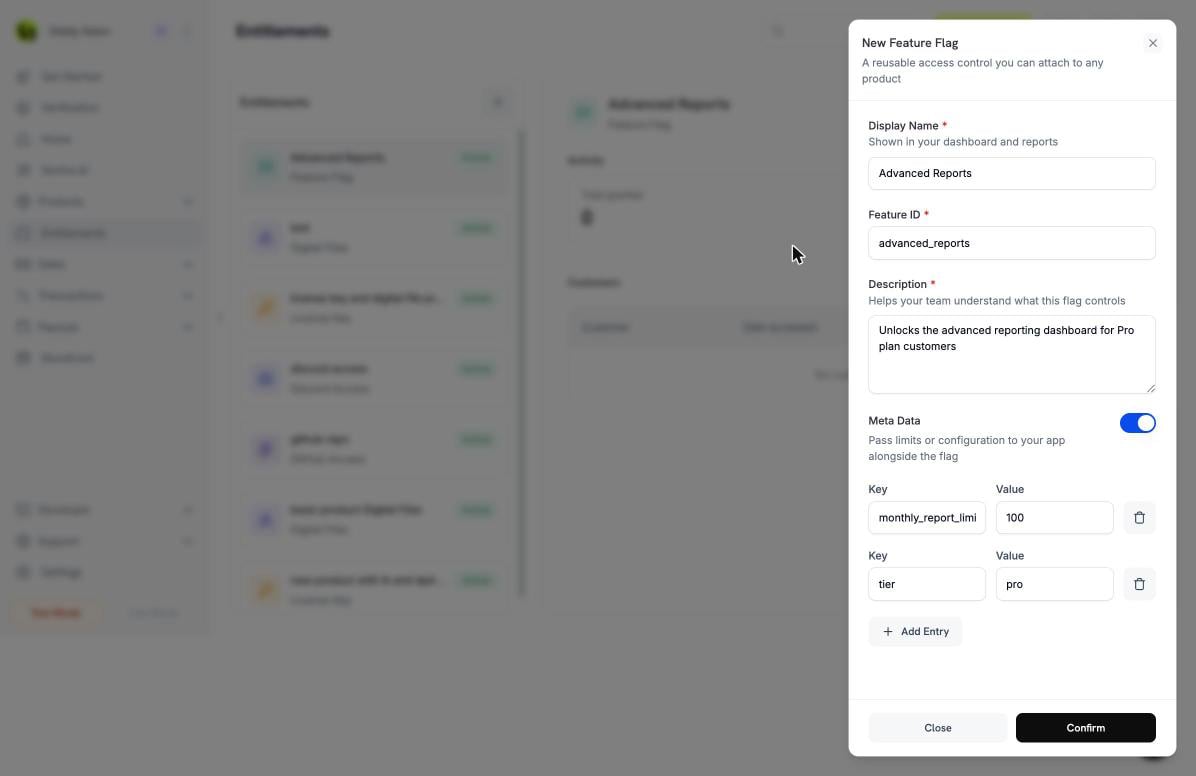
Enter a Display Name for your dashboard and reports, and a Description so your team knows what the flag controls. The Feature ID is what your application checks. The dashboard fills it in from the display name (for example, “API access” becomes api_access), and you can edit it. It can’t contain spaces.
Creating a feature flag. The Feature ID is what your application checks; Meta Data attaches limits alongside the flag.
3
Add Metadata (Optional)
Turn on Meta Data to attach key-value configuration, such as limits, tier names, or quotas, that your application receives alongside the flag. Click Add Entry for each pair. See Attach limits with metadata.
4
Confirm
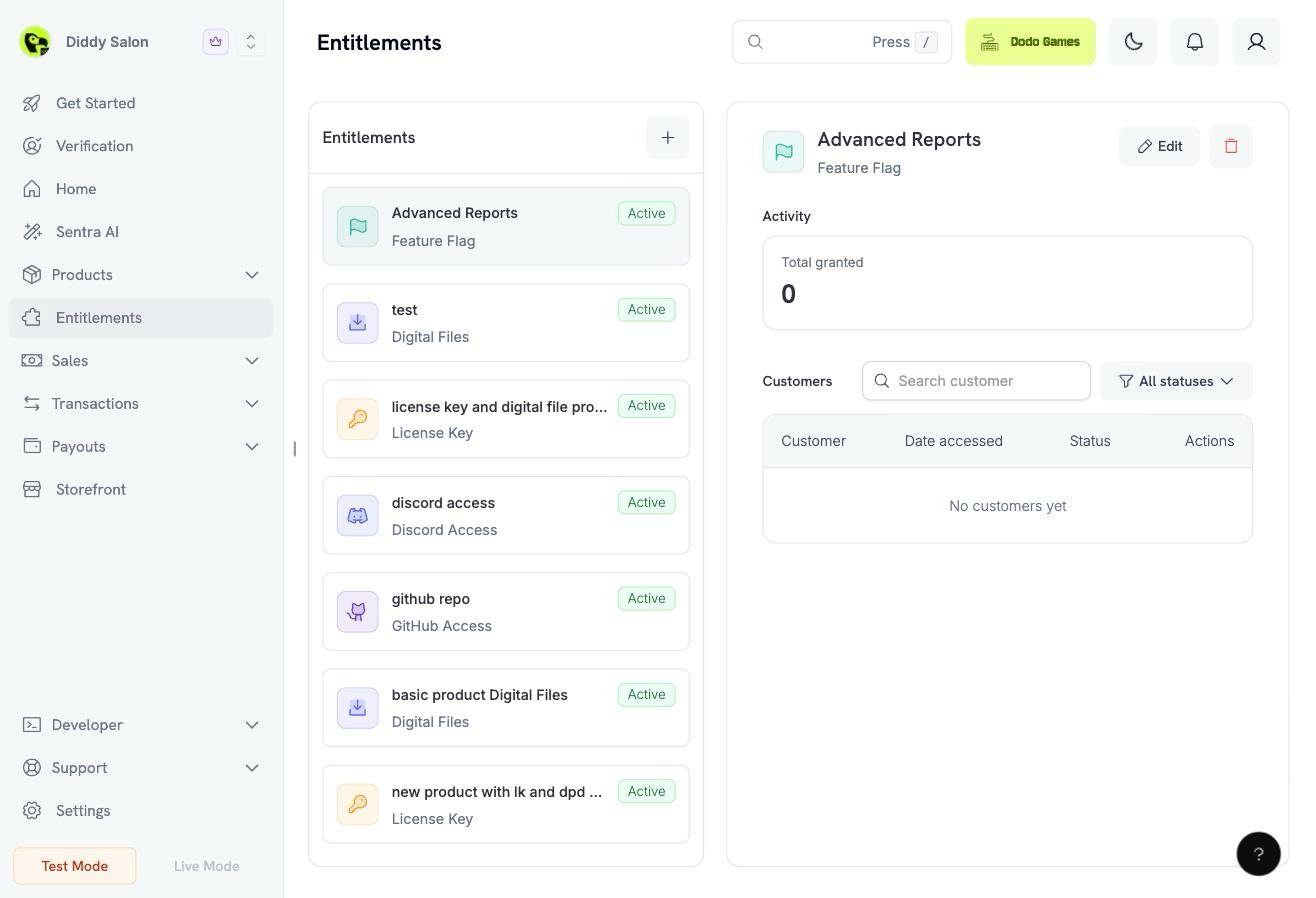
Click Confirm. The flag appears in your entitlements list, ready to attach to products.
The created feature flag. The right pane tracks every customer grant issued from it.
// client is a *dodopayments.Client, for example from// dodopayments.NewClient(option.WithEnvironmentTestMode()); ctx is a context.Context.client.Entitlements.New(ctx, dodopayments.EntitlementNewParams{ Name: dodopayments.F("Advanced Reports"), IntegrationType: dodopayments.F(dodopayments.EntitlementIntegrationTypeFeatureFlag), IntegrationConfig: dodopayments.F[dodopayments.IntegrationConfigUnionParam]( dodopayments.IntegrationConfigFeatureFlagConfigParam{ FeatureType: dodopayments.F(dodopayments.FeatureTypeBoolean), FeatureID: dodopayments.F("advanced_reports"), }, ),})
A boolean flag answers “Does this customer have the feature?”. Metadata answers “With what configuration?”. Entitlement metadata accepts string, integer, number, and boolean values. Every grant takes a frozen snapshot of the entitlement’s metadata when the grant is created.The snapshot is what makes metadata safe to use for plan limits:
Editing the entitlement’s metadata later affects only future grants. Customers keep the limits they purchased under.
Each grant returns its snapshot in its metadata field, so one API call gives you both the flag and its configuration.
For example, an advanced_reports flag with { "tier": "pro", "monthly_report_limit": 100 } lets your application unlock the dashboard and enforce the 100-report quota without a second lookup. If you later raise the limit to 250, existing customers stay at 100 until they receive a new grant, for example after a plan change.
Use metadata for limits and configuration, and use feature_id only for identity. Encoding a limit in the ID (advanced_reports_100) forces a new flag for every limit change and breaks your application’s checks.
To build the set of features a customer has, list their delivered feature flag grants. The endpoint returns one row per grant across all entitlements, and you can filter it by integration_type and status. These examples use the client from Create via API.
const features = new Map<string, Record<string, unknown>>();for await (const grant of client.customers.listEntitlementGrants('cus_abc123', { integration_type: 'feature_flag', status: 'Delivered',})) { if (grant.feature) { features.set(grant.feature.feature_id, grant.metadata ?? {}); }}if (features.has('advanced_reports')) { const limit = features.get('advanced_reports')?.monthly_report_limit; // unlock the dashboard, enforce the limit}
page = client.customers.list_entitlement_grants( customer_id="cus_abc123", integration_type="feature_flag", status="Delivered",)# Iterating the page fetches every page of results.features = { grant.feature.feature_id: grant.metadata for grant in page if grant.feature}if "advanced_reports" in features: limit = features["advanced_reports"].get("monthly_report_limit")
The feature payload is populated only on feature_flag grants. It’s null for every other integration type. See the List Customer Grants API reference for the full response shape.
Calling the API on every request adds latency to your hot path. Cache each customer’s feature set with a short TTL (minutes, not hours), and invalidate the cache from your webhook handler when a grant changes state. Together, these keep checks fast and make revocations take effect on the next request.
Feature flag grants follow the standard grant lifecycle with one simplification: there’s no delivery step, so grants never sit in Pending and never move to Failed.
Trigger
Effect
One-time payment succeeds / subscription becomes active
Grant created with status: Delivered and delivered_at set.
Subscription put on hold, paused, cancelled, or expired
Grant revoked with the matching revocation_reason.
Refund on a one-time payment
Grant revoked with revocation_reason: refund.
Subscription recovers (for example, dunning succeeds) or is unpaused
The revoked grant is restored to Delivered, with the same grant id and the revocation fields cleared.
Manual API revoke
Grant revoked with revocation_reason: manual. Not auto-restored on renewal.
Grants are idempotent per entitlement and customer. While a customer has a non-revoked grant for a flag, repeat purchases and renewals don’t create duplicates.
Create the flag. Set feature_id: advanced_reports with metadata { "tier": "pro", "monthly_report_limit": 100 }.
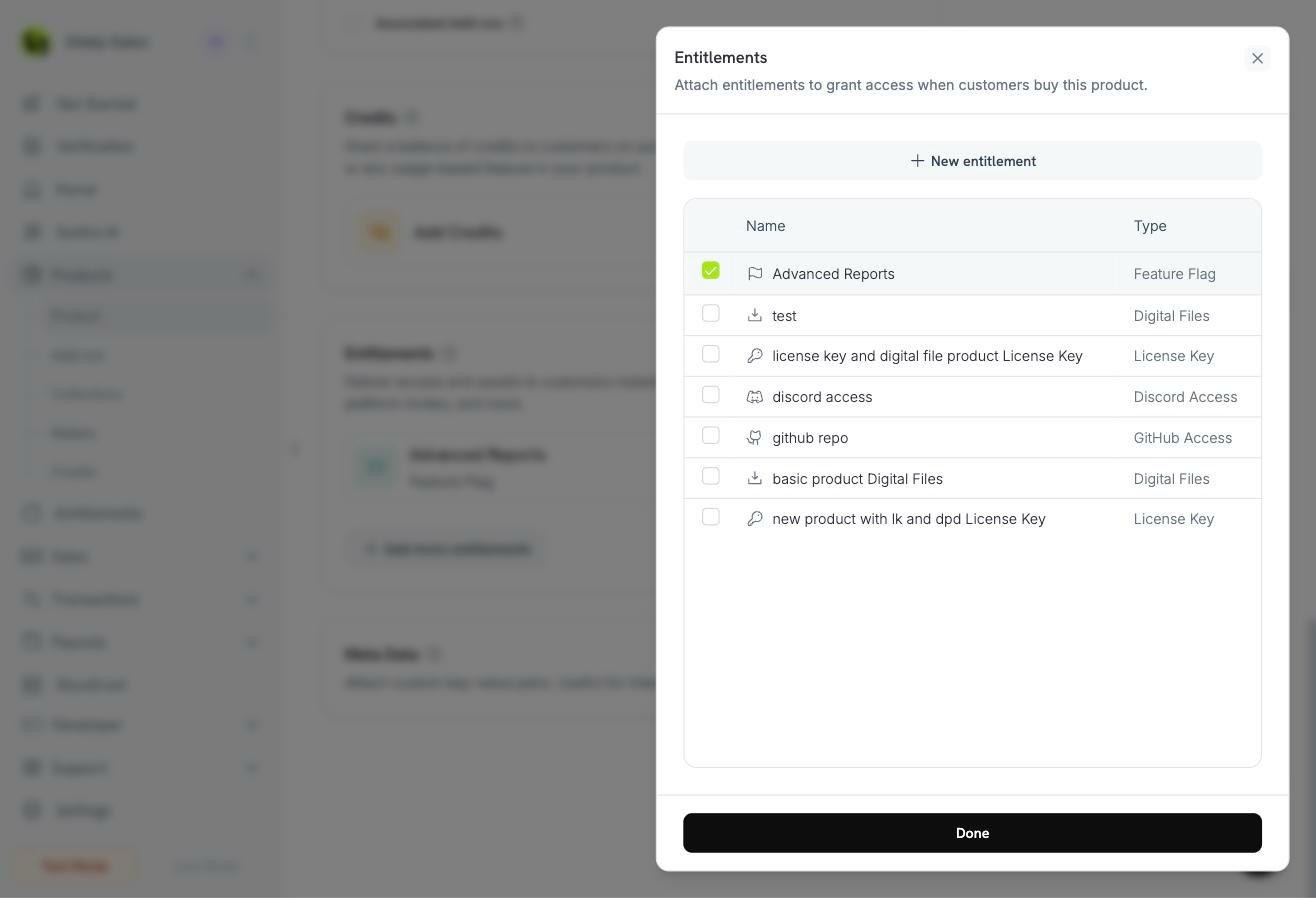
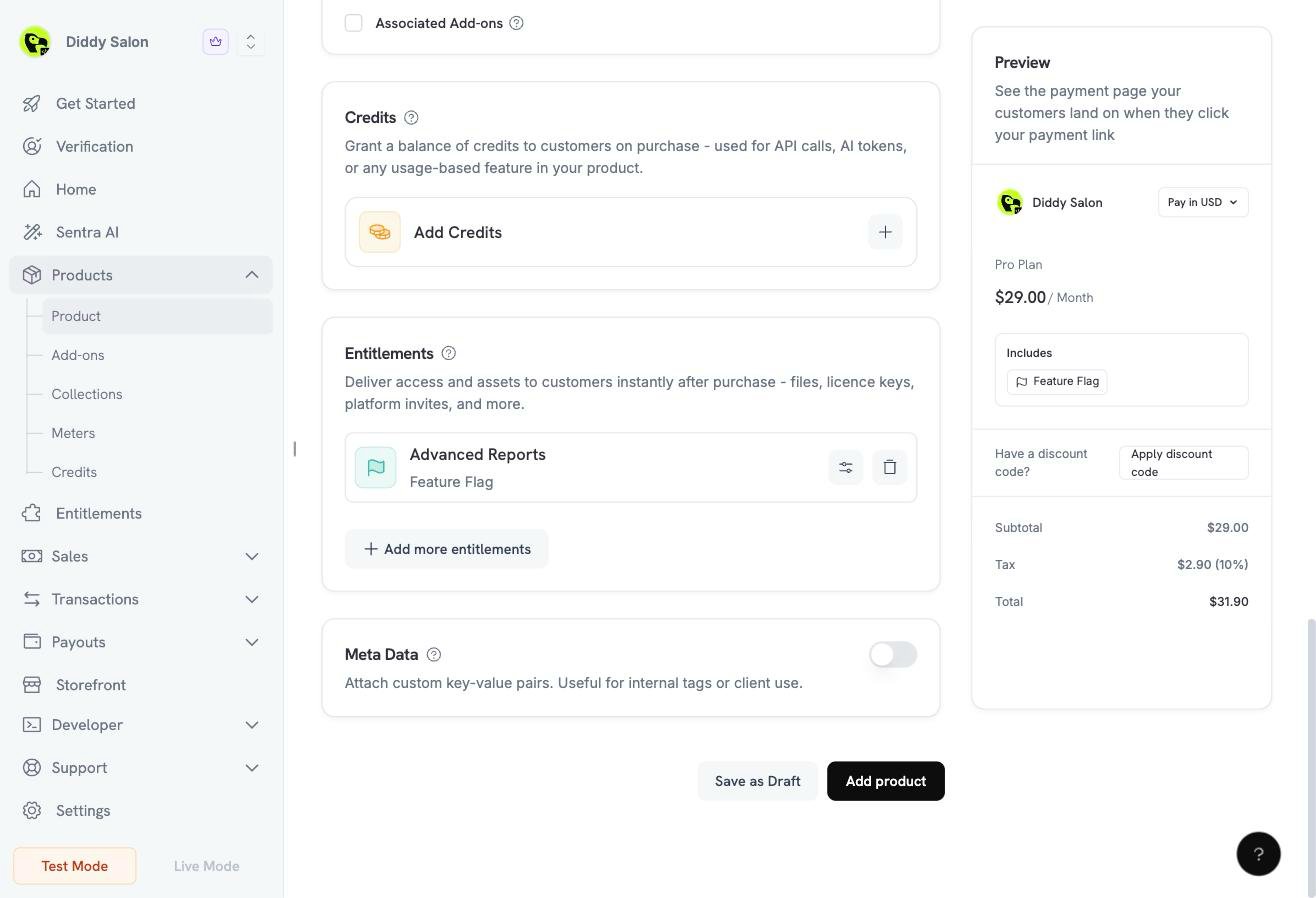
Attach it to your Pro Plan subscription product.
A customer subscribes. Dodo Payments creates a Delivered grant and fires entitlement_grant.created. Your webhook handler enables advanced_reports for the customer with a limit of 100.
Your app gates the feature. On dashboard load, check the cached feature set (or call listEntitlementGrants) and render the reports tab only when advanced_reports is present.
The customer cancels. Dodo Payments revokes the grant and fires entitlement_grant.revoked, and your handler disables the feature. If a subscription later recovers through dunning, entitlement_grant.delivered restores the feature with no code changes.
Use stable feature IDs in snake_case. Your application code checks these strings, so renaming one is a breaking change on both sides.
Use one flag per capability. Prefer advanced_reports and api_access as two entitlements over a single pro_bundle, so revocation and plan combinations stay clean.
Drive state from webhooks, and verify with the API. Webhooks keep your database current. The list endpoint is the source of truth for reconciliation jobs and cache misses.
Treat Revoked as immediate. A revoked flag means the customer no longer pays for the feature. Gate on the next request, not the next session.
Put limits in metadata, not in code. Changing a quota then requires only an edit to the entitlement. New customers get the new value, and existing grants keep their purchased snapshot.