अपने application में किसी purchase के आधार पर features को enable करें। Feature flag entitlements payment पर boolean capability देते हैं और cancellation पर इसे अपने-आप revoke कर देते हैं।
Feature flag entitlement Dodo Payments को billing-aware feature flag store में बदल देता है। advanced_reports जैसे flag को किसी product से attach करें, और हर paying customer को एक grant मिलता है जिसे आपका application API के ज़रिए check करता है या webhooks के साथ sync रखता है। किसी external platform, OAuth step या delivery step की आवश्यकता नहीं है: grant स्वयं capability है।
Dodo Payments से कुछ भी बाहर नहीं जाता। Grant ही deliverable है:
Purchase पर, Dodo Payments सीधे Delivered में grant बनाता है। यह कभी Pending में नहीं जाता, customer की किसी action की आवश्यकता नहीं होती और ऐसा कोई delivery step नहीं होता जो fail हो सके।
Grant में typed feature payload होता है: { "feature_type": "boolean", "feature_id": "advanced_reports" }। आपका application feature_id को पढ़कर तय करता है कि क्या unlock करना है।
Cancellation, refund या manual revoke grant को Revoked में ले जाता है और customer के delivered grants से flag हट जाता है।
सामान्य उपयोगों में plan-based feature gating (Pro से analytics unlock करना), add-on capabilities (“API access” upgrade) और one-time purchases के रूप में बेचे जाने वाले early-access programs शामिल हैं।
feature_id एक identifier है जिसे आप चुनते हैं, और यह entitlements के बीच unique नहीं होता। दो entitlements एक ही feature_id दे सकते हैं, जैसे monthly और yearly Pro plan, जो दोनों advanced_reports grant करते हैं।
Dodo Payments dashboard में Entitlements पर जाएं और नया entitlement शुरू करने के लिए + पर click करें, फिर Feature Flags चुनें।
2
Name the Flag
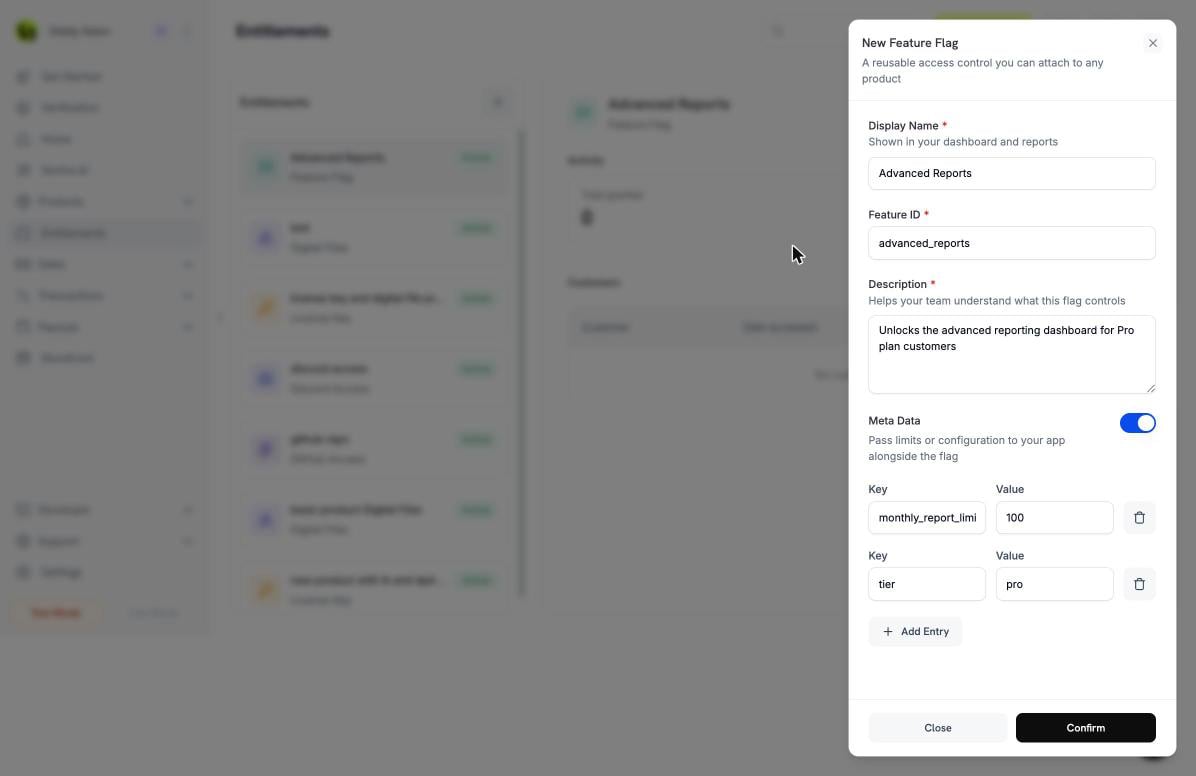
अपने dashboard और reports के लिए Display Name दर्ज करें और एक Description लिखें, ताकि आपकी team को पता हो कि flag क्या control करता है। Feature ID वह value है जिसे आपका application check करता है। Dashboard इसे display name से भर देता है (उदाहरण के लिए, “API access” से api_access बन जाता है), और आप इसे edit कर सकते हैं। इसमें spaces नहीं हो सकते।
Creating a feature flag. The Feature ID is what your application checks; Meta Data attaches limits alongside the flag.
3
Add Metadata (Optional)
Key-value configuration attach करने के लिए Meta Data चालू करें, जैसे limits, tier names या quotas, जिन्हें आपका application flag के साथ प्राप्त करता है। हर pair के लिए Add Entry पर click करें। Attach limits with metadata देखें।
4
Confirm
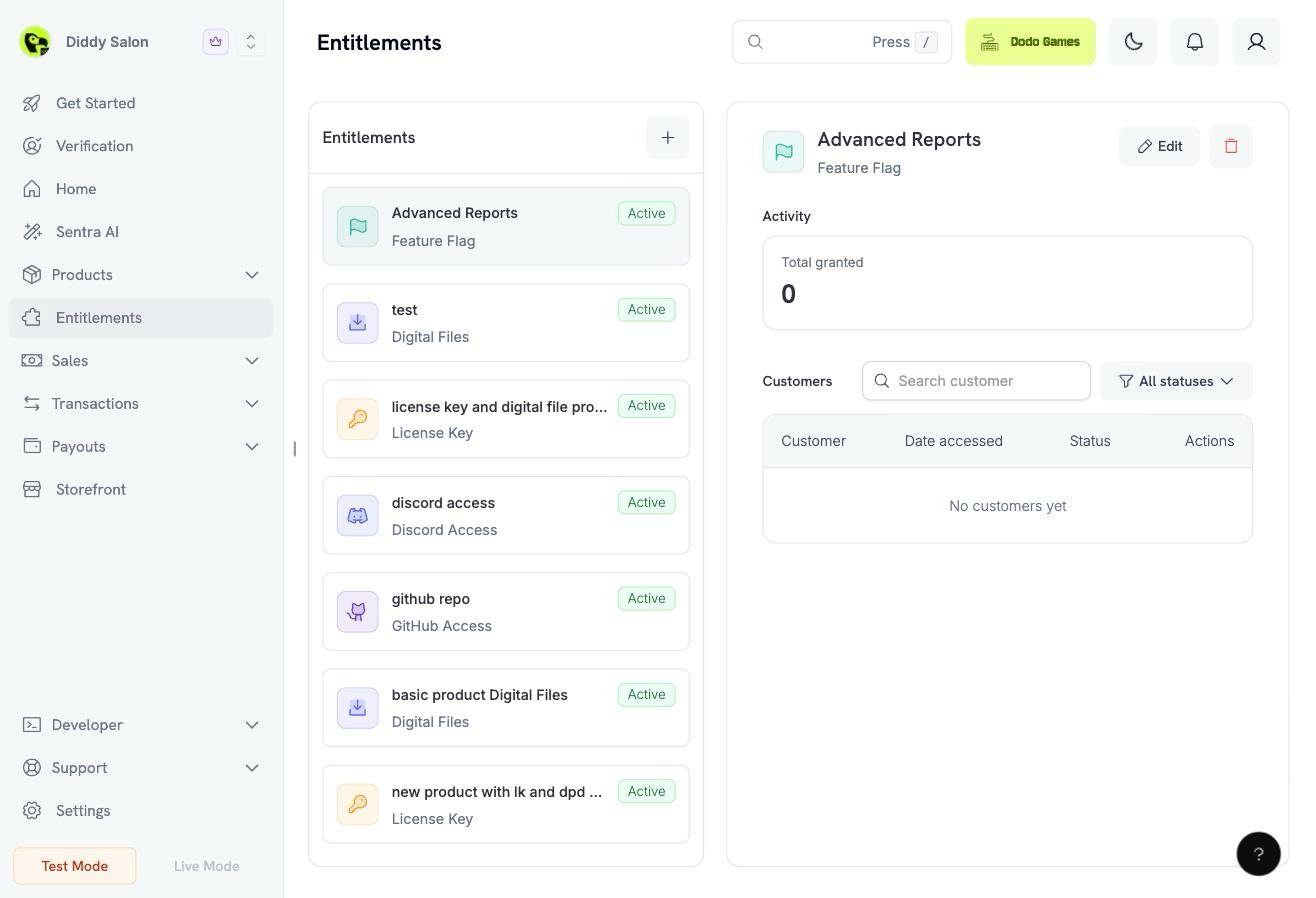
Confirm पर click करें। Flag आपकी entitlements list में दिखाई देगा और products से attach करने के लिए तैयार होगा।
The created feature flag. The right pane tracks every customer grant issued from it.
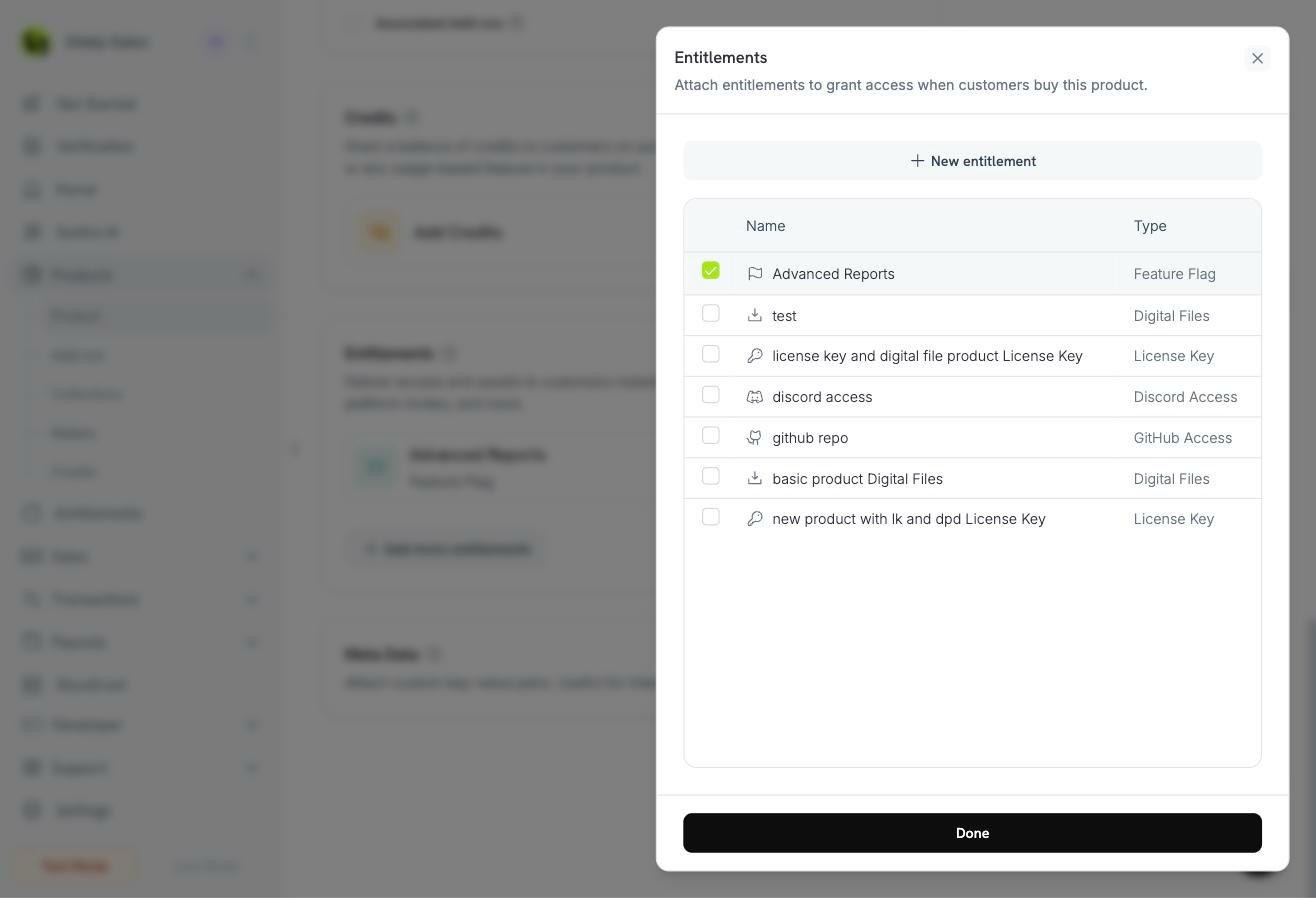
किसी product को खोलें या नया product बनाएं और Entitlements card खोजें। Existing entitlements attach करने के लिए + पर click करें, अपना feature flag चुनें और Done पर click करें।
Attaching the feature flag to a product. One product can deliver multiple entitlements.
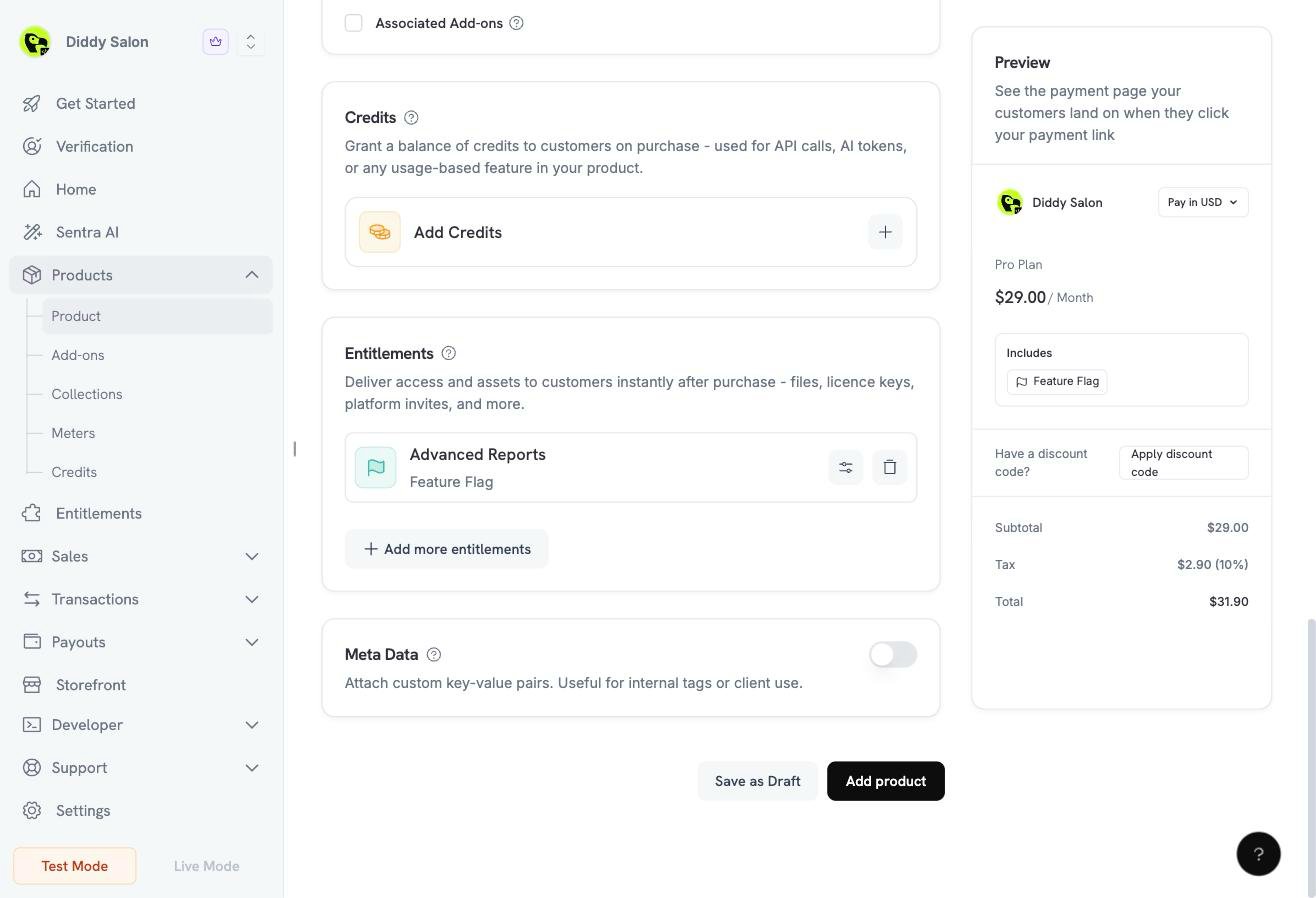
Attached flag product form पर दिखाई देता है और checkout preview इसे Includes के अंतर्गत सूचीबद्ध करता है।
The product now includes the feature flag. Every successful purchase or active subscription grants it.
// client is a *dodopayments.Client, for example from// dodopayments.NewClient(option.WithEnvironmentTestMode()); ctx is a context.Context.client.Entitlements.New(ctx, dodopayments.EntitlementNewParams{ Name: dodopayments.F("Advanced Reports"), IntegrationType: dodopayments.F(dodopayments.EntitlementIntegrationTypeFeatureFlag), IntegrationConfig: dodopayments.F[dodopayments.IntegrationConfigUnionParam]( dodopayments.IntegrationConfigFeatureFlagConfigParam{ FeatureType: dodopayments.F(dodopayments.FeatureTypeBoolean), FeatureID: dodopayments.F("advanced_reports"), }, ),})
Boolean flag इस प्रश्न का उत्तर देता है: “क्या इस customer के पास feature है?” Metadata इसका उत्तर देता है: “किस configuration के साथ?” Entitlement metadata string, integer, number और boolean values स्वीकार करता है। हर grant में grant बनाए जाने के समय entitlement के metadata का एक frozen snapshot होता है।यह snapshot metadata को plan limits के लिए सुरक्षित बनाता है:
बाद में entitlement का metadata edit करने से केवल future grants प्रभावित होते हैं। Customers के पास वही limits रहती हैं जिनके अंतर्गत उन्होंने purchase किया था।
हर grant अपना snapshot metadata field में लौटाता है, इसलिए एक API call से आपको flag और उसका configuration दोनों मिल जाते हैं।
उदाहरण के लिए, { "tier": "pro", "monthly_report_limit": 100 } के साथ advanced_reports flag आपके application को dashboard unlock करने और 100-report quota लागू करने देता है, बिना किसी दूसरी lookup के। यदि आप बाद में limit बढ़ाकर 250 कर देते हैं, तो existing customers 100 पर ही रहते हैं, जब तक उन्हें नया grant न मिले, जैसे plan change के बाद।
Limits और configuration के लिए metadata का उपयोग करें और identity के लिए केवल feature_id का उपयोग करें। ID में limit encode करना (advanced_reports_100) हर limit change के लिए नया flag बनाने को बाध्य करता है और आपके application’s checks को तोड़ देता है।
किसी customer के पास मौजूद features का set बनाने के लिए, उसके delivered feature flag grants की list बनाएं। Endpoint सभी entitlements में प्रत्येक grant के लिए एक row लौटाता है, और आप इसे integration_type और status से filter कर सकते हैं। इन examples में Create via API का client उपयोग किया गया है।
const features = new Map<string, Record<string, unknown>>();for await (const grant of client.customers.listEntitlementGrants('cus_abc123', { integration_type: 'feature_flag', status: 'Delivered',})) { if (grant.feature) { features.set(grant.feature.feature_id, grant.metadata ?? {}); }}if (features.has('advanced_reports')) { const limit = features.get('advanced_reports')?.monthly_report_limit; // unlock the dashboard, enforce the limit}
page = client.customers.list_entitlement_grants( customer_id="cus_abc123", integration_type="feature_flag", status="Delivered",)# Iterating the page fetches every page of results.features = { grant.feature.feature_id: grant.metadata for grant in page if grant.feature}if "advanced_reports" in features: limit = features["advanced_reports"].get("monthly_report_limit")
feature payload केवल feature_flag grants पर populated होता है। हर दूसरे integration type के लिए यह null होता है। पूर्ण response shape के लिए List Customer Grants API reference देखें।
हर request पर API call करने से आपके hot path में latency बढ़ती है। प्रत्येक customer के feature set को short TTL (hours नहीं, minutes) के साथ cache करें और grant की state बदलने पर अपने webhook handler से cache invalidate करें। साथ में, ये checks को fast रखते हैं और revocations को अगली request पर प्रभावी बनाते हैं।
Feature flag grants standard grant lifecycle का पालन करते हैं, एक simplification के साथ: कोई delivery step नहीं है, इसलिए grants कभी Pending में नहीं रुकते और कभी Failed में नहीं जाते।
Trigger
Effect
One-time payment succeeds / subscription becomes active
Grant को status: Delivered और delivered_at set के साथ बनाया जाता है।
Subscription put on hold, paused, cancelled, or expired
Grant को matching revocation_reason के साथ revoke किया जाता है।
Refund on a one-time payment
Grant को revocation_reason: refund के साथ revoke किया जाता है।
Subscription recovers (for example, dunning succeeds) or is unpaused
Revoked grant को उसी grant id के साथ Delivered में restore किया जाता है और revocation fields clear कर दिए जाते हैं।
Manual API revoke
Grant को revocation_reason: manual के साथ revoke किया जाता है। Renewal पर auto-restore नहीं होता।
Grants प्रत्येक entitlement और customer के लिए idempotent होते हैं। जब तक किसी customer के पास किसी flag के लिए non-revoked grant है, repeat purchases और renewals duplicates नहीं बनाते।
Flag बनाएं।feature_id: advanced_reports को metadata { "tier": "pro", "monthly_report_limit": 100 } के साथ set करें।
इसे attach करें अपने Pro Plan subscription product से।
एक customer subscribe करता है। Dodo Payments Delivered grant बनाता है और entitlement_grant.created fire करता है। आपका webhook handler customer के लिए advanced_reports enable करता है, जिसकी limit 100 है।
आपका app feature को gate करता है। Dashboard load होने पर cached feature set check करें (या listEntitlementGrants call करें) और reports tab को तभी render करें जब advanced_reports मौजूद हो।
Customer cancel करता है। Dodo Payments grant revoke करता है और entitlement_grant.revoked fire करता है, और आपका handler feature disable कर देता है। यदि subscription बाद में dunning के ज़रिए recover होती है, तो entitlement_grant.delivered बिना किसी code changes के feature restore करता है।
snake_case में stable feature IDs का उपयोग करें। आपका application code इन strings को check करता है, इसलिए किसी एक का नाम बदलना दोनों sides पर breaking change है।
हर capability के लिए एक flag का उपयोग करें। एक single pro_bundle के बजाय advanced_reports और api_access को दो entitlements के रूप में रखना बेहतर है, ताकि revocation और plan combinations साफ रहें।
State को webhooks से drive करें और API से verify करें। Webhooks आपके database को current रखते हैं। List endpoint reconciliation jobs और cache misses के लिए source of truth है।
Revoked को immediate मानें। Revoked flag का अर्थ है कि customer अब feature के लिए pay नहीं करता। अगली request पर gate करें, अगली session पर नहीं।
Limits को code में नहीं, metadata में रखें। Quota बदलने के लिए केवल entitlement edit करना होगा। नए customers को नई value मिलेगी और existing grants अपना purchased snapshot बनाए रखेंगे।