

Product Collections संबंधित products (जैसे Starter, Pro और Enterprise plans) को एक umbrella के अंतर्गत समूहित करते हैं। सभी विकल्पों को एक checkout में प्रदर्शित करें, upgrade/downgrade paths निर्धारित करें और customers को Customer Portal से सीधे plans बदलने दें।
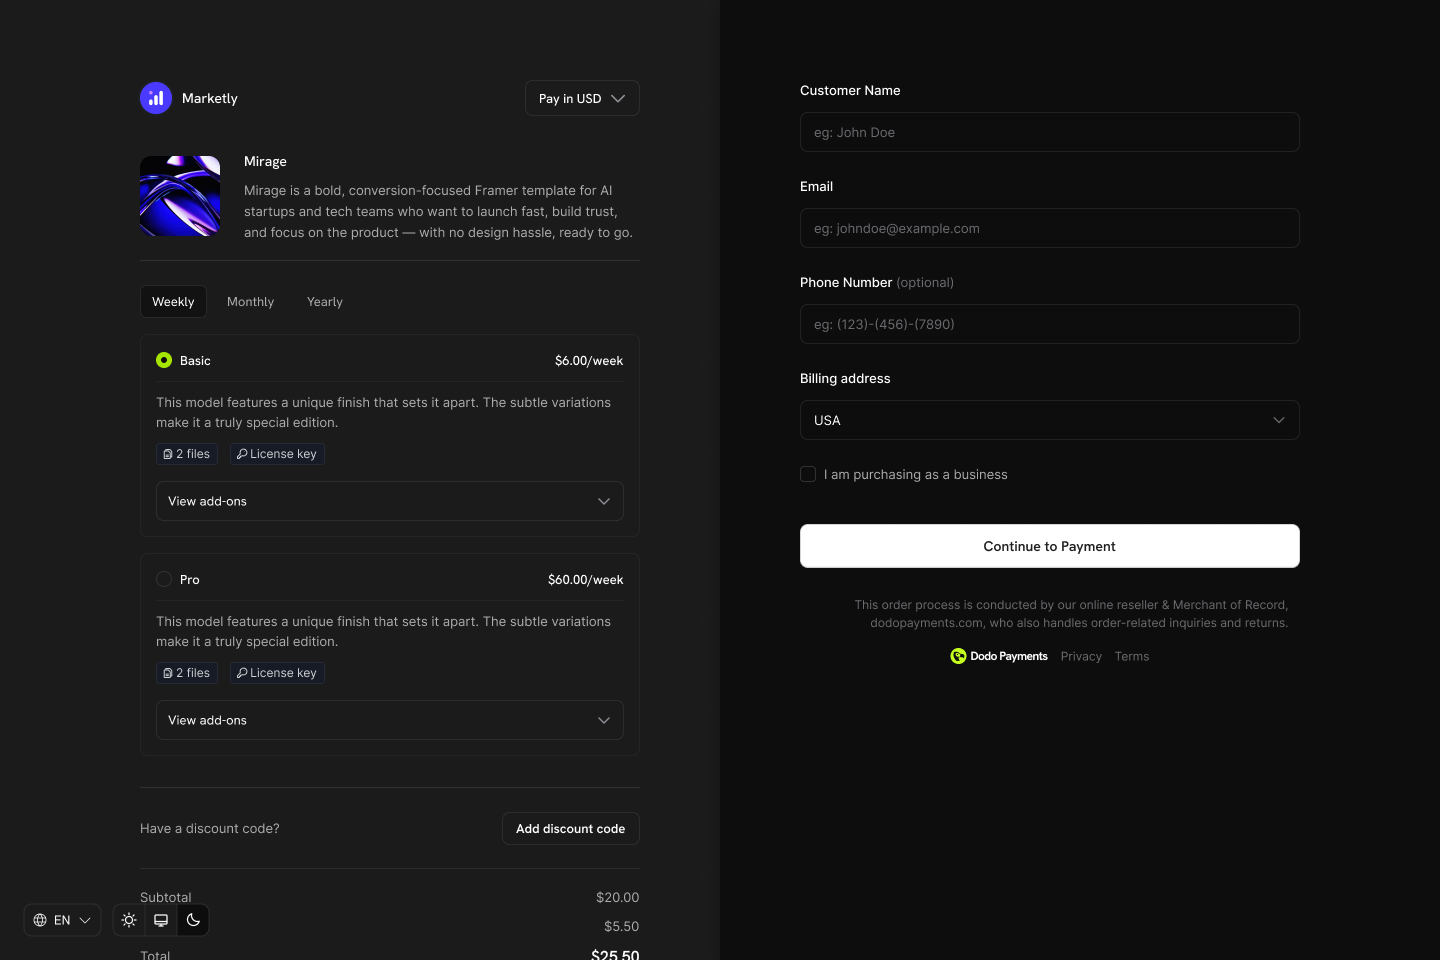
प्रमुख हाइलाइट्स
Product Collections आपको ये करने देते हैं:- व्यवस्थित management के लिए संबंधित products (plans, tiers, pricing options) को समूहित करें।
- कई products शामिल करें, जैसे Starter, Pro और Lifetime, जिनमें से प्रत्येक का अपना pricing model हो।
- सभी products को एक checkout view में प्रदर्शित करें, ताकि customers तुलना करके अपना पसंदीदा plan चुन सकें।
- Customers को Customer Portal के माध्यम से उसी collection में मौजूद products के बीच upgrade या downgrade करने दें।
- नियंत्रित करें कि कौन से products दिखाई दें, किस क्रम में दिखाई दें और checkout पर कौन सा pre-selected हो।
Product Collection बनाना
Dashboard या API के माध्यम से collections बनाएँ और manage करें।1
Create the collection
Collection को name और optional description के साथ परिभाषित करें। Checkout में इसे दर्शाने के लिए एक image upload करें।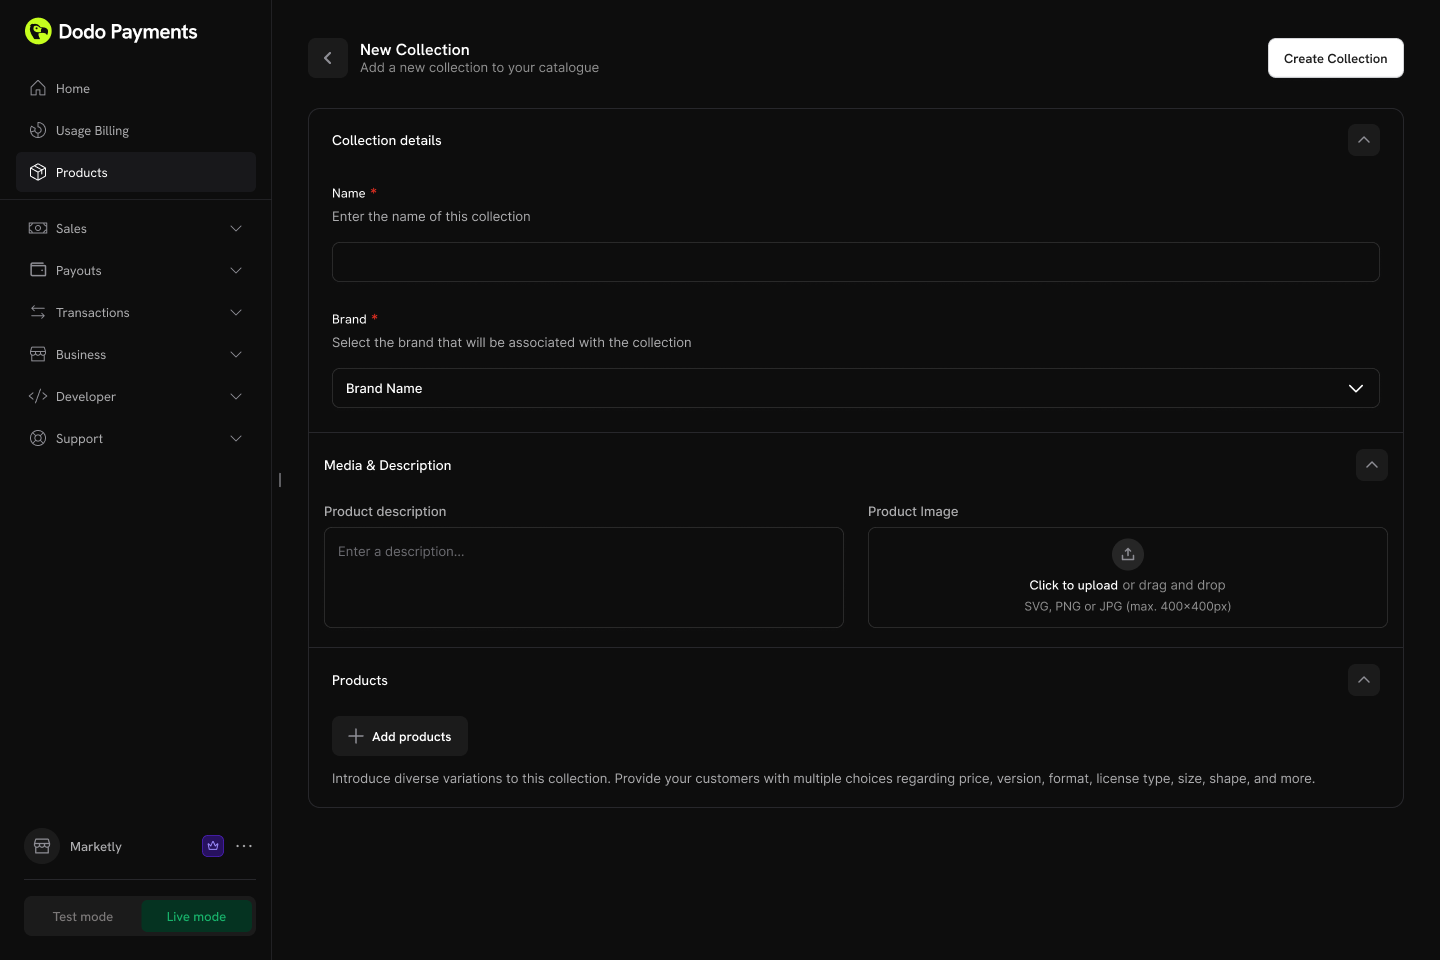
- Name (आवश्यक): Display name (जैसे, “SaaS Plans”, “License Tiers”)।
- Description (वैकल्पिक): Checkout में दिखाई जाने वाली संक्षिप्त व्याख्या।
- Image (वैकल्पिक): Collection के लिए visual branding।
2
Add products to the collection
अपने collection में मौजूदा products जोड़ें। बेहतर structure के लिए उन्हें groups में व्यवस्थित करें।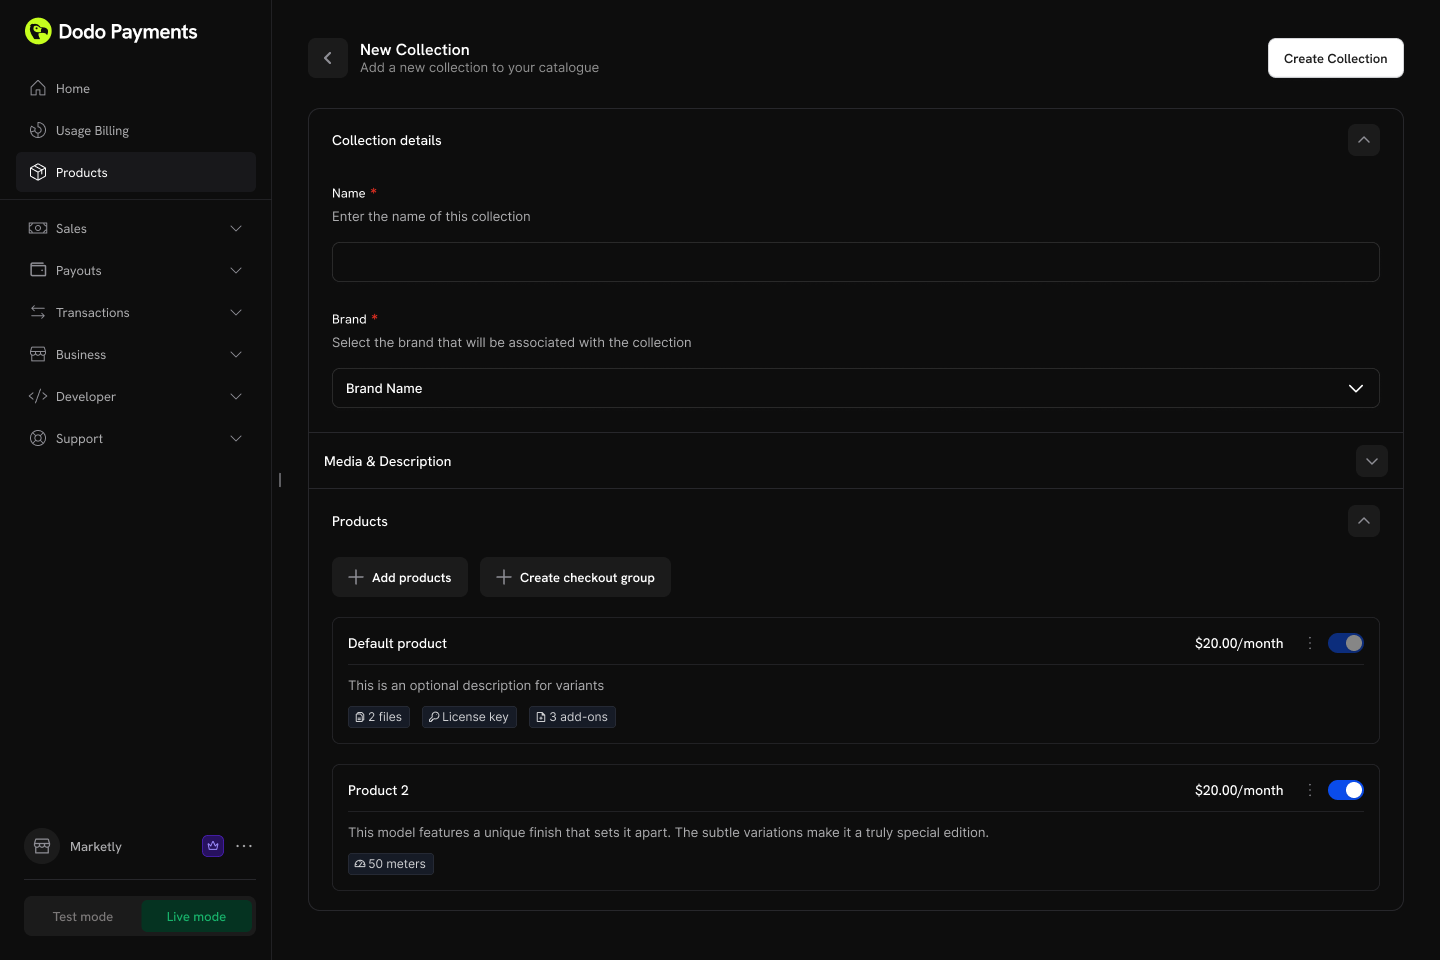
- Groups: Products को optional रूप से named groups में व्यवस्थित करें (जैसे, “Monthly Plans”, “Annual Plans”)।
- Ungrouped products: बिना group वाले products collection level पर दिखाई देते हैं।
- Ordering: Display order निर्धारित करने के लिए drag and drop करें।
3
Configure ordering and visibility
Collection के भीतर products का display order और visibility नियंत्रित करें।Configuration options:
- Product status: Collection के भीतर अलग-अलग products को enable या disable करें।
- Display order: Checkout में products के दिखाई देने का क्रम निर्धारित करने के लिए drag and drop करें।
Collection का पहला product checkout पर अपने-आप pre-selected होता है। Default रूप से चुने गए product को बदलने के लिए products का क्रम बदलें।
Collection Checkout
Collections एक unified checkout experience सक्षम करते हैं, जहाँ customers सभी उपलब्ध products को एक ही स्थान पर देख और चुन सकते हैं।Checkout Types
Collection Checkout Experience
Collection checkout का उपयोग करते समय:- Collection के सभी active products प्रदर्शित किए जाते हैं।
- Collection order में पहला product अपने-आप pre-selected होता है।
- प्रत्येक product अपना name, description और pricing दिखाता है।
- Customer खरीदने के लिए एक product चुनता है।
- Checkout चुने गए product की pricing और billing settings के साथ आगे बढ़ता है।
API Integration
किसी collection के लिए checkout session बनाएँ:Customer Portal Integration
Customers Customer Portal से सीधे उसी collection के products के बीच upgrade या downgrade कर सकते हैं।Plan Management Actions
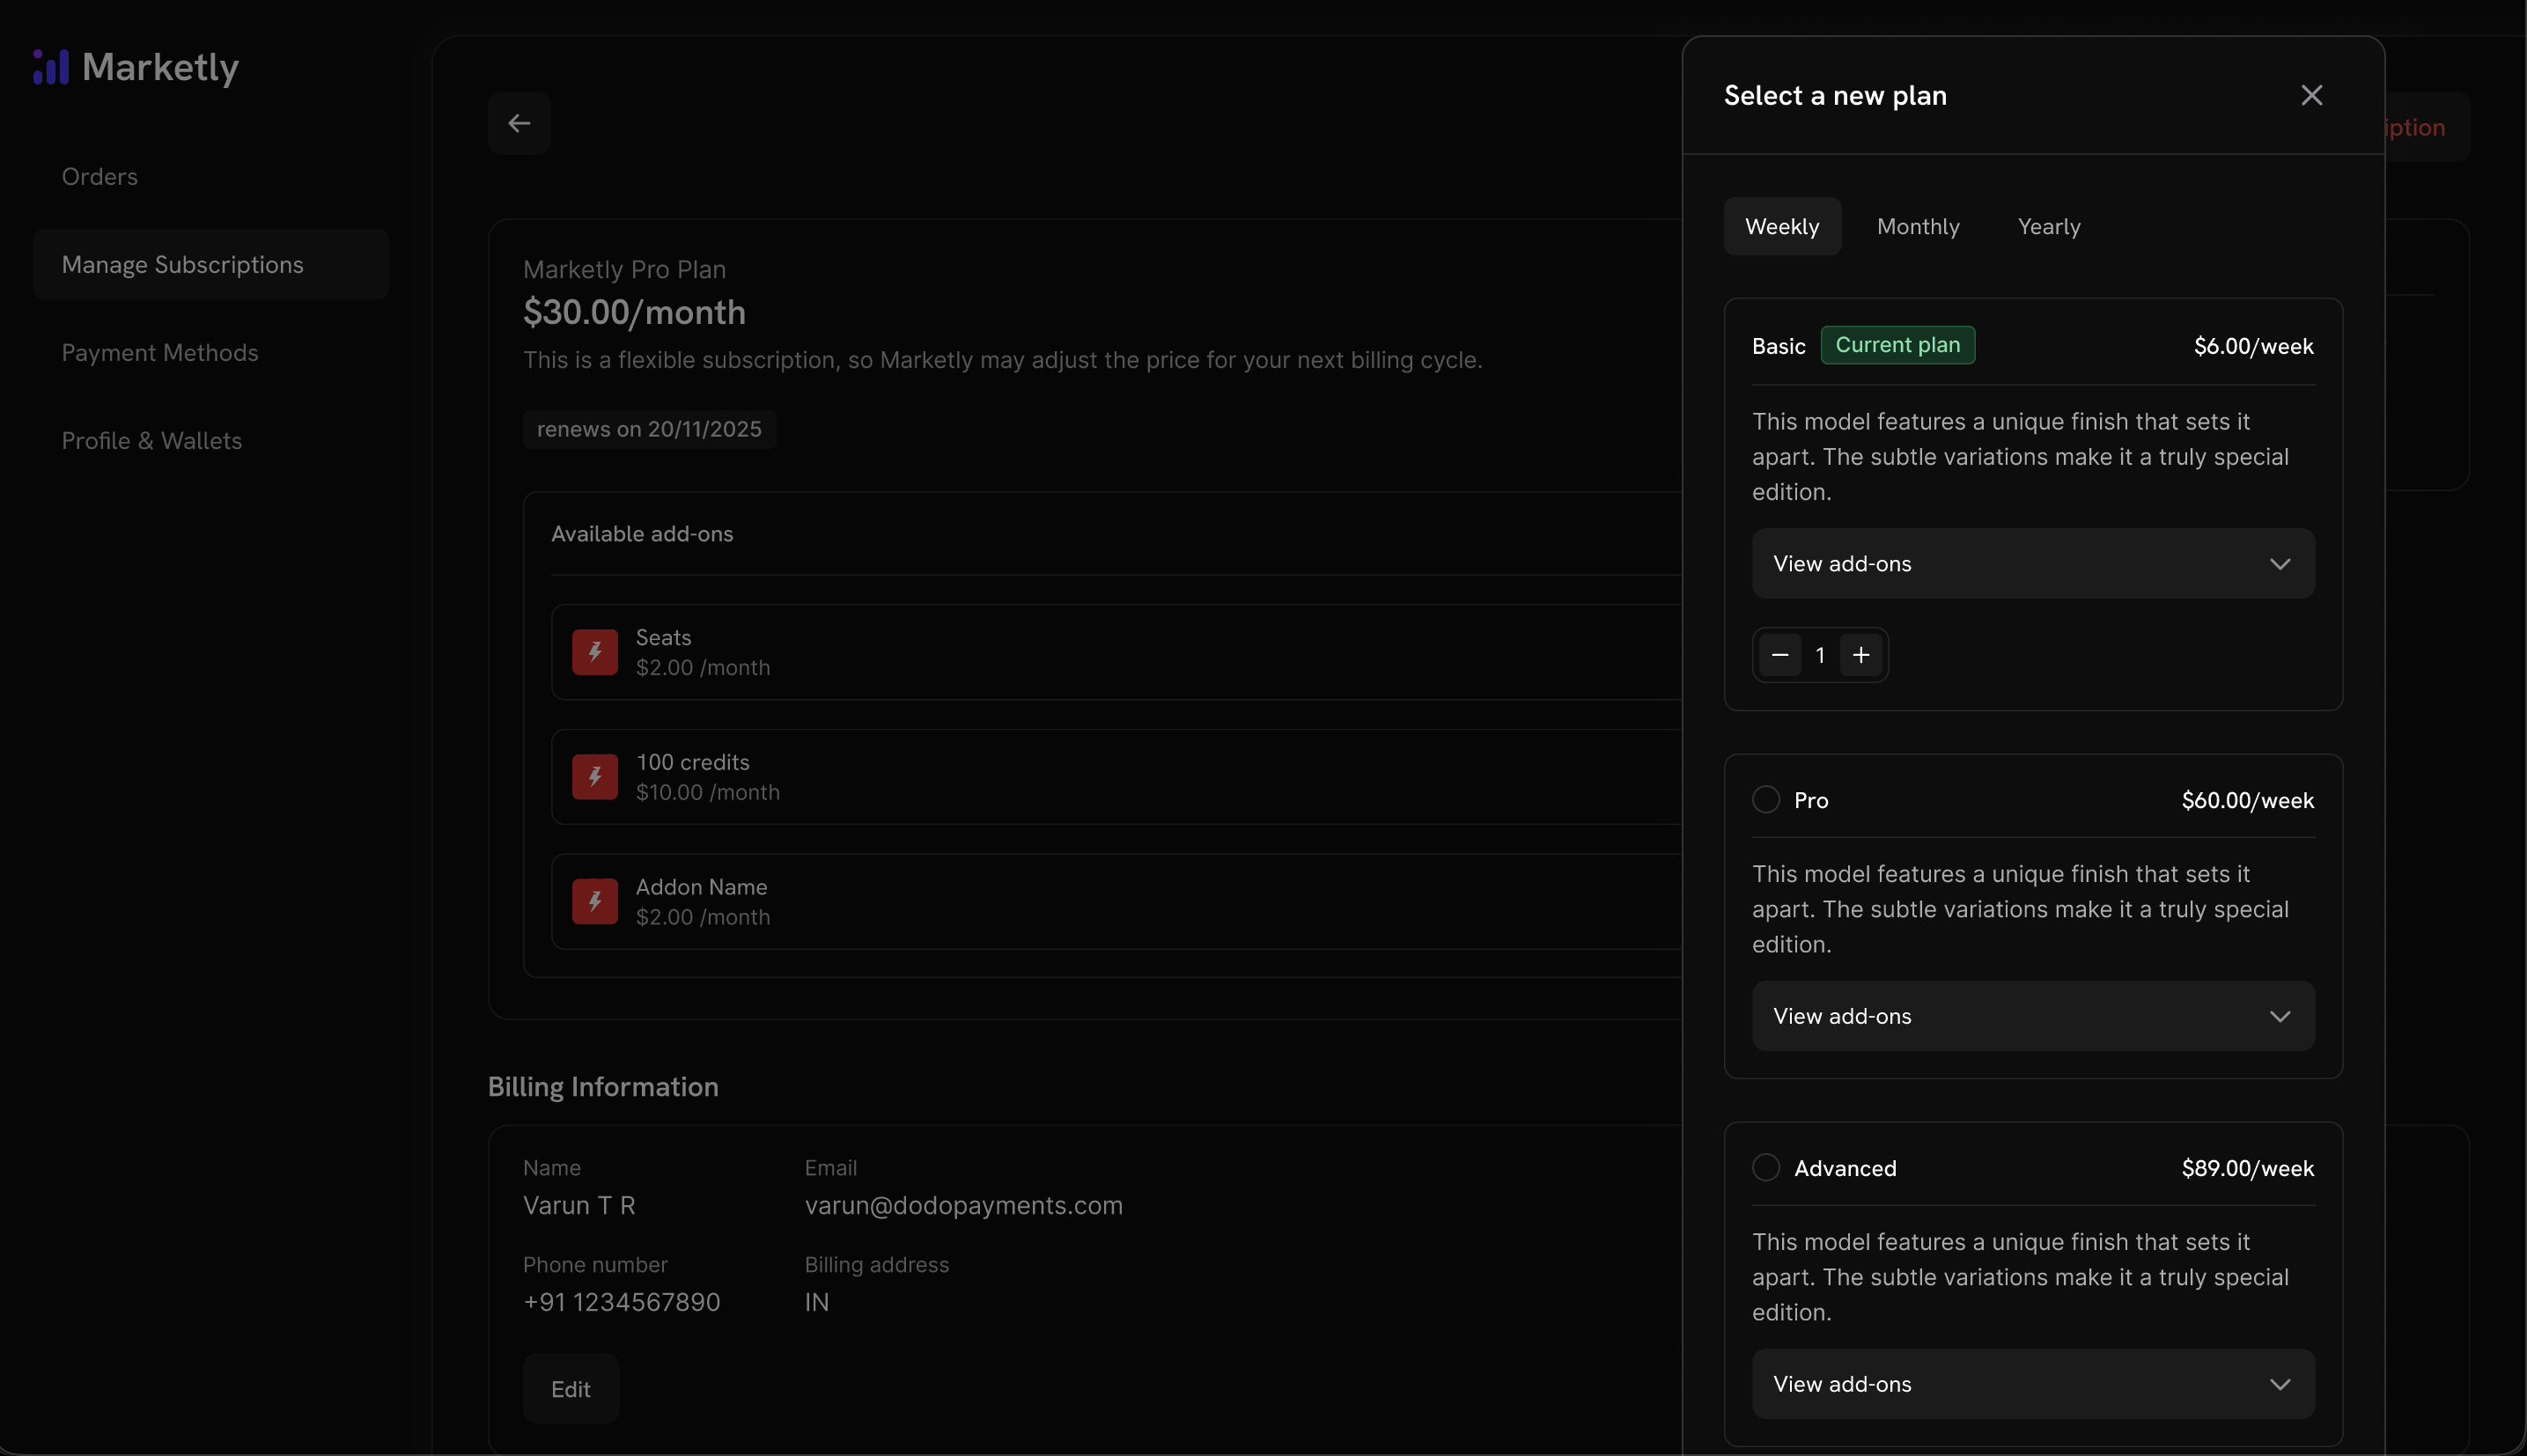
Upgrade/Downgrade Rules
- Upgrades और downgrades केवल उसी collection के products के बीच उपलब्ध हैं।
- Customer Portal plan changes के लिए proration, Settings → Subscriptions में default upgrade और downgrade behavior का पालन करता है, और प्रत्येक collection इन defaults को override कर सकता है। Change Plan API के माध्यम से किए गए plan changes request के साथ भेजे गए
proration_billing_modeका उपयोग करते हैं। - प्रत्येक upgrade, downgrade या cancellation पर business को email notifications भेजी जाती हैं।
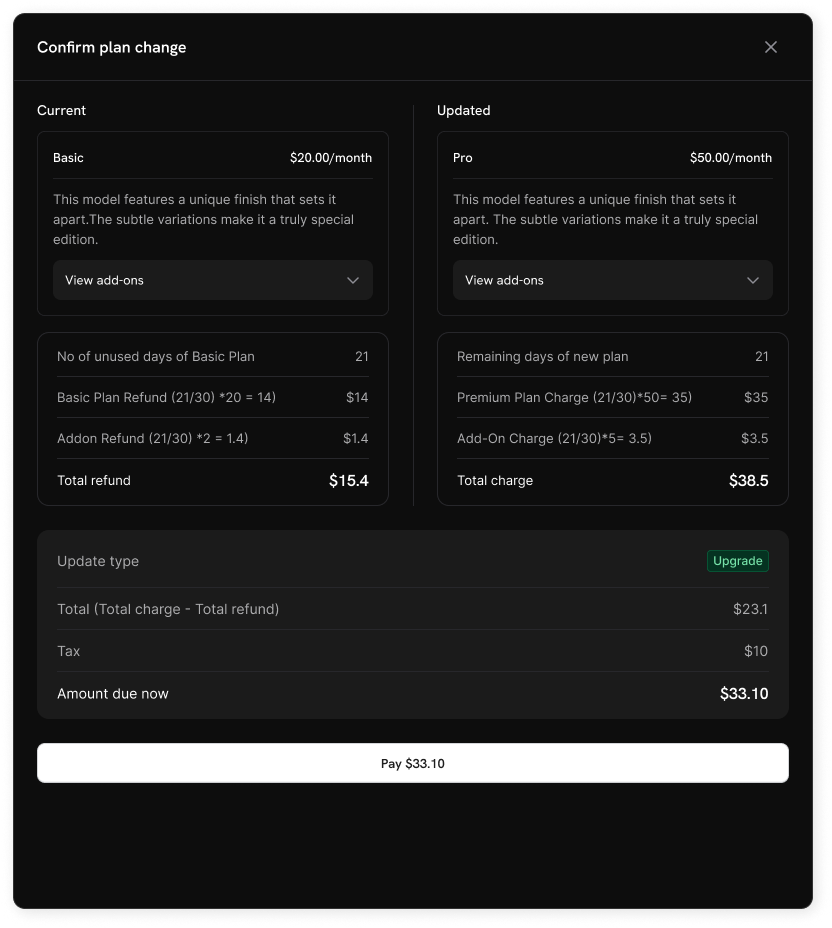
Customers अपनी current collection के बाहर के products पर switch नहीं कर सकते। अलग-अलग product lines के लिए अलग collections बनाएँ।
Subscription Settings
अपने dashboard में Settings → Subscriptions से पूरे business में subscriptions और plan changes के काम करने का तरीका configure करें।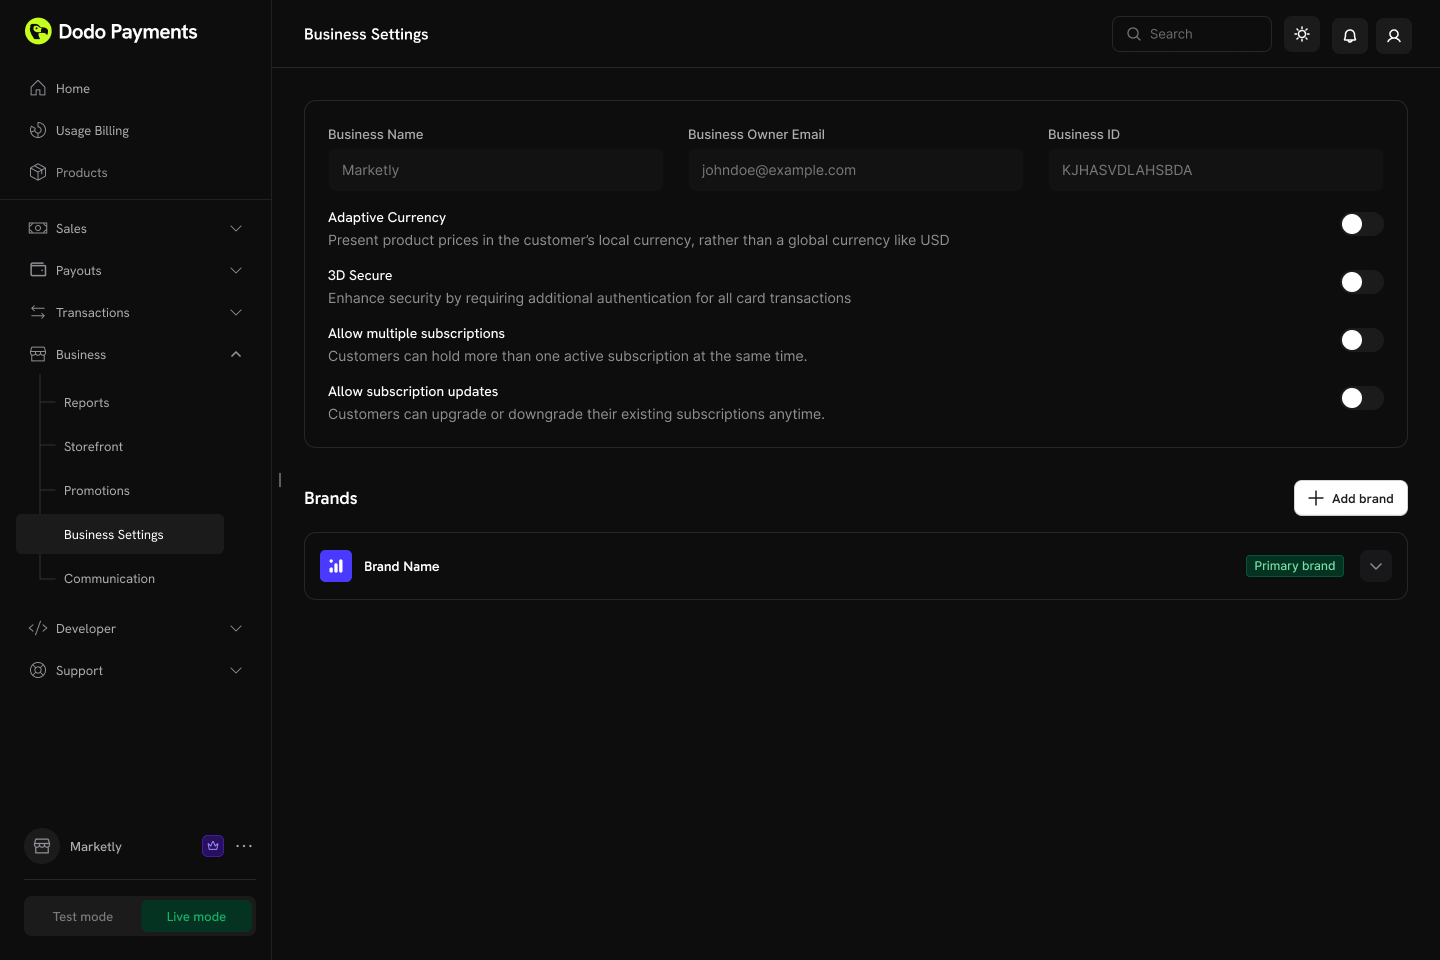
Available Settings
Customer Portal के माध्यम से plan changes default रूप से disabled होते हैं। Customers को उसी collection में products के बीच upgrade या downgrade करने देने के लिए Settings → Subscriptions में “Allow Subscription Updates” enable करें।
Cancellation की दोनों settings स्वतंत्र हैं, इसलिए आप customers को पहले से paid period पूरा करने दे सकते हैं और instant cancellation को केवल अपने लिए रख सकते हैं, या इसका उल्टा कर सकते हैं। किसी एक को बंद करने पर Customer Portal में वह option छिप जाता है और Customer Portal API के माध्यम से उसके requests अस्वीकार हो जाते हैं। आपके अपने merchant-side cancellations प्रभावित नहीं होते। Cancelling a Subscription देखें।
“Allow Subscription Pause” केवल Customer Portal को नियंत्रित करता है — setting चाहे जो हो, आप dashboard या API से pause और resume कर सकते हैं। “Bill Usage at Pause” केवल usage-based subscriptions पर लागू होता है और प्रत्येक billing cycle के लिए record किया जाता है, इसलिए इसे cycle के बीच बदलने से चल रहे cycle का settlement नहीं बदलता। Pausing and Resuming Subscriptions देखें।
Trial redemptions का मिलान और record कैसे किया जाता है, इसके विवरण के लिए Preventing Trial Misuse देखें।
“Payment Method Reminder” केवल उन subscriptions के लिए महत्वपूर्ण है जिनमें Card-Optional at Zero Price enabled है — इसका उन subscriptions पर कोई प्रभाव नहीं पड़ता जिनमें पहले से card आवश्यक है। पूरी sequence के लिए What Happens Without a Card देखें, जिसमें reminder को अनदेखा करने पर होने वाली स्थिति भी शामिल है।
Subscription Plan Changes
Collections Manage करना
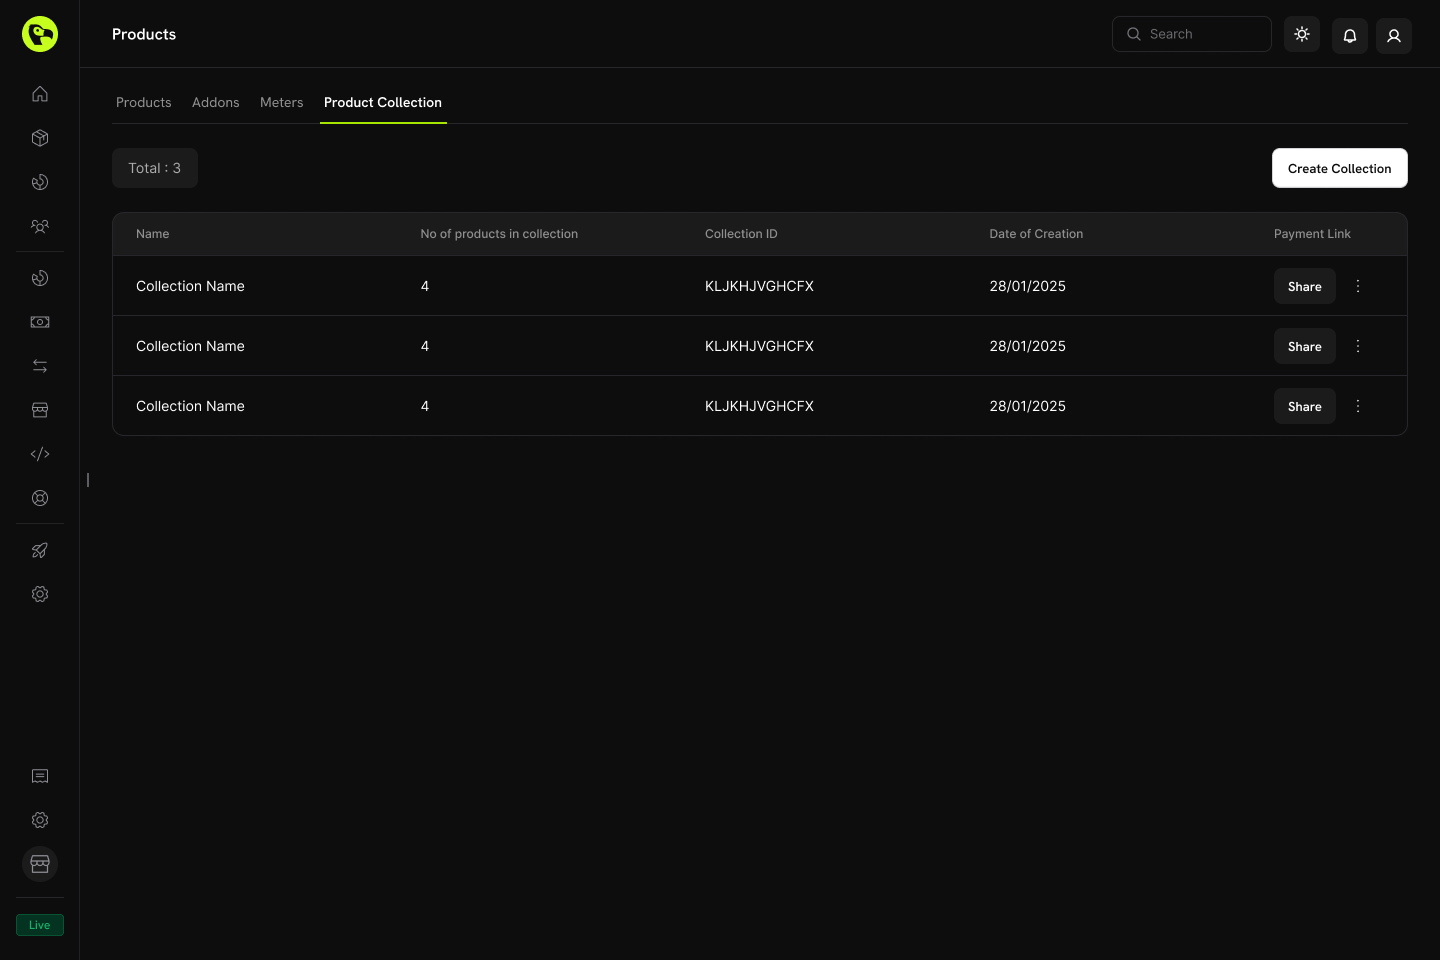
Dashboard के माध्यम से या API द्वारा programmatically collections manage करें।Dashboard Operations
- Create: Products और groups के साथ नई collections set up करें।
- Update: Name, description, image और product organization में बदलाव करें।
- Reorder: Product display order बदलने के लिए drag and drop करें।
- Enable/Disable products: नियंत्रित करें कि कौन से products checkout में दिखाई दें।
- Archive: Collection को स्थायी रूप से delete किए बिना छिपाएँ (बाद में unarchive किया जा सकता है)।
API Management
Nested groups और products के management सहित, product collections को programmatically create, update, retrieve, archive और organize करने के लिए निम्न endpoints का उपयोग करें।Listing Product Collections
Listing Product Collections
अपने account से संबद्ध सभी product collections को
GET request के माध्यम से /product-collections endpoint से fetch करें। Pagination, brand के आधार पर filtering और archived collections को शामिल करना supported है।List Product Collections API
Creating a Product Collection
Creating a Product Collection
आवश्यक
name और उत्पादों के groups के साथ-साथ description और brand जैसे वैकल्पिक विवरण भेजकर POST अनुरोध के माध्यम से /product-collections endpoint पर एक नया product collection बनाएँ।Create Product Collection API
Retrieving a Product Collection
Retrieving a Product Collection
किसी specific product collection के बारे में detailed information — जिसमें उसके groups और product items शामिल हैं —
GET request के माध्यम से /product-collections/{id} endpoint से प्राप्त करें।Get Product Collection API
Updating a Product Collection
Updating a Product Collection
PATCH request को /product-collections/{id} endpoint पर भेजकर product collection की details (name, description, brand आदि) modify करें।Update Product Collection API
Uploading Collection Images
Uploading Collection Images
Pre-signed URL के माध्यम से image upload करके उसे collection से associate करें।
/product-collections/{id}/images endpoint से upload URL माँगें, फिर 60 seconds के भीतर returned URL पर image को PUT करें।Update Collection Images API
Archiving a Product Collection
Archiving a Product Collection
DELETE request को /product-collections/{id} endpoint पर भेजकर collection archive करें। इससे collection नए use से छिप जाती है, लेकिन स्थायी रूप से remove नहीं होती।Archive Product Collection API
Unarchiving a Product Collection
Unarchiving a Product Collection
POST request को /product-collections/{id}/unarchive endpoint पर भेजकर archived collection restore करें।Unarchive Product Collection API
Managing Groups within a Collection
Managing Groups within a Collection
Groups आपको collection के भीतर products व्यवस्थित करने देते हैं (उदाहरण के लिए, “Monthly Plans” और “Annual Plans”)। Collection के भीतर groups जोड़ने, update करने या remove करने के लिए groups endpoints का उपयोग करें।
- Create a group:
POST /product-collections/{id}/groups - Update a group:
PATCH /product-collections/{id}/groups/{group_id} - Delete a group:
DELETE /product-collections/{id}/groups/{group_id}
Create Group
Update Group
Delete Group
Managing Products within a Group
Managing Products within a Group
Group के भीतर individual product items manage करें — नए products जोड़ें, existing items (जैसे display order) update करें या उन्हें पूरी तरह remove करें।
- Add products to a group:
POST /product-collections/{id}/groups/{group_id}/items - Update a group item:
PATCH /product-collections/{id}/groups/{group_id}/items/{item_id} - Delete a group item:
DELETE /product-collections/{id}/groups/{group_id}/items/{item_id}
Add Products to Group
Update Group Item
Delete Group Item
Best Practices
- Group logically: Products को billing interval (monthly/annual) या feature tier (starter/pro/enterprise) के आधार पर व्यवस्थित करें।
- Order strategically: सबसे लोकप्रिय या recommended plan को पहले रखें, क्योंकि checkout पर वही pre-selected होगा।
- Use clear naming: Product names को value differences स्पष्ट रूप से communicate करना चाहिए।
- Enable both directions: Customers को flexibility देने के लिए upgrades और downgrades दोनों की अनुमति दें।
- Consider proration: ऐसा proration mode चुनें जो आपके business model के अनुरूप हो।
- Test thoroughly: Live होने से पहले test mode में checkout और plan change flows verify करें।