

One-Time
Subscriptions
Usage-Based
Product बनाएँ
Dashboard या API के माध्यम से products बनाएँ। शुरुआत में pricing model चुनें—One-Time, Subscription या Usage-Based—फिर विवरण configure करें। Pricing model immutable है; यदि आपको अलग model चाहिए, तो नया product बनाएँ।1
Name and Description
स्पष्ट title और संक्षिप्त, value-oriented description दें। Descriptions में Markdown समर्थित है।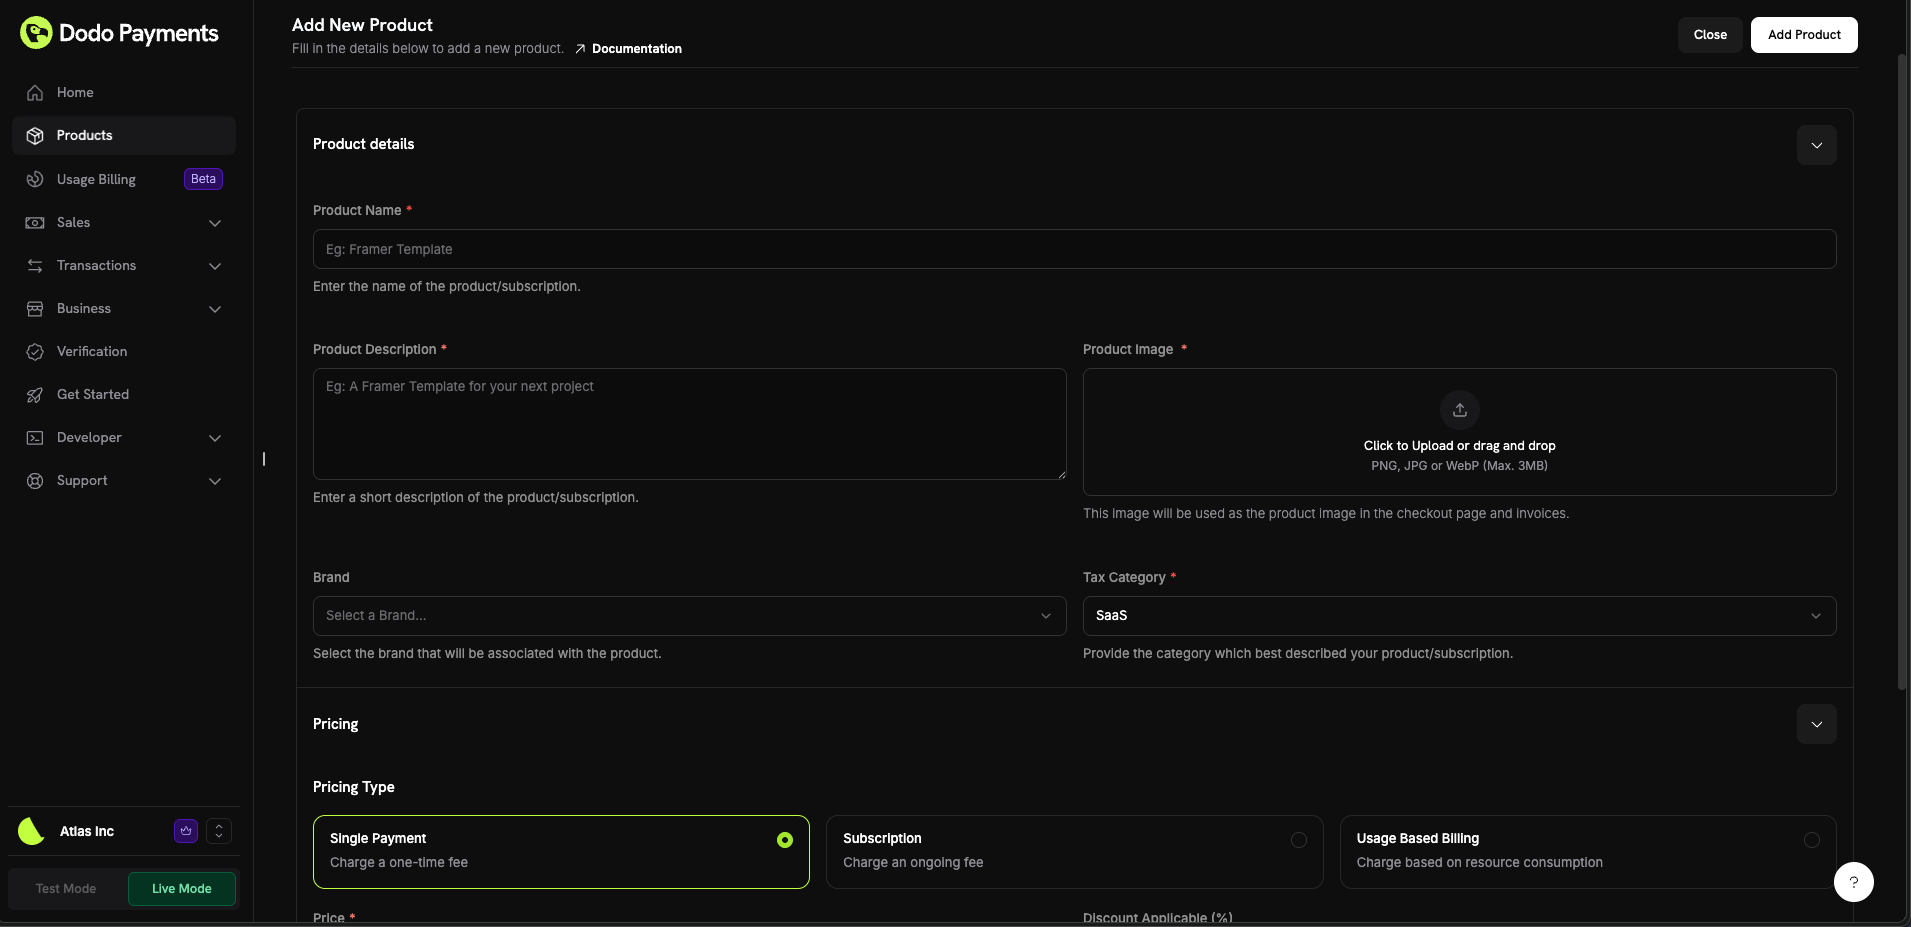
2
Pricing Model and Price
Pricing model चुनें:
- One-Time: एक बार भुगतान की जाने वाली fixed price।
- Subscription: interval और optional trial के साथ recurring price।
- Usage-Based: metered events से निर्धारित price।
- कीमत: मूल राशि और मुद्रा। आप मूल कीमत Dodo Payments द्वारा समर्थित किसी भी मुद्रा में सेट कर सकते हैं, सिवाय Pay What You Want products के, जिनकी मूल मुद्रा USD, GBP, या EUR होनी चाहिए। त्वरित access के लिए USD, GBP, EUR, और INR को currency selector में सबसे ऊपर पिन किया गया है।
- छूट लागू (%): checkout और invoices में दिखाई जाने वाली वैकल्पिक प्रतिशत छूट। आप दो दशमलव स्थानों तक दर्ज कर सकते हैं, जैसे
10.5। API में, छूट को basis points मेंdiscount_bpsके साथ सेट करें, इसलिए105010.5% है। legacydiscountfield deprecated है और इसे पूर्ण प्रतिशत तक round किया जाता है। - subscriptions के लिए, हर बार दोहराएँ (जैसे, 1 month या 1 year), Trial days, और paid trial के लिए वैकल्पिक Trial amount सेट करें। शून्य से अधिक subscription price उस currency के subscription minimum को पूरा करनी चाहिए जिसमें customer भुगतान करता है: USD के लिए $1.00। USD, EUR, और GBP के अलावा अन्य currencies की value भी कम-से-कम $1.00 होनी चाहिए। ठीक $0 की कीमत भी समर्थित है, और आप customers को card के बिना $0 subscription शुरू करने दे सकते हैं; Card-Optional at Zero Price देखें। Negative amounts समर्थित नहीं हैं।
Adaptive Currency चालू होने पर, आपकी base currency के बाहर के customers को उनकी local currency में bill किया जाता है, इसलिए आप अपने market के लिए सबसे उपयुक्त currency में prices तय कर सकते हैं। इसके बंद होने पर वे आपकी base currency में भुगतान करते हैं।
3
Product Media
Checkout और invoices पर product दिखाने के लिए images upload करें। समर्थित formats: PNG, JPG, WebP, अधिकतम 3 MB। Images को कभी भी reorder या replace किया जा सकता है।
4
Automated Entitlements
Entitlements section में ऐसा fulfillment जोड़ें जो payment के बाद अपने-आप activate हो जाए:
- License Keys: unique keys जारी करें और validate करें।
- Digital Files: secure file access प्रदान करें।
- Feature Flags: ऐसी capability unlock करें जिसे आपका app check करता है।
- Platform Access: Discord, GitHub, Telegram, Figma, Framer, या Notion पर access प्रदान करें।
Variants और Pricing Options
एक product के अंतर्गत variants बनाने के बजाय, प्रत्येक pricing option के लिए अलग products बनाएँ (उदाहरण के लिए, Monthly और Yearly)। फिर उन्हें Product Collection में group करें, ताकि सभी options एक ही checkout में दिखाई दें और Customer Portal में plan switching सक्षम हो।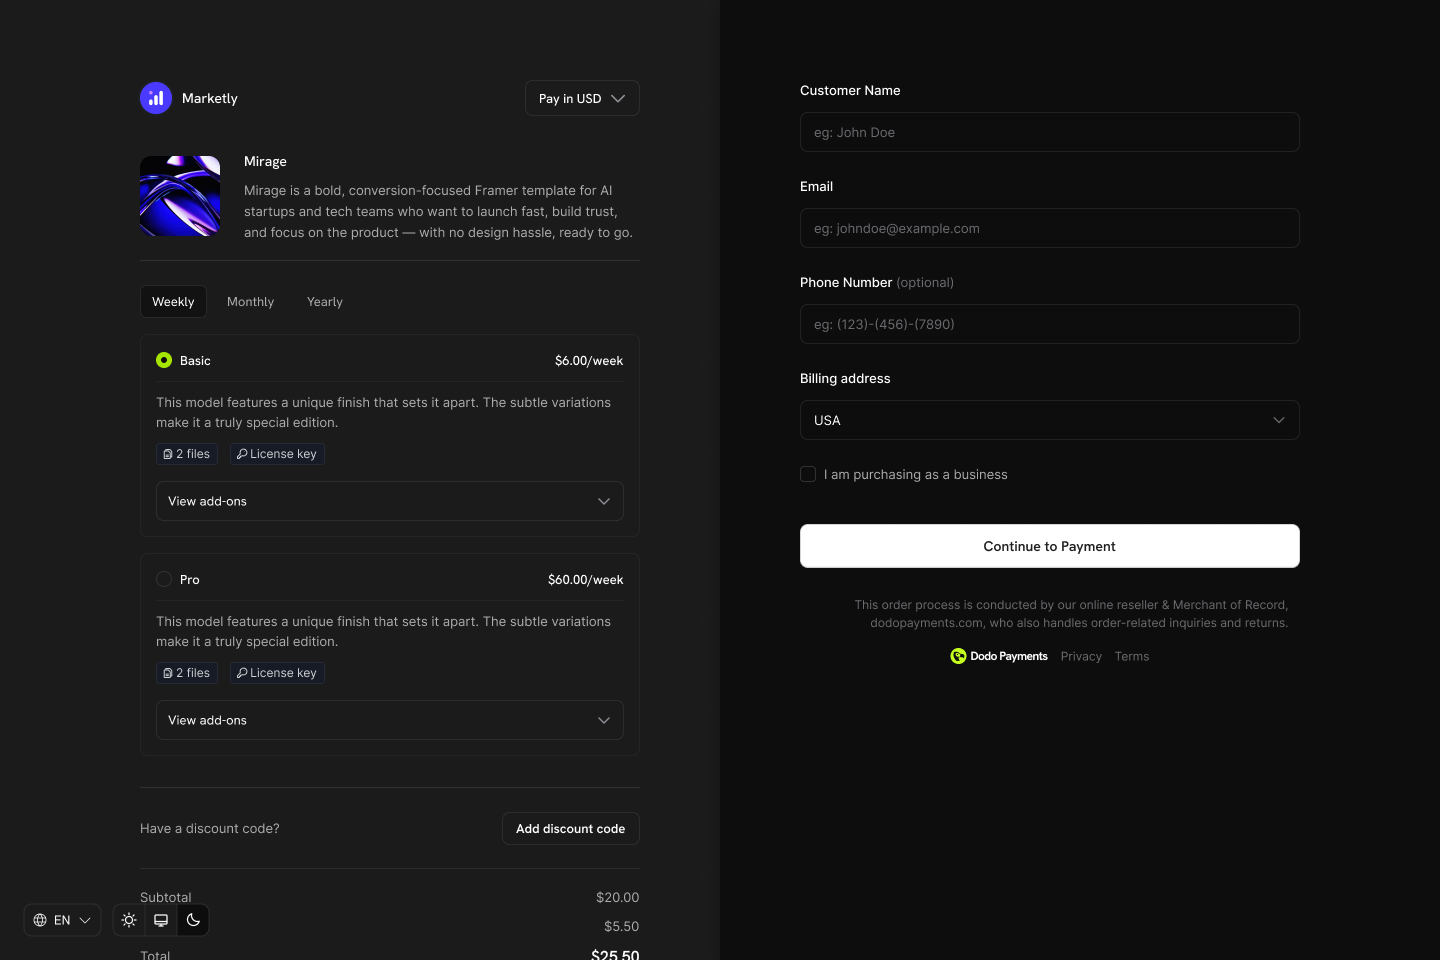
यह Approach क्यों?
- स्पष्ट pricing models: प्रत्येक product का एक single, अच्छी तरह परिभाषित pricing model होता है (one-time, subscription या usage-based)।
- Predictable APIs: Nested variant logic के बिना सरल integrations।
- आसान reporting: Variant aggregation के बिना प्रत्येक product के revenue और metrics track करें।
- Flexible checkout: कई products को साथ-साथ दिखाएँ, ताकि customers तुलना करके चुन सकें।
Product Collections कैसे काम करते हैं
- Products बनाएँ: प्रत्येक plan के लिए individual products सेट करें (जैसे, Starter Monthly, Starter Annual, Pro Monthly, Pro Annual)।
- Collection में group करें: Related products को Product Collection में जोड़ें।
- Unified checkout: Customers सभी options को एक checkout में देखते हैं और अपना preferred plan चुनते हैं।
- Plan switching: Customers Customer Portal के माध्यम से उसी collection में products के बीच upgrade या downgrade कर सकते हैं।
Product Collections
Products प्रबंधित करना
आप products को dashboard के माध्यम से या API द्वारा programmatically manage कर सकते हैं। API product creation, updates, retrieval, image uploads, और archiving पर full control प्रदान करता है।Dashboard Management
- Update: Name, description, images, price, fields और benefits को कभी भी edit करें (pricing model immutable है)।
- Archive: Existing customers को प्रभावित किए बिना product को new purchases से छिपाएँ। बाद में उसे unarchive किया जा सकता है।
- Drafts: प्रगति में चल रहा product draft के रूप में save किया जाता है, ताकि आप बाद में उस पर लौट सकें। Drafts test mode और live mode के लिए अलग-अलग रखे जाते हैं, इसलिए किसी एक mode में अधूरा product दूसरे mode में कभी नहीं पहुँचता। उसे छोड़कर नए सिरे से शुरू करने के लिए Clear Draft का उपयोग करें।
API Management
निम्न instructions आपको products create, update, manage, और retrieve करने देती हैं, जिनमें images upload करना भी शामिल है।Creating a Product
Creating a Product
Name, description, price, currency और यह recurring product है या नहीं जैसी details के साथ
POST request को /products endpoint पर भेजें।Recurring products के लिए, price object को recurring price (type: recurring_price) पर सेट करें और उनके corresponding counts के साथ payment_frequency_interval और subscription_period_interval (Day, Week, Month, या Year) specify करें।Create Product API
Updating a Product
Updating a Product
PATCH request को /products/{product_id} endpoint पर भेजें। अन्य details को अपरिवर्तित रखते हुए name, price और description जैसी properties update कर सकते हैं।सुनिश्चित करें कि endpoint में product_id किसी existing product से match करता है।Update Product API
Retrieving Products
Retrieving Products
GET request को /products endpoint पर भेजकर अपने account में stored products की list प्राप्त करें। इससे आप active और archived products सहित product details retrieve कर सकते हैं।Retrieve Products API
Uploading Product Images
Uploading Product Images
API द्वारा दिए गए pre-signed URL का उपयोग करके AWS S3 पर image upload कर product के साथ associate करें। पहले
/products/{product_id}/images endpoint से image upload URL का request करें, फिर दी गई URL का उपयोग करके 60 seconds के भीतर image upload करें।API से pre-signed URL प्राप्त होने के बाद, PUT method का उपयोग करके image upload करें। इससे image upload करने के लिए AWS S3 का secure और temporary access सुनिश्चित होता है।S3 पर upload करने के लिए supported libraries:- Node.js:
axios,node-fetch - Python:
requests,boto3 - Go:
net/http - PHP:
GuzzleHttp - Ruby:
rest-client
200 OK status लौटाएगा, जो दर्शाता है कि image successfully store हो गई है।Upload Product Image API
Archiving a Product
Archiving a Product
DELETE request को /products/{id} endpoint पर भेजकर product को स्थायी रूप से delete किए बिना new purchases से छिपाएँ।Archive Product API
Unarchiving a Product
Unarchiving a Product
POST request को /products/{product_id}/unarchive endpoint पर भेजकर archived product restore करें। इससे product फिर से active हो जाता है और उपयोग के लिए उपलब्ध हो जाता है।Unarchive Product API
Checkout and Fulfillment
Checkout and Fulfillment
Products से payment या subscription flows बनाएँ और benefits तथा webhooks के माध्यम से automatically fulfill करें।
Checkout Sessions
Payment Webhooks
Subscription Webhooks
Best Practices
- स्पष्टता से शुरुआत करें: प्रत्येक pricing option (Monthly और Yearly) के लिए अलग products बनाएँ।
- Trials का सोच-समझकर उपयोग करें: Activation बढ़ाने के लिए trials को onboarding के साथ जोड़ें।
- Fulfillment automate करें: तुरंत delivery के लिए benefits और webhooks का उपयोग करें।
- Metadata के साथ tag करें: Reconciliation के लिए अपने system IDs store करें।