

अवलोकन
Dodo Payments हर सफल transaction के लिए एक invoice बनाता है, इसलिए आपको कभी भी invoices हाथ से बनाने की आवश्यकता नहीं होती और हर sale एक ही तरीके से documented होती है। हर payment के बाद, आपके customer को receipt details और Customer Portal में payment का link वाला payment confirmation email मिलता है। Invoice email के साथ attached नहीं होती।One-time purchases और recurring subscription payments, दोनों के लिए invoices बनाए जाते हैं।
प्रमुख विशेषताएँ
Automatic Generation
Custom Branding
Email Delivery
Dashboard Management
इनवॉइस ब्रांडिंग सेट करना
Invoice में उस brand का नाम और logo दिखता है जिससे payment संबंधित है। एक brand वाले business के लिए यह आपका primary brand होता है। कई brands होने पर, प्रत्येक brand पर नाम और logo सेट करें। Multi-Brand Setup देखें।1
Navigate to Business Settings
Dodo Payments dashboard खोलें और Settings → Business पर जाएँ।
2
Configure Branding
Brands Under [Your Business] panel में, brand का
... menu खोलें और Edit चुनें। Brand Logo upload करें और Brand Name दर्ज करें। उस brand के payments के invoices में ये details दिखाई देती हैं।Accepted logo formats: PNG, JPEG, GIF, WebP, ICO, और SVG। AVIF सहित कोई भी अन्य format, upload के समय
422 error के साथ reject कर दिया जाता है। Invoice render होने पर WebP और ICO files को PNG में convert किया जाता है, ताकि वे सही तरीके से print हों। प्रत्येक side को 4096 pixels से कम रखें। यदि invoice logo को render नहीं कर पाता, तो इसे logo के बिना generate किया जाता है।3
Save Configuration
अपनी branding लागू करने के लिए Save Changes पर click करें। इसके बाद generate किए गए invoices में ये details उपयोग होती हैं।
आपकी invoice branding configure हो गई है और यह सभी नए invoices पर लागू होती है।
Invoices में क्या शामिल है
हर generated invoice में ये transaction details शामिल होती हैं:- Business Information: आपके brand का नाम और logo, साथ ही वह Dodo Payments entity जो आपके customer को Merchant of Record के रूप में बेचती है
- Customer Details: Customer का नाम और billing address। Tax ID वाली business purchase के लिए customer का business name।
- Invoice Number: Tracking और reference के लिए एक unique invoice ID
- Transaction Date: Payment process होने का समय और payment ID
- Payment Details: Paid amount और currency
- Product/Service Description: खरीदे गए products या subscriptions की itemized list, जिसमें प्रत्येक line के लिए quantity, unit price और tax, साथ ही कोई discount शामिल है
- Tax Information: लागू taxes और tax identification numbers
- Payment Status: सफल payment के लिए Paid
Dodo Payments invoice ID अपने-आप generate करता है। यह प्रत्येक invoice के लिए unique होता है।
Invoice Generation कैसे काम करता है
- One-Time Purchases
- Subscription Renewals
जब customer one-time purchase पूरा करता है:
- Payment सफलतापूर्वक process किया जाता है।
- Dodo Payments transaction details के साथ एक invoice generate करता है।
- Customer को payment confirmation email मिलता है।
- Invoice payment के details page पर Transactions → Payments के अंतर्गत उपलब्ध होती है।
Invoices Manage करना
अपनी Invoices Access करना
Invoices payments से attached होती हैं। किसी invoice को ढूँढने के लिए, अपने Dodo Payments dashboard में Transactions → Payments पर जाएँ और payment खोलें। वहाँ से आप ये काम कर सकते हैं:- View Invoice Details: Payment के details page पर पूरी transaction information देखें।
- Download PDF: Invoice को PDF के रूप में download करने के लिए ऊपर-दाएँ कोने में Invoice पर click करें। Refund के लिए, इसे Transactions → Refunds के अंतर्गत खोलें और Download Refund Invoice पर click करें।
- Resend to Customer: Customer का payment email दोबारा भेजने के लिए customer के Sent Emails tab में Resend का उपयोग करें। Email Logs देखें।
- Filter and Search: आवश्यक invoices ढूँढने के लिए payments को date, status या currency के आधार पर filter करें।
Invoice Template Preview
Branded invoice इस तरह दिखाई देती है: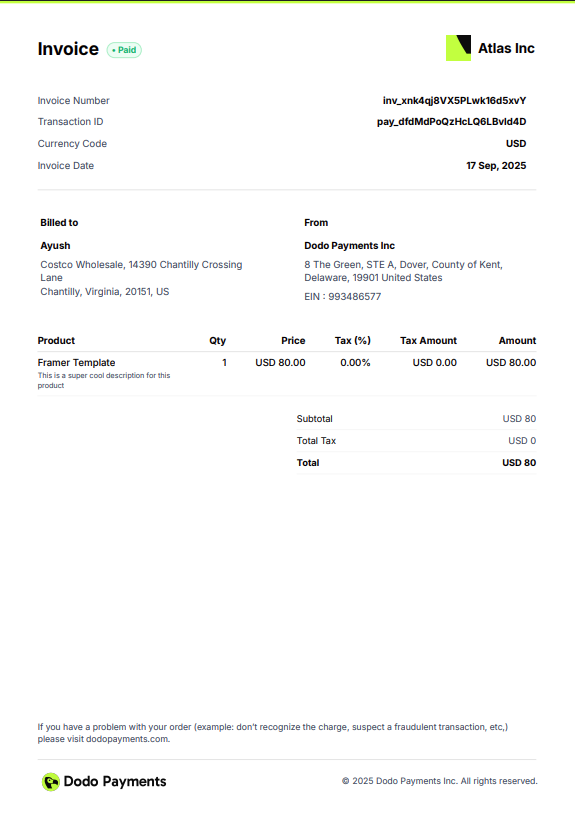
Example of a generated invoice with custom branding