

परिचय
Dispute, जिसे chargeback भी कहा जाता है, तब शुरू होता है जब कोई customer अपने card issuer से payment वापस लेने के लिए कहता है। आपके Merchant of Record के रूप में, Dodo Payments card networks के साथ dispute process संभालता है। आप तय करते हैं कि प्रत्येक dispute स्वीकार करना है या उसका counter करना है, और आप evidence उपलब्ध कराते हैं। जब कोई dispute खुलता है, तो disputed amount और dispute fee आपके balance से काट लिए जाते हैं। Disputes tab आपके account के प्रत्येक dispute का status, reason और dispute ID दिखाता है। Dodo Payments तीन ऐसे tools भी उपलब्ध कराता है जो disputes को chargebacks बनने से पहले रोकते हैं:- Visa Rapid Dispute Resolution (RDR) आपके threshold से कम या उसके बराबर Visa disputes का refund अपने-आप करता है।
- Ethoca Alerts issuer द्वारा alert भेजे जाने पर Mastercard और अन्य non-Visa payments का refund अपने-आप करता है।
- Deflections Visa और Mastercard payments पर fraud claims को file किए जाने से पहले block करता है, ताकि funds आपके पास रहें।
Disputes देखना और समझना
Open the Transactions Page
View Dispute Details
Access Associated Payment Information
किसी Dispute का जवाब देना
जब कोई customer dispute खोलता है, तो Dodo Payments आपको email भेजता है और dispute Disputes tab में Dispute opened status के साथ दिखाई देता है।Check Your Dashboard
Review the Email Notification
Choose Your Response
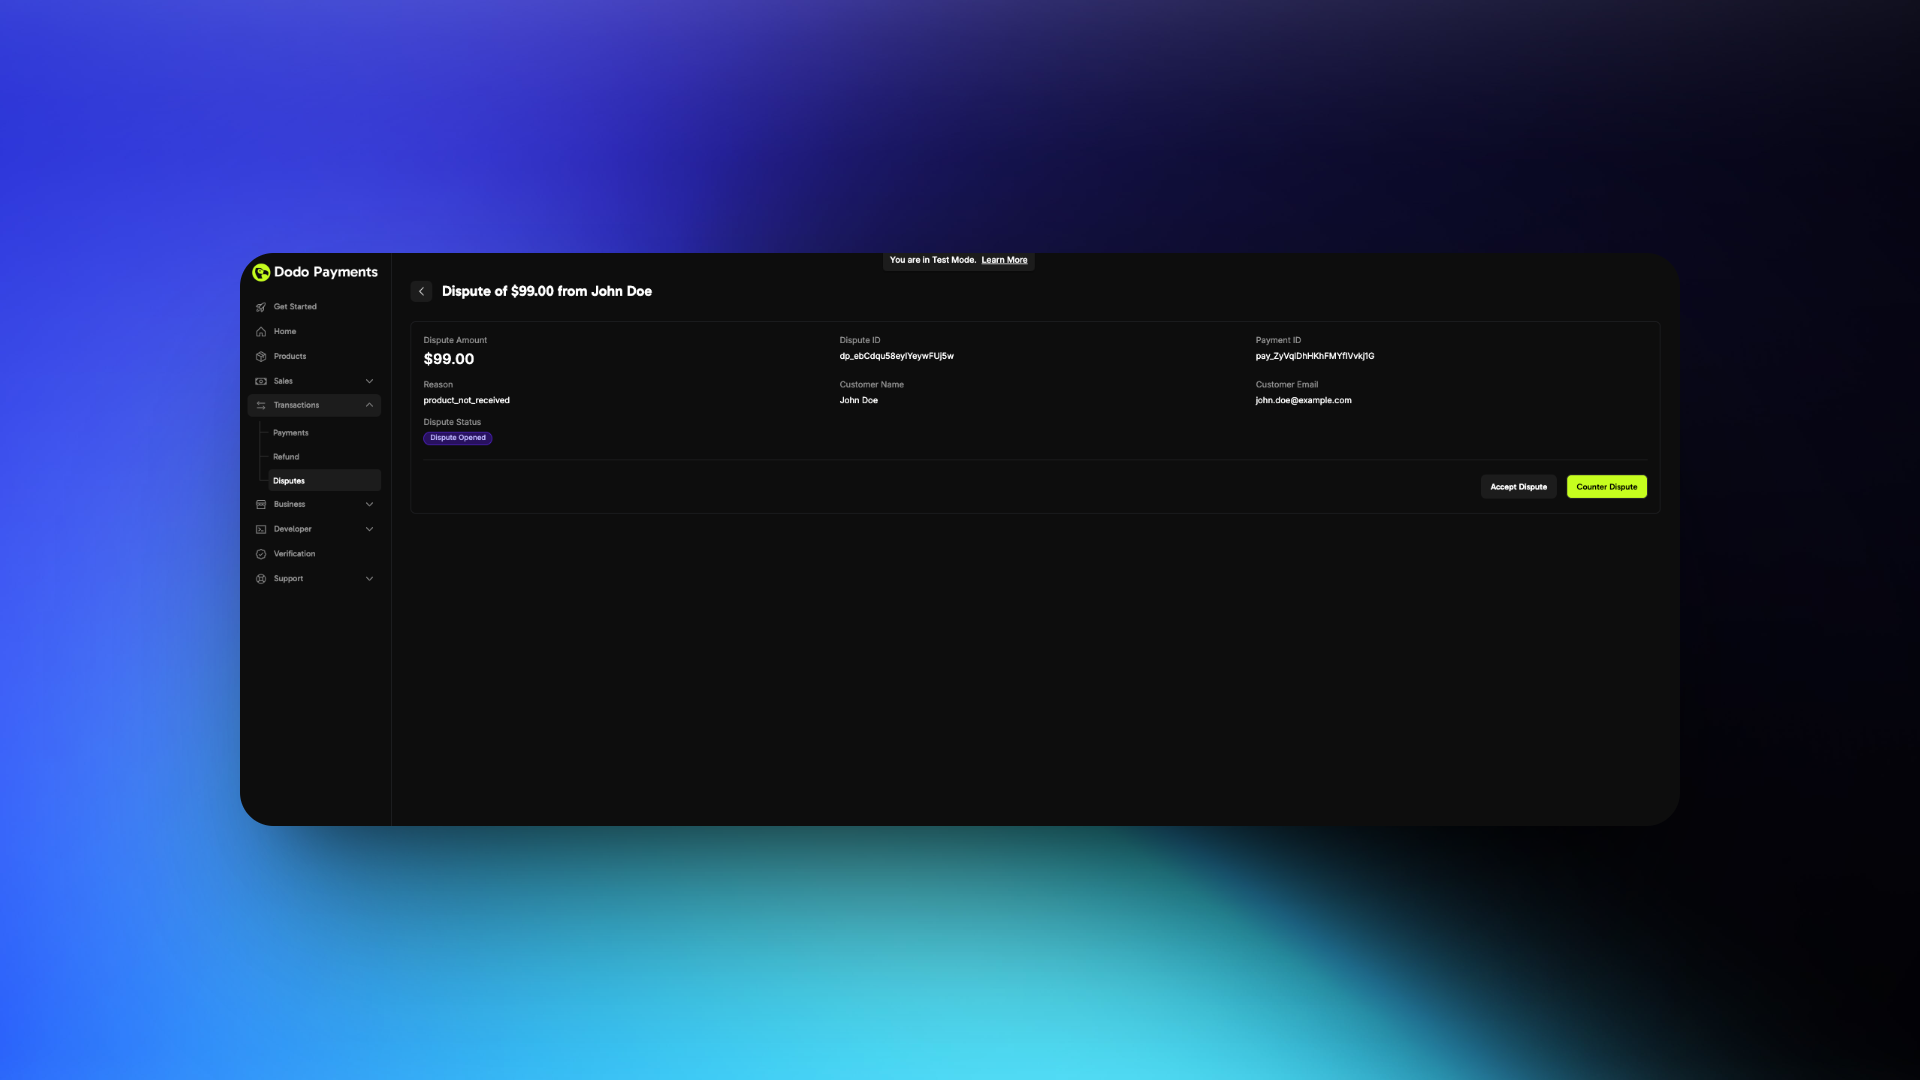
If Accepting
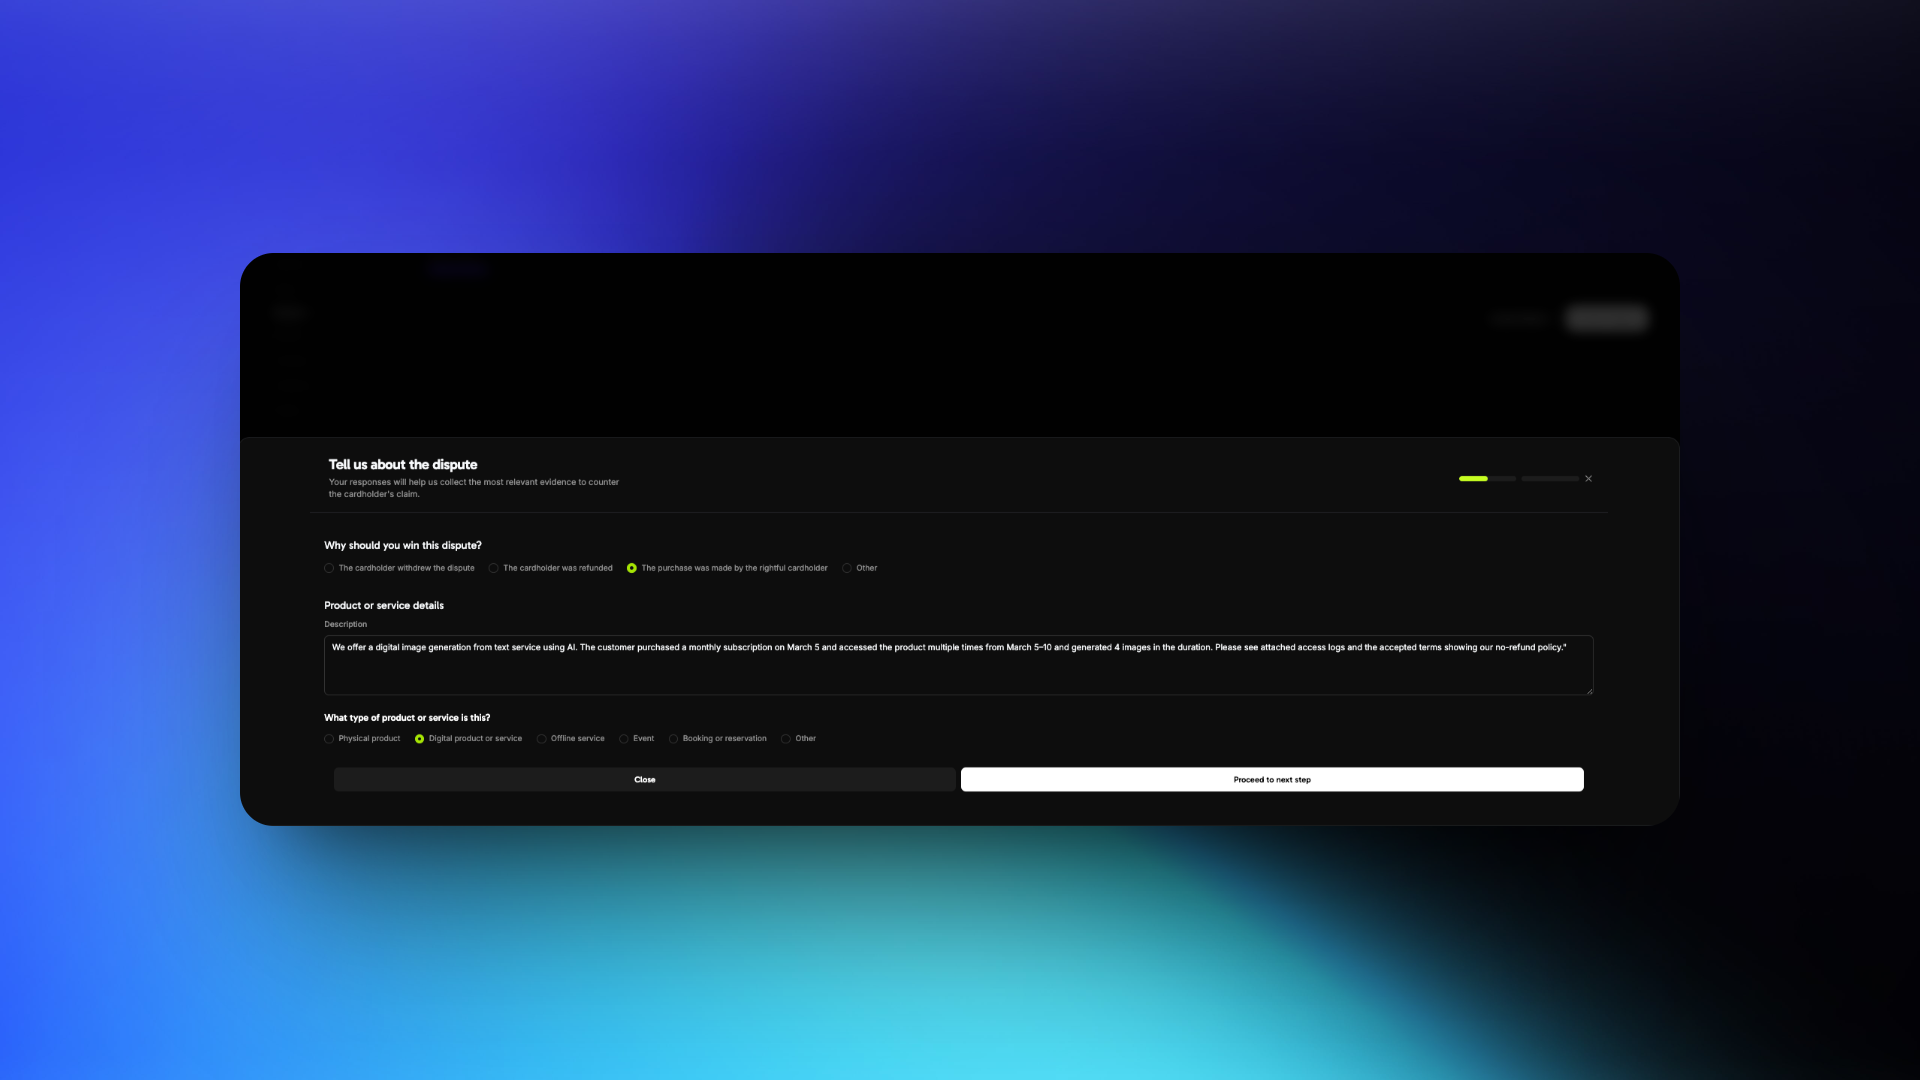
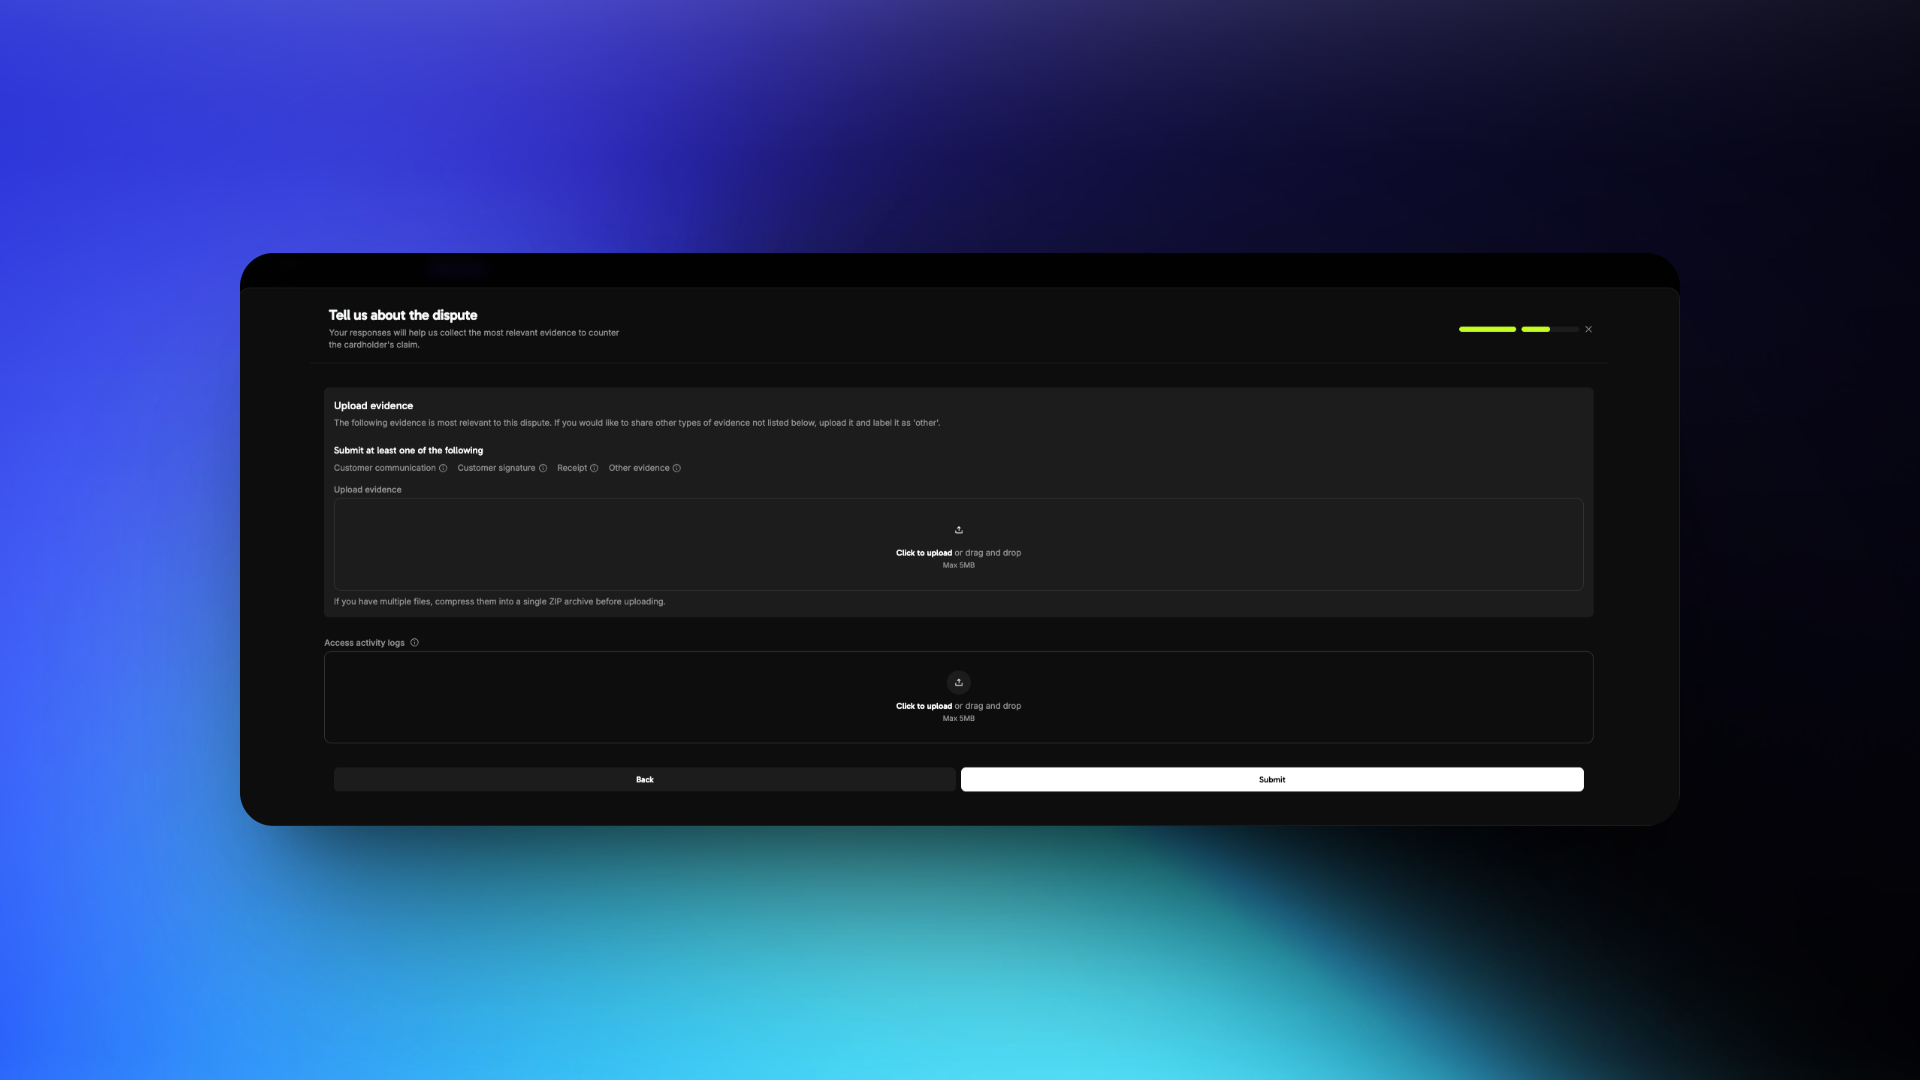
If Countering
Dispute Response Best Practices
Understand the Dispute Reason
Fraudulent Transaction
Product/Service Not Received
Not as Described
Gather the Right Evidence
- Fraudulent Transaction
- Product/Service Not Received
- Not as Described
Required Evidence
- Purchase का Invoice
- Purchase के समय IP address, device और location details
- आपके platform या service तक access दिखाने वाले Login timestamps
- Browser या device fingerprint, या account activity logs
- उसी customer या account से किए गए पिछले सफल transactions
- Purchase के समय स्वीकार की गई Terms of Service और Refund Policy
Craft a Clear Description
Focus Points
- Customer ने क्या खरीदा
- उसने कब और कैसे access किया
- Dispute claim गलत क्यों है
Example Response
Format and Submit Evidence
Submission Guidelines
- केवल PDF, JPG, PNG, या ZIP files का उपयोग करें
- प्रत्येक file को स्पष्ट रूप से Label करें, उदाहरण के लिए
Login_Log_March_5.pdf - केवल relevant और organized files submit करें
- प्रत्येक file को 5 MB से कम रखें
- एक evidence type के लिए कई files upload करने हेतु उन्हें एक ZIP archive में compress करें
- Links या URLs शामिल न करें
Common Mistakes to Avoid
Common Mistakes to Avoid
Avoid These Errors
- वास्तविक dispute reason को अनदेखा करना
- अस्पष्ट या भावनात्मक statements का उपयोग करना
- असंबंधित या अव्यवस्थित files upload करना
- Files के बजाय links देना
Bonus Tips
Bonus Tips
Strengthen Your Case
- Access timelines सिद्ध करने के लिए time zone सहित timestamps शामिल करें
- किसी भी two-factor authentication या verification steps को highlight करें
- यदि आपकी policy के अनुरूप हो, तो refund refusal communication साझा करें
- अपनी policies visible रखें, ताकि आप सिद्ध कर सकें कि customer ने उन्हें स्वीकार किया था
Visa Rapid Dispute Resolution (RDR)
Visa Rapid Dispute Resolution (RDR) eligible Visa disputes को formal chargebacks बनने से पहले resolve करता है। जब cardholder अपने bank के साथ Visa payment पर dispute करता है, तो RDR amount को आपके configured threshold से check करता है। यदि amount eligible है, तो RDR आपकी ओर से cardholder को refund कर देता है, इसलिए chargeback file नहीं होता।RDR क्यों महत्वपूर्ण है
Disputes digital businesses के लिए money और time दोनों की लागत लाते हैं। High dispute rate का असर प्रत्येक lost payment से आगे भी होता है:Financial Impact
Dispute Rate Penalties
Account Risk
Operational Overhead
RDR कैसे काम करता है
Cardholder Initiates a Dispute
RDR Intercepts the Dispute
Automatic Refund Issued
No Chargeback Recorded
dispute.lost के रूप में is_resolved_by_rdr: true के साथ report करता है। इन disputes के लिए dispute fee के स्थान पर Visa RDR fee लागू होती है।मुख्य लाभ
RDR low-value Visa dispute के outcome को चार तरीकों से बदलता है:Configuration
RDR एक USD threshold का उपयोग करता है। आपके threshold से कम या उसके बराबर Visa dispute refund के साथ अपने-आप resolve हो जाता है। threshold से अधिक का dispute सामान्य dispute process से गुजरता है, इसलिए आप evidence के साथ उसका counter कर सकते हैं।अपने Account के लिए RDR Enable करें
Visa RDR सभी Dodo Payments accounts पर $100 USD threshold के साथ default रूप से enabled है। $100 या उससे कम का कोई भी Visa dispute आपके किसी action के बिना refund के साथ अपने-आप resolve हो जाता है। Pricing के लिए Dodo Payments pricing page देखें।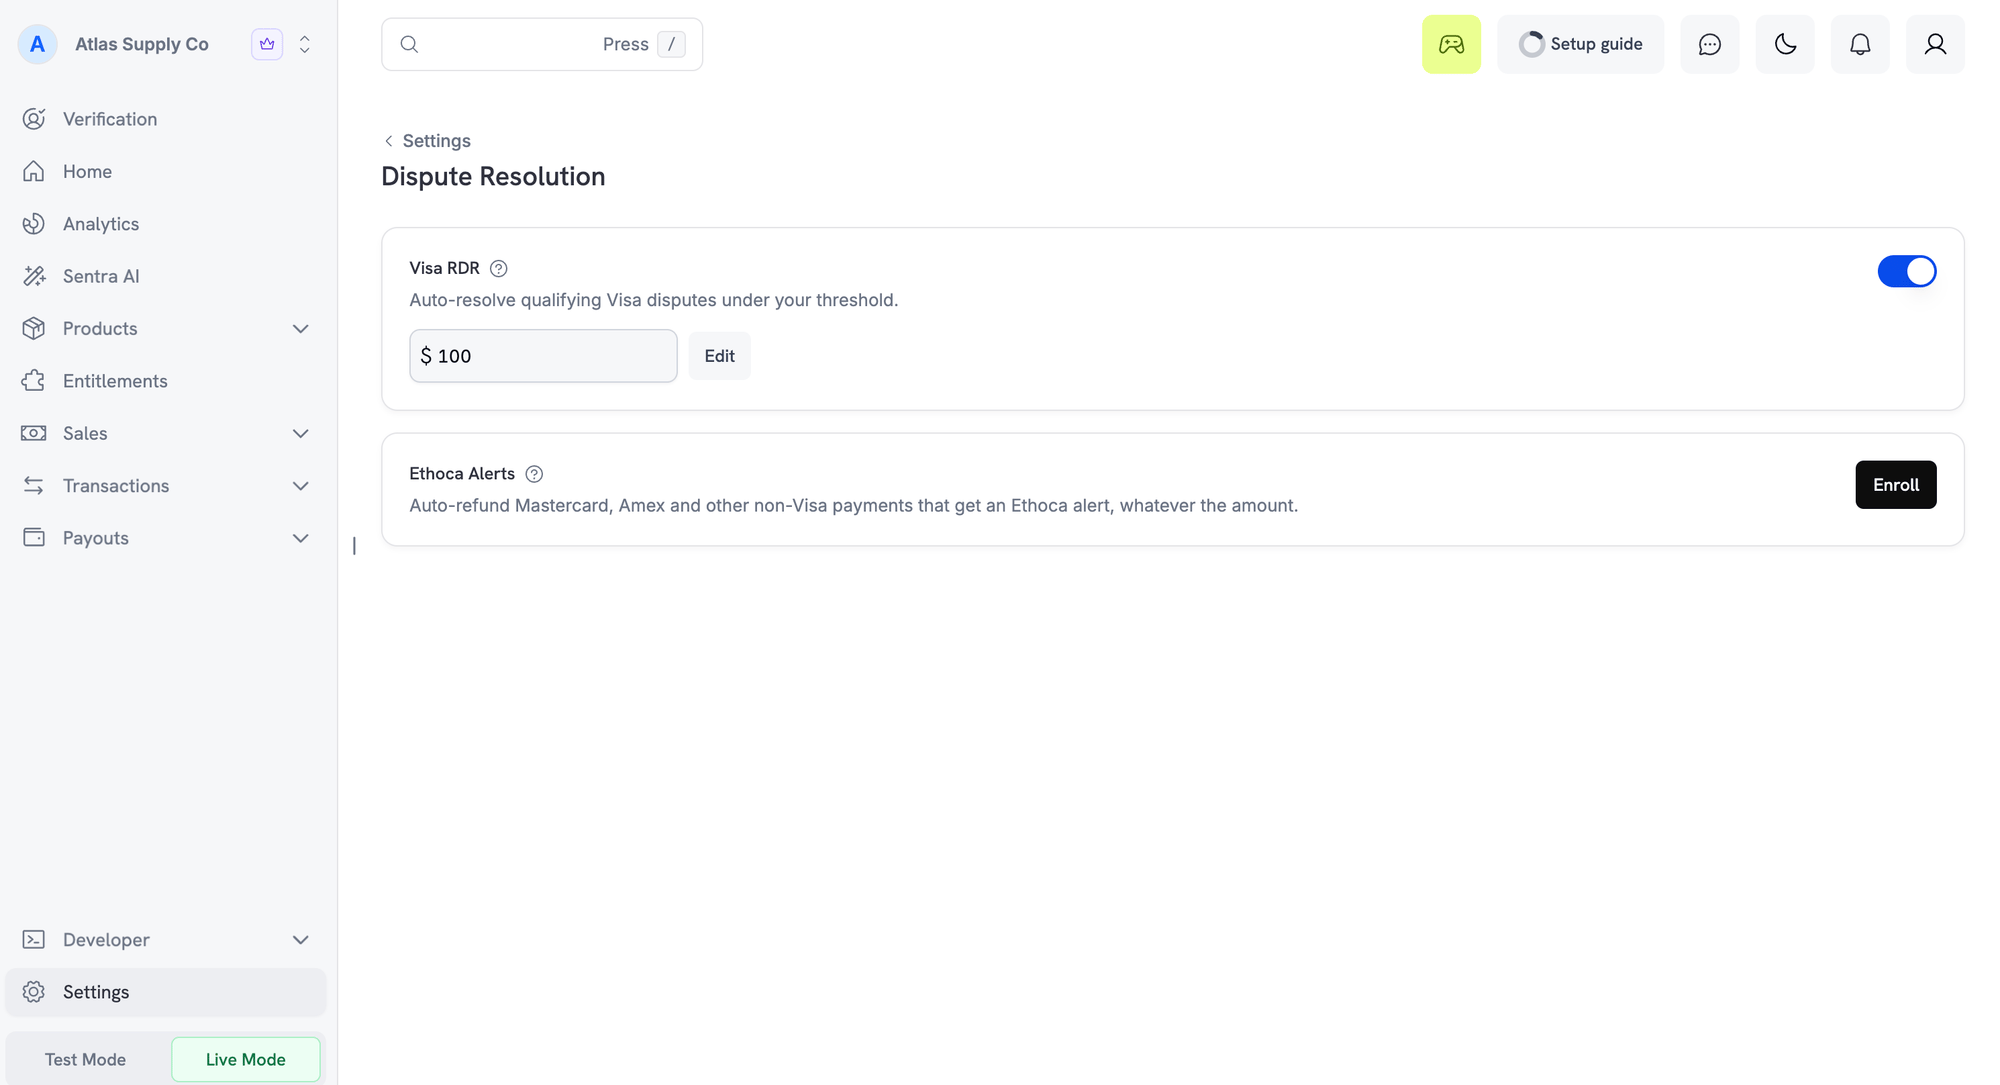
Visa RDR on the Dispute Resolution settings page
अपना Threshold Customize करें
RDR threshold बदलने के लिए:Open the Dispute Resolution Settings
Edit the Threshold
Save Your Changes
Frequently Asked Questions
Can a cardholder dispute the same transaction again after RDR resolution?
Can a cardholder dispute the same transaction again after RDR resolution?
Ethoca Alerts
Visa RDR केवल Visa cards को cover करता है। Ethoca alerts Mastercard और अन्य non-Visa cards पर वही pre-chargeback protection देते हैं। Ethoca, Mastercard का alert network है। जब cardholder fraud report करता है या charge dispute करता है, तो उसका card issuer chargeback file करने से पहले alert भेजता है। Dodo Payments payment का refund अपने-आप कर देता है, इसलिए chargeback कभी file नहीं होता। Alerts केवल उन card issuers से आते हैं जो Ethoca में भाग लेते हैं। अधिकांश alerts Mastercard payments पर होते हैं। American Express और अन्य non-Visa cards के alerts भी issuer के भाग लेने पर इसी तरह handle किए जाते हैं। Visa disputes हमेशा Visa RDR द्वारा handle किए जाते हैं।Ethoca Alerts कैसे काम करते हैं
आपके business के enrolled होने के बाद, non-Visa payment पर आने वाला प्रत्येक alert अपने-आप resolve होता है:Cardholder Reports the Charge
The Issuer Sends an Alert
The Payment Is Refunded in Full
Any Linked Subscription Is Cancelled
The Alert Is Resolved
Dashboard में आपको क्या दिखता है
Ethoca alert Disputes tab में दिखाई नहीं देता, क्योंकि कोई dispute बनाया ही नहीं जाता। इसके बजाय:Ethoca Alerts Enable करें
Ethoca alerts opt-in हैं। Enroll करने से पहले आपके business में live payments enabled और statement descriptor होना चाहिए। प्रत्येक alert पर fee लागू होती है। Pricing के लिए Dodo Payments pricing page देखें।Open Dispute Resolution Settings
Ethoca Alerts on the Dispute Resolution settings page
Enroll
Wait for Confirmation
Unenrolling
उसी कार्ड पर नामांकन रद्द करें पर क्लिक करें और पुष्टि करें। हटाने की प्रक्रिया पूरी होने तक, आमतौर पर कुछ मिनटों तक, आपकी स्थिति हटाने का अनुरोध किया गया दिखाई देगी। प्रक्रिया पूरी होने तक अलर्ट आ सकते हैं और उनका रिफंड किया जा सकता है। आप किसी भी समय फिर से नामांकन कर सकते हैं। अगर डैशबोर्ड बताता है कि वहां से आपका नामांकन हटाया नहीं जा सकता, तो सहायता टीम से संपर्क करें।Ethoca Alerts FAQ
Why was a subscription cancelled after an Ethoca alert?
Why was a subscription cancelled after an Ethoca alert?
Can I contest an Ethoca alert with evidence?
Can I contest an Ethoca alert with evidence?
Can a payment go through both Visa RDR and Ethoca alerts?
Can a payment go through both Visa RDR and Ethoca alerts?
Why was an alert not refunded automatically?
Why was an alert not refunded automatically?
Why did I still receive a chargeback on a non-Visa payment after enrolling?
Why did I still receive a chargeback on a non-Visa payment after enrolling?
Deflections
Deflection बिना refund के dispute को file होने से पहले रोकता है। जब cardholder अपने bank को बताता है कि उसने purchase नहीं की, तो bank payment को order details और आपके साथ customer की पिछली purchases से check करता है। यदि evidence दिखाता है कि वही customer purchase कर चुका है, तो bank dispute block कर देता है। Payment आपके पास रहती है और आपकी dispute rate के विरुद्ध कुछ count नहीं होता। Deflection fee लागू होती है।Deflections कैसे काम करते हैं
Cardholder Questions a Charge
The Bank Looks Up the Order
The Network Checks Earlier Purchases
The Dispute Is Deflected
Dashboard में आपको क्या दिखता है
Deflection कोई dispute या refund create नहीं करता। इसके बजाय:Availability
हर Dodo Payments business deflections में अपने-आप enrolled होता है। Enable या configure करने के लिए कुछ नहीं है। Pricing के लिए Dodo Payments pricing page देखें।Deflections FAQ
Why did I receive a deflection email but see no dispute?
Why did I receive a deflection email but see no dispute?
Should I refund a deflected payment?
Should I refund a deflected payment?