Introduction
The disputes section provides a detailed view of all the disputes raised along with the current status of these disputes. You will have to manage the dispute resolution at your end but the dashboard will provide a visibility into the status, reason for dispute, dispute ID for convenience of access to information.Viewing and Understanding Disputes
Open the Transactions Page
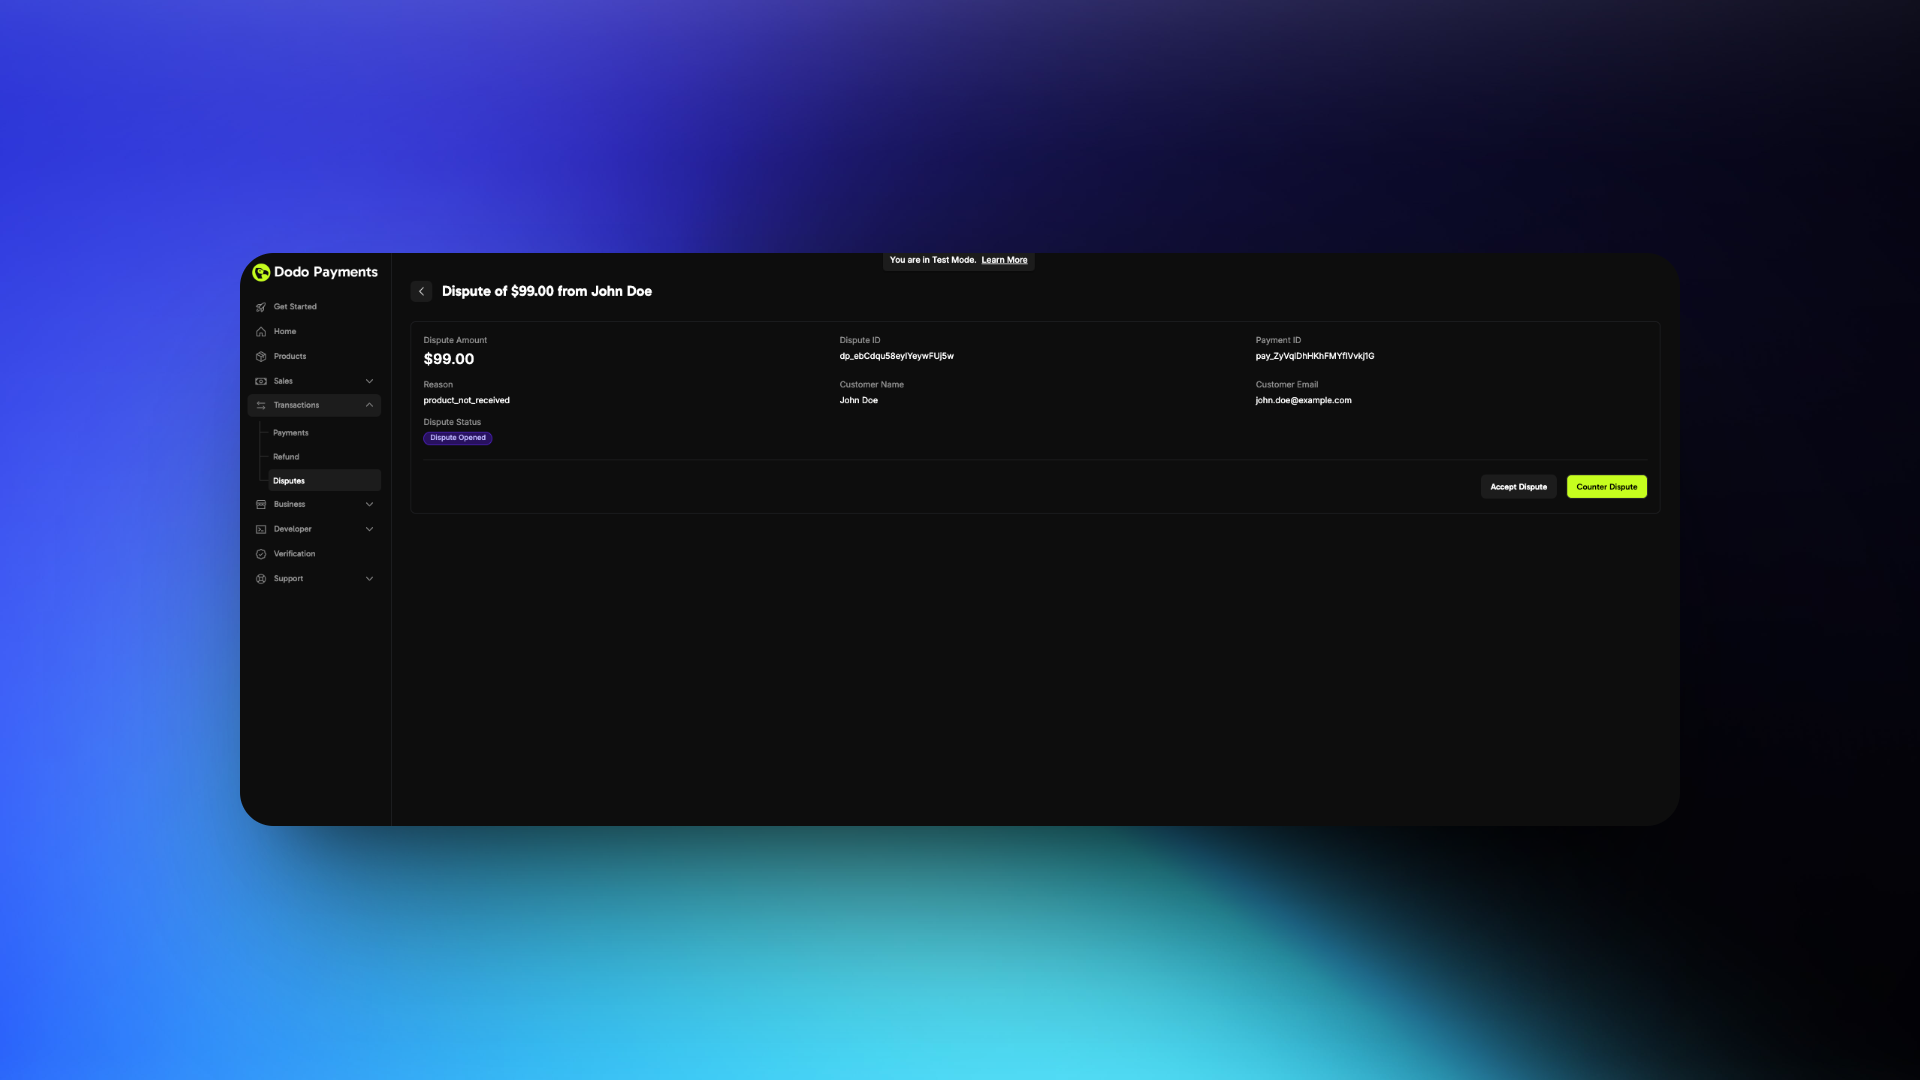
Go to the Transactions page in your dashboard and select the Disputes tab. This displays a list of all disputes associated with your account.
View Dispute Details
Click the eye icon next to any dispute entry to open a detailed view. Here, you can review the dispute reason, status, dispute ID, and other relevant information.
Responding to a Dispute
When a dispute is raised against your transaction, follow these steps to respond effectively:-
Check Your Dashboard
- Navigate to the transactions → disputes section
- Look for the new dispute entry
-
Review Email Notification
- Check your registered email for dispute creation notification
-
Choose Your Response
- You can either accept or counter the dispute
-
If Accepting
- No further action required
- You will lose the dispute
-
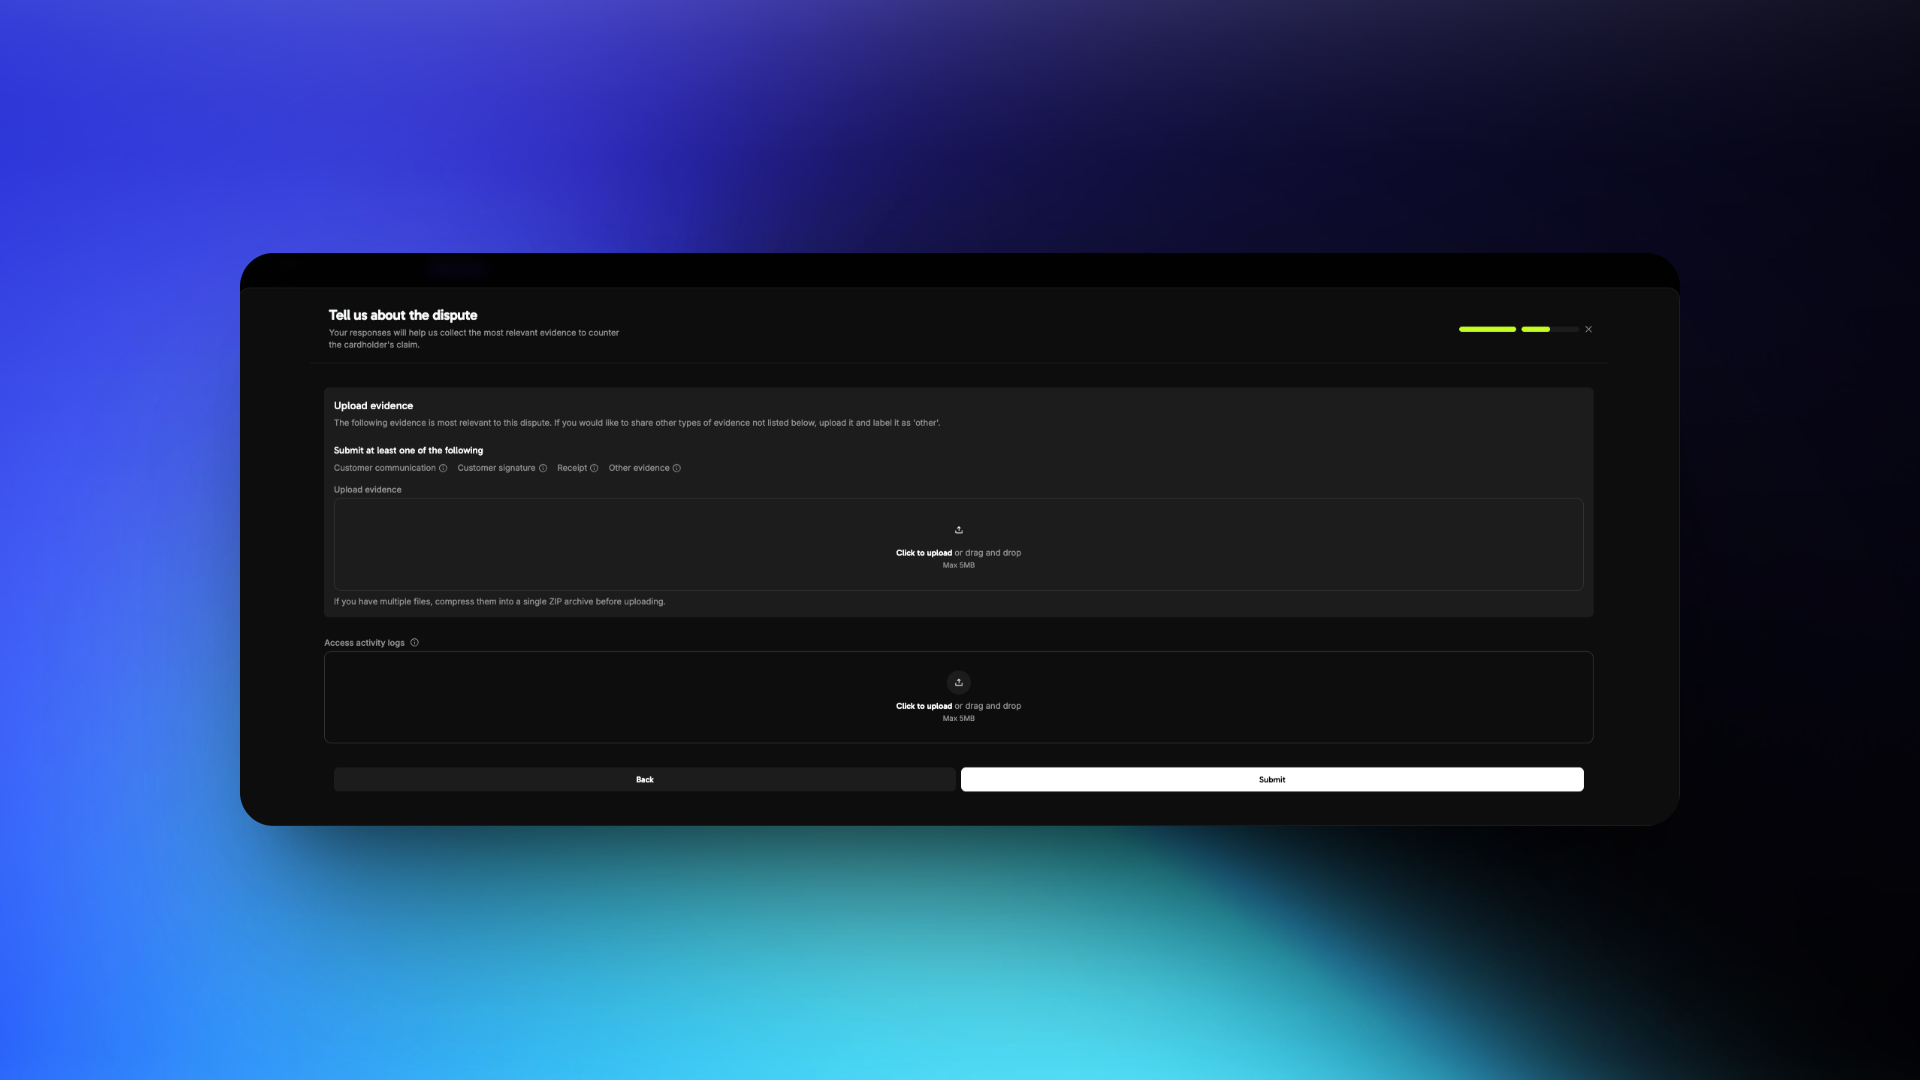
If Countering
- Prepare to submit evidence
- Follow the best practices below

You have 4 days to respond to a dispute after creation
Dispute Response Best Practices
Understand the Dispute Reason
Review the dispute reason carefully. Common reasons include:
Fraudulent Transaction
The customer claims they did not authorize the transaction
Product/Service Not Received
The customer claims they did not receive the product/service after payment
Not as Described
The customer claims the product/service differs from what was advertised
Your response must directly address the specific reason. Avoid submitting generic or unrelated evidence.
Gather the Right Evidence
Focus on customer identity, access, and usage evidence.
- Fraudulent Transaction
- Product/Service Not Received
- Not as Described
Required Evidence
- Invoice of the purchase
- IP address, device, and location details at time of purchase
- Login timestamps showing access to your platform or service
- Browser/device fingerprint or account activity logs
- Previous successful transactions from the same customer or account
- Terms of Service and Refund Policy accepted at time of purchase
Craft a Clear Description
Focus Points
- What the customer purchased
- When and how they accessed it
- Why the dispute claim is inaccurate
Keep your language factual and professional. Avoid emotional or accusatory statements.
Example Response
“We offer a digital image generation from text service using AI. The customer purchased a monthly subscription on March 5 and accessed the product multiple times from March 5–10 and generated 4 images in the duration. Please see attached access logs and the accepted terms showing our no-refund policy.”
Common Mistakes to Avoid
Common Mistakes to Avoid
Avoid These Errors
- Ignoring the actual dispute reason
- Using vague or emotional statements
- Uploading unrelated or unstructured files
- Providing links instead of files
Bonus Tips
Bonus Tips
Strengthen Your Case
- Include timestamps with timezone to prove access timelines
- Highlight any two-factor authentication or verification steps
- Share refund refusal communication if it aligns with your policy
- Keep your policies clearly visible and easy to prove were accepted
Visa Rapid Dispute Resolution (RDR)
Visa Rapid Dispute Resolution (RDR) is an automated dispute prevention tool that resolves eligible disputes before they become formal chargebacks. When a cardholder initiates a dispute with their bank, RDR intercepts the dispute and automatically issues a refund on your behalf if the transaction is below your configured threshold — preventing the chargeback from ever being filed.Why RDR Matters
Disputes are one of the most costly and time-consuming challenges for digital businesses. Beyond the direct financial impact, high dispute rates can have severe consequences:Financial Impact
Each dispute costs you the transaction amount plus a non-refundable dispute fee, regardless of whether you win or lose.
Dispute Rate Penalties
Card networks monitor your dispute-to-transaction ratio. Visa’s threshold is 0.9% — exceeding it places you in a monitoring program with escalating fines.
Account Risk
Consistently high dispute rates can lead to increased processing fees, reserve requirements, or even account termination by payment processors.
Operational Overhead
Each dispute requires evidence gathering, response preparation, and follow-up — consuming valuable time that could be spent building your product.
How RDR Works
Cardholder initiates a dispute
The customer contacts their bank to dispute a Visa transaction on their statement.
RDR intercepts the dispute
Before the dispute becomes a formal chargeback, Visa’s RDR system checks if the transaction qualifies for automatic resolution based on your configured rules.
Automatic refund issued
If the transaction amount is within your threshold, a refund is automatically issued to the cardholder via Visa’s network. The dispute is resolved instantly.
Transactions auto-refunded through RDR will appear as a lost dispute in your Dodo Payments dashboard. This is expected behavior — the refund was issued automatically to prevent a formal chargeback, and the “lost” status reflects that the funds were returned to the cardholder.
Key Benefits
| Benefit | Description |
|---|---|
| Lower dispute rate | RDR-resolved disputes don’t count toward your Visa dispute ratio, keeping you below the 0.9% threshold |
| Dispute fee still applies | A dispute fee is still charged on RDR-resolved transactions. This fee covers the cost of contesting the dispute with Visa on your behalf — an intentional part of actively keeping your dispute rate below the 0.9% threshold |
| Zero operational overhead | No need to gather evidence, write responses, or track dispute deadlines — resolution is fully automatic |
| Better customer experience | Cardholders receive their refund instantly instead of waiting weeks for a dispute to be resolved |
| Protect your account standing | Stay out of Visa’s monitoring programs and avoid escalating fines and processing restrictions |
Configuration
RDR is configured with a USD threshold — any Visa dispute at or below this amount is automatically resolved with a refund. Disputes above the threshold proceed through the normal dispute process, giving you the opportunity to counter them with evidence.For example, with a $100 threshold: a $75 dispute is auto-resolved (refunded), while a $150 dispute proceeds normally for you to review and respond to.
Enable RDR for Your Account
Visa RDR is enabled by default on all Dodo Payments accounts with a $100 USD threshold. This means any Visa dispute at or below $100 is automatically resolved with a refund — no action needed from you.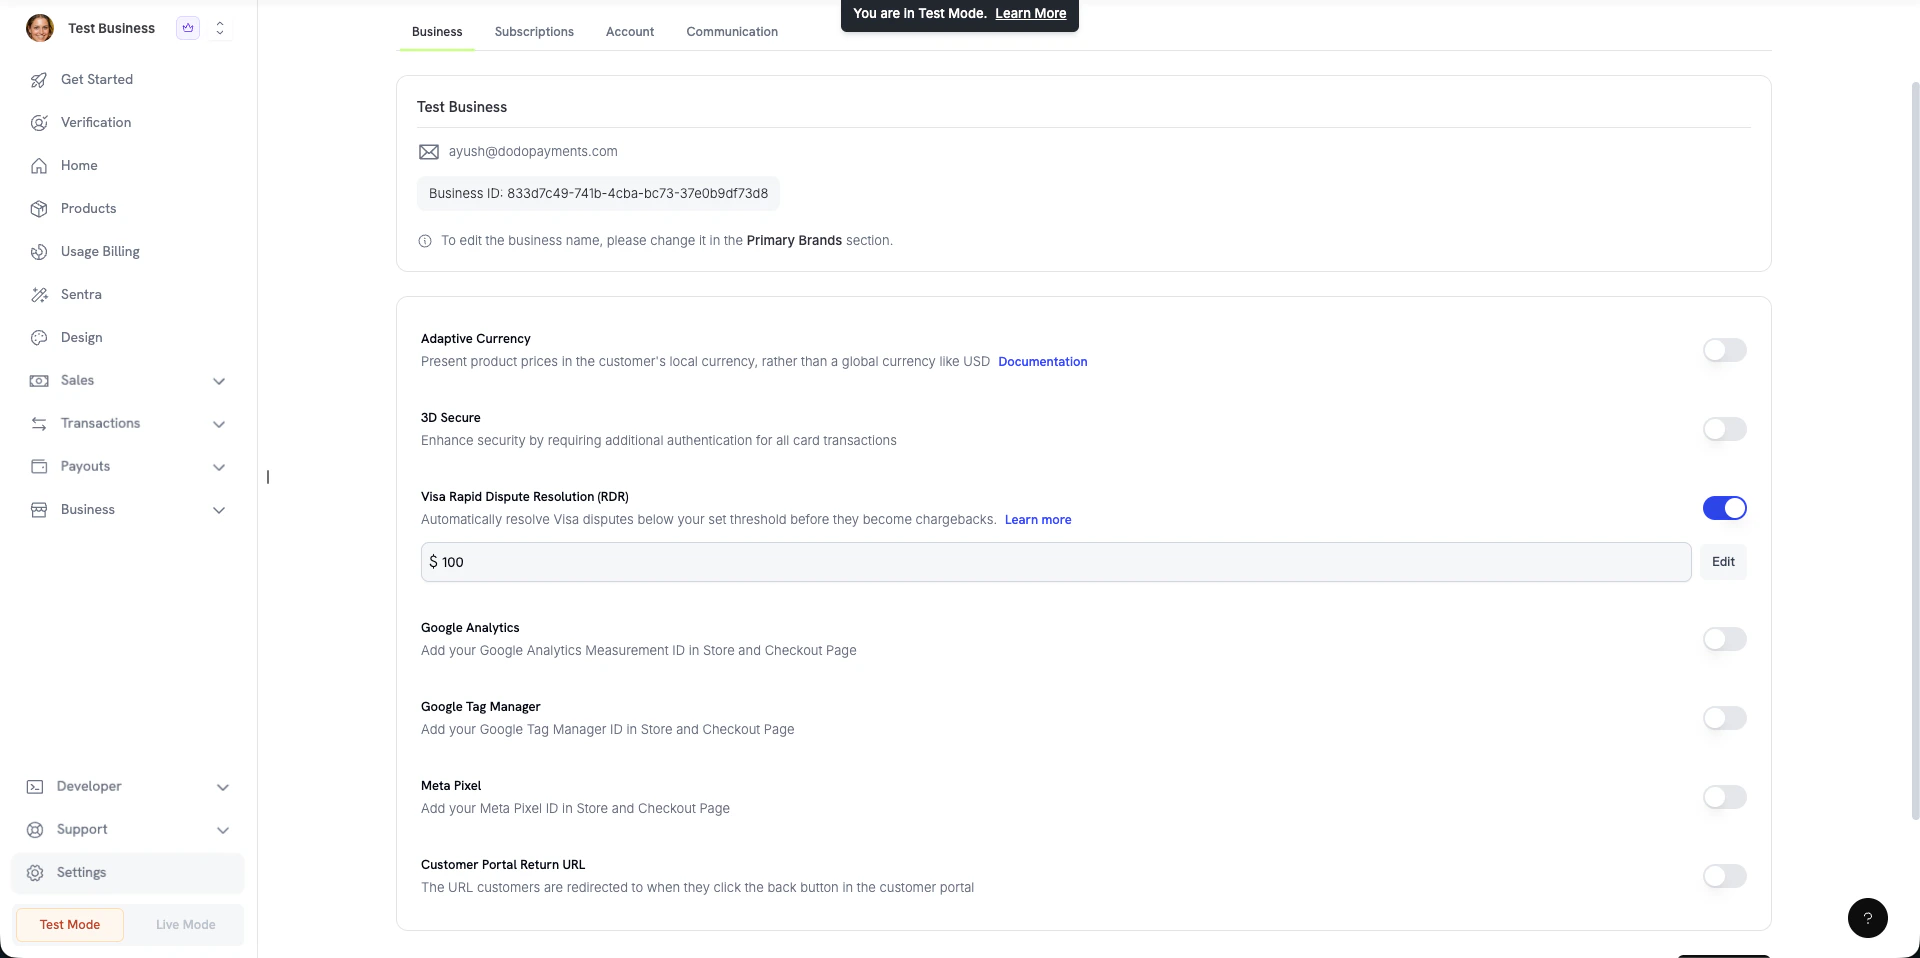
Customizing Your Threshold
You can adjust the RDR threshold to match your business needs:Open the Disputes Settings
Navigate to Settings → Business in your Dodo Payments dashboard and locate the Visa Rapid Dispute Resolution (RDR) section.
Edit the Threshold
Click the Edit button next to the current threshold value. Enter your desired USD amount — any Visa dispute at or below this amount will be automatically resolved.
You can also disable RDR entirely by toggling it off, though we recommend keeping it enabled to protect your dispute rate.
Frequently Asked Questions
Why am I charged a dispute fee on RDR-resolved transactions?
Why am I charged a dispute fee on RDR-resolved transactions?
Dispute fees are still charged even when a transaction is resolved through RDR. The fee covers the cost of contesting the dispute with Visa on your behalf. This is intentional — it’s part of how we actively keep your dispute rate below the 0.9% threshold, which is critical for maintaining good standing with banks and payment processors. A necessary cost, but one working in your favour.
Can a cardholder dispute the same transaction again after RDR resolution?
Can a cardholder dispute the same transaction again after RDR resolution?
No. Once a transaction is resolved via RDR, it is closed at the Visa network level. The issuer will not re-process a chargeback for the same transaction ID — if a cardholder tries again, their bank will see the prior resolution and reject it. This is enforced upstream by Visa, so there is nothing you need to manage on your end.