
Introduction

Automatically sync your paying customers to MailerLite subscriber lists when payment events occur. Add customers to specific groups, trigger automation workflows, and keep your email marketing lists up-to-date with real payment data. MailerLite is a powerful email marketing platform for newsletters, campaigns, and automations. This integration helps you automatically manage subscribers based on payment activity - perfect for onboarding sequences, customer segmentation, and targeted marketing campaigns.
This integration requires your MailerLite API Key for authentication. You can generate one from your MailerLite Integrations page.

Getting Started

1

Open the Webhook Section

In your Dodo Payments dashboard, navigate to Webhooks + Add Endpoint and expand the integrations dropdown.
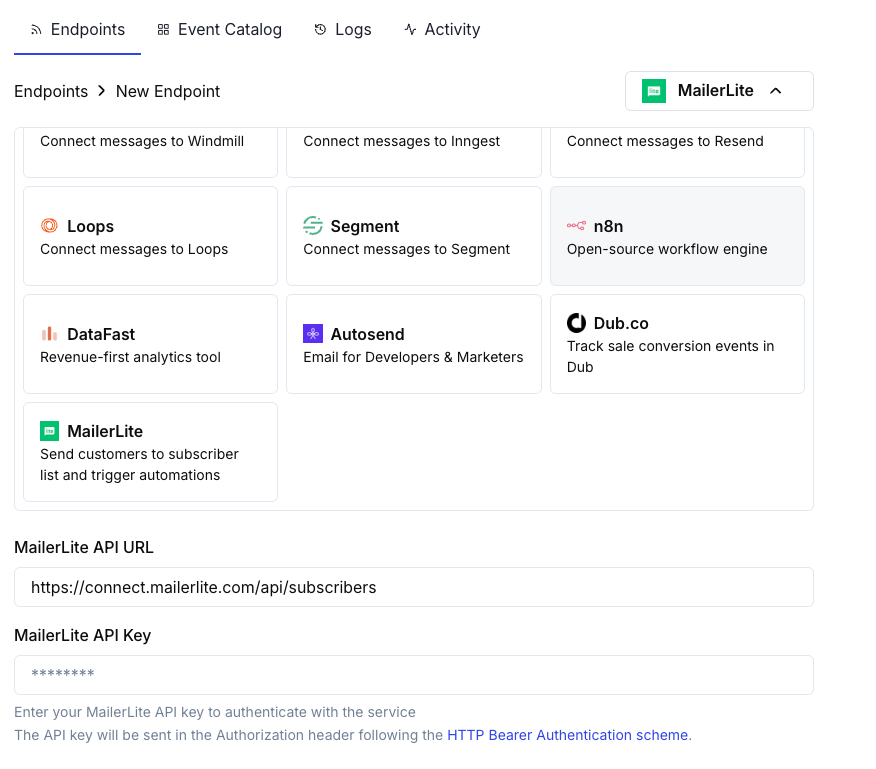
Add Endpoint and integrations dropdown
2

Select MailerLite

Choose the MailerLite integration card.
3

Enter API Key

Provide your MailerLite API Key in the configuration.
4

Configure Transformation

Edit the transformation code to format subscriber data for MailerLite’s API.
5

Test & Create

Test with sample payloads and click Create to activate the subscriber sync.
6

Done!

Payment events will now automatically sync customers to your MailerLite lists.

Transformation Code Examples

Add Customer on Successful Payment

add_customer.js
function handler(webhook) {
  if (webhook.eventType === "payment.succeeded") {
    const p = webhook.payload.data;
    webhook.url = "https://connect.mailerlite.com/api/subscribers";
    webhook.payload = {
      email: p.customer.email,
      fields: {
        name: p.customer.name,
        company: p.customer.business_name || "",
        last_name: ""
      },
      groups: ["your-group-id-here"],
      status: "active"
    };
  }
  return webhook;
}

Add Subscriber to Multiple Groups Based on Product

product_segmentation.js
function handler(webhook) {
  if (webhook.eventType === "payment.succeeded") {
    const p = webhook.payload.data;
    
    // Determine groups based on product or amount
    const groups = ["customers-group-id"];
    
    // Add to premium group if high-value purchase
    if (p.total_amount >= 10000) { // $100+
      groups.push("premium-customers-group-id");
    }
    
    webhook.url = "https://connect.mailerlite.com/api/subscribers";
    webhook.payload = {
      email: p.customer.email,
      fields: {
        name: p.customer.name,
        last_purchase_amount: (p.total_amount / 100).toFixed(2),
        last_purchase_date: new Date(webhook.payload.timestamp).toISOString().split('T')[0],
        payment_id: p.payment_id
      },
      groups: groups,
      status: "active"
    };
  }
  return webhook;
}

Add New Subscriber on Subscription Activation

subscription_subscriber.js
function handler(webhook) {
  if (webhook.eventType === "subscription.active") {
    const s = webhook.payload.data;
    webhook.url = "https://connect.mailerlite.com/api/subscribers";
    webhook.payload = {
      email: s.customer.email,
      fields: {
        name: s.customer.name,
        subscription_plan: s.product_id,
        subscription_amount: (s.recurring_pre_tax_amount / 100).toFixed(2),
        billing_frequency: s.payment_frequency_interval,
        subscription_start: new Date().toISOString().split('T')[0]
      },
      groups: ["subscribers-group-id", "active-subscriptions-group-id"],
      status: "active"
    };
  }
  return webhook;
}

Update Subscriber on Subscription Cancellation

subscription_cancelled.js
function handler(webhook) {
  if (webhook.eventType === "subscription.cancelled") {
    const s = webhook.payload.data;
    // Use PUT to update existing subscriber
    webhook.url = "https://connect.mailerlite.com/api/subscribers/" + encodeURIComponent(s.customer.email);
    webhook.method = "PUT";
    webhook.payload = {
      fields: {
        subscription_status: "cancelled",
        cancellation_date: new Date().toISOString().split('T')[0]
      },
      groups: ["churned-customers-group-id"]
    };
  }
  return webhook;
}

Add Customer with Custom Fields

custom_fields.js
function handler(webhook) {
  if (webhook.eventType === "payment.succeeded") {
    const p = webhook.payload.data;
    webhook.url = "https://connect.mailerlite.com/api/subscribers";
    webhook.payload = {
      email: p.customer.email,
      fields: {
        name: p.customer.name,
        company: p.customer.business_name || "",
        country: p.customer.country || "",
        city: p.customer.city || "",
        phone: p.customer.phone || "",
        // Custom fields (must be created in MailerLite first)
        total_spent: (p.total_amount / 100).toFixed(2),
        customer_since: new Date().toISOString().split('T')[0],
        payment_method: p.payment_method || "unknown",
        currency: p.currency || "USD"
      },
      groups: ["paying-customers-group-id"],
      status: "active",
      subscribed_at: new Date().toISOString().replace('T', ' ').split('.')[0]
    };
  }
  return webhook;
}

Trigger Automation via Event

trigger_automation.js
function handler(webhook) {
  if (webhook.eventType === "payment.succeeded") {
    const p = webhook.payload.data;
    
    // First, ensure subscriber exists
    webhook.url = "https://connect.mailerlite.com/api/subscribers";
    webhook.payload = {
      email: p.customer.email,
      fields: {
        name: p.customer.name,
        // Add a trigger field that your automation watches
        last_payment_trigger: new Date().toISOString(),
        last_payment_amount: (p.total_amount / 100).toFixed(2)
      },
      status: "active"
    };
    
    // Tip: Create an automation in MailerLite that triggers
    // when 'last_payment_trigger' field is updated
  }
  return webhook;
}

Tips

  • Create custom fields in MailerLite before using them in your transformations
  • Use groups to segment customers by product, plan tier, or purchase behavior
  • Set up automation workflows in MailerLite that trigger on field updates
  • Use the upsert behavior (POST to /subscribers) to avoid duplicate subscriber errors
  • Store payment metadata in custom fields for better customer insights
  • Test with a small group before enabling for all payments

Custom Fields Setup

Before using custom fields, you need to create them in MailerLite:
  1. Go to your MailerLite dashboard
  2. Navigate to Subscribers Fields
  3. Click Create field and add fields like:
    • total_spent (Number)
    • customer_since (Date)
    • subscription_plan (Text)
    • payment_method (Text)
    • last_payment_amount (Number)

Troubleshooting

  • Verify API Key is correct and active
  • Check that the email address is valid (RFC 2821 compliant)
  • Ensure group IDs are correct and exist in your account
  • Note: Unsubscribed, bounced, or junk subscribers cannot be reactivated via API
  • Verify custom fields exist in MailerLite before using them
  • Check that field names match exactly (case-sensitive)
  • Ensure field values match the expected type (text, number, date)
  • MailerLite API has a rate limit of 120 requests per minute
  • Use batch endpoints if processing many subscribers
  • Implement backoff strategies for high-volume scenarios
  • Verify group IDs are numeric strings
  • Check that groups exist in your MailerLite account
  • Note: Using PUT with groups will remove subscriber from unlisted groups

API Reference

MailerLite Subscribers API accepts the following key parameters:
ParameterTypeRequiredDescription
emailstringYesValid email address (RFC 2821)
fieldsobjectNoObject with field name/value pairs
fields.namestringNoSubscriber’s first name
fields.last_namestringNoSubscriber’s last name
fields.companystringNoCompany name
fields.countrystringNoCountry
fields.citystringNoCity
fields.phonestringNoPhone number
groupsarrayNoArray of group IDs to add subscriber to
statusstringNoOne of: active, unsubscribed, unconfirmed, bounced, junk
subscribed_atstringNoDate in format yyyy-MM-dd HH:mm:ss
ip_addressstringNoSubscriber’s IP address
For complete API documentation, visit MailerLite Developers.