跳转到主要内容

介绍

在支付事件发生时,自动将您的付费客户同步到 MailerLite 订阅者列表。将客户添加到特定组,触发自动化工作流,并使用真实的支付数据保持您的电子邮件营销列表的最新状态。 MailerLite 是一个强大的电子邮件营销平台,适用于新闻通讯、活动和自动化。此集成帮助您根据支付活动自动管理订阅者 - 非常适合入职序列、客户细分和有针对性的营销活动。
此集成需要您的 MailerLite API 密钥进行身份验证。您可以从您的 MailerLite 集成页面 生成一个。

开始使用

1

打开 Webhook 部分

在您的 Dodo Payments 仪表板中,导航到 Webhooks + 添加端点 并展开集成下拉菜单。
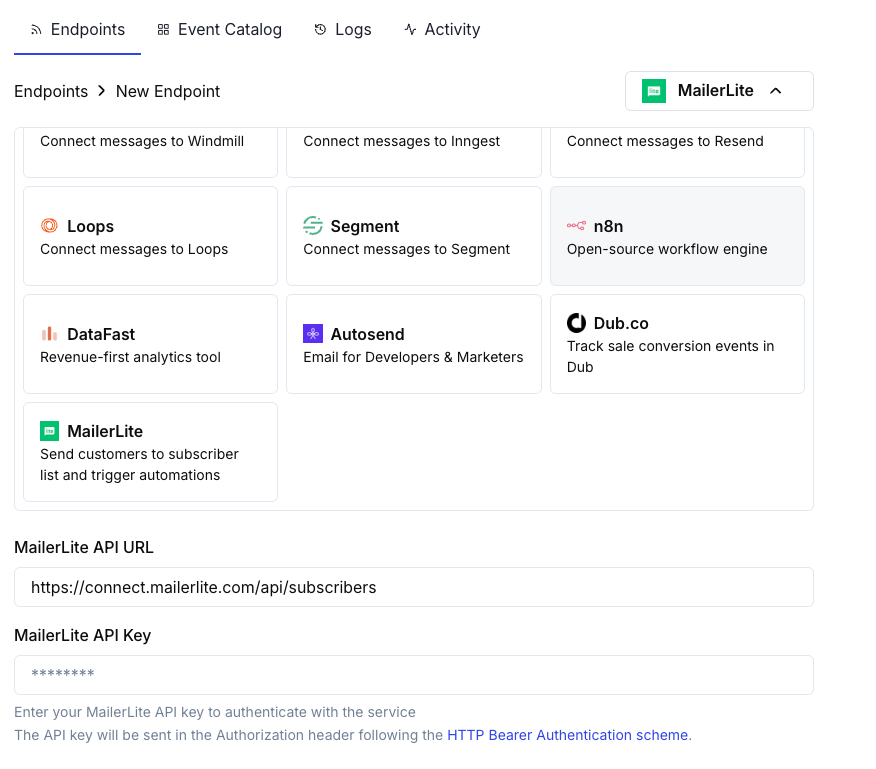
添加端点和集成下拉菜单
2

选择 MailerLite

选择 MailerLite 集成卡片。
3

输入 API 密钥

在配置中提供您的 MailerLite API 密钥。
4

配置转换

编辑转换代码以格式化订阅者数据以适应 MailerLite 的 API。
5

测试并创建

使用示例有效负载进行测试,然后单击 创建 以激活订阅者同步。
6

完成!

现在,支付事件将自动将客户同步到您的 MailerLite 列表中。

转换代码示例

在成功支付时添加客户

add_customer.js
function handler(webhook) {
  if (webhook.eventType === "payment.succeeded") {
    const p = webhook.payload.data;
    webhook.url = "https://connect.mailerlite.com/api/subscribers";
    webhook.payload = {
      email: p.customer.email,
      fields: {
        name: p.customer.name,
        company: p.customer.business_name || "",
        last_name: ""
      },
      groups: ["your-group-id-here"],
      status: "active"
    };
  }
  return webhook;
}

根据产品将订阅者添加到多个组

product_segmentation.js
function handler(webhook) {
  if (webhook.eventType === "payment.succeeded") {
    const p = webhook.payload.data;
    
    // Determine groups based on product or amount
    const groups = ["customers-group-id"];
    
    // Add to premium group if high-value purchase
    if (p.total_amount >= 10000) { // $100+
      groups.push("premium-customers-group-id");
    }
    
    webhook.url = "https://connect.mailerlite.com/api/subscribers";
    webhook.payload = {
      email: p.customer.email,
      fields: {
        name: p.customer.name,
        last_purchase_amount: (p.total_amount / 100).toFixed(2),
        last_purchase_date: new Date(webhook.payload.timestamp).toISOString().split('T')[0],
        payment_id: p.payment_id
      },
      groups: groups,
      status: "active"
    };
  }
  return webhook;
}

在订阅激活时添加新订阅者

subscription_subscriber.js
function handler(webhook) {
  if (webhook.eventType === "subscription.active") {
    const s = webhook.payload.data;
    webhook.url = "https://connect.mailerlite.com/api/subscribers";
    webhook.payload = {
      email: s.customer.email,
      fields: {
        name: s.customer.name,
        subscription_plan: s.product_id,
        subscription_amount: (s.recurring_pre_tax_amount / 100).toFixed(2),
        billing_frequency: s.payment_frequency_interval,
        subscription_start: new Date().toISOString().split('T')[0]
      },
      groups: ["subscribers-group-id", "active-subscriptions-group-id"],
      status: "active"
    };
  }
  return webhook;
}

在订阅取消时更新订阅者

subscription_cancelled.js
function handler(webhook) {
  if (webhook.eventType === "subscription.cancelled") {
    const s = webhook.payload.data;
    // Use PUT to update existing subscriber
    webhook.url = "https://connect.mailerlite.com/api/subscribers/" + encodeURIComponent(s.customer.email);
    webhook.method = "PUT";
    webhook.payload = {
      fields: {
        subscription_status: "cancelled",
        cancellation_date: new Date().toISOString().split('T')[0]
      },
      groups: ["churned-customers-group-id"]
    };
  }
  return webhook;
}

使用自定义字段添加客户

custom_fields.js
function handler(webhook) {
  if (webhook.eventType === "payment.succeeded") {
    const p = webhook.payload.data;
    webhook.url = "https://connect.mailerlite.com/api/subscribers";
    webhook.payload = {
      email: p.customer.email,
      fields: {
        name: p.customer.name,
        company: p.customer.business_name || "",
        country: p.customer.country || "",
        city: p.customer.city || "",
        phone: p.customer.phone || "",
        // Custom fields (must be created in MailerLite first)
        total_spent: (p.total_amount / 100).toFixed(2),
        customer_since: new Date().toISOString().split('T')[0],
        payment_method: p.payment_method || "unknown",
        currency: p.currency || "USD"
      },
      groups: ["paying-customers-group-id"],
      status: "active",
      subscribed_at: new Date().toISOString().replace('T', ' ').split('.')[0]
    };
  }
  return webhook;
}

通过事件触发自动化

trigger_automation.js
function handler(webhook) {
  if (webhook.eventType === "payment.succeeded") {
    const p = webhook.payload.data;
    
    // First, ensure subscriber exists
    webhook.url = "https://connect.mailerlite.com/api/subscribers";
    webhook.payload = {
      email: p.customer.email,
      fields: {
        name: p.customer.name,
        // Add a trigger field that your automation watches
        last_payment_trigger: new Date().toISOString(),
        last_payment_amount: (p.total_amount / 100).toFixed(2)
      },
      status: "active"
    };
    
    // Tip: Create an automation in MailerLite that triggers
    // when 'last_payment_trigger' field is updated
  }
  return webhook;
}

提示

  • 在使用自定义字段之前,请在 MailerLite 中创建它们
  • 使用组根据产品、计划级别或购买行为对客户进行细分
  • 在 MailerLite 中设置在字段更新时触发的自动化工作流
  • 使用 upsert 行为(POST 到 /subscribers)以避免重复订阅者错误
  • 在自定义字段中存储支付元数据以获得更好的客户洞察
  • 在为所有支付启用之前,先对小组进行测试

自定义字段设置

在使用自定义字段之前,您需要在 MailerLite 中创建它们:
  1. 转到您的 MailerLite 仪表板
  2. 导航到 订阅者字段
  3. 点击 创建字段 并添加字段,例如:
    • total_spent (数字)
    • customer_since (日期)
    • subscription_plan (文本)
    • payment_method (文本)
    • last_payment_amount (数字)

故障排除

  • 验证 API 密钥是否正确且有效
  • 检查电子邮件地址是否有效(符合 RFC 2821)
  • 确保组 ID 正确并存在于您的帐户中
  • 注意:未订阅、退回或垃圾邮件的订阅者无法通过 API 重新激活
  • 验证自定义字段在使用之前是否存在于 MailerLite 中
  • 检查字段名称是否完全匹配(区分大小写)
  • 确保字段值与预期类型匹配(文本、数字、日期)
  • MailerLite API 的速率限制为每分钟 120 次请求
  • 如果处理多个订阅者,请使用批处理端点
  • 在高流量场景中实施回退策略
  • 验证组 ID 是否为数字字符串
  • 检查组是否存在于您的 MailerLite 帐户中
  • 注意:使用 PUT 与组将从未列出的组中移除订阅者

API 参考

MailerLite 订阅者 API 接受以下关键参数:
参数类型必需描述
emailstring有效的电子邮件地址(RFC 2821)
fieldsobject字段名称/值对的对象
fields.namestring订阅者的名字
fields.last_namestring订阅者的姓氏
fields.companystring公司名称
fields.countrystring国家
fields.citystring城市
fields.phonestring电话号码
groupsarray要添加订阅者的组 ID 数组
statusstring其中之一:active, unsubscribed, unconfirmed, bounced, junk
subscribed_atstring日期格式为 yyyy-MM-dd HH:mm:ss
ip_addressstring订阅者的 IP 地址
有关完整的 API 文档,请访问 MailerLite 开发者.