
Our webhook implementation follows the Standard Webhooks specification, ensuring compatibility with industry best practices and existing webhook libraries.
Key Features
Real-time Delivery
Receive instant notifications when events occur
Secure by Default
HMAC SHA256 signature verification included
Automatic Retries
Built-in retry logic with exponential backoff
Event Filtering
Subscribe only to events you need
Getting Started

Select Events to Receive
Choose the specific events your webhook endpoint should listen for by selecting them from the event list.
Get Secret Key
Obtain your webhook
Secret Key from the settings page. You’ll use this to verify the authenticity of received webhooks.Configuring Subscribed Events
You can configure which specific events they want to receive for each webhook endpoint.Accessing Event Configuration
Navigate to Webhook Details
Go to your Dodo Payments Dashboard and navigate to
Developer > Webhooks.Managing Event Subscriptions
View Available Events
The interface displays all available webhook events organized in a hierarchical structure. Events are grouped by category (e.g.,
dispute, payment, subscription).Search and Filter
Use the search bar to quickly find specific events by typing event names or keywords.
Select Events
Check the boxes next to the events you want to receive. You can:
- Select individual sub-events (e.g.,
dispute.accepted,dispute.challenged) - Select parent events to receive all related sub-events
- Mix and match specific events based on your needs
Review Event Details
Hover over the information icon (ⓘ) next to each event to see a description of when that event is triggered.
Webhook Delivery
Timeouts
Webhooks have a 15-second timeout window for both connection and read operations. Ensure your endpoint responds quickly to avoid timeouts.Automatic Retries
If a webhook delivery fails, Dodo Payments automatically retries with exponential backoff to prevent overwhelming your system.| Attempt | Delay | Description |
|---|---|---|
| 1 | Immediately | First retry happens right away |
| 2 | 5 seconds | Second attempt after short delay |
| 3 | 5 minutes | Third attempt with increased backoff |
| 4 | 30 minutes | Fourth attempt continuing backoff |
| 5 | 2 hours | Fifth attempt with extended delay |
| 6 | 5 hours | Sixth attempt with longer delay |
| 7 | 10 hours | Seventh attempt with maximum delay |
| 8 | 10 hours | Final attempt - webhook marked as failed if unsuccessful |
Maximum of 8 retry attempts per webhook event. For example, if a webhook fails three times before succeeding, the total delivery time is approximately 35 minutes and 5 seconds from the first attempt.
Idempotency
Each webhook event includes a uniquewebhook-id header. Use this identifier to implement idempotency and prevent duplicate processing.
Event Ordering
Webhook events may arrive out of order due to retries or network conditions. Design your system to handle events in any sequence.You will receive the latest payload at the time of delivery, regardless of when the webhook event was originally emitted.
Securing Webhooks
To ensure the security of your webhooks, always validate the payloads and use HTTPS.Verifying Signatures
Each webhook request includes awebhook-signature header, an HMAC SHA256 signature of the webhook payload and timestamp, signed with your secret key.
SDK verification (recommended)
All official SDKs include built‑in helpers to securely validate and parse incoming webhooks. Two methods are available:unwrap(): Verifies signatures using your webhook secret keyunsafe_unwrap(): Parses payloads without verification
Manual verification (alternative)
If you are not using an SDK, you can verify signatures yourself following the Standard Webhooks spec:- Build the signed message by concatenating
webhook-id,webhook-timestamp, and the exact raw stringifiedpayload, separated by periods (.). - Compute the HMAC SHA256 of that string using your webhook secret key from the Dashboard.
- Compare the computed signature to the
webhook-signatureheader. If they match, the webhook is authentic.
We follow the Standard Webhooks specification. You can use their libraries to verify signatures: https://github.com/standard-webhooks/standard-webhooks/tree/main/libraries. For event payload formats, see the Webhook Payload.
Responding to Webhooks
- Your webhook handler must return a
2xx status codeto acknowledge receipt of the event. - Any other response will be treated as a failure, and the webhook will be retried.
Best Practices
Use HTTPS endpoints only
Use HTTPS endpoints only
Always use HTTPS URLs for webhook endpoints. HTTP endpoints are vulnerable to man-in-the-middle attacks and expose your webhook data.
Respond immediately
Respond immediately
Return a
200 status code immediately upon receiving the webhook. Process the event asynchronously to avoid timeouts.Handle duplicate events
Handle duplicate events
Implement idempotency using the
webhook-id header to safely process the same event multiple times without side effects.Secure your webhook secret
Secure your webhook secret
Store your webhook secret securely using environment variables or a secrets manager. Never commit secrets to version control.
Webhook Payload Structure
Understanding the webhook payload structure helps you parse and process events correctly.Request Format
Headers
Unique identifier for this webhook event. Use this for idempotency checks.
HMAC SHA256 signature for verifying the webhook authenticity.
Unix timestamp (in seconds) when the webhook was sent.
Request Body
Your Dodo Payments business identifier.
Event type that triggered this webhook (e.g.,
payment.succeeded, subscription.active).ISO 8601 formatted timestamp of when the event occurred.
Event-specific payload containing detailed information about the event.
Example Payload
Event Types
Browse all available webhook event types
Event Payloads
View detailed payload schemas for each event
Testing Webhooks
You can test your webhook integration directly from the Dodo Payments dashboard to ensure your endpoint is working correctly before going live.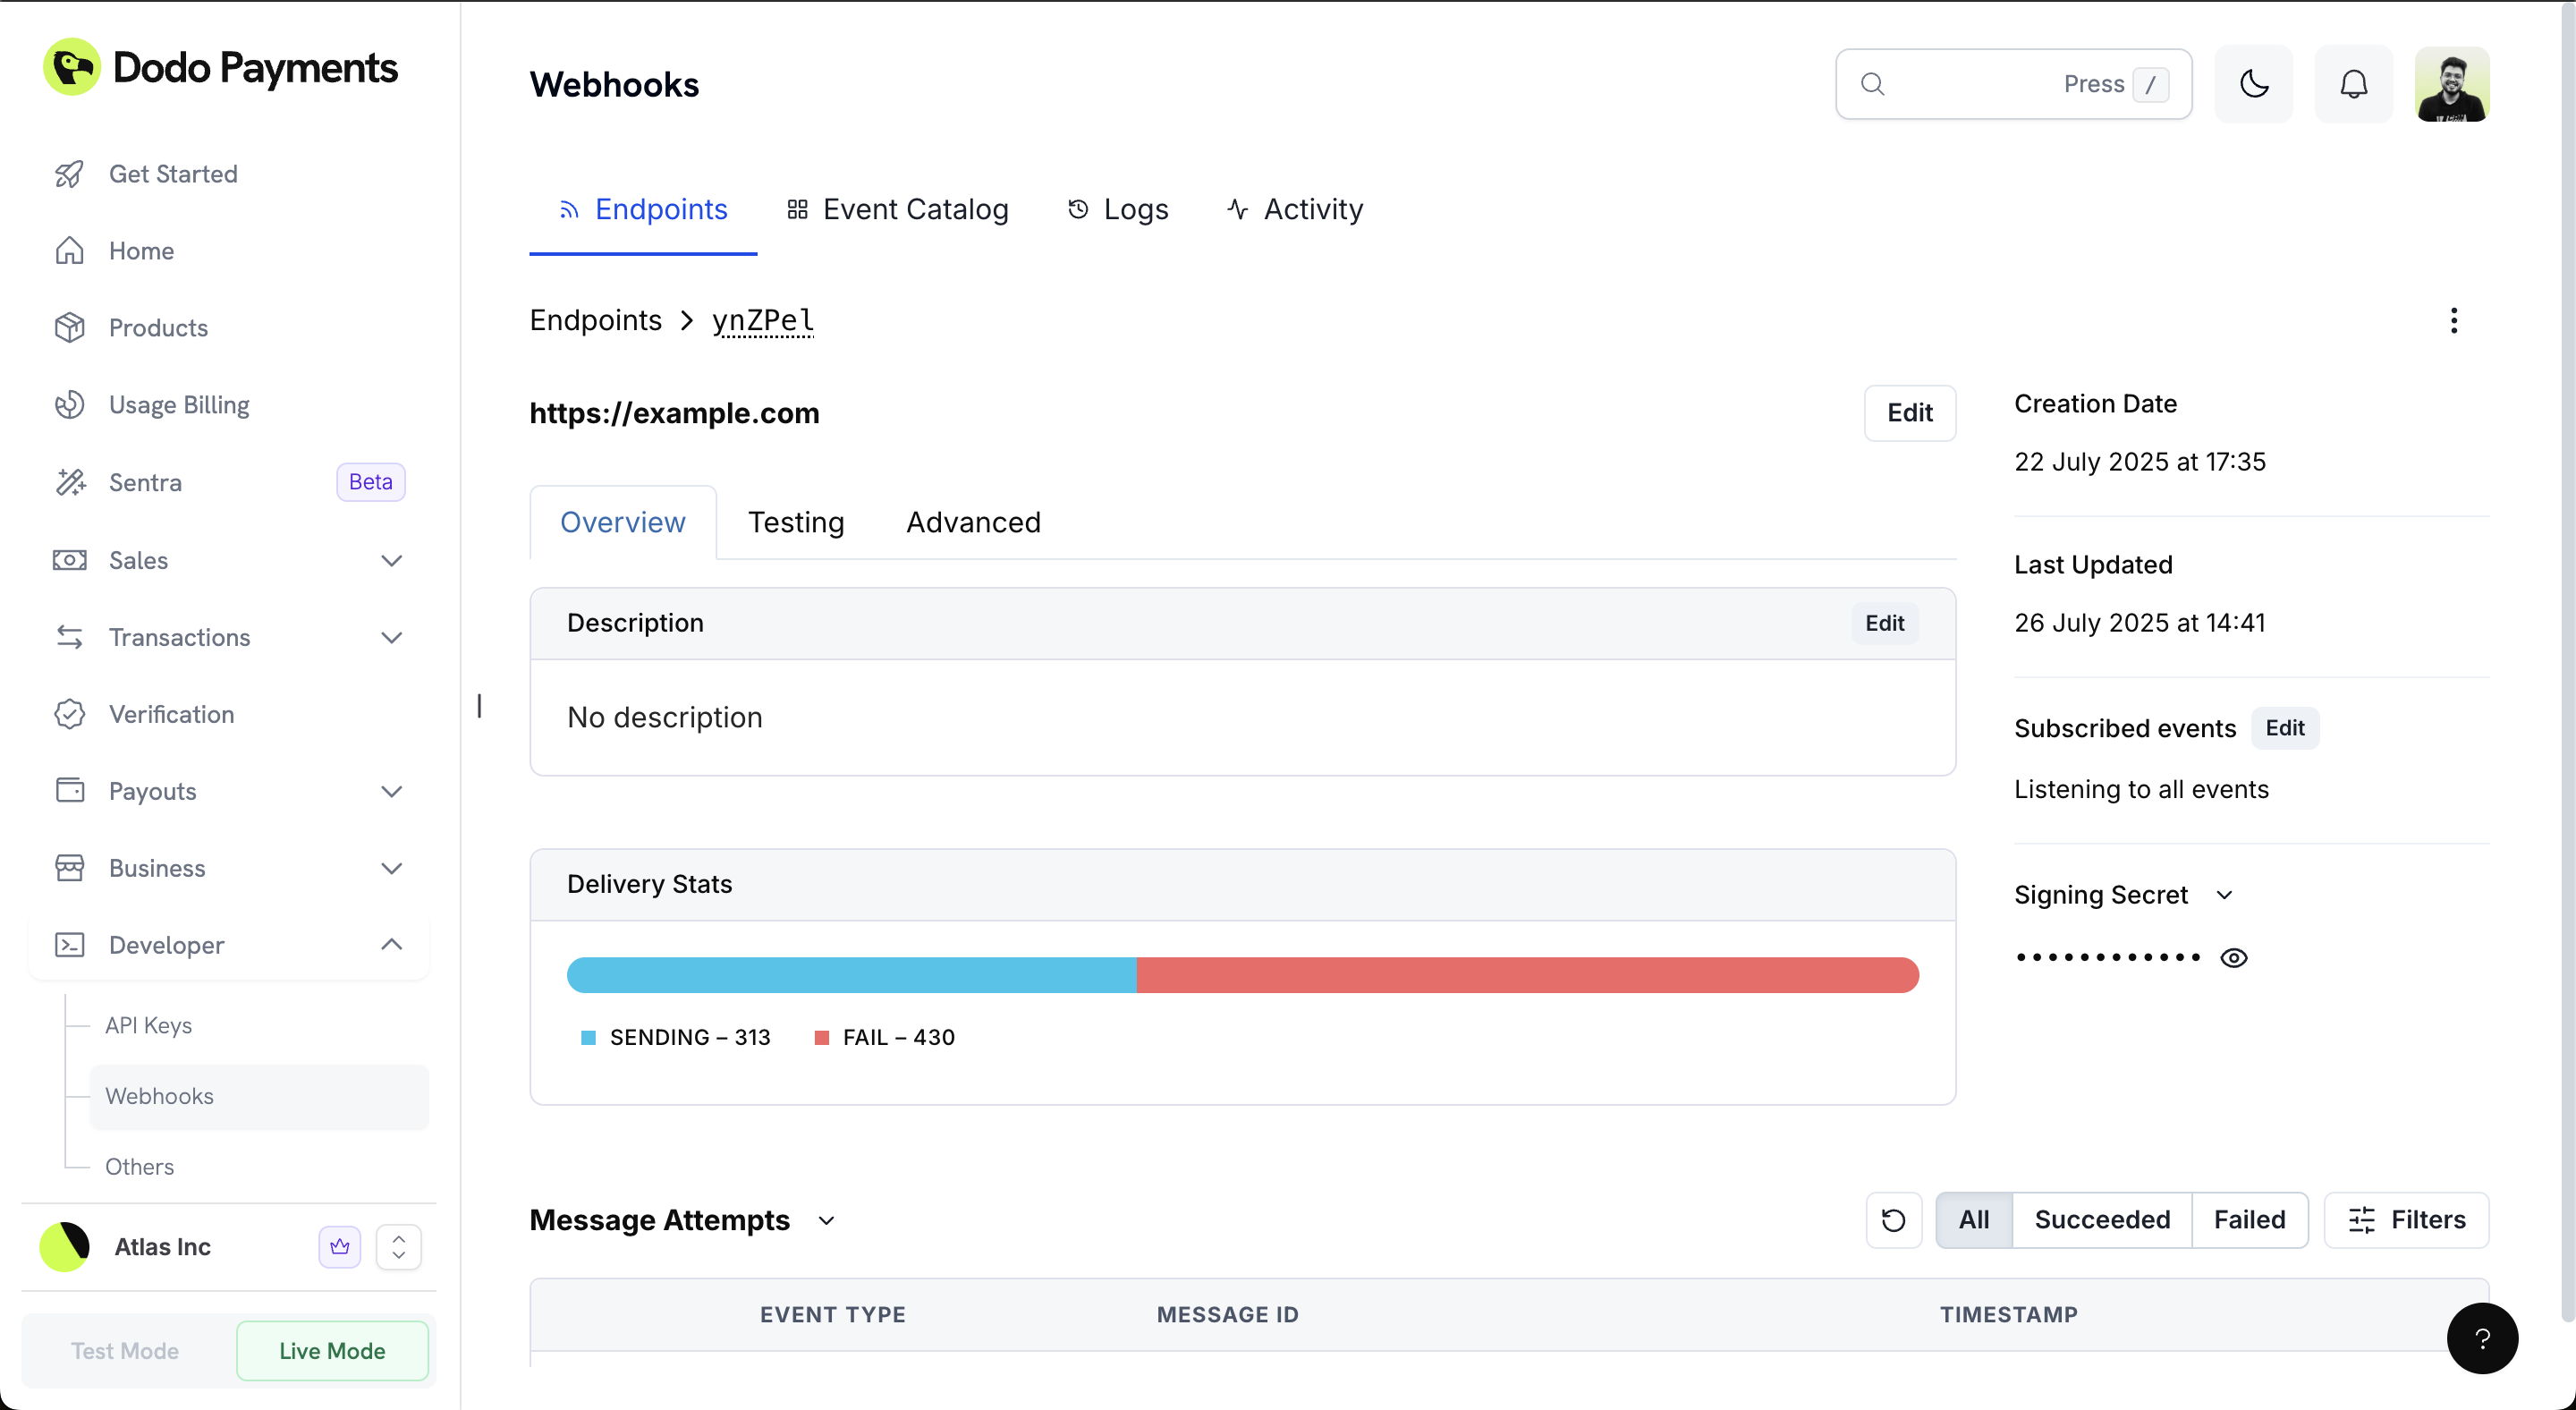
Accessing the Testing Interface
Testing Your Webhook
The testing interface provides a comprehensive way to test your webhook endpoint:Select Event Type
Use the dropdown menu to select the specific event type you want to test (e.g.,
payment.succeeded, payment.failed, etc.).The dropdown contains all available webhook event types that your endpoint can receive.
Review Schema and Example
The interface displays both the Schema (data structure) and Example (sample payload) for the selected event type.
Verifying Your Test
Implementation Example
Here’s a complete Express.js implementation showing webhook verification and handling:Testing Webhooks with the CLI
The Dodo Payments CLI provides two commands for testing webhooks during local development, without needing to leave your terminal.Listen for Live Webhooks Locally
Forward real webhook events from your test mode account to your local development server in real time:http://localhost:3000/webhook), preserving all headers including signature headers for verification testing.
The listener only works with test mode API keys. Run
dodo login and select Test Mode before using this command.Trigger Mock Webhook Events
Send mock webhook payloads to any endpoint without creating real transactions:CLI Webhook Testing Docs
See the full CLI webhook testing documentation
Advanced Settings
The Advanced Settings tab provides additional configuration options for fine-tuning your webhook endpoint behavior.Rate Limiting (Throttling)
Control the rate at which webhook events are delivered to your endpoint to prevent overwhelming your system.Configure Rate Limit
Click the Edit button to modify the rate limit settings.
By default, webhooks have “No rate limit” applied, meaning events are delivered as soon as they occur.
Custom Headers
Add custom HTTP headers to all webhook requests sent to your endpoint. This is useful for authentication, routing, or adding metadata to your webhook requests.Transformations
Transformations allow you to modify a webhook’s payload and redirect it to a different URL. This powerful feature enables you to:- Modify the payload structure before processing
- Route webhooks to different endpoints based on content
- Add or remove fields from the payload
- Transform data formats
Configure Transformation
Click Edit transformation to define your transformation rules.
You can use JavaScript to transform the webhook payload and specify a different target URL.
Monitoring Webhook Logs
The Logs tab provides comprehensive visibility into your webhook delivery status, allowing you to monitor, debug, and manage webhook events effectively.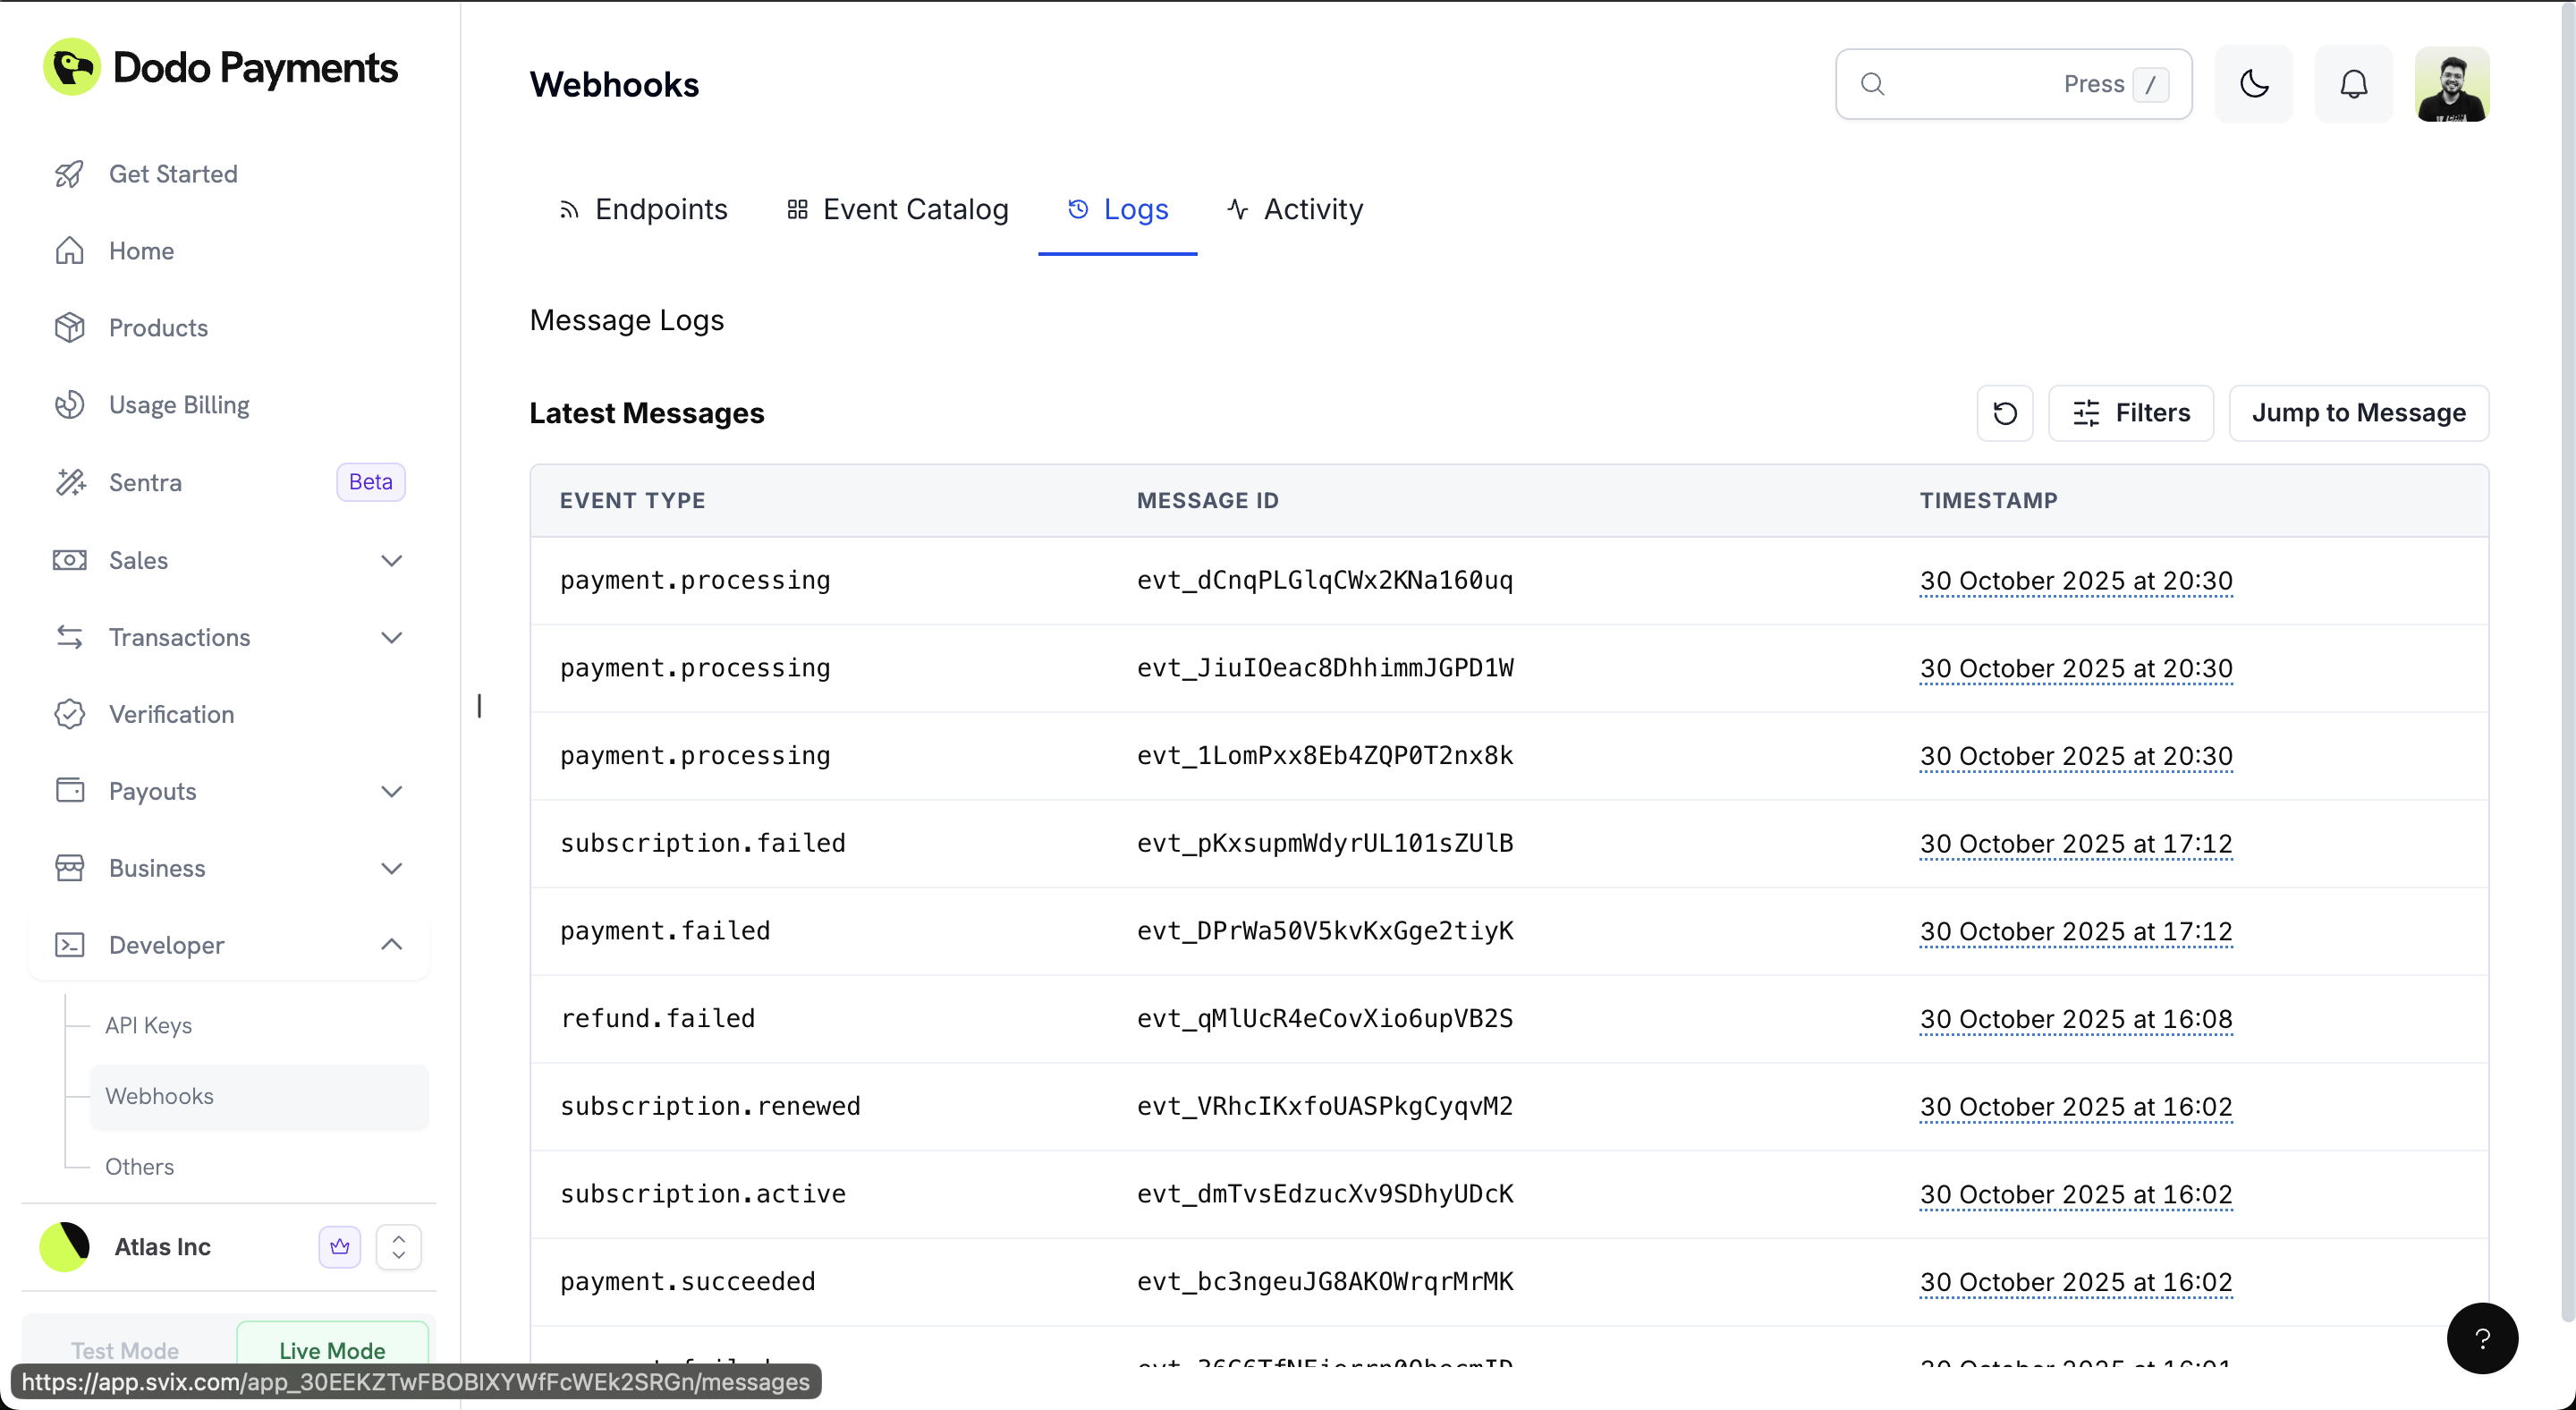
Activity Monitoring
The Activity tab provides real-time insights into your webhook delivery performance with visual analytics.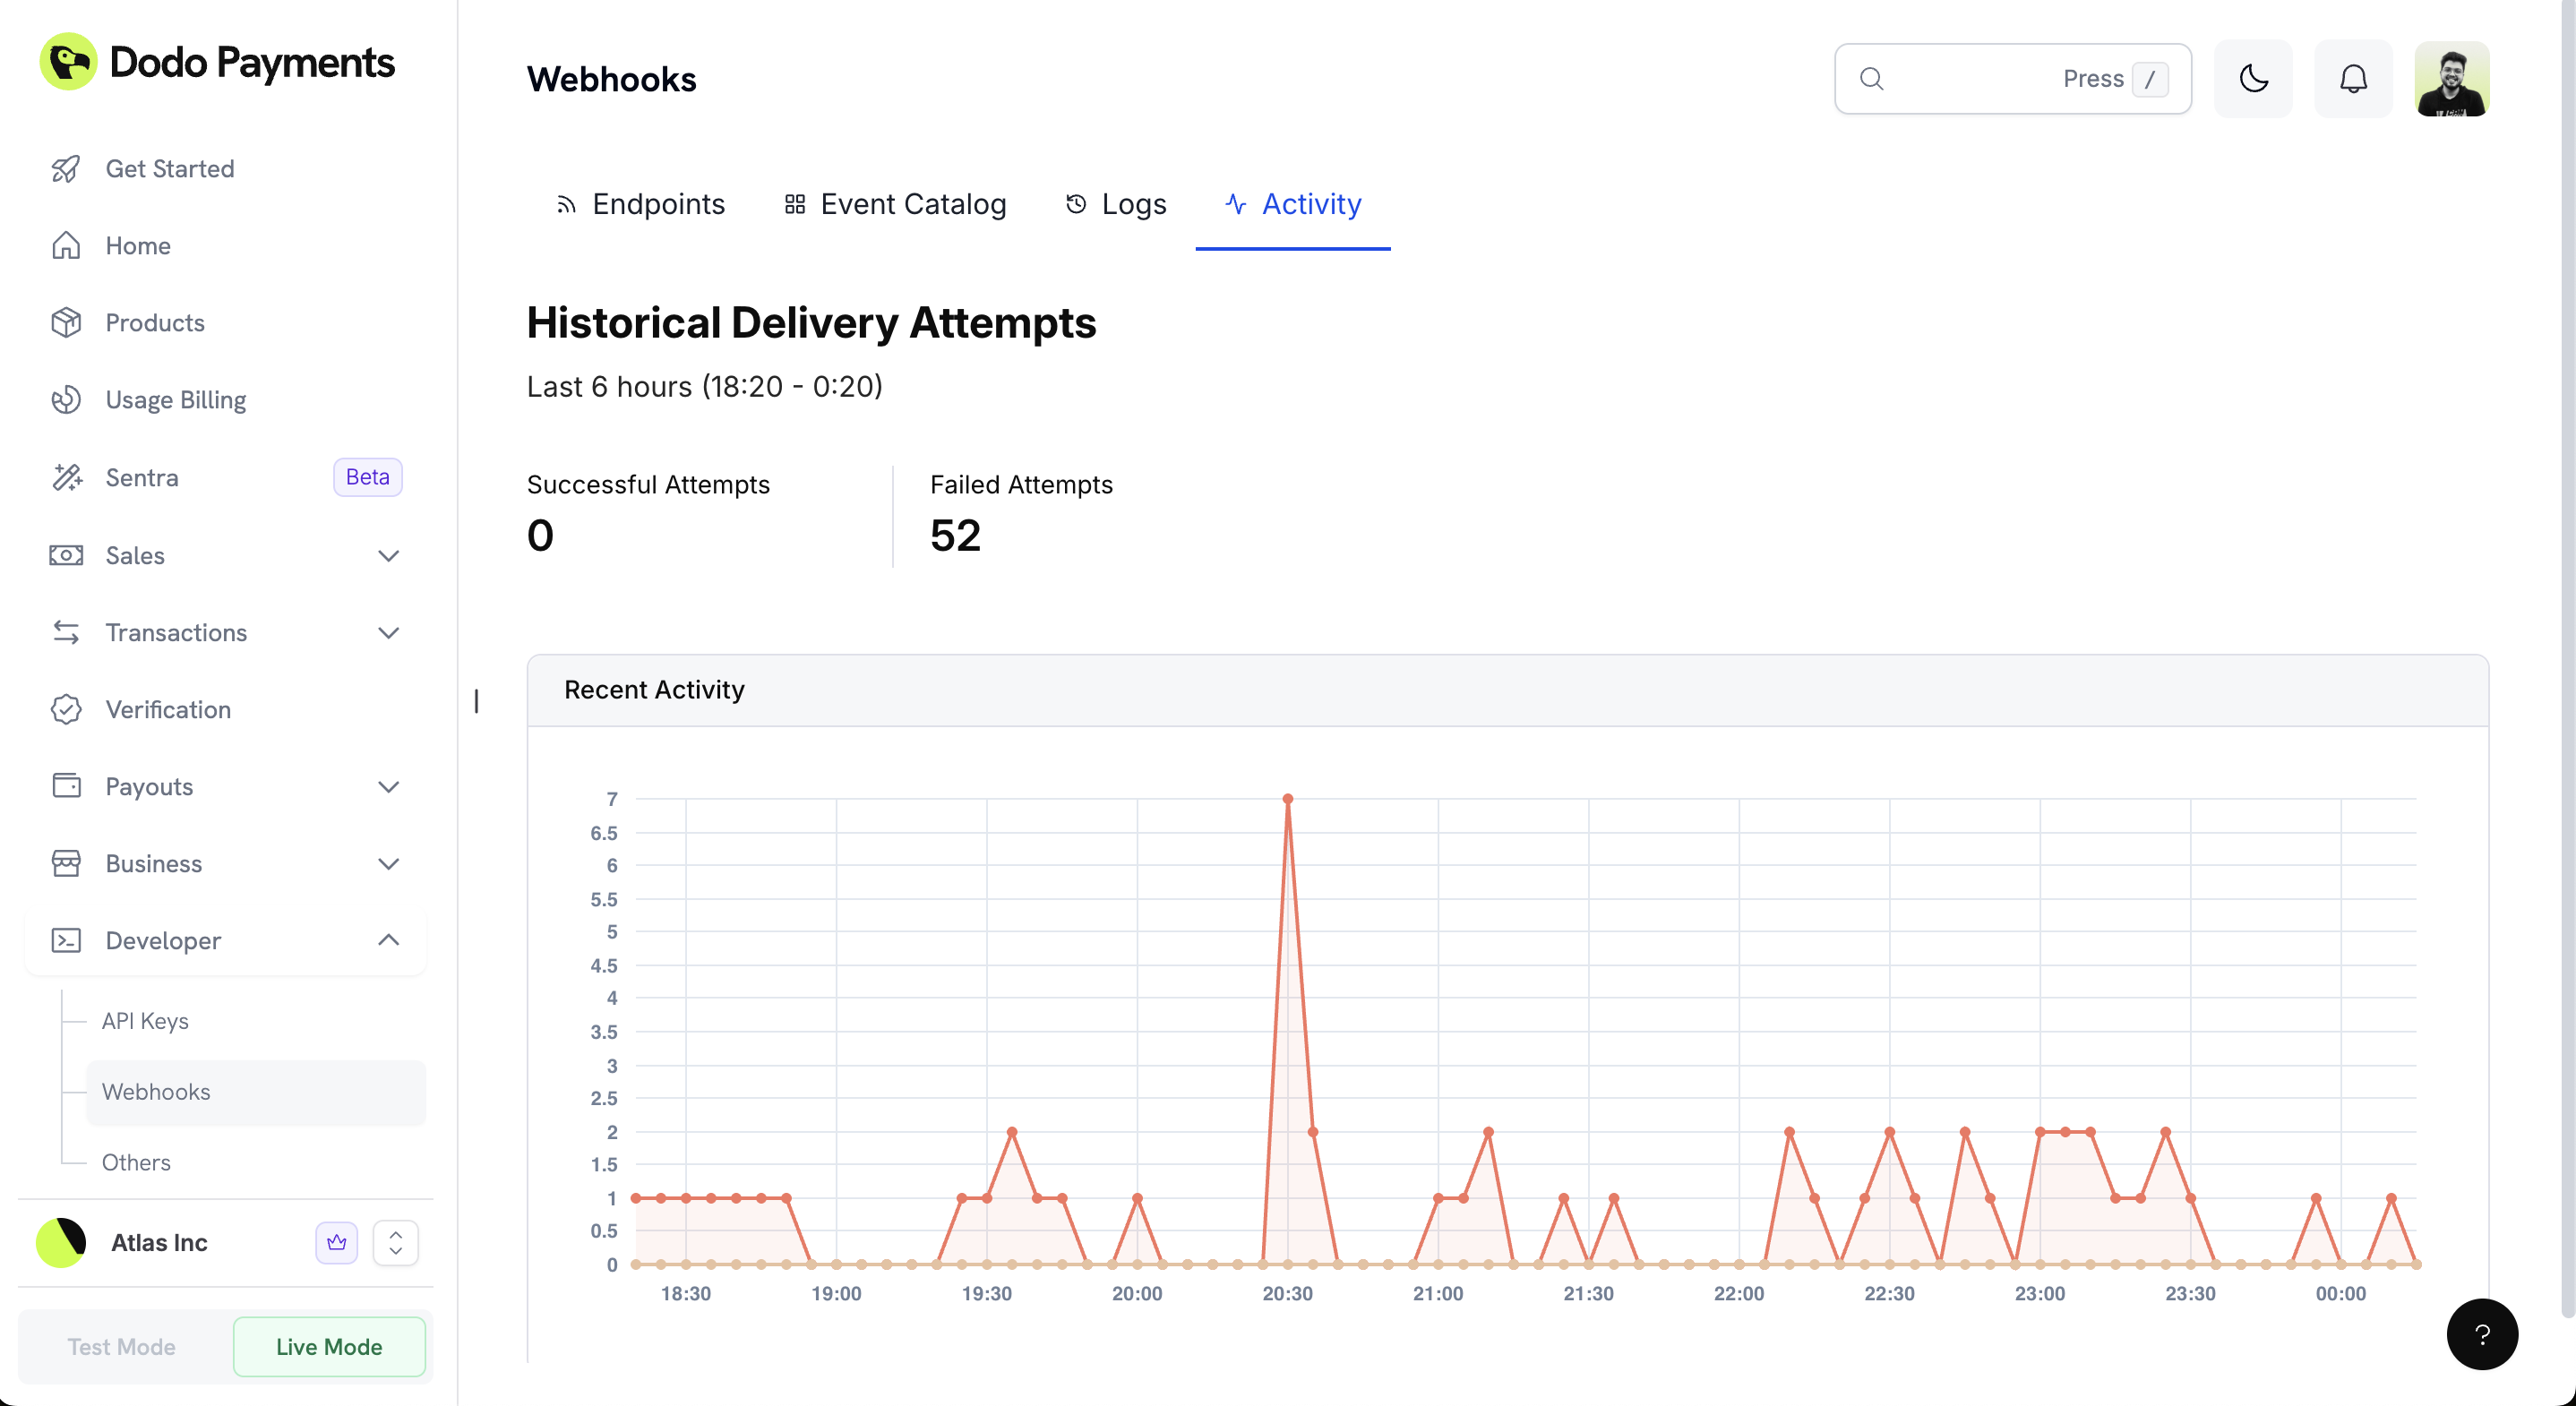
Email Alerts
Stay informed about your webhook health with automatic email notifications. When webhook deliveries start failing or your endpoint stops responding, you’ll receive email alerts so you can quickly address issues and keep your integrations running smoothly.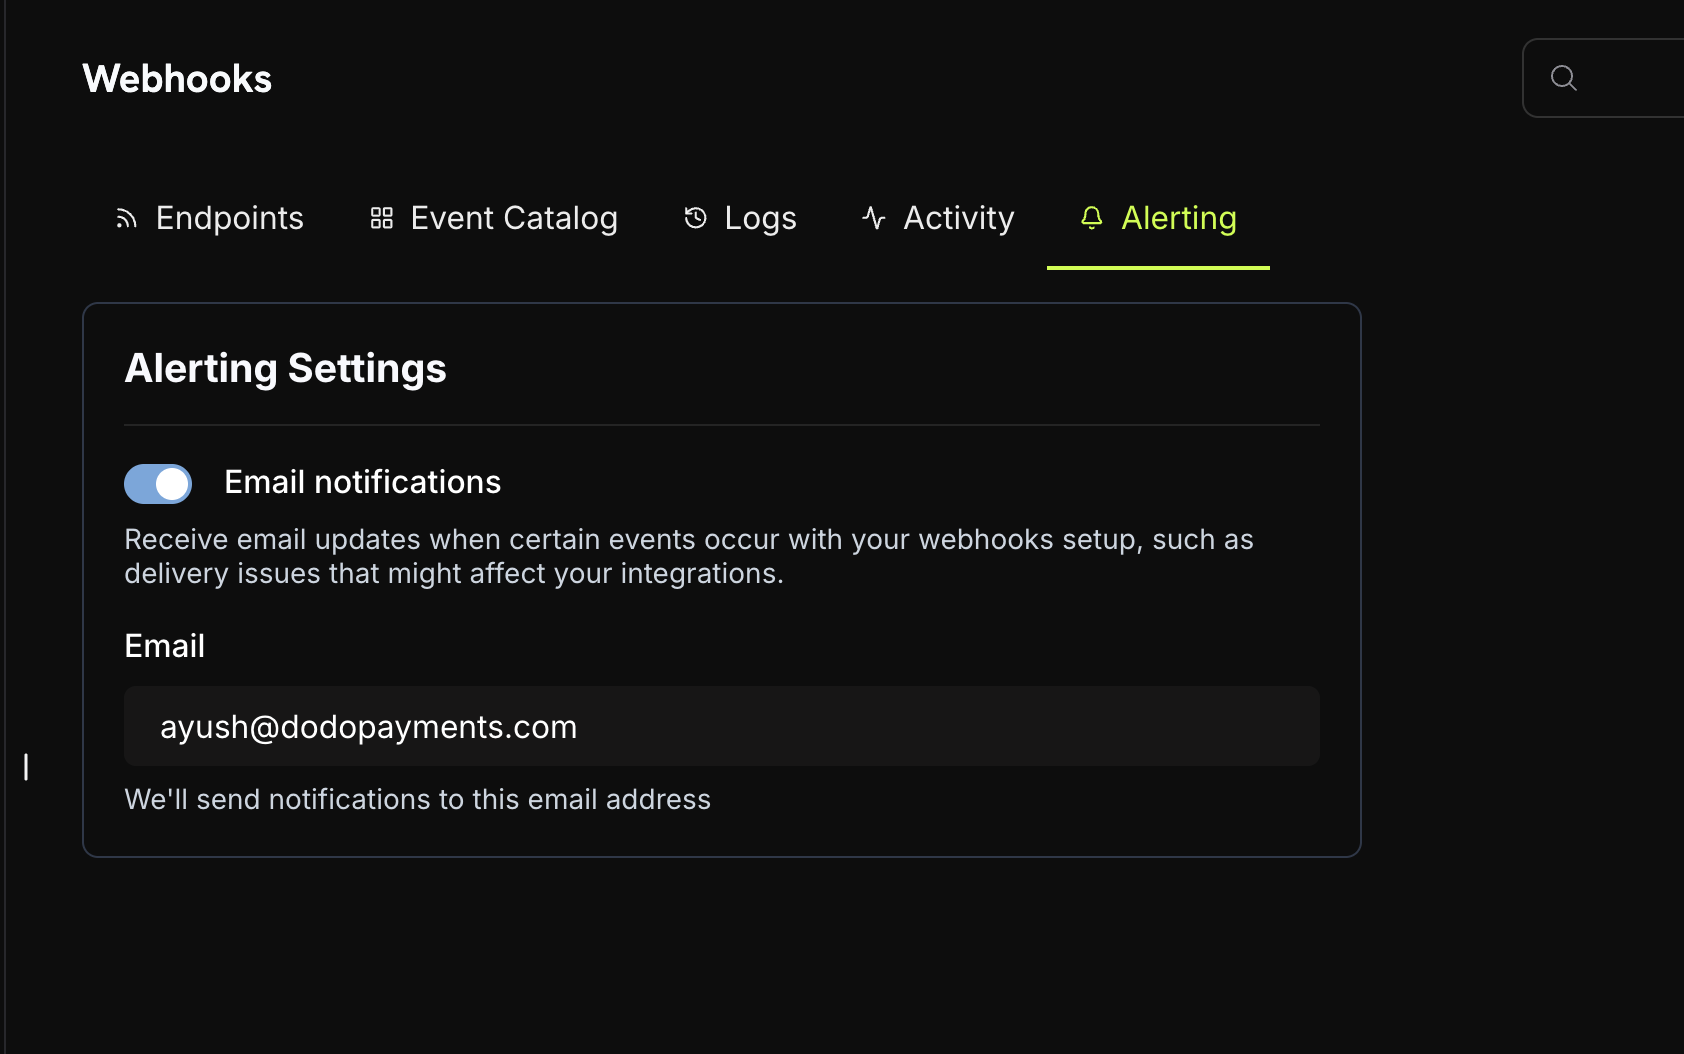
Enable Email Alerts
Navigate to Alerting Settings
Go to your Dodo Payments Dashboard and navigate to Dashboard → Webhooks → Alerting.
Enable Email Notifications
Toggle on Email notifications to start receiving alerts about webhook delivery issues.
Deploy to Cloud Platforms
Ready to deploy your webhook handler to production? We provide platform-specific guides to help you deploy webhooks to popular cloud providers with best practices for each platform.Vercel
Deploy webhooks to Vercel with serverless functions
Cloudflare Workers
Run webhooks on Cloudflare’s edge network
Supabase Edge Functions
Integrate webhooks with Supabase
Netlify Functions
Deploy webhooks as Netlify serverless functions
Each platform guide includes environment setup, signature verification, and deployment steps specific to that provider.
Related API Reference
Create Webhook
API reference for creating and configuring webhook endpoints programmatically
List Webhooks
API reference for retrieving and managing your webhook endpoints