메인 콘텐츠로 건너뛰기

개요

Dodo Payments Checkout SDK는 웹 애플리케이션에 결제 오버레이를 통합하는 매끄러운 방법을 제공합니다. TypeScript와 현대 웹 표준으로 구축되어 있으며, 실시간 이벤트 처리 및 사용자 정의 가능한 테마를 통해 결제를 처리하는 강력한 솔루션을 제공합니다.
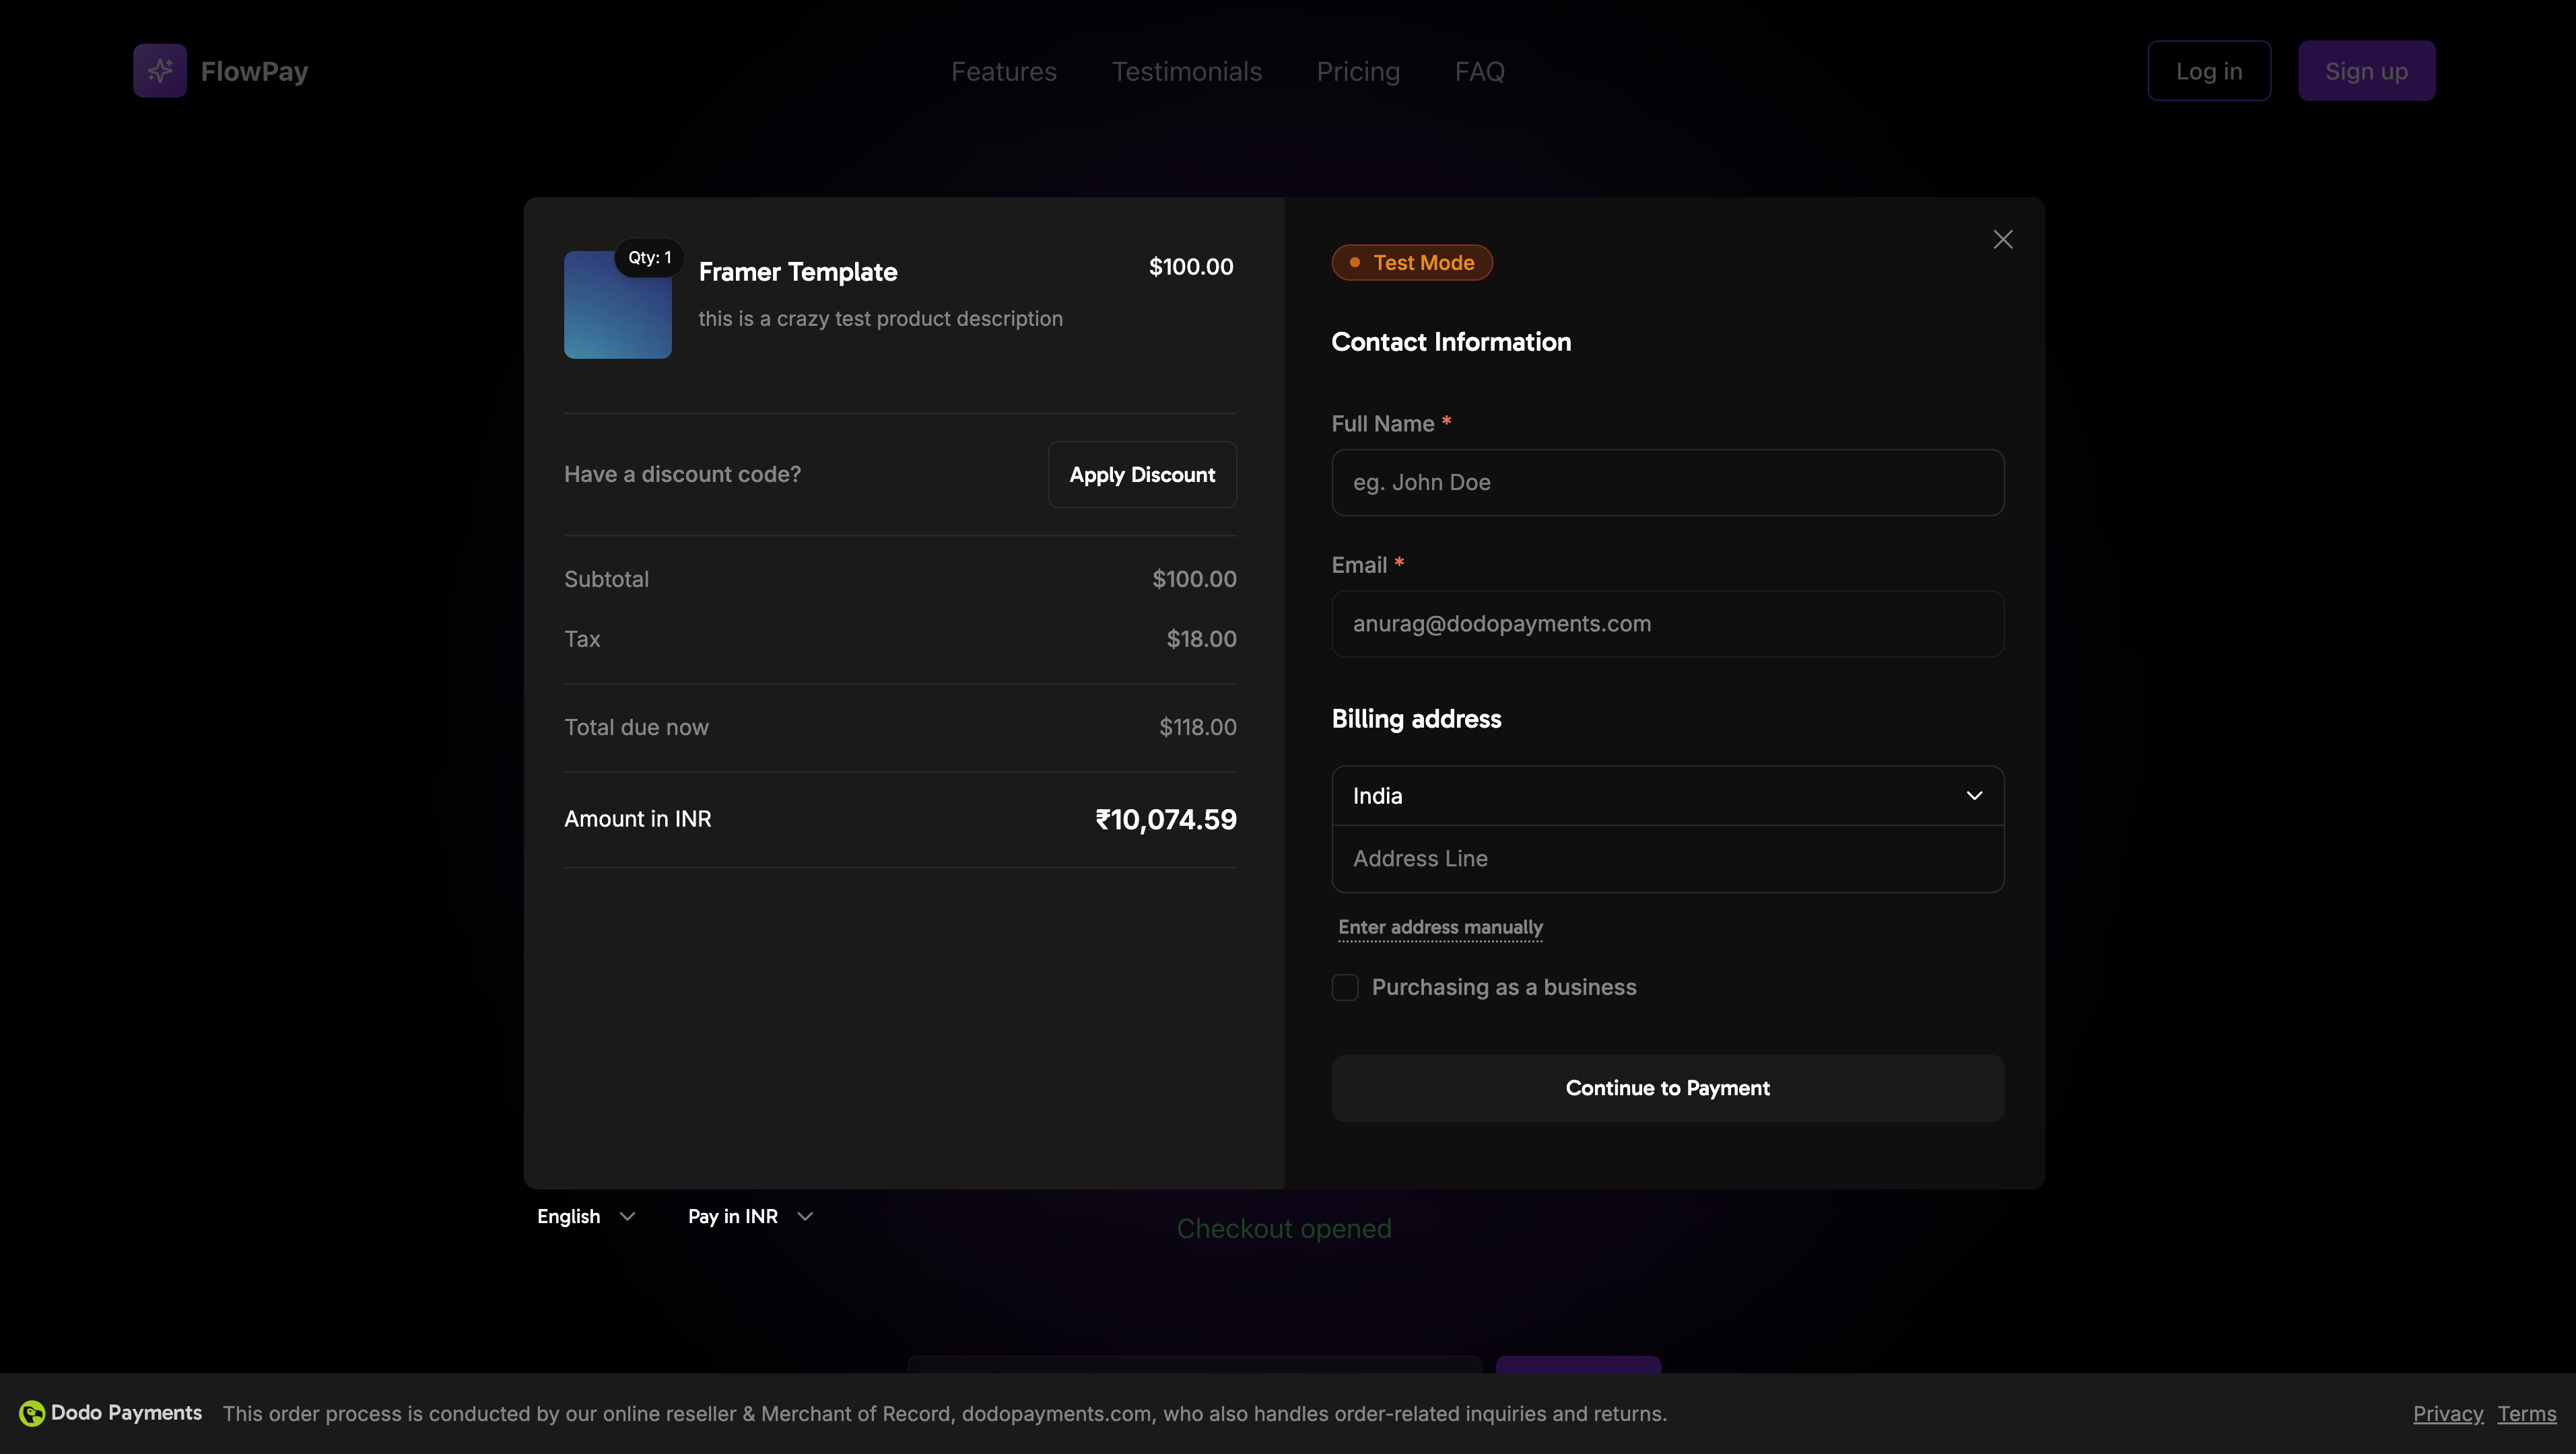
오버레이 체크아웃 커버 이미지

데모

인터랙티브 데모

실시간 데모에서 오버레이 체크아웃을 확인하세요.

빠른 시작

Dodo Payments Checkout SDK를 몇 줄의 코드로 시작하세요:
import { DodoPayments } from "dodopayments-checkout";

// Initialize the SDK
DodoPayments.Initialize({
  mode: "test", // 'test' or 'live'
  displayType: "overlay", // Optional: defaults to 'overlay' for overlay checkout
  onEvent: (event) => {
    console.log("Checkout event:", event);
  },
});

// Open checkout
DodoPayments.Checkout.open({
  checkoutUrl: "https://checkout.dodopayments.com/session/cks_123"
});
체크아웃 세션 생성 API에서 체크아웃 URL을 가져오세요.

단계별 통합 가이드

1

SDK 설치

선호하는 패키지 관리자를 사용하여 Dodo Payments Checkout SDK를 설치하세요:
npm install dodopayments-checkout
2

SDK 초기화

주로 메인 컴포넌트나 앱 진입점에서 애플리케이션 내에서 SDK를 초기화하세요:
import { DodoPayments } from "dodopayments-checkout";

DodoPayments.Initialize({
  mode: "test", // Change to 'live' for production
  displayType: "overlay", // Optional: defaults to 'overlay' for overlay checkout
  onEvent: (event) => {
    console.log("Checkout event:", event);
    
    // Handle different events
    switch (event.event_type) {
      case "checkout.opened":
        // Checkout overlay has been opened
        break;
      case "checkout.closed":
        // Checkout has been closed
        break;
      case "checkout.error":
        // Handle errors
        console.error("Checkout error:", event.data?.message);
        break;
    }
  },
});
체크아웃을 열기 전에 항상 SDK를 초기화하세요. 초기화는 애플리케이션이 로드될 때 한 번만 발생해야 합니다.
3

체크아웃 버튼 컴포넌트 생성

체크아웃 오버레이를 여는 컴포넌트를 생성하세요:
// components/CheckoutButton.tsx
"use client";

import { Button } from "@/components/ui/button";
import { DodoPayments } from "dodopayments-checkout";
import { useEffect, useState } from "react";

export function CheckoutButton() {
  const [isLoading, setIsLoading] = useState(false);

  useEffect(() => {
    // Initialize the SDK
    DodoPayments.Initialize({
      mode: "test",
      displayType: "overlay",
      onEvent: (event) => {
        switch (event.event_type) {
          case "checkout.opened":
            setIsLoading(false);
            break;
          case "checkout.error":
            setIsLoading(false);
            console.error("Checkout error:", event.data?.message);
            break;
        }
      },
    });
  }, []);

  const handleCheckout = async () => {
    try {
      setIsLoading(true);
      await DodoPayments.Checkout.open({
        checkoutUrl: "https://checkout.dodopayments.com/session/cks_123"
      });
    } catch (error) {
      console.error("Failed to open checkout:", error);
      setIsLoading(false);
    }
  };

  return (
    <Button 
      onClick={handleCheckout}
      disabled={isLoading}
    >
      {isLoading ? "Loading..." : "Checkout Now"}
    </Button>
  );
}
4

페이지에 체크아웃 추가

애플리케이션에서 체크아웃 버튼 컴포넌트를 사용하세요:
// app/page.tsx
import { CheckoutButton } from "@/components/CheckoutButton";

export default function Home() {
  return (
    <main className="flex min-h-screen flex-col items-center justify-center p-24">
      <h1>Welcome to Our Store</h1>
      <CheckoutButton />
    </main>
  );
}
5

성공 및 실패 페이지 처리

체크아웃 리디렉션을 처리할 페이지를 생성하세요:
// app/success/page.tsx
export default function SuccessPage() {
  return (
    <div className="flex min-h-screen flex-col items-center justify-center">
      <h1>Payment Successful!</h1>
      <p>Thank you for your purchase.</p>
    </div>
  );
}

// app/failure/page.tsx
export default function FailurePage() {
  return (
    <div className="flex min-h-screen flex-col items-center justify-center">
      <h1>Payment Failed</h1>
      <p>Please try again or contact support.</p>
    </div>
  );
}
6

통합 테스트

  1. 개발 서버를 시작하세요:
npm run dev
  1. 체크아웃 흐름을 테스트하세요:
    • 체크아웃 버튼 클릭
    • 오버레이가 나타나는지 확인
    • 테스트 자격 증명을 사용하여 결제 흐름 테스트
    • 리디렉션이 올바르게 작동하는지 확인
브라우저 콘솔에 체크아웃 이벤트가 기록되는 것을 확인해야 합니다.
7

라이브로 전환

프로덕션 준비가 되었을 때:
  1. 모드를 'live'로 변경하세요:
DodoPayments.Initialize({
  mode: "live",
  displayType: "overlay",
  onEvent: (event) => {
    console.log("Checkout event:", event);
  }
});
  1. 백엔드에서 라이브 체크아웃 세션을 사용하도록 체크아웃 URL을 업데이트하세요.
  2. 프로덕션에서 전체 흐름을 테스트하세요.
  3. 이벤트 및 오류를 모니터링하세요.

API 참조

구성

초기화 옵션

interface InitializeOptions {
  mode: "test" | "live";
  displayType?: "overlay" | "inline";
  onEvent: (event: CheckoutEvent) => void;
}
옵션유형필수설명
mode"test" | "live"환경 모드: 'test' 개발용, 'live' 운영용
displayType"overlay" | "inline"아니요표시 유형: 'overlay' 모달 체크아웃(기본값), 'inline' 임베디드 체크아웃
onEventfunction체크아웃 이벤트를 처리하는 콜백 함수

체크아웃 옵션

interface CheckoutOptions {
  checkoutUrl: string;
  options?: {
    showTimer?: boolean;
    showSecurityBadge?: boolean;
    manualRedirect?: boolean;
  };
}
옵션유형필수설명
checkoutUrlstring체크아웃 세션 생성 API에서 가져온 체크아웃 세션 URL
options.showTimerboolean아니요체크아웃 타이머를 표시하거나 숨깁니다. 기본값은 true입니다. 비활성화하면 세션이 만료될 때 checkout.link_expired 이벤트를 받게 됩니다.
options.showSecurityBadgeboolean아니요보안 배지를 표시하거나 숨깁니다. 기본값은 true입니다.
options.manualRedirectboolean아니요활성화되면 체크아웃이 완료 후 자동으로 리디렉션되지 않습니다. 대신, 리디렉션을 직접 처리하기 위해 checkout.statuscheckout.redirect_requested 이벤트를 받게 됩니다.

메서드

체크아웃 열기

지정된 체크아웃 세션 URL로 체크아웃 오버레이를 엽니다.
DodoPayments.Checkout.open({
  checkoutUrl: "https://checkout.dodopayments.com/session/cks_123"
});
체크아웃 동작을 사용자 정의하기 위해 추가 옵션을 전달할 수도 있습니다:
DodoPayments.Checkout.open({
  checkoutUrl: "https://checkout.dodopayments.com/session/cks_123",
  options: {
    showTimer: false,
    showSecurityBadge: false,
    manualRedirect: true,
  },
});
manualRedirect을 사용할 때, onEvent 콜백에서 체크아웃 완료를 처리하세요:
DodoPayments.Initialize({
  mode: "test",
  displayType: "overlay",
  onEvent: (event) => {
    if (event.event_type === "checkout.status") {
      const status = event.data?.message?.status;
      // Handle status: "succeeded", "failed", or "processing"
    }
    if (event.event_type === "checkout.redirect_requested") {
      const redirectUrl = event.data?.message?.redirect_to;
      // Redirect the customer manually
      window.location.href = redirectUrl;
    }
    if (event.event_type === "checkout.link_expired") {
      // Handle expired checkout session
    }
  },
});

체크아웃 닫기

프로그램적으로 체크아웃 오버레이를 닫습니다.
DodoPayments.Checkout.close();

상태 확인

현재 체크아웃 오버레이가 열려 있는지 여부를 반환합니다.
const isOpen = DodoPayments.Checkout.isOpen();
// Returns: boolean

이벤트

SDK는 onEvent 콜백을 통해 수신할 수 있는 실시간 이벤트를 제공합니다:

체크아웃 상태 이벤트 데이터

manualRedirect이 활성화되면, 다음 데이터와 함께 checkout.status 이벤트를 받습니다:
interface CheckoutStatusEventData {
  message: {
    status?: "succeeded" | "failed" | "processing";
  };
}

체크아웃 리디렉션 요청 이벤트 데이터

manualRedirect이 활성화되면, 다음 데이터와 함께 checkout.redirect_requested 이벤트를 받습니다:
interface CheckoutRedirectRequestedEventData {
  message: {
    redirect_to?: string;
  };
}
DodoPayments.Initialize({
  onEvent: (event: CheckoutEvent) => {
    switch (event.event_type) {
      case "checkout.opened":
        // Checkout overlay has been opened
        break;
      case "checkout.payment_page_opened":
        // Payment page has been displayed
        break;
      case "checkout.customer_details_submitted":
        // Customer and billing details submitted
        break;
      case "checkout.closed":
        // Checkout has been closed
        break;
      case "checkout.redirect":
        // Checkout will perform a redirect
        break;
      case "checkout.error":
        // An error occurred
        console.error("Error:", event.data?.message);
        break;
      case "checkout.link_expired":
        // Checkout session has expired (only when showTimer is false)
        break;
      case "checkout.status":
        // Checkout status update (only when manualRedirect is enabled)
        const status = event.data?.message?.status;
        break;
      case "checkout.redirect_requested":
        // Redirect requested (only when manualRedirect is enabled)
        const redirectUrl = event.data?.message?.redirect_to;
        break;
    }
  }
});
이벤트 유형설명
checkout.opened체크아웃 오버레이가 열렸습니다
checkout.payment_page_opened결제 페이지가 표시되었습니다
checkout.customer_details_submitted고객 및 청구 세부정보가 제출되었습니다
checkout.closed체크아웃 오버레이가 닫혔습니다
checkout.redirect체크아웃이 리디렉션을 수행합니다
checkout.error체크아웃 중 오류가 발생했습니다
checkout.link_expired체크아웃 세션이 만료되었을 때 발생합니다. showTimerfalse로 설정된 경우에만 수신됩니다.
checkout.statusmanualRedirect이 활성화되었을 때 발생합니다. 체크아웃 상태(succeeded, failed, 또는 processing)를 포함합니다.
checkout.redirect_requestedmanualRedirect이 활성화되었을 때 발생합니다. 고객을 리디렉션할 URL을 포함합니다.

구현 옵션

패키지 관리자 설치

npm, yarn 또는 pnpm을 통해 단계별 통합 가이드와 같이 설치합니다.

CDN 구현

빌드 단계 없이 빠른 통합을 위해 CDN을 사용할 수 있습니다:
<!DOCTYPE html>
<html lang="en">
<head>
    <meta charset="UTF-8">
    <meta name="viewport" content="width=device-width, initial-scale=1.0">
    <title>Dodo Payments Checkout</title>
    
    <!-- Load DodoPayments -->
    <script src="https://cdn.jsdelivr.net/npm/dodopayments-checkout@latest/dist/index.js"></script>
    <script>
        // Initialize the SDK
        DodoPaymentsCheckout.DodoPayments.Initialize({
            mode: "test", // Change to 'live' for production
            displayType: "overlay",
            onEvent: (event) => {
                console.log('Checkout event:', event);
            }
        });
    </script>
</head>
<body>
    <button onclick="openCheckout()">Checkout Now</button>

    <script>
        function openCheckout() {
            DodoPaymentsCheckout.DodoPayments.Checkout.open({
                checkoutUrl: "https://checkout.dodopayments.com/session/cks_123"
            });
        }
    </script>
</body>
</html>

TypeScript 지원

SDK는 TypeScript로 작성되었으며 포괄적인 타입 정의를 포함합니다. 모든 공개 API는 더 나은 개발자 경험과 IntelliSense 지원을 위해 완전히 타입이 지정되어 있습니다.
import { DodoPayments, CheckoutEvent } from "dodopayments-checkout";

DodoPayments.Initialize({
  mode: "test",
  displayType: "overlay",
  onEvent: (event: CheckoutEvent) => {
    // event is fully typed
    console.log(event.event_type, event.data);
  },
});

오류 처리

SDK는 이벤트 시스템을 통해 자세한 오류 정보를 제공합니다. 항상 onEvent 콜백에서 적절한 오류 처리를 구현하세요:
DodoPayments.Initialize({
  mode: "test",
  displayType: "overlay",
  onEvent: (event: CheckoutEvent) => {
    if (event.event_type === "checkout.error") {
      console.error("Checkout error:", event.data?.message);
      // Handle error appropriately
      // You may want to show a user-friendly error message
      // or retry the checkout process
    }
    if (event.event_type === "checkout.link_expired") {
      // Handle expired checkout session
      console.warn("Checkout session has expired");
    }
  }
});
오류가 발생할 때 좋은 사용자 경험을 제공하기 위해 항상 checkout.error 이벤트를 처리하세요.

모범 사례

  1. 한 번 초기화: 애플리케이션이 로드될 때 SDK를 한 번 초기화하고, 매 체크아웃 시도 시 초기화하지 마세요.
  2. 오류 처리: 이벤트 콜백에서 항상 적절한 오류 처리를 구현하세요.
  3. 테스트 모드: 개발 중에는 test 모드를 사용하고, 운영 준비가 되었을 때만 live로 전환하세요.
  4. 이벤트 처리: 완전한 사용자 경험을 위해 모든 관련 이벤트를 처리하세요.
  5. 유효한 URL: 항상 체크아웃 세션 생성 API에서 유효한 체크아웃 URL을 사용하세요.
  6. TypeScript: 더 나은 타입 안전성과 개발자 경험을 위해 TypeScript를 사용하세요.
  7. 로딩 상태: 체크아웃이 열리는 동안 로딩 상태를 표시하여 UX를 개선하세요.
  8. 수동 리디렉션: 체크아웃 후 탐색에 대한 사용자 정의 제어가 필요할 때 manualRedirect을 사용하세요.
  9. 타이머 관리: 세션 만료를 수동으로 처리하려면 타이머(showTimer: false)를 비활성화하세요.

문제 해결

가능한 원인:
  • open() 호출 전에 SDK가 초기화되지 않음
  • 유효하지 않은 체크아웃 URL
  • 콘솔의 JavaScript 오류
  • 네트워크 연결 문제
해결 방법:
  • 체크아웃을 열기 전에 SDK 초기화가 발생하는지 확인하세요.
  • 콘솔 오류를 확인하세요.
  • 체크아웃 URL이 유효하고 체크아웃 세션 생성 API에서 가져온 것인지 확인하세요.
  • 네트워크 연결을 확인하세요.
가능한 원인:
  • 이벤트 핸들러가 제대로 설정되지 않음
  • 이벤트 전파를 방해하는 JavaScript 오류
  • SDK가 올바르게 초기화되지 않음
해결 방법:
  • Initialize()에서 이벤트 핸들러가 제대로 구성되었는지 확인하세요.
  • JavaScript 오류에 대한 브라우저 콘솔을 확인하세요.
  • SDK 초기화가 성공적으로 완료되었는지 확인하세요.
  • 간단한 이벤트 핸들러로 먼저 테스트하세요.
가능한 원인:
  • 애플리케이션 스타일과의 CSS 충돌
  • 테마 설정이 올바르게 적용되지 않음
  • 반응형 디자인 문제
해결 방법:
  • 브라우저 DevTools에서 CSS 충돌을 확인하세요.
  • 테마 설정이 올바른지 확인하세요.
  • 다양한 화면 크기에서 테스트하세요.
  • 오버레이와의 z-index 충돌이 없는지 확인하세요.

Apple Pay 활성화

Apple Pay를 사용하면 고객이 저장된 결제 방법을 사용하여 빠르고 안전하게 결제를 완료할 수 있습니다. 활성화되면 고객은 지원되는 장치에서 체크아웃 오버레이에서 직접 Apple Pay 모달을 시작할 수 있습니다.
Apple Pay는 iOS 17+, iPadOS 17+, macOS의 Safari 17+에서 지원됩니다.
생산 환경에서 도메인에 대해 Apple Pay를 활성화하려면 다음 단계를 따르세요:
1

Apple Pay 도메인 연관 파일 다운로드 및 업로드

Apple Pay 도메인 연관 파일을 다운로드하세요.파일을 /.well-known/apple-developer-merchantid-domain-association에 있는 웹 서버에 업로드하세요. 예를 들어, 웹사이트가 example.com인 경우, 파일을 https://example.com/well-known/apple-developer-merchantid-domain-association에서 사용할 수 있도록 하세요.
2

Apple Pay 활성화 요청

다음 정보를 포함하여 [email protected]에 이메일을 보내세요:
  • 귀하의 생산 도메인 URL (예: https://example.com)
  • 귀하의 도메인에 대해 Apple Pay 활성화를 요청합니다.
Apple Pay가 귀하의 도메인에 대해 활성화되면 1-2 영업일 이내에 확인을 받게 됩니다.
3

Apple Pay 가용성 확인

확인을 받은 후 체크아웃에서 Apple Pay를 테스트하세요:
  1. 지원되는 장치(iOS 17+, iPadOS 17+, 또는 macOS의 Safari 17+)에서 체크아웃을 엽니다.
  2. Apple Pay 버튼이 결제 옵션으로 나타나는지 확인합니다.
  3. 결제 흐름을 완전히 테스트합니다.
Apple Pay는 생산 환경에서 결제 옵션으로 나타나기 전에 귀하의 도메인에 대해 활성화되어야 합니다. Apple Pay를 제공할 계획이라면 라이브로 전환하기 전에 지원팀에 문의하세요.

브라우저 지원

Dodo Payments Checkout SDK는 다음 브라우저를 지원합니다:
  • Chrome (최신 버전)
  • Firefox (최신 버전)
  • Safari (최신 버전)
  • Edge (최신 버전)
  • IE11+

오버레이 vs 인라인 체크아웃

사용 사례에 맞는 체크아웃 유형을 선택하세요:
기능오버레이 체크아웃인라인 체크아웃
통합 깊이페이지 위의 모달페이지에 완전히 내장
레이아웃 제어제한적완전한 제어
브랜딩페이지와 분리매끄럽게
구현 노력낮음높음
최적빠른 통합, 기존 페이지사용자 정의 체크아웃 페이지, 높은 전환 흐름
기존 페이지에 최소한의 변경으로 빠른 통합을 위해 오버레이 체크아웃을 사용하세요. 체크아웃 경험과 매끄러운 브랜딩에 대한 최대 제어가 필요할 때는 인라인 체크아웃을 사용하세요.

관련 리소스

더 많은 도움이 필요하면 Discord 커뮤니티를 방문하거나 개발자 지원 팀에 문의하세요.