

यह tutorial email provider के रूप में Resend का उपयोग करता है। इसका free tier (प्रति month 3,000 emails) पूरे flow को बनाने और test करने के लिए पर्याप्त है। Billing pattern किसी भी provider के साथ काम करता है:
resend.emails.send को SendGrid, Postmark, Amazon SES या अपने SMTP relay के call से बदलें।- Dashboard में emails के लिए custom credit entitlement बनाएँ।
- Credits को subscription plan और one-time top-up product से attach करें।
- Resend के ज़रिए email भेजें और ledger entry के साथ प्रति send एक credit debit करें।
- अपने frontend से customer का live credit balance पढ़ें।
- Dodo Payments webhooks को verify करें और balance शून्य होने से पहले customers को चेतावनी देने के लिए
credit.balance_lowhandle करें।
हम क्या बना रहे हैं
MailKit दो products बेचता है:
Unit one email = one credit है। Customers को tokens, batches या weighted units के बारे में सोचने की ज़रूरत नहीं है। उन्हें दिखता है: “इस month में 4,231 emails बाकी हैं।”
शुरू करने से पहले आपको चाहिए:
- Dodo Payments account। सब कुछ test mode में बनाएँ।
- Free Resend account और API key।
- Node.js 22 या बाद का version और TypeScript का working knowledge।
Step 1: अपना Email Credit Entitlement बनाएँ
Credit entitlement उस unit को define करता है जिसे MailKit बेचता है: एक email send।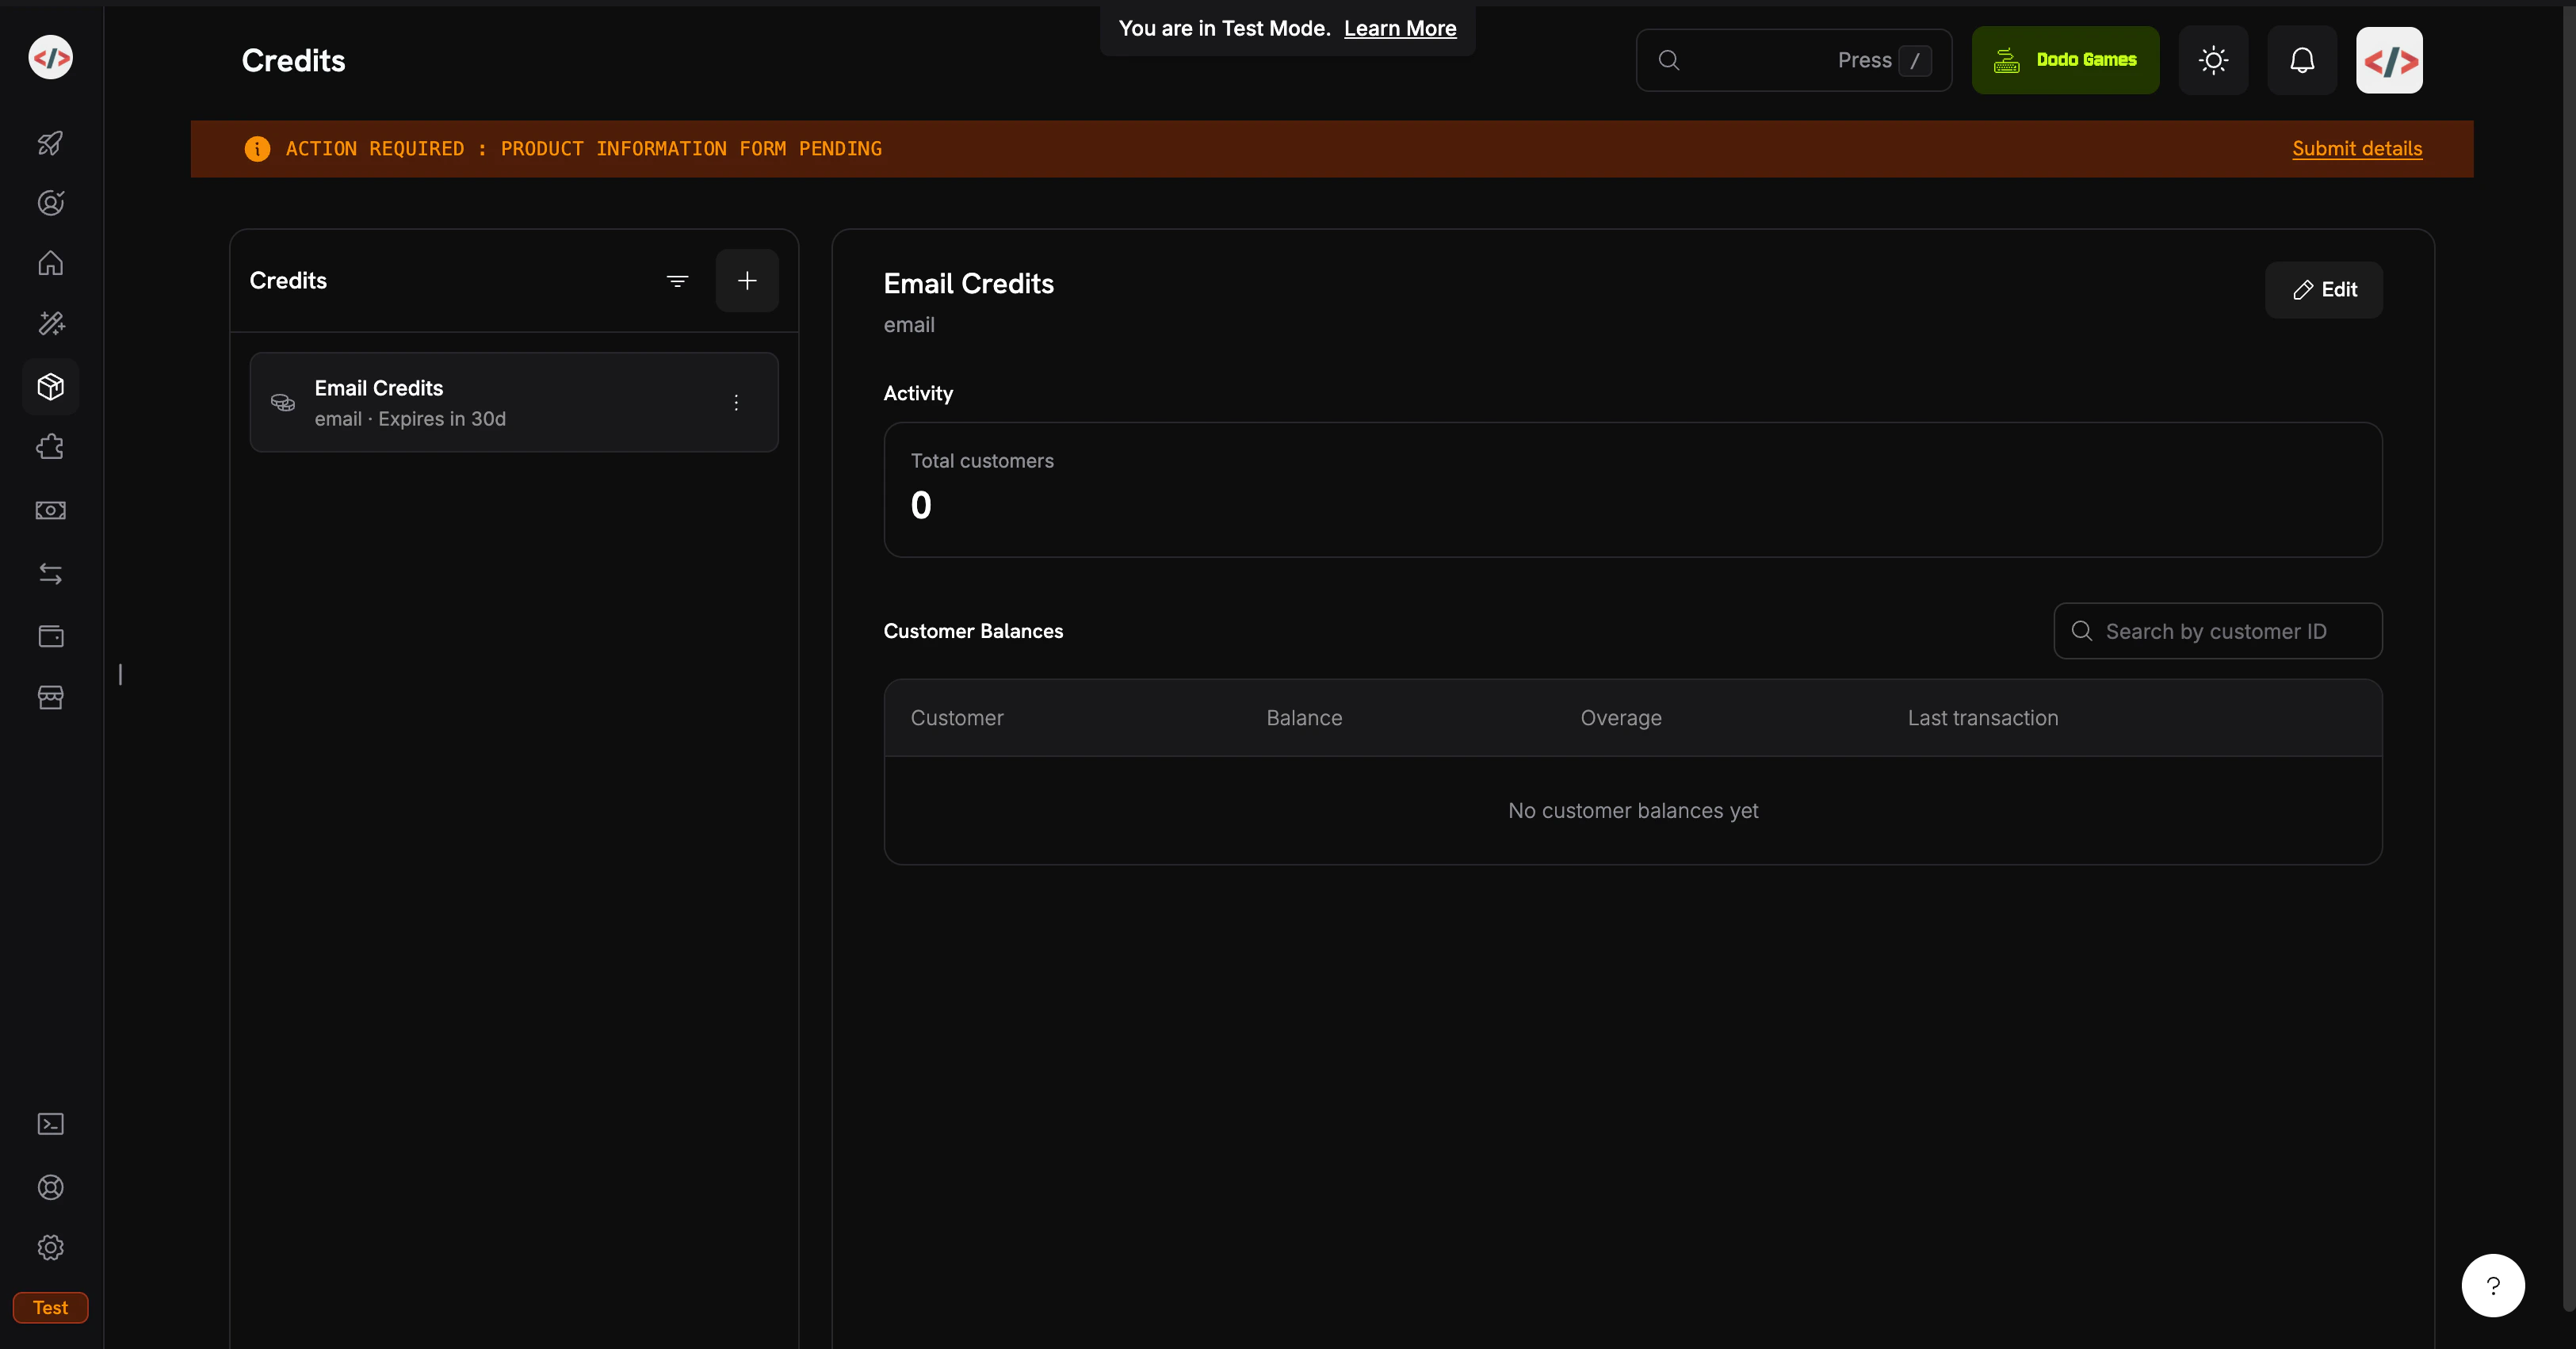
The Credits tab under Products lists all your credit entitlements.
1
Open the Credits Section
- Dodo Payments dashboard में log in करें।
- Sidebar में Products पर click करें।
- Credits tab चुनें।
- Create Credit पर click करें।
2
Configure the Credit Unit
ये values दर्ज करें:Credit Name:
Email CreditsCredit Type: Custom UnitUnit Name: emailDefine Precision: 0। Email एक whole unit है, इसलिए balance में decimals की आवश्यकता कभी नहीं होगी।Credit Expiry: 30 days। Unused credits जारी होने के 30 दिन बाद expire हो जाते हैं।3
Leave the Other Defaults
Credit flow को सरल रखने के लिए यह tutorial rollover और overage को off रखता है। बाद में इन्हें credit पर या प्रत्येक product के credit attachment पर on कर सकते हैं।
4
Save and Copy the Credit ID
Create Credit पर click करें। Credit खोलें और उसकी ID copy करें, जो
cde_ से शुरू होती है। Backend इसका उपयोग balance reads और ledger entries के लिए करता है।Email Credits entitlement तैयार है। अब वे products बनाएँ जो इसे customers को grant करेंगे।Step 2: Plan और Top-Up Pack बनाएँ
एक हीEmail Credits entitlement attach करने वाले दो products बनाएँ: एक Subscription plan जो प्रत्येक billing cycle में 5,000 emails grant करे, और एक One Time top-up जो आवश्यकता पर 5,000 और जोड़ दे।
MailKit Plan ($19/month, 5,000 Emails)
1
Create the Subscription
- Products पर जाएँ और Add Product पर click करें।
- Product details दर्ज करें:
MailKit PlanDescription: 5,000 transactional emails per month.- Pricing Type के अंतर्गत Subscription चुनें।
- Recurring price सेट करें:
19.00Repeat payment every: 1 monthCurrency: USD2
Attach the Email Credit Entitlement
Entitlements section में Credits के पास Attach पर click करें और configure करें:Select credits:
Email CreditsCredits issued per billing cycle: 5000Low Balance Threshold (%): 20। जब balance प्रति cycle जारी किए गए credits के 20% से कम होता है, यानी 1,000 emails, Dodo Payments credit.balance_low भेजता है।Import Default Credit Settings: on रखें, ताकि product Step 1 में सेट की गई 30-day expiry का उपयोग करे।Product में credit जोड़ें, फिर product save करें। Product ID copy करें, जो pdt_ से शुरू होती है।Plan: $19/month, जिसमें प्रत्येक billing cycle में 5,000 emails जारी होते हैं।
Top-Up Pack ($9 One-Time, 5,000 Emails)
1
Create a One-Time Product
- Products पर जाएँ और Add Product पर click करें।
- Product details दर्ज करें:
Email Top-Up PackDescription: Add 5,000 emails to your MailKit balance.- Pricing Type के अंतर्गत One Time चुनें।
- Price सेट करें:
9.00Currency: USD2
Attach the Credit Grant
Entitlements section में Credits के पास Attach पर click करें और configure करें:Product save करें और उसकी ID copy करें।
- Select credits:
Email Credits - No of credits issued:
5000
One-time product को अपनी expiry वाले credits मिलते हैं: purchase से 30 दिन बाद, यानी Step 1 में सेट किए गए default के अनुसार। Top-up credits subscription credits में जुड़ते हैं; वे उन्हें replace नहीं करते।
Top-Up Pack: $9 में 5,000 emails, payment सफल होने के बाद balance में जोड़े जाते हैं।
Step 3: Backend सेट अप करें
ऐसा Express server बनाएँ जो checkouts बनाए, email भेजे, balances पढ़े और webhooks receive करे।1
Initialize the Project
package.json में dev script जोड़ें:2
Configure Environment Variables
Developer → API Keys से test mode API key और Steps 1 और 2 की IDs लेकर Webhook endpoint बनाने के बाद Step 4 में
.env बनाएँ:.env
DODO_PAYMENTS_WEBHOOK_KEY भरेंगे। Resend API key resend.com/api-keys पर बनाएँ।3
Build the Server
Project root में
server.ts बनाएँ। Server पाँच routes expose करता है: subscribe checkout, top-up checkout, balance read, send और webhook receiver।Backend तैयार है: subscribe, top-up, balance, send और webhook handler।
4
Add a Demo UI
public/index.html बनाएँ। यह हर route को एक simple form से call करता है, ताकि आप browser में flow test कर सकें:Step 4: Webhook Endpoint जोड़ें
credit.balance_low event customers के credits समाप्त होने से पहले उन्हें चेतावनी देने देता है। इसके बिना customer को समस्या का पता तब चलता है जब email भेजना fail हो जाता है।
1
Expose Your Local Server
Webhooks के लिए public URL चाहिए। Development के दौरान ngrok या किसी अन्य tunnel का उपयोग करें:HTTPS forwarding URL copy करें, उदाहरण के लिए
https://1234abcd.ngrok-free.app।2
Register the Endpoint in Dodo Payments
- Developer → Webhooks पर जाएँ और Add endpoint पर click करें।
- URL
https://1234abcd.ngrok-free.app/webhooks/dodoदर्ज करें और अपना tunnel host इस्तेमाल करें। - Events
credit.added,credit.balance_lowऔरcredit.rolled_overचुनें। - Create endpoint पर click करें।
- Endpoint के Overview tab से signing secret copy करें और उसे
.envमेंDODO_PAYMENTS_WEBHOOK_KEYके रूप में डालें। - Server restart करें।
Step 5: पूरा Flow Test करें
1
Start the Server
MailKit running on http://localhost:3000 log करता है। वह URL browser में खोलें।2
Subscribe a Test Customer
- Section 1 में test email address और name दर्ज करें, फिर Get checkout link पर click करें।
- Link खोलें और test card से checkout पूरा करें।
- Dashboard में Customers पर जाएँ और नए customer की ID copy करें, जो
cus_से शुरू होती है।
Customer के balance में 5,000 emails हैं। पुष्टि करने के लिए Customers में customer खोलें और Credits tab चुनें।
3
Send an Email
- Customer ID को section 3 में paste करें।
- To को
delivered@resend.devपर ही रखें, यह Resend test address है जो हर message स्वीकार करता है। - Send पर click करें।
4
Trigger the Low-Balance Webhook
Threshold 20% है, यानी प्रति cycle जारी किए गए 5,000 emails में से 1,000। 4,000 emails भेजे बिना वहाँ पहुँचने के लिए dashboard में balance manually debit करें:
- Customers में customer खोलें, Credits tab चुनें और Email Credits चुनें।
- Apply Credit/Debit पर click करें, Debit चुनें और
4000दर्ज करें। अब balance ठीक 1,000 है, जो अभी threshold से कम नहीं है। - Demo से एक और email भेजें। Balance घटकर 999 हो जाता है।
Server ने webhook receive और verify कर लिया। Production में यहीं से आप customer को email भेजेंगे या in-app banner दिखाएँगे।
5
Buy a Top-Up Pack
- Customer ID को section 4 में paste करें।
- Buy 5,000 emails पर click करें और test checkout पूरा करें।
- Balance refresh करें। इसमें 5,000 की वृद्धि होगी।
Dodo Payments
credit.added event भेजता है जिसमें transaction_type: "credit_added" होता है। इसके पीछे grant में source_type: one_time होता है, जिसे List Customer Grants API से वापस पढ़ सकते हैं। Top-up credits subscription credits में जुड़ते हैं। Debits पहले expire होने वाले grant से और जब दो grants एक ही समय expire हों तो सबसे पुराने grant से लिए जाते हैं।6
Test the Hard Stop
Dashboard में balance को zero तक debit करें, फिर एक और email भेजने का प्रयास करें। Server
402 के साथ response देता है:402 आपके application का enforcement है। Dodo Payments balance API को source of truth मानें और client पर balance cache न करें।Troubleshooting
Webhook signature verification fails (401)
Webhook signature verification fails (401)
Signature raw HTTP body को cover करती है।
express.json() body को parsed object से replace करता है, इसलिए verification fail हो जाती है। /webhooks/dodo को express.raw({ type: 'application/json' }) के साथ app.use(express.json()) line से ऊपर register करें। फिर जाँचें कि DODO_PAYMENTS_WEBHOOK_KEY endpoint के Overview tab पर मौजूद signing secret से match करता है।Balance is 0, customer not found, or credits don't deduct
Balance is 0, customer not found, or credits don't deduct
इन तीन चीज़ों को इसी क्रम में जाँचें:
- Customer ने checkout पूरा किया। Credits checkout session बनने पर नहीं, payment सफल होने पर जारी होते हैं।
.envमेंCREDIT_ENTITLEMENT_IDproduct से attached credit से match करता है। Balance और ledger calls इसी ID का उपयोग करते हैं, इसलिए mismatch होने पर कोई दूसरा credit read या debit होगा।- आपके द्वारा पास किया गया
customer_idDodo Payments customer ID है (यहcus_से शुरू होती है), आपके अपने database की ID नहीं।
Resend rejects the recipient
Resend rejects the recipient
Test sender
onboarding@resend.dev केवल आपके Resend account के email address या delivered@resend.dev पर deliver करता है। किसी अन्य को भेजने के लिए verify a domain करें और उस domain पर मौजूद from address का उपयोग करें।