

このチュートリアルでは、terminal applicationのサンプルコードを使用します。コードはReact、Vue、Angularなどのframeworkや、applicationでユーザー入力を収集する方法に合わせて変更できます。
- OpenAI の
gpt-image-2.5-flareモデルで画像を生成します。 - 請求のために、すべての画像生成を追跡します。
- 顧客が生成した画像に対して料金を請求します。
mediumとhighの2つの品質ティアに対応します。
構築するもの
PixelGen AIは次のように動作します。- サービス: OpenAI Image API を使用した AI 画像生成
- 料金モデル: 画像ごとの従量課金(1画像あたり $0.05)
- 無料ティア: 顧客1人あたり月10枚まで無料
- 品質オプション:
mediumとhighの品質の画像を同じ料金で提供
- Dodo Payments アカウント
- OpenAI API へのアクセス。GPT Image models を使用する前に、OpenAI による API Organization Verification が必要になる場合があります。
- Node.js 22 以降、および TypeScript と Node.js に関する実務知識
Step 1: Usage Meterを作成する
Dodo Payments dashboardで、serviceが生成するすべての画像を追跡するmeterを作成します。meterはbillable eventをカウントします。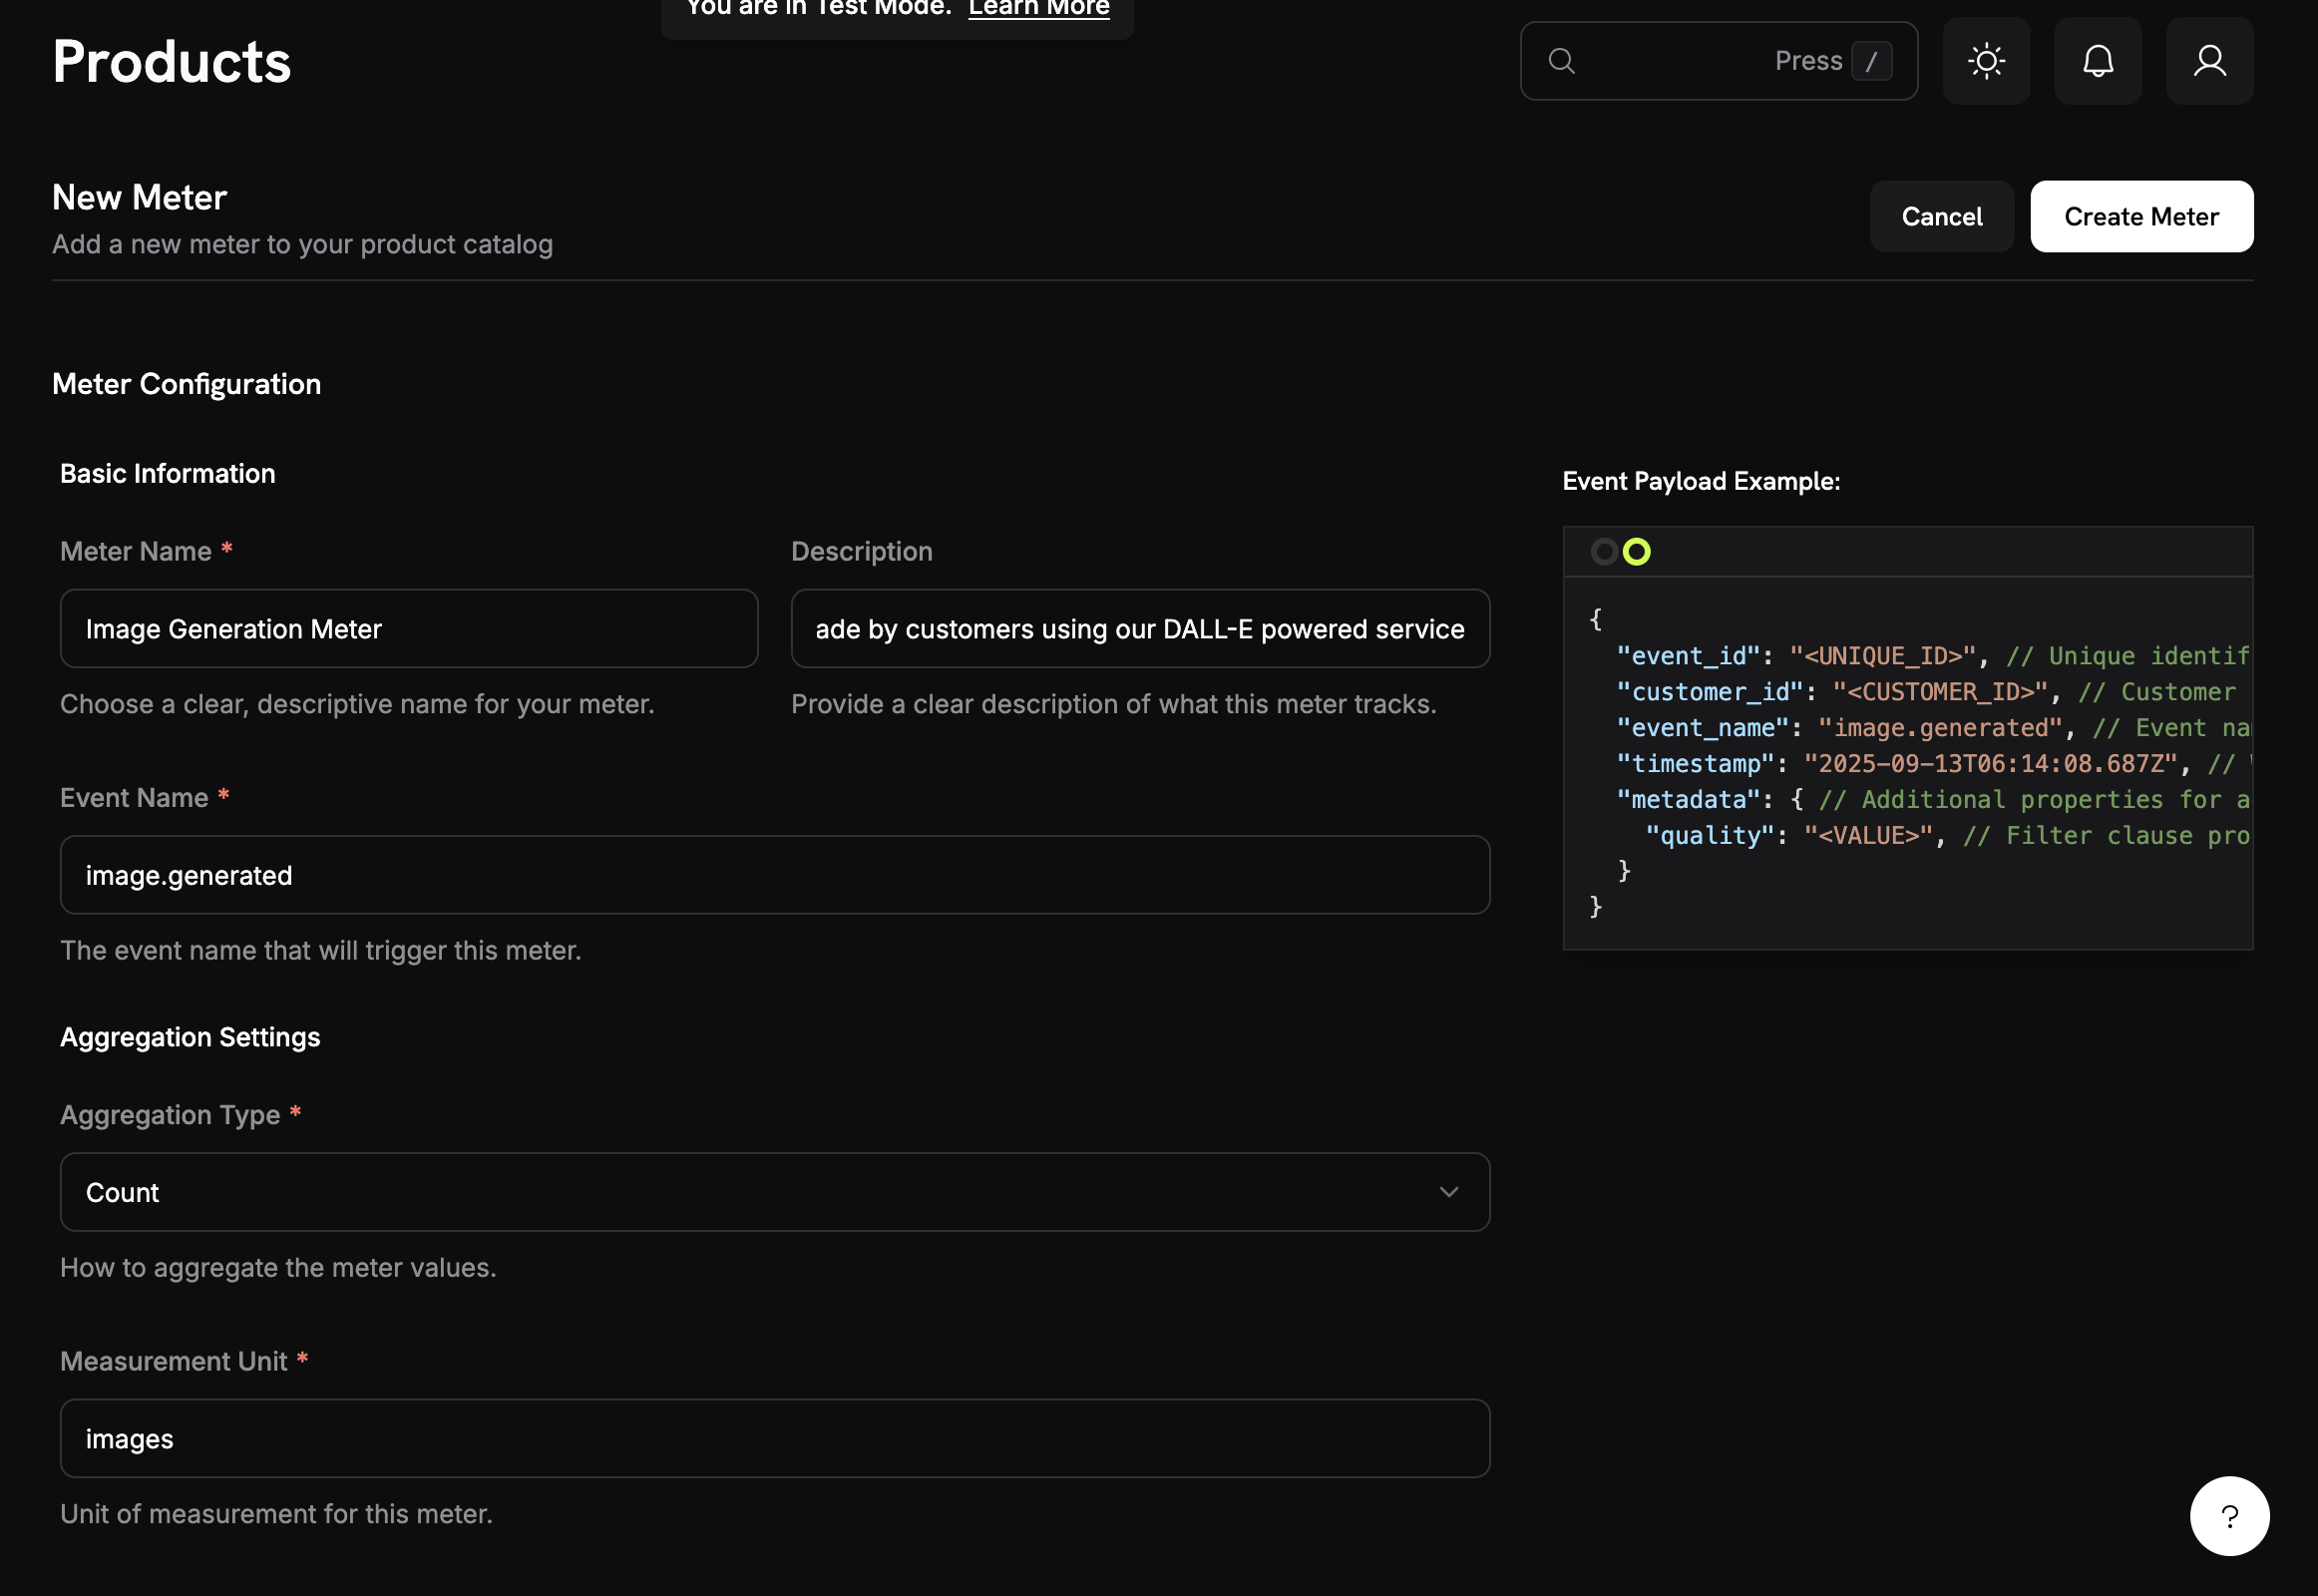
1
Open the Meters Section
- Dodo Payments dashboardにログインします。
- sidebarでProducts → Metersに移動します。
- Create Meterをクリックします。
2
Enter the Meter Details
PixelGen AIの詳細を入力します。Meter Name:
Image Generation Meter説明: Tracks each AI image generation request made by customers using our OpenAI image serviceEvent Name: image.generated3
Configure How Images Are Counted
meterがeventを結合する方法を制御するaggregationを設定します。Aggregation Type: CountMeasurement Unit:
imagesCountでは、サイズや生成時間ではなく、生成された画像数に基づいて請求します。成功した画像1枚がbillable unit 1つです。
4
Add Quality Filtering
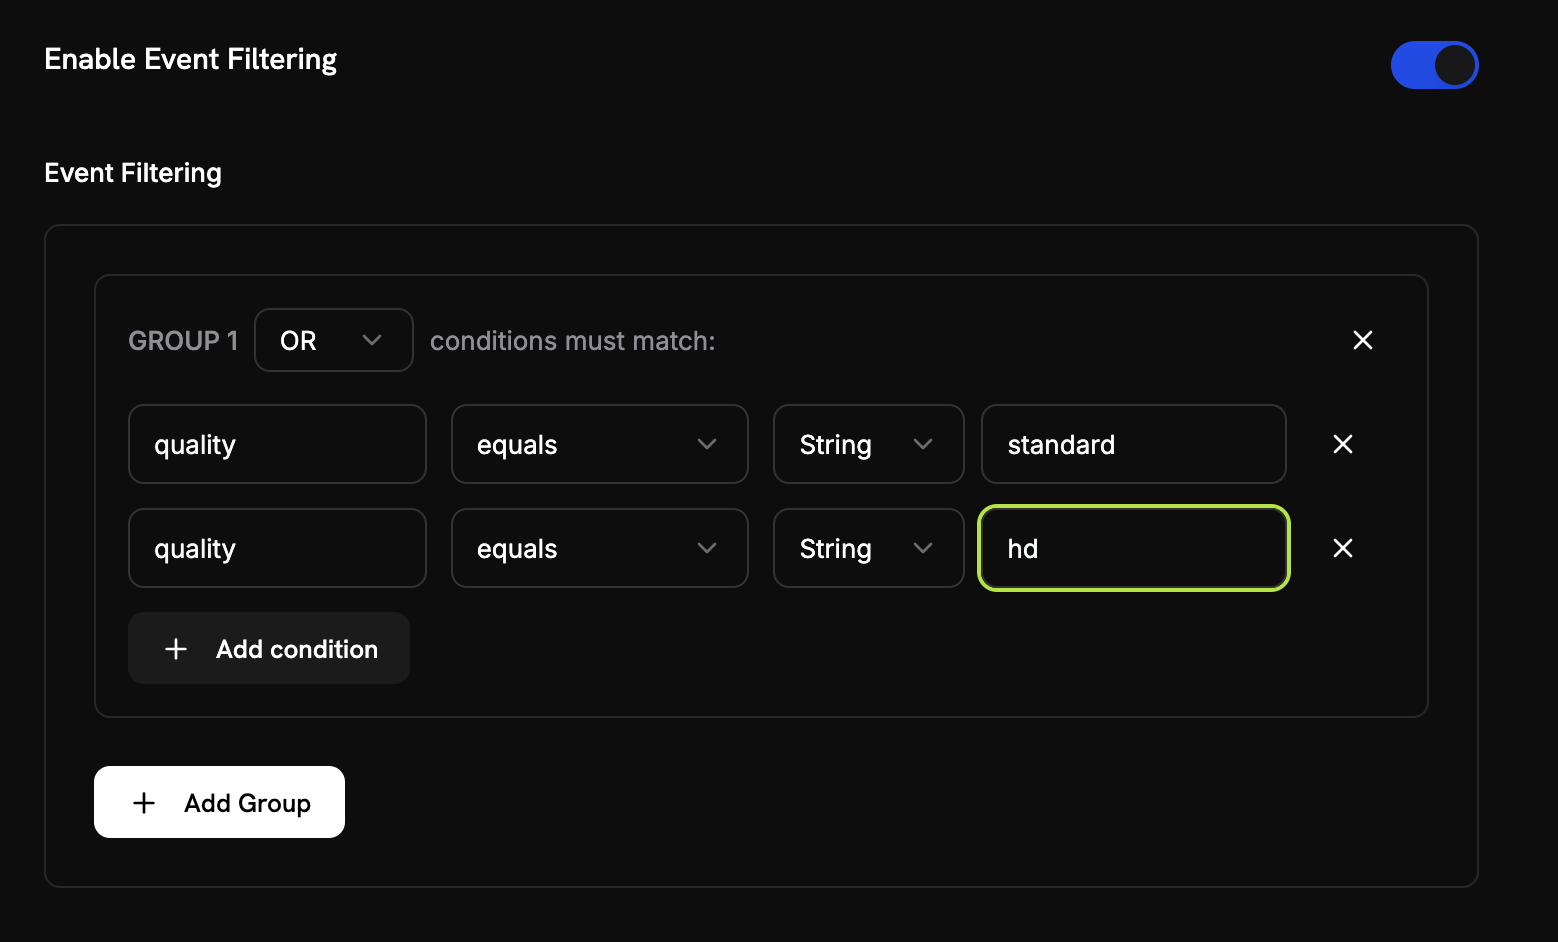
- Enable Event Filtering をオンにします。
- 一致ロジックを OR に設定し、いずれかの条件に一致した場合にイベントがカウントされるようにします。
- 最初の条件を追加します:
- Key:
quality - Operator:
equals - Value:
medium
- Key:
- Add condition をクリックして、2つ目の条件を追加します:
- Key:
quality - Operator:
equals - Value:
high
- Key:
5
Create Your Meter
- すべての設定が上記の値と一致していることを確認します。作成後のmeterは編集できません。
- Create Meterをクリックします。
Meterが作成されました。「Image Generation Meter」で画像生成のカウントを開始できます。次に、これをbilling productに接続します。
Step 2: Billing Productを作成する
価格を定義するproductを作成します。料金は画像1枚につき$0.05で、10枚まで無料です。このproductによってmeterをbillingに接続します。1
Navigate to Products
- Dodo Payments dashboardのsidebarでProductsをクリックします。
- Add Productをクリックします。
- Pricing TypeでUsage Based Billingを選択します。
2
Enter Product Details
次の値を入力します。Product Name:
PixelGen AI - Image GenerationDescription: AI-powered image generation service with pay-per-use billingProduct Image: 明確で関連性のある画像をアップロードします。nameとdescriptionはcustomer invoiceに表示されます。
3
Connect Your Meter
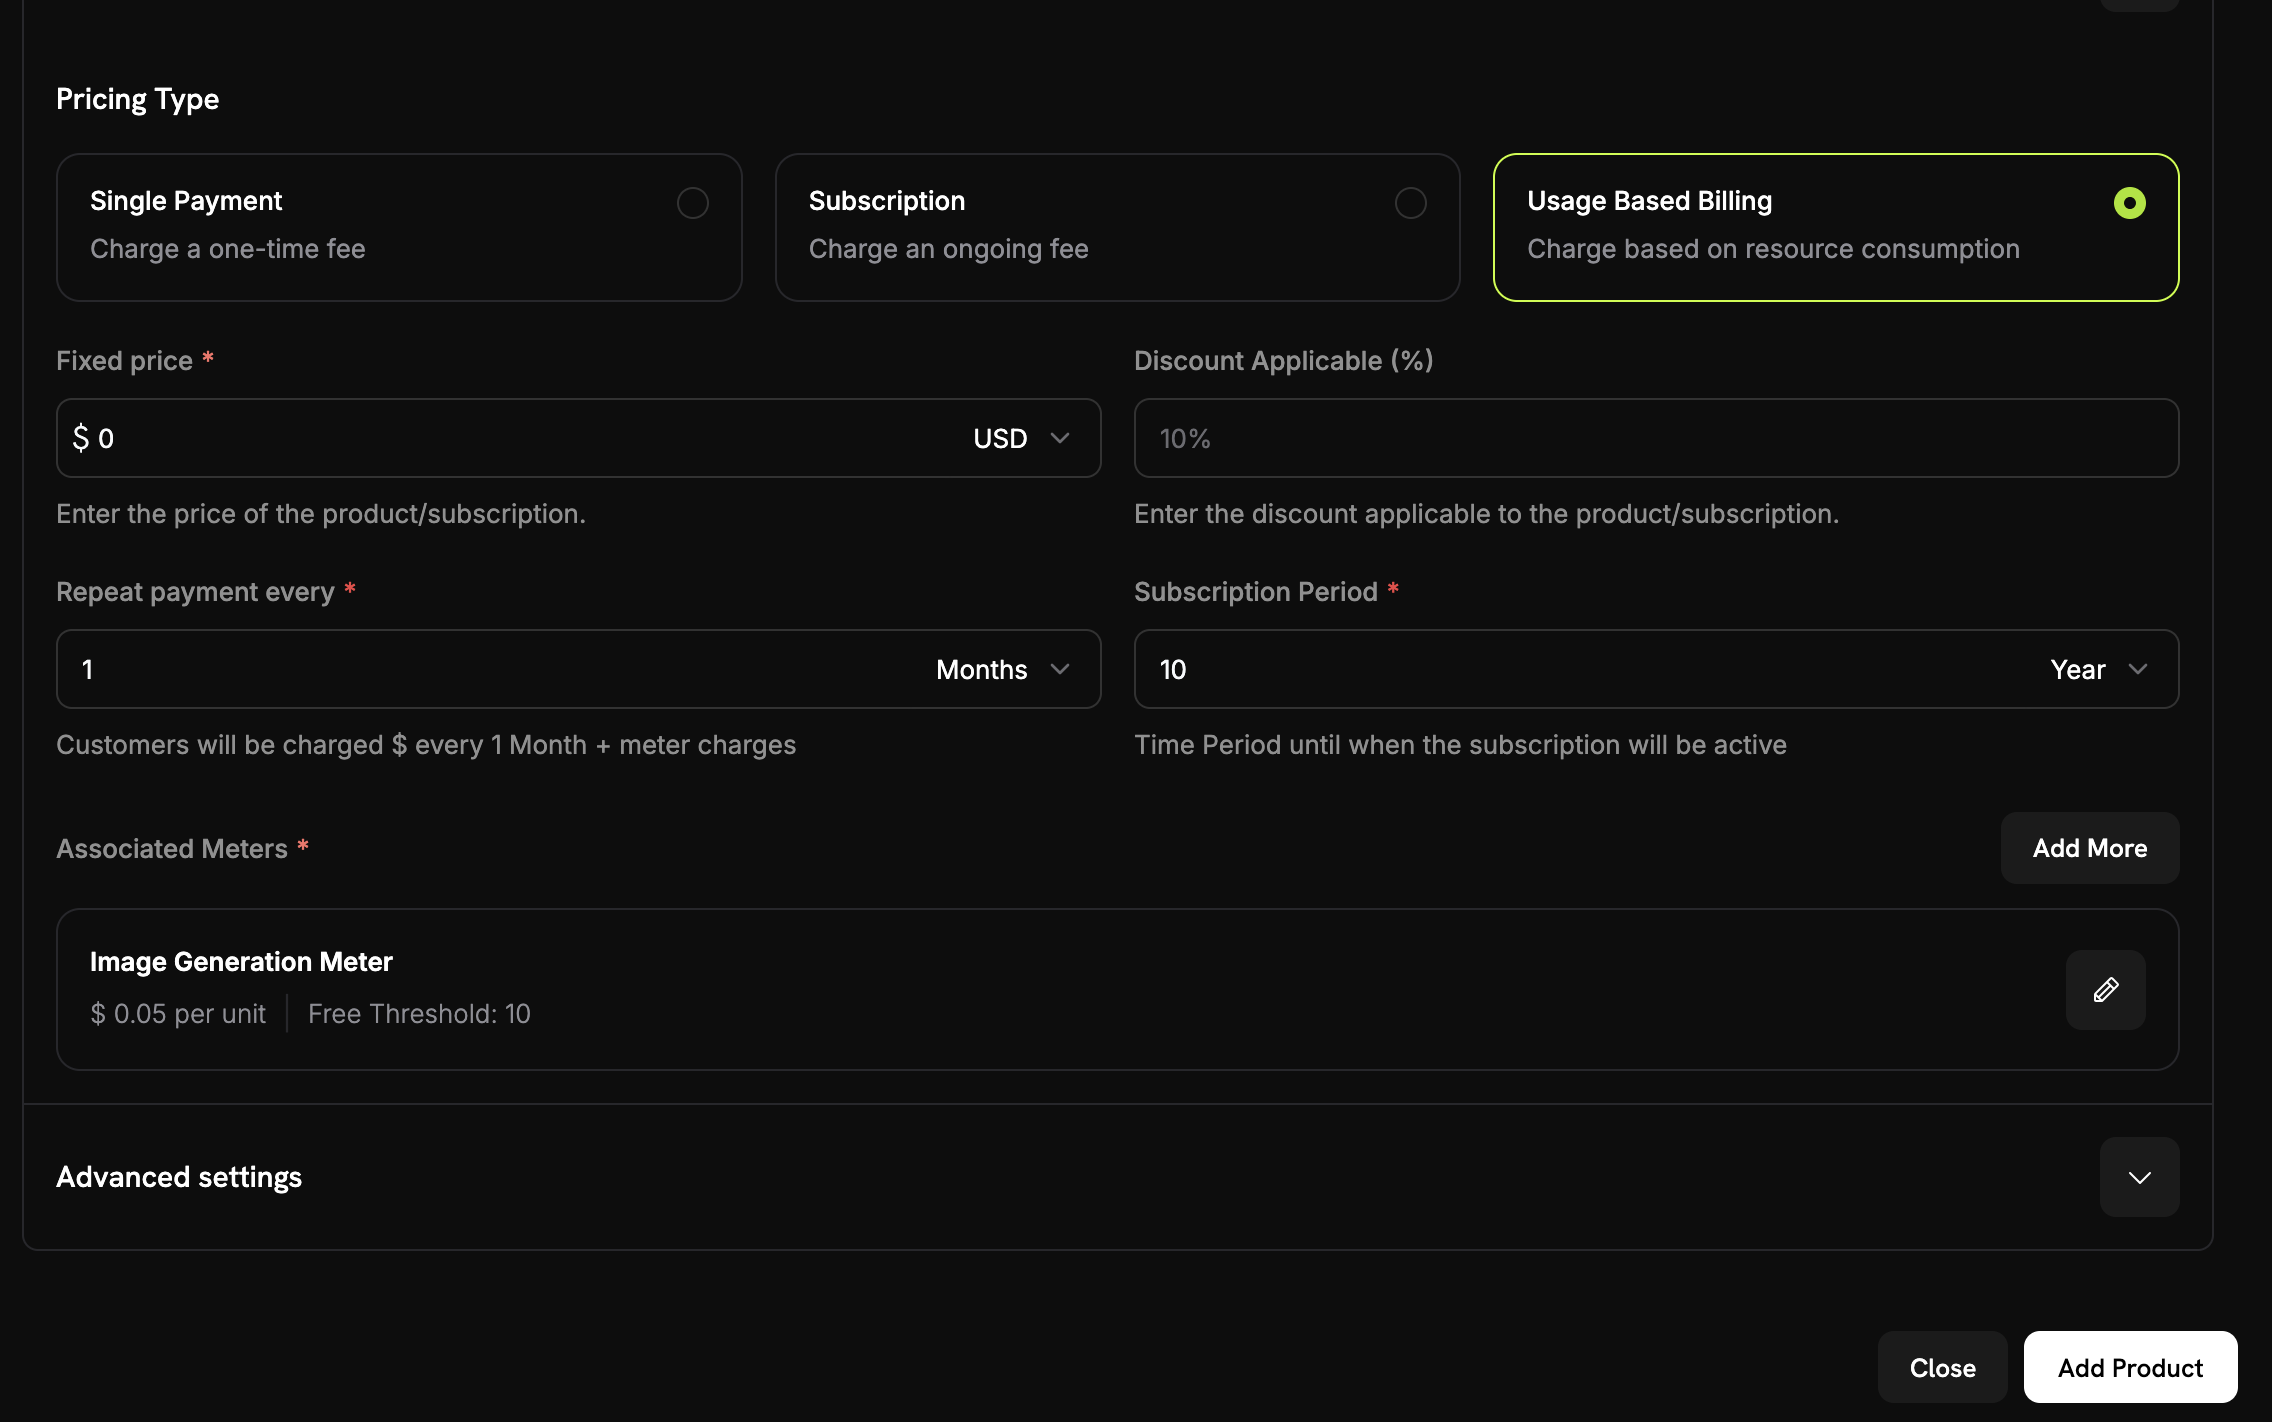
0に設定します。これにより、base feeなしで使用量分だけ顧客に請求できます。次に、作成したmeterをlinkします。- Associated Meters sectionまでスクロールします。
- Add metersをクリックします。
- dropdownから**「Image Generation Meter」**を選択します。
- product configurationにmeterが表示されていることを確認します。
meterがproductに接続されました。
4
Set Your Pricing
画像単位の価格とfree tierを定義します。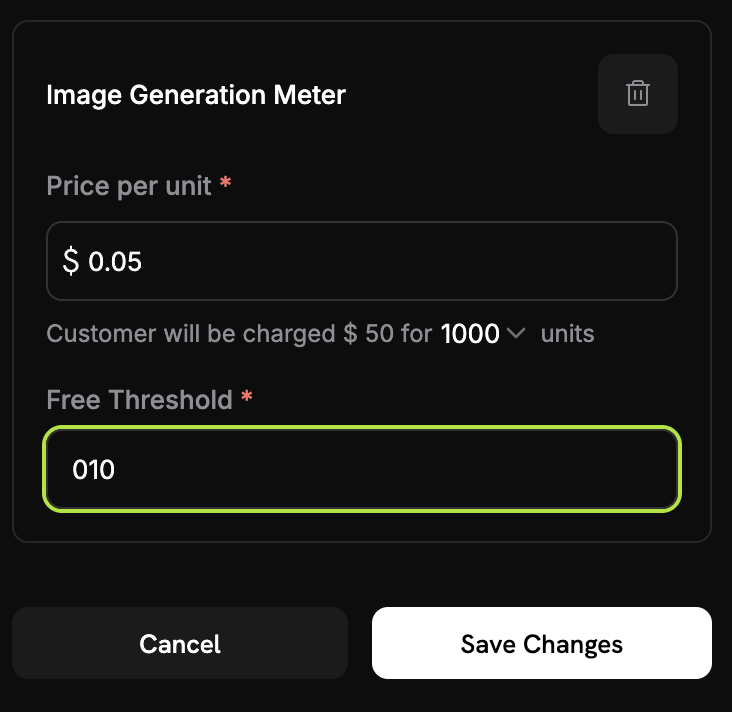
0.05(画像1枚につき$0.05)。Free Threshold: 10。顧客1人あたり月10枚まで無料です。5
Save Your Product
- 設定を確認します。
- Name: PixelGen AI - Image Generation
- Meter: Image Generation Meter
- Price: 画像1枚につき$0.05
- Free tier: 10枚
- Save Changesをクリックします。
**Productが作成されました。**billingが設定され、顧客が生成した画像に対して料金が請求されます。
Step 3: Test Purchaseを行う
test modeでproductを1回購入します。この購入によって、appがusage eventを送信するcustomerが作成されます。1
Get Your Payment Link
- Dodo Payments dashboardでProductsに移動します。
- 「PixelGen AI - Image Generation」productを見つけます。
- productの横にあるShareをクリックします。
- payment linkをコピーします。
https://test.checkout.dodopayments.com/buy/pdt_IgPWlRsfpbPd5jQKezzW1?quantity=1のようになります。2
Complete a Test Purchase
- 新しいbrowser tabでpayment linkを開きます。
- test payment detailsを入力し、購入を完了します。
paymentが成功すると、購入によってcustomerが作成されます。application codeでは、そのcustomerのIDを使用します。
3
Find Your Customer ID
- Dodo Payments dashboardに戻ります。
- sidebarでSales → Customersに移動します。
- test email addressで作成したcustomerを見つけます。
- customer IDをコピーします。
cus_abc123def456のような形式です。
このcustomer IDを保存します。サンプルapplicationではこのIDをcodeに設定するため、すべてのeventがこのcustomerに記録されます。
Step 4: サンプルApplicationを構築する
billingの設定とtest customerの作成が完了したら、サンプルのPixelGen AI applicationを構築します。画像を生成し、billingのためにDodo Paymentsへ報告します。このサンプルでは、Image API を通じて OpenAI の
gpt-image-2.5-flare モデルを呼び出します。Image API は base64 でエンコードされた画像データを返すため、サンプルでは各画像を PNG ファイルとして保存します。Dodo Payments の部分(メーター、商品、image.generated usage event)は、モデルに依存しません。1
Set Up Your Project
directoryを作成し、projectを初期化します。
2
Install Dependencies
packageをインストールします。
3
Create the Main Application
index.tsという名前のfileを作成し、以下のapplication codeを貼り付けます。.envおよびpackage.json:
Step 5: サンプルApplicationをテストする
PixelGen AIをend to endでテストし、usageがDodo Paymentsに届くことを確認します。1
Set Up Your Environment
pixelgen-aidirectoryに.envfileを作成します。- API keysを追加します。
- dependenciesをインストールしてappを実行します。
2
Generate Your First Test Image
appが起動すると、次のように表示されます。このpromptを入力します。「A cute robot painting a landscape」出力は次のようになります。
sendUsageEventが出力するrequest debug linesは省略しています。出力に「Usage event sent successfully」が含まれていれば、billing integrationは動作しています。
3
Generate a Few More Images
複数のeventをテストするため、さらに2〜3枚の画像を生成します。画像ごとに
npm startを1回実行し、次のpromptを使用します。- 「A sunset over mountains with purple clouds」
- 「A steampunk coffee machine in a Victorian kitchen」
- 「A friendly dragon reading a book in a library」
4
Check Your Dodo Payments Dashboard
Dodo Paymentsがeventを受信したことを確認します。
- Dodo Payments dashboardを開きます。
- Products → Metersに移動し、Image Generation Meterを開きます。
- Events tabを選択します。
- listから画像生成eventを見つけます。
- Event name:
image.generated - Customer ID: test customer ID
listには、生成した画像ごとに1つのeventが表示されます。
5
Verify Billing Calculations
usage countを確認します。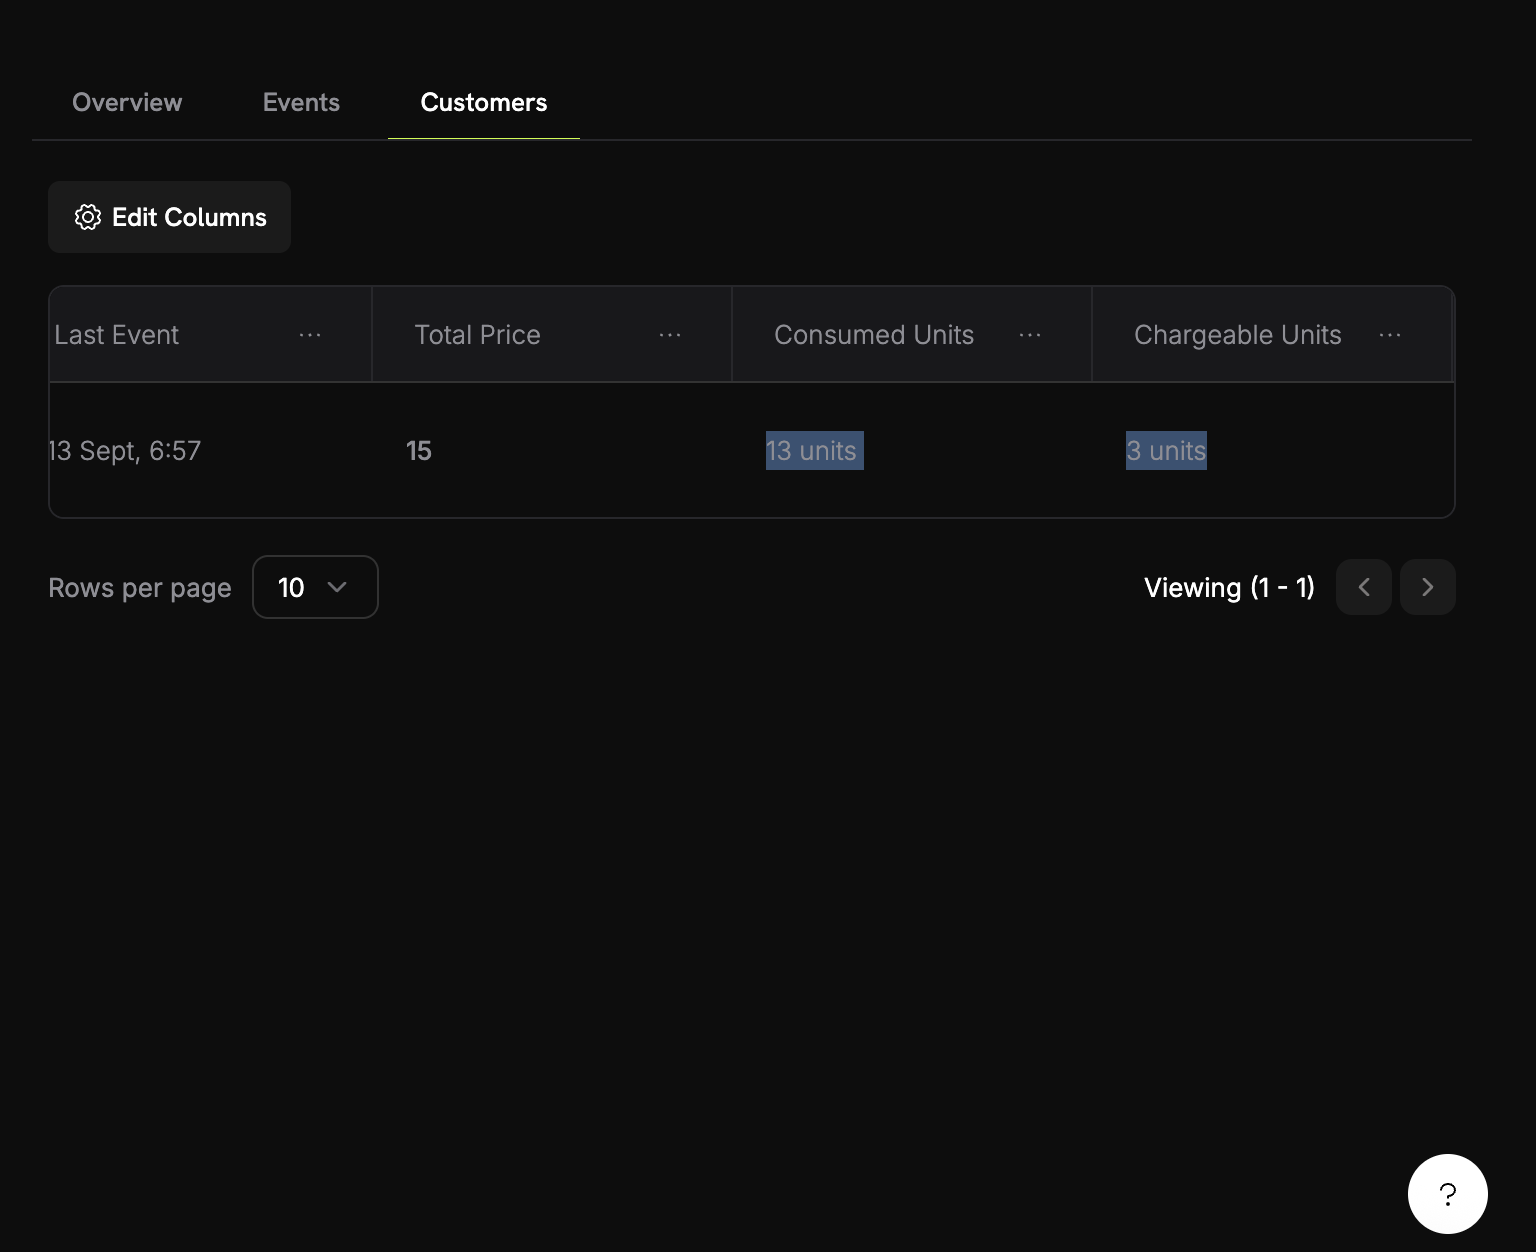
- meterでCustomers tabを選択します。
- test customerを見つけます。
- Consumed Units columnを確認します。
6
Test the Billing Threshold
free tierを超えてbillingを確認します。
- 画像を8枚追加で生成し、合計12枚にします。
- meterのCustomers tabをもう一度開きます。
- 値を確認します。
- Consumed Units: 12
- Chargeable Units: 2(12 − 無料10枚)
- Total Price: $0.10
**Usage-based billingが動作しています。**顧客は生成した画像に対して料金を支払います。
Troubleshooting
よくある問題と解決方法:Events not appearing in dashboard
Events not appearing in dashboard
考えられる原因:
- event nameがmeter configurationと完全には一致していない
- customer IDがaccountに存在しない
- API keyが無効または期限切れ
- network connectivityの問題
- event nameがmeterと完全に一致していることを確認します。大文字と小文字が区別されます。
- customer IDがDodo Paymentsに存在することを確認します。
- 簡単なAPI callでAPI keyをテストします。
- network connectivityとfirewall settingsを確認します。