メインコンテンツへスキップ
このチュートリアルでは、Dodo Paymentsのアドオンを使用して座席ベースの価格設定を実装する方法を学びます。追加の座席用のアドオンを持つサブスクリプション製品を作成し、カスタムアドオン数量を持つ支払いリンクを生成する方法を示します。
このチュートリアルでは、Node.js/Expressアプリケーションのサンプル実装コードを紹介します。Next.js、React、Vueなどの具体的なフレームワークに合わせてこのコードを変更し、アプリケーションの要件に応じてユーザーインターフェイスをカスタマイズできます。
このチュートリアルの終わりまでに、次のことができるようになります:
  • 座席ベースの価格設定を持つサブスクリプション製品を作成する
  • 追加の座席用のアドオンを設定する
  • カスタムアドオン数量を持つ支払いリンクを生成する
  • 動的な座席数を持つチェックアウトセッションを処理する

何を作成するか

座席ベースの価格モデルを作成しましょう:
  • 基本プラン: 5人のチームメンバーまで月額49ドル
  • 座席アドオン: 追加の座席1つにつき月額2ドル
  • 支払いリンク: カスタム座席数量での動的チェックアウト
始める前に、以下を確認してください:
  • Dodo Paymentsアカウント
  • TypeScript/Node.jsの基本的な知識

ステップ1: 座席アドオンを作成する

追加の座席を表すアドオンを作成する必要があります。このアドオンは基本のサブスクリプションに添付され、顧客が追加の座席を購入できるようにします。
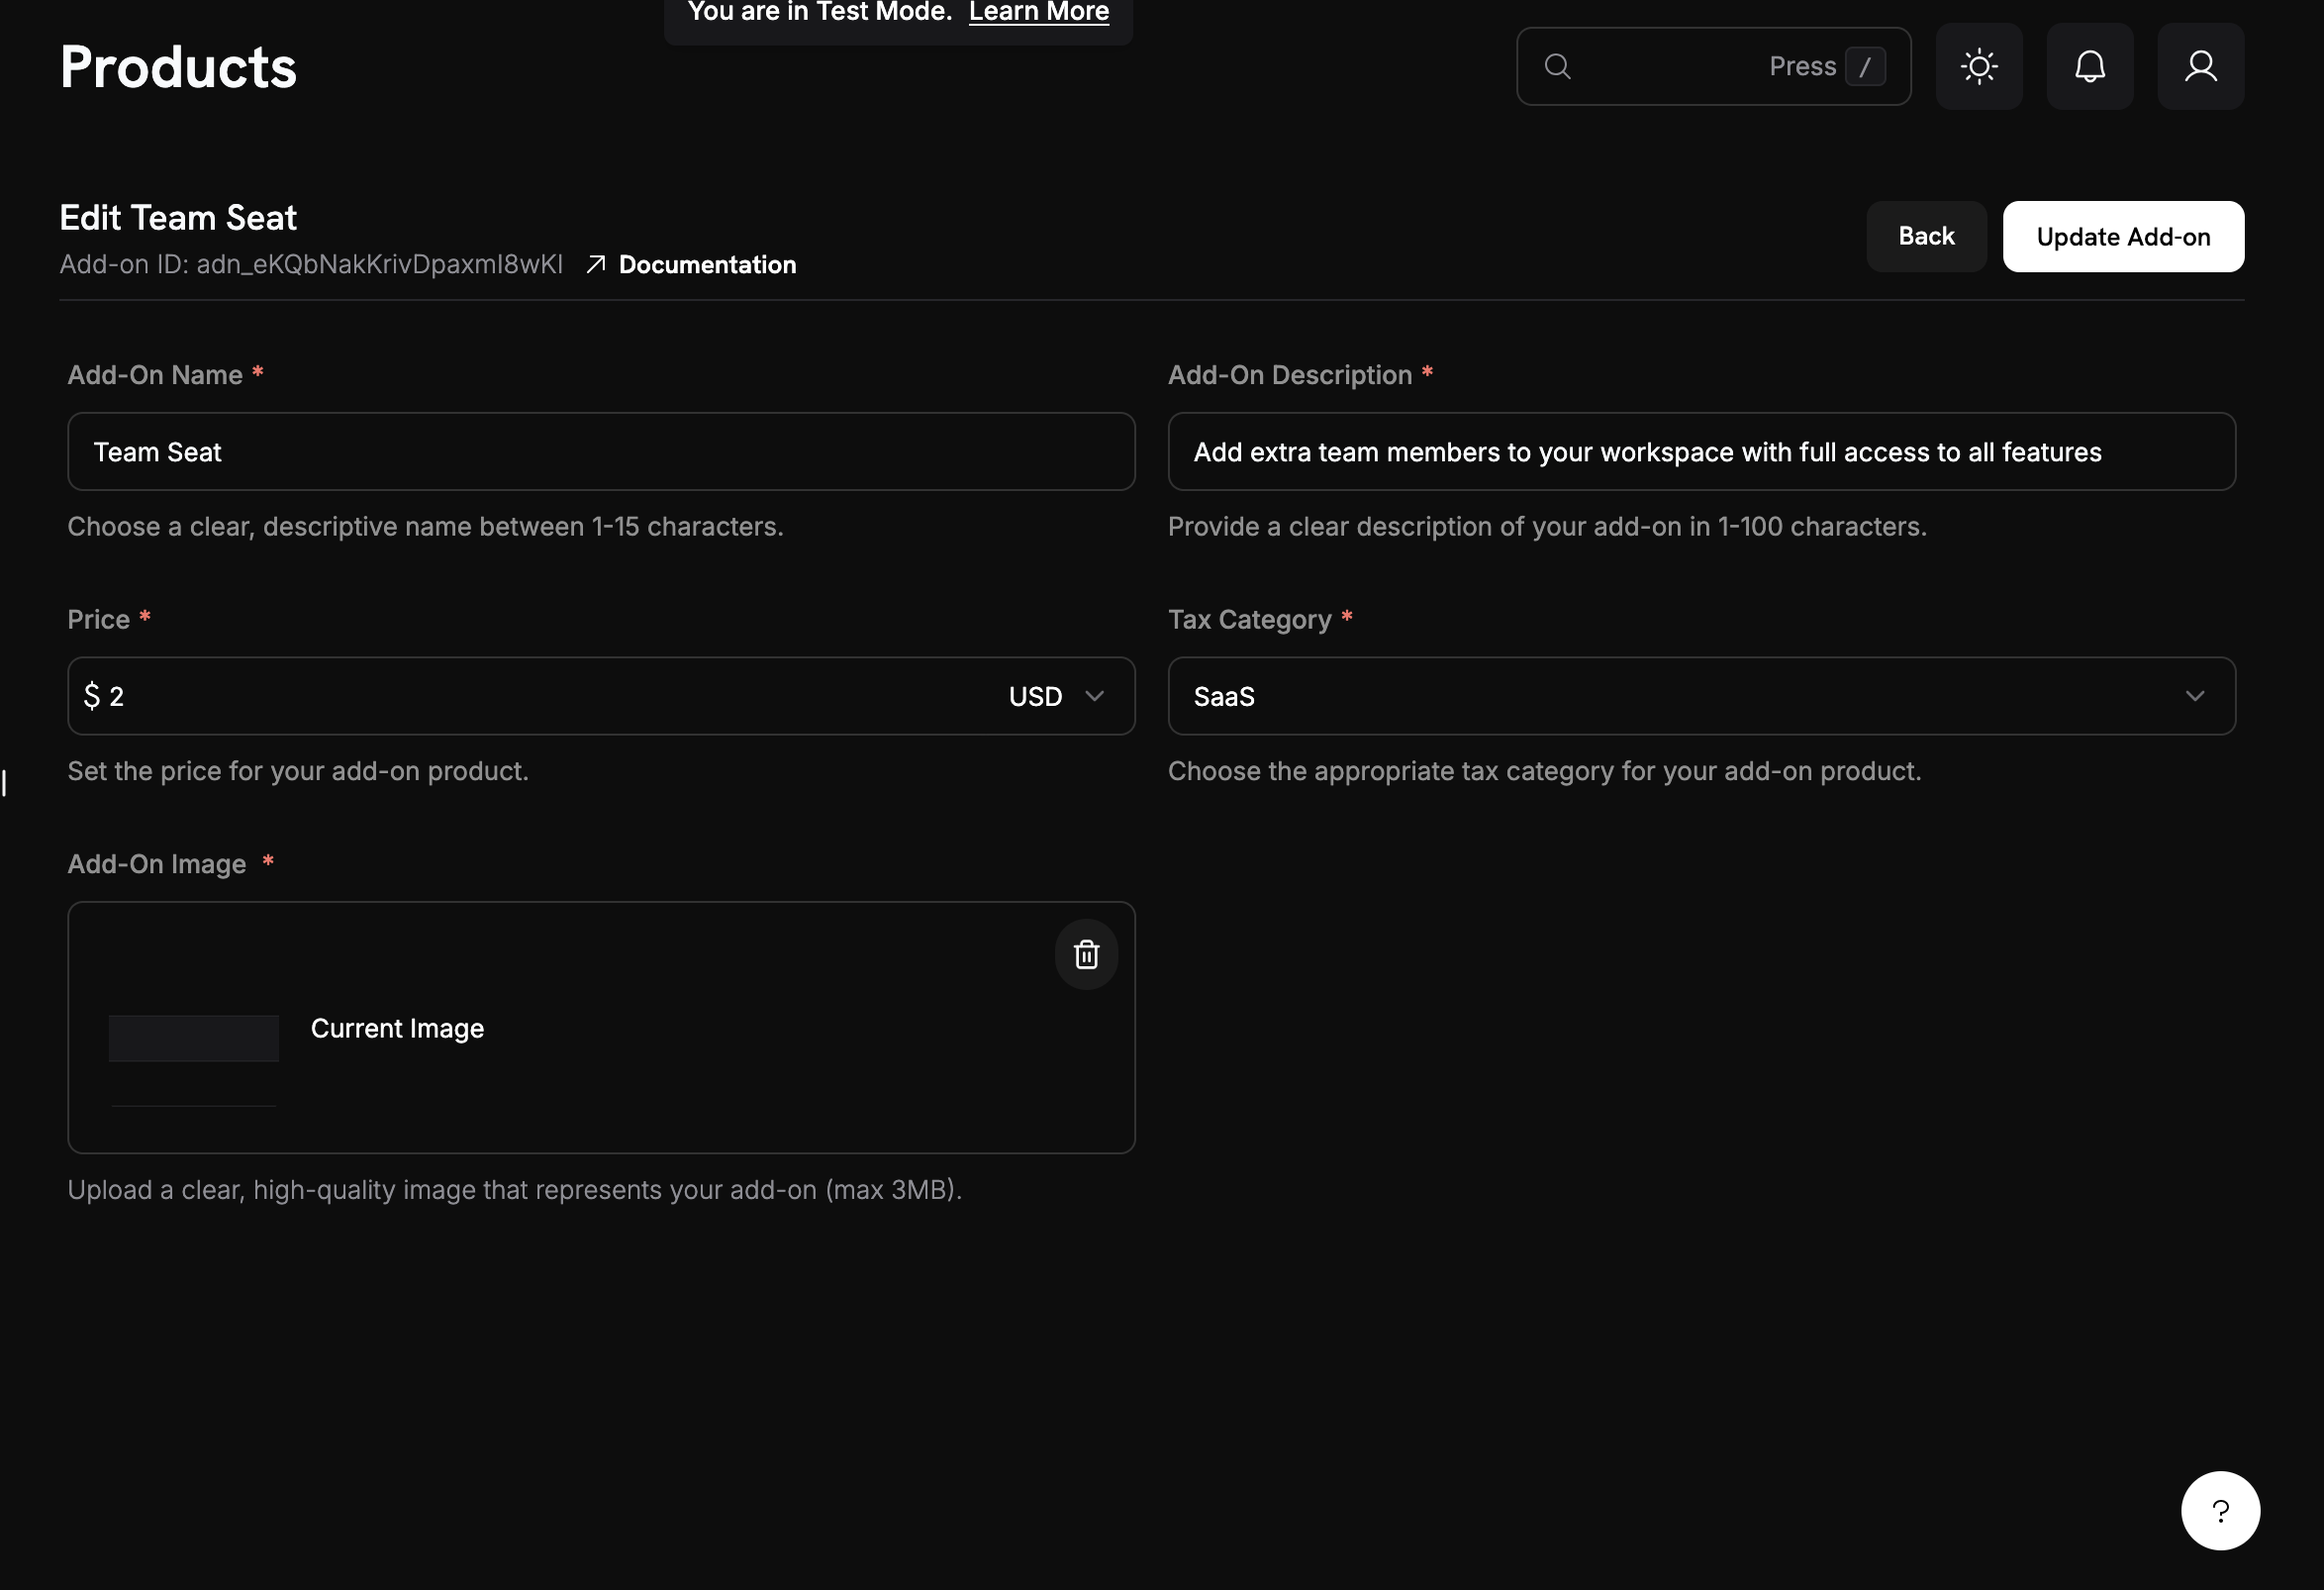
Creating base subscription product
今回作成するもの:1席あたり月額2ドルのアドオンで、任意の基本サブスクリプションに追加できます。
1

Navigate to Add-Ons

  1. Dodo PaymentsのダッシュボードでProductsセクションにとどまります
  2. Add-Onsタブをクリック
  3. Create Add-Onをクリック
これでアドオン作成フォームが開きます。
2

Enter add-on details

座席アドオンには次の値を入力します:Add-On NameAdditional Team SeatDescriptionAdd extra team members to your workspace with full access to all featuresPrice:→ 2.00 を入力通貨: 基本サブスクリプションの通貨と一致する必要があります税カテゴリ: 製品に適切なカテゴリを選択します。
3

Save your add-on

  1. 設定を確認します:
    • 名称:Additional Team Seat
    • 価格:月額2.00ドル
  2. Create Add-Onをクリック
アドオンが作成されました! あなたの座席アドオンは、サブスクリプションに追加できるようになりました。

ステップ2: 基本サブスクリプション製品を作成する

5人のチームメンバーを含む基本サブスクリプション製品を作成します。これが座席ベースの価格モデルの基盤となります。
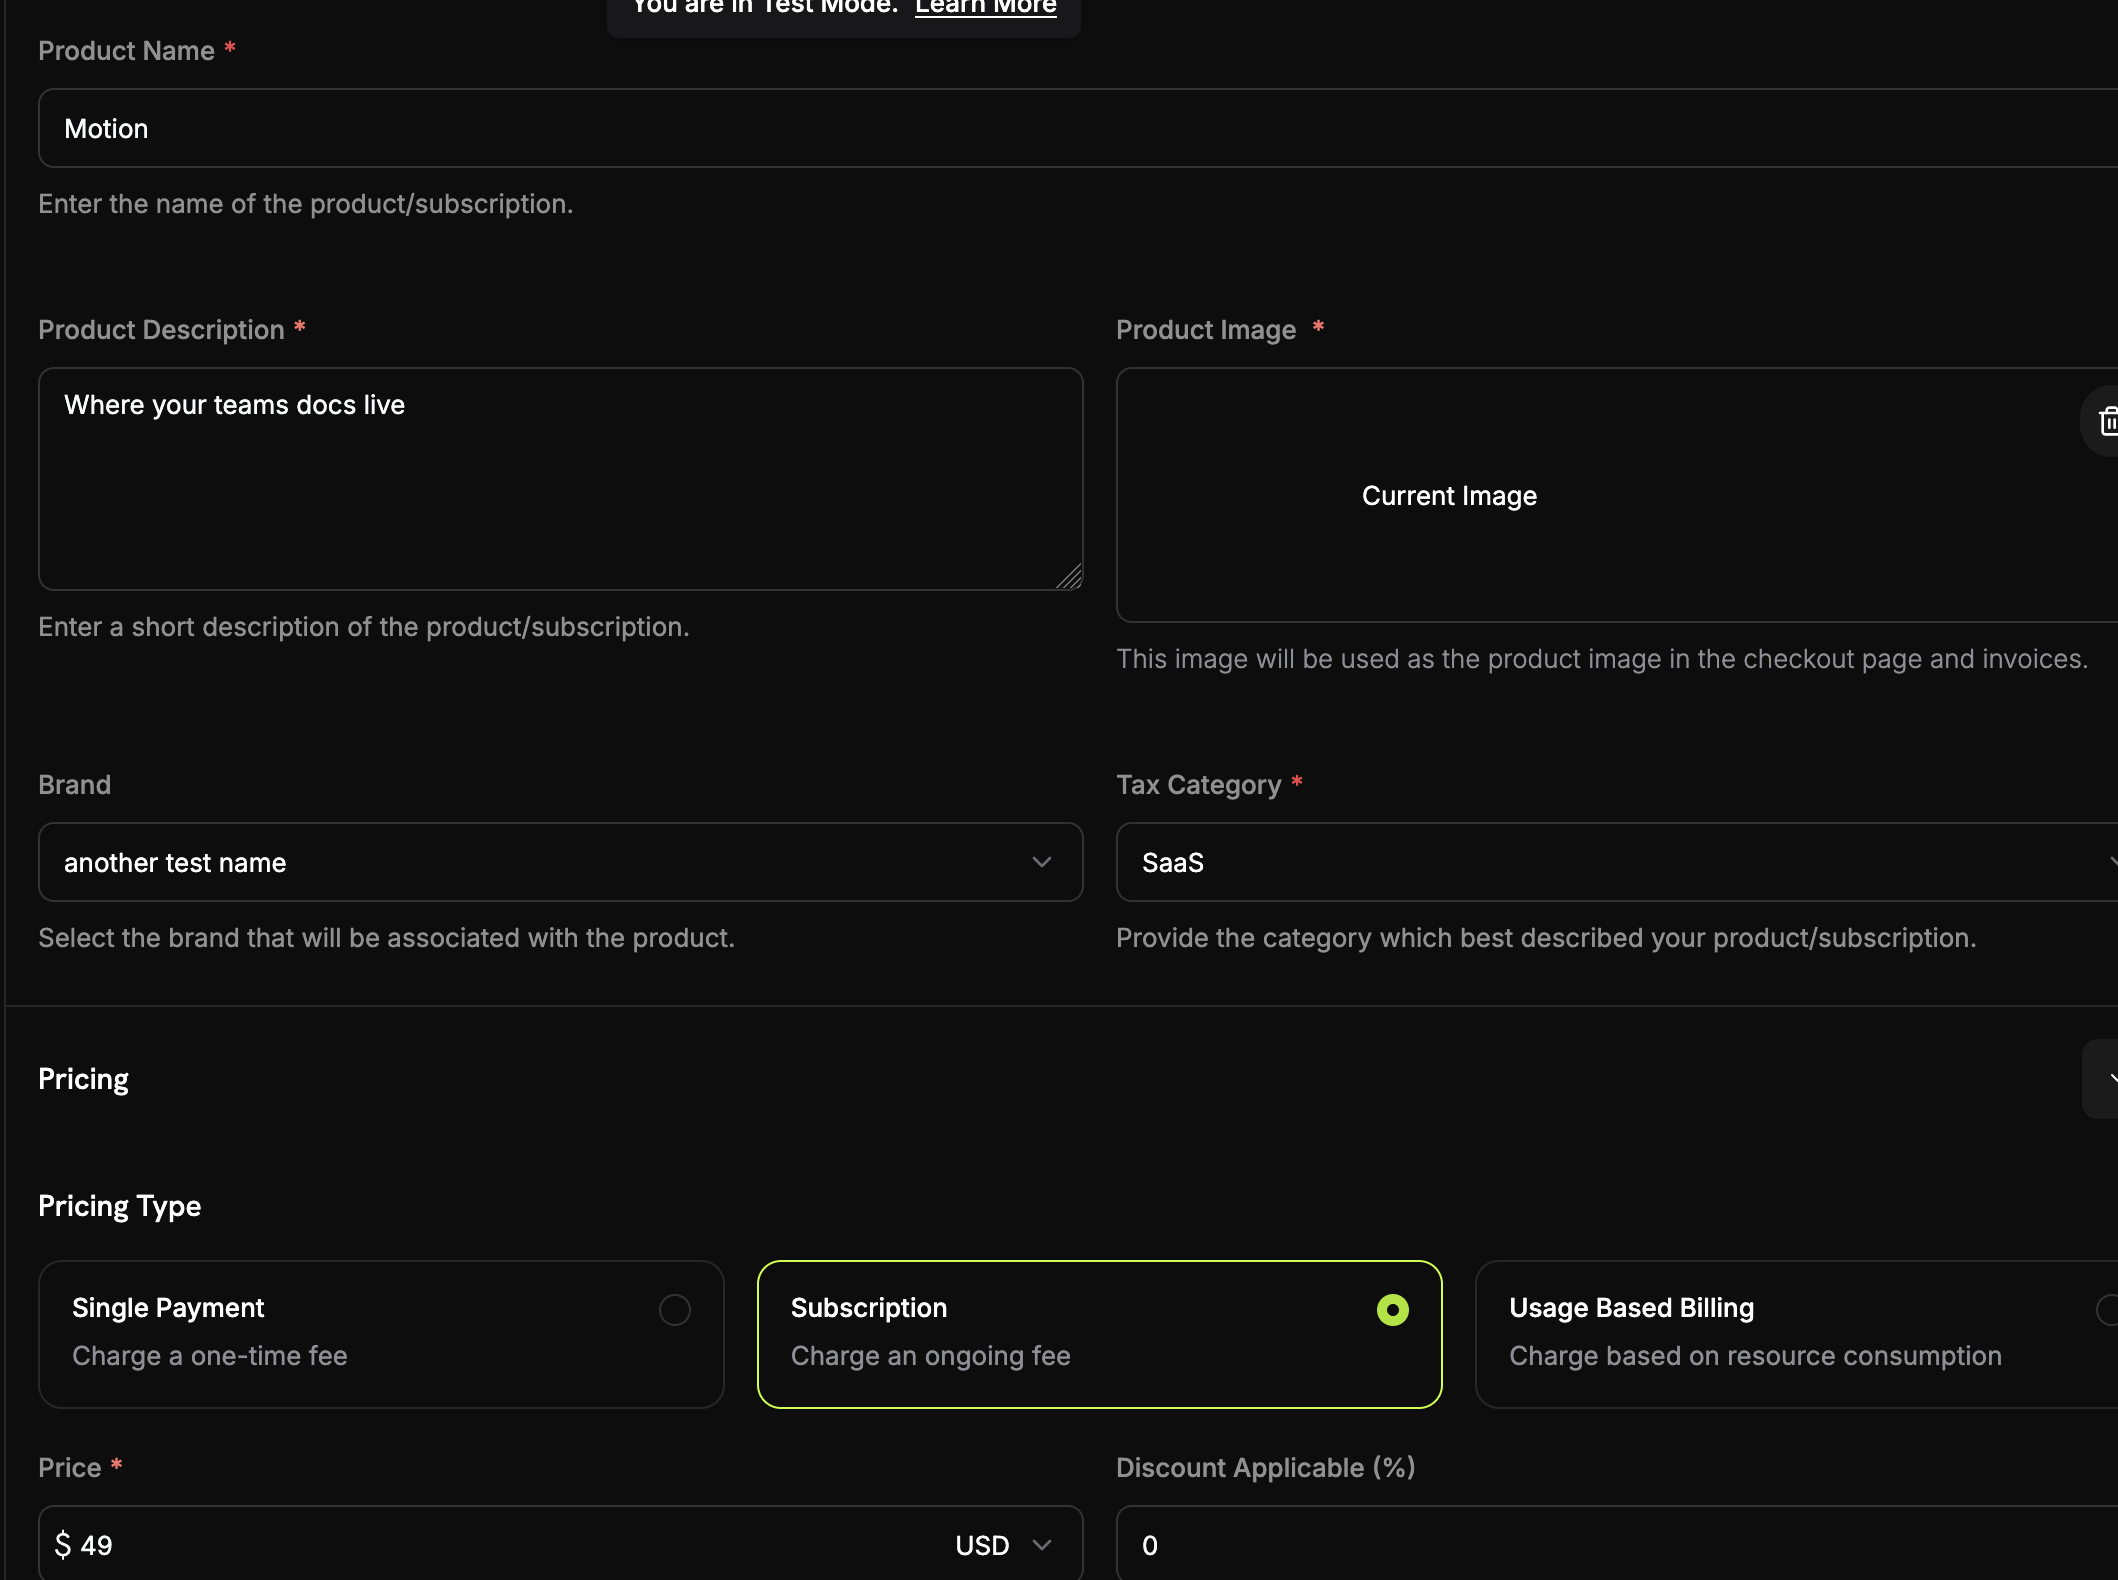
Creating base subscription product
1

Navigate to Products

  1. Dodo Paymentsダッシュボードにログイン
  2. 左側のサイドバーでProductsをクリック
  3. Create Productボタンをクリック
  4. 製品タイプとしてSubscriptionを選択
基本サブスクリプションの設定を行うフォームが表示されるはずです。
2

Fill in the subscription details

ここで基本プランの詳細を入力します:Product NameMotionDescriptionWhere your team's documentation lives.Recurring Price:→ 49.00 を入力Billing Cycle:→ Monthly を選択Currency:希望する通貨を選択(例:USD

ステップ3: アドオンをサブスクリプションに接続する

座席アドオンを基本サブスクリプションに関連付ける必要があります。これにより、顧客はチェックアウト中に追加の座席を購入できます。
1

Attach the seat add-on
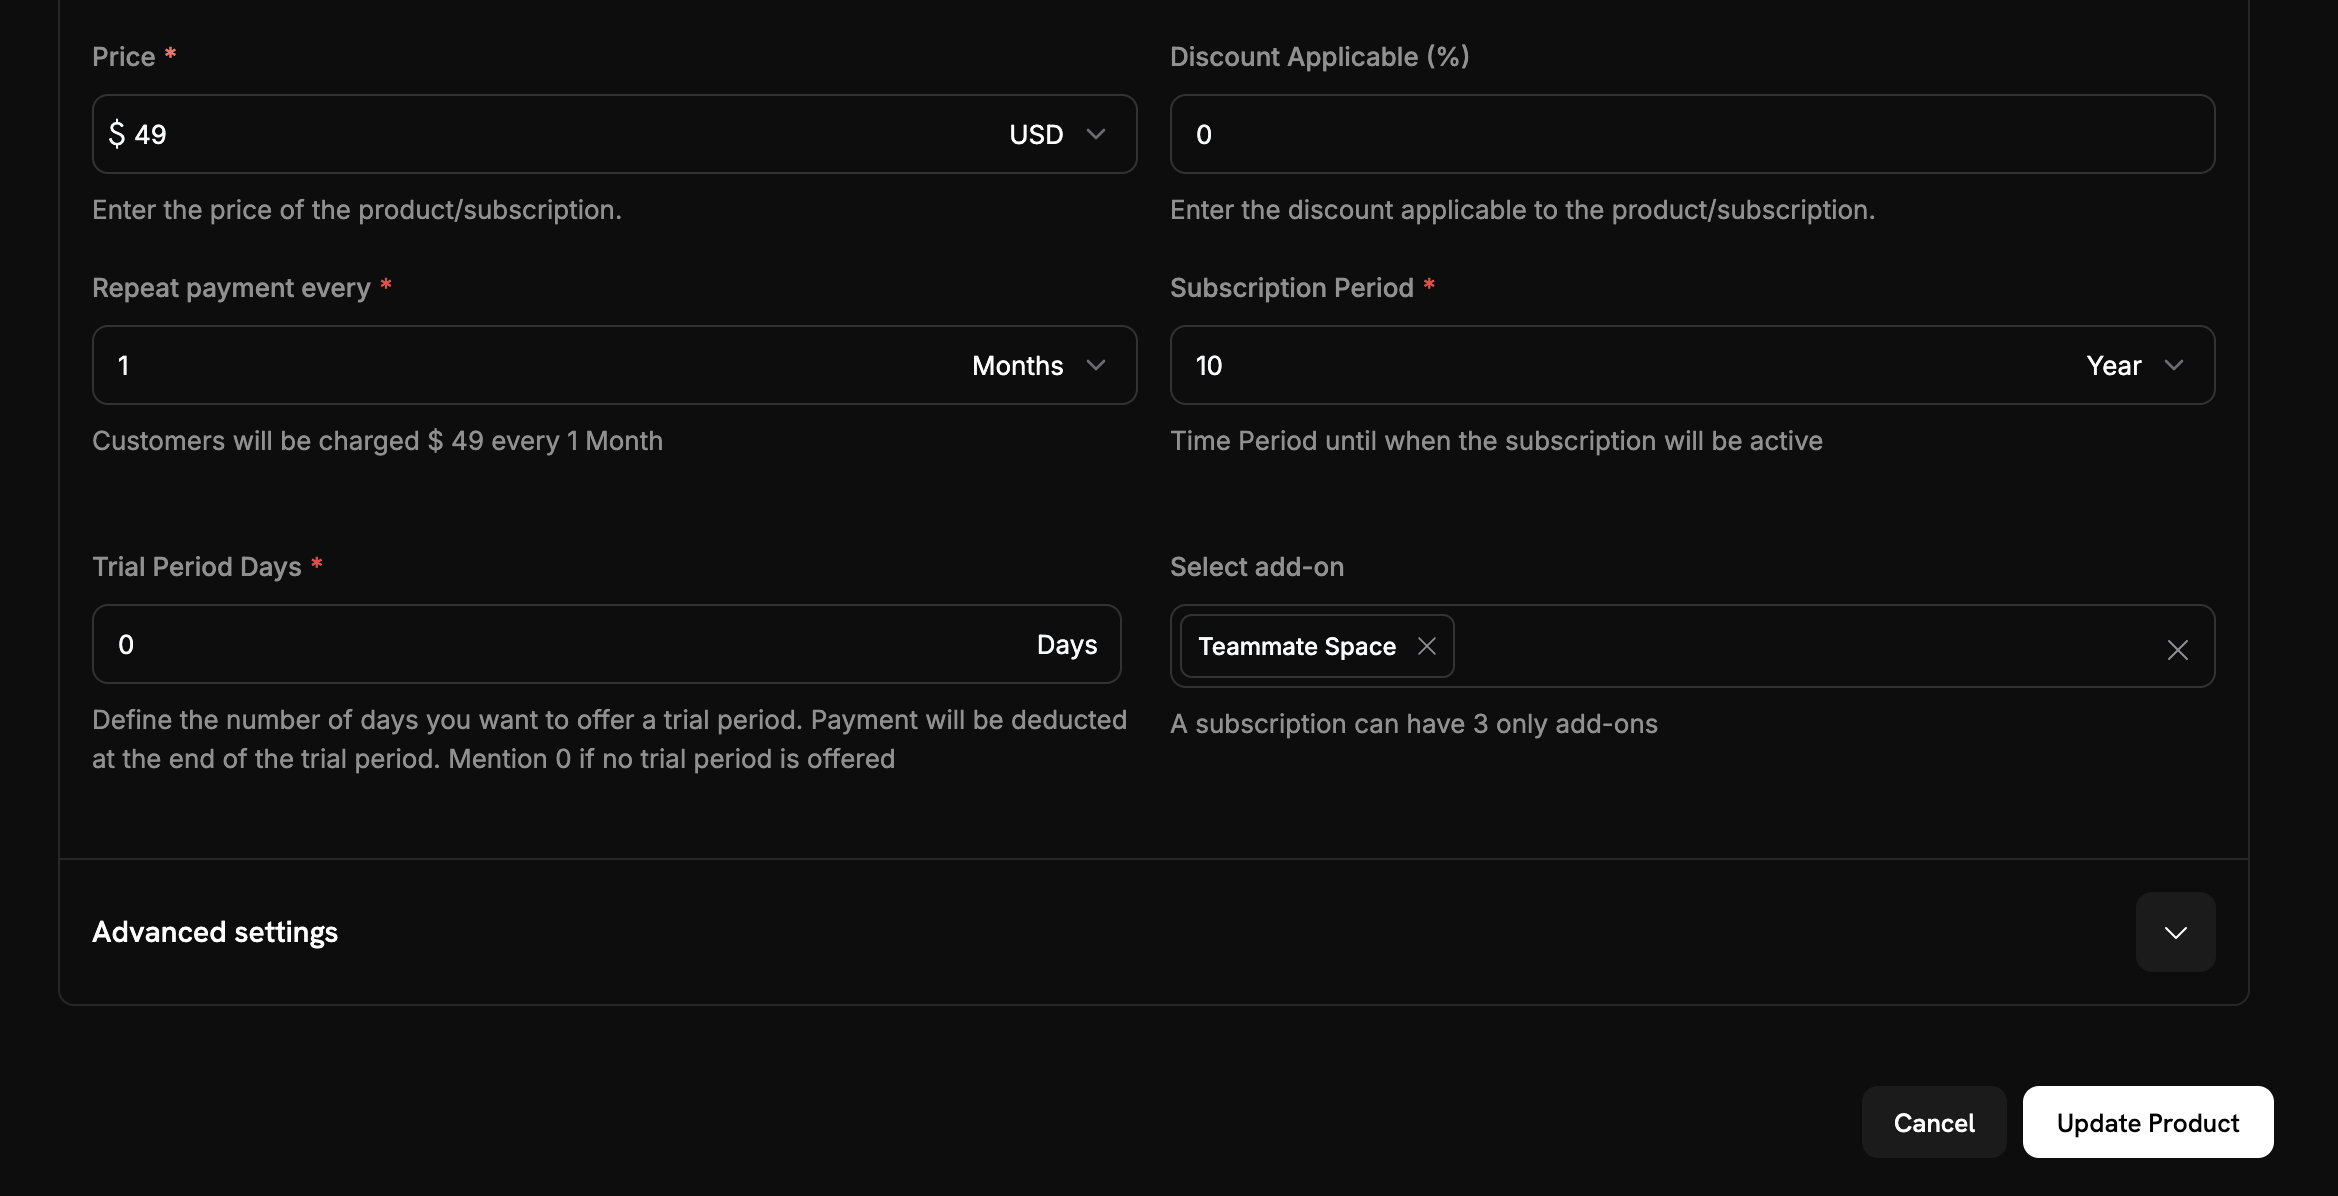
Attaching add-on to subscription
  1. アドオンセクションまでスクロールします
  2. アドオンを追加をクリックします
  3. ドロップダウンから座席アドオンを選択します
  4. サブスクリプション設定に表示されていることを確認します
2

Save subscription changes

  1. サブスクリプション設定を確認します:
    • 基本プラン:5席で月額49ドル
    • アドオン:追加席1席あたり月額2ドル
    • 無料トライアル:14日間
  2. Save Changesをクリック
席数ベースの価格設定が構成されました! 顧客は基本プランを購入し、必要に応じて追加席を追加できます。

ステップ4: カスタムアドオン数量で支払いリンクを生成する

次に、カスタムアドオン数量で支払いリンクを生成するExpress.jsアプリケーションを作成します。これが座席ベースの価格設定の真の力です - 追加の座席の数に応じて動的にチェックアウトセッションを作成できます。
1

Set up your project

新しいNode.jsプロジェクトを作成し、必要な依存関係をインストールします:
mkdir seat-based-pricing
cd seat-based-pricing
npm init -y
npm install dodopayments express dotenv
npm install -D @types/node @types/express typescript ts-node
tsconfig.json ファイルを作成:
{
  "compilerOptions": {
    "target": "ES2020",
    "module": "commonjs",
    "outDir": "./dist",
    "rootDir": "./src",
    "strict": true,
    "esModuleInterop": true,
    "skipLibCheck": true,
    "forceConsistentCasingInFileNames": true
  }
}
2

Create your environment file

Dodo PaymentsのAPIキーを含む .env ファイルを作成:
DODO_PAYMENTS_API_KEY=your_actual_dodo_api_key_here
APIキーをバージョン管理にコミットしないでください。.env.gitignore ファイルに追加します。
3

Implement the checkout session creation

以下のコードを含む src/server.ts ファイルを作成:
// Add this new endpoint for dynamic seat quantities
import 'dotenv/config';
import DodoPayments from 'dodopayments';
import express, { Request, Response } from 'express';

const app = express();

// Initialize the Dodo Payments client
const client = new DodoPayments({
  bearerToken: process.env.DODO_PAYMENTS_API_KEY,
  environment: 'test_mode'
});

async function createCheckoutSession(seatCount: number) {
  try {
    const session = await client.checkoutSessions.create({
      // Products to sell - use IDs from your Dodo Payments dashboard
      product_cart: [
        {
          product_id: 'pdt_7Rl9OWT2Mz4wwUTKz74iZ', // Replace with your actual product ID
          quantity: 1,
          addons: [
            {
              addon_id: 'adn_eKQbNakKrivDpaxmI8wKI', // Replace with your actual addon ID
              quantity: seatCount
            }
          ]
        }
      ],
      
      // Pre-fill customer information to reduce friction
      customer: {
        email: 'steve@example.com',
        name: 'Steve Irwin',
      },
      // Where to redirect after successful payment
      return_url: 'https://example.com/checkout/success',
    });

    // Redirect your customer to this URL to complete payment
    console.log('Checkout URL:', session.checkout_url);
    console.log('Session ID:', session.session_id);
    
    return session;
    
  } catch (error) {
    console.error('Failed to create checkout session:', error);
    throw error;
  }
}

// Example usage in an Express.js route
app.post('/create-checkout/:seatCount', async (req: Request, res: Response) => {
  try {
    const seatCount = parseInt(req.params.seatCount);
    const session = await createCheckoutSession(seatCount);
    res.json({ checkout_url: session.checkout_url });
  } catch (error) {
    res.status(500).json({ error: 'Failed to create checkout session' });
  }
});

// Add this line after your other middleware
app.use(express.static('public'));

// Add this route to serve the demo page
app.get('/', (req, res) => {
  res.sendFile(__dirname + '/../public/index.html');
});

app.listen(3000, () => {
  console.log('Server is running on port 3000');
});
4

Add a simple web interface

テストを簡略化するための public/index.html ファイルを作成:
<!DOCTYPE html>
<html>
<head>
    <title>Seat-Based Pricing Demo</title>
    <style>
        body { font-family: Arial, sans-serif; max-width: 600px; margin: 50px auto; padding: 20px; }
        .form-group { margin: 20px 0; }
        label { display: block; margin-bottom: 5px; font-weight: bold; }
        input { width: 100%; padding: 10px; border: 1px solid #ddd; border-radius: 4px; }
        button { background: #007bff; color: white; padding: 10px 20px; border: none; border-radius: 4px; cursor: pointer; }
        button:hover { background: #0056b3; }
        .result { margin-top: 20px; padding: 15px; background: #f8f9fa; border-radius: 4px; }
    </style>
</head>
<body>
    <h1>Seat-Based Pricing Demo</h1>
    <p>Generate checkout links with custom seat quantities:</p>
    
    <div class="form-group">
        <label for="seatCount">Number of Additional Seats:</label>
        <input type="number" id="seatCount" value="3" min="0" max="50">
    </div>
    
    <button onclick="createCheckout()">Generate Checkout Link</button>
    
    <div id="result" class="result" style="display: none;">
        <h3>Checkout Link Generated!</h3>
        <p><strong>Seat Count:</strong> <span id="seatCountDisplay"></span></p>
        <p><strong>Total Cost:</strong> $<span id="totalCost"></span>/month</p>
        <p><strong>Checkout URL:</strong></p>
        <a id="checkoutUrl" href="#" target="_blank">Click here to checkout</a>
    </div>

    <script>
        async function createCheckout() {
            const seatCount = document.getElementById('seatCount').value;
            
            try {
                const response = await fetch(`/create-checkout/${seatCount}`, {
                    method: 'POST'
                });
                
                const data = await response.json();
                
                if (response.ok) {
                    document.getElementById('seatCountDisplay').textContent = seatCount;
                    document.getElementById('totalCost').textContent = data.total_cost;
                    document.getElementById('checkoutUrl').href = data.checkout_url;
                    document.getElementById('result').style.display = 'block';
                } else {
                    alert('Error: ' + data.error);
                }
            } catch (error) {
                alert('Error creating checkout session');
            }
        }
    </script>
</body>
</html>
Webインターフェイスが作成されました! これで異なる座席数をテストするシンプルなUIが完成しました。
5

Serve static files

HTMLファイルを提供するために、src/server.ts に次を追加:
// Add this line after your other middleware
app.use(express.static('public'));

// Add this route to serve the demo page
app.get('/', (req, res) => {
  res.sendFile(__dirname + '/../public/index.html');
});
静的ファイルが設定されました! http://localhost:3000 を開いてデモインターフェイスを確認してください。

ステップ5: 実装をテストする

座席ベースの価格設定の実装が正しく機能するかどうかをテストしましょう。
1

Start your server

  1. 正しいAPIキーが入った .env ファイルを用意
  2. 実際のDodo Paymentsダッシュボードの値で製品IDとアドオンIDをコード内に更新
  3. サーバーを起動:
npm run dev
サーバーが正常に起動し、「Server running on http://localhost:3000」が表示されるはずです。
2

Test the web interface
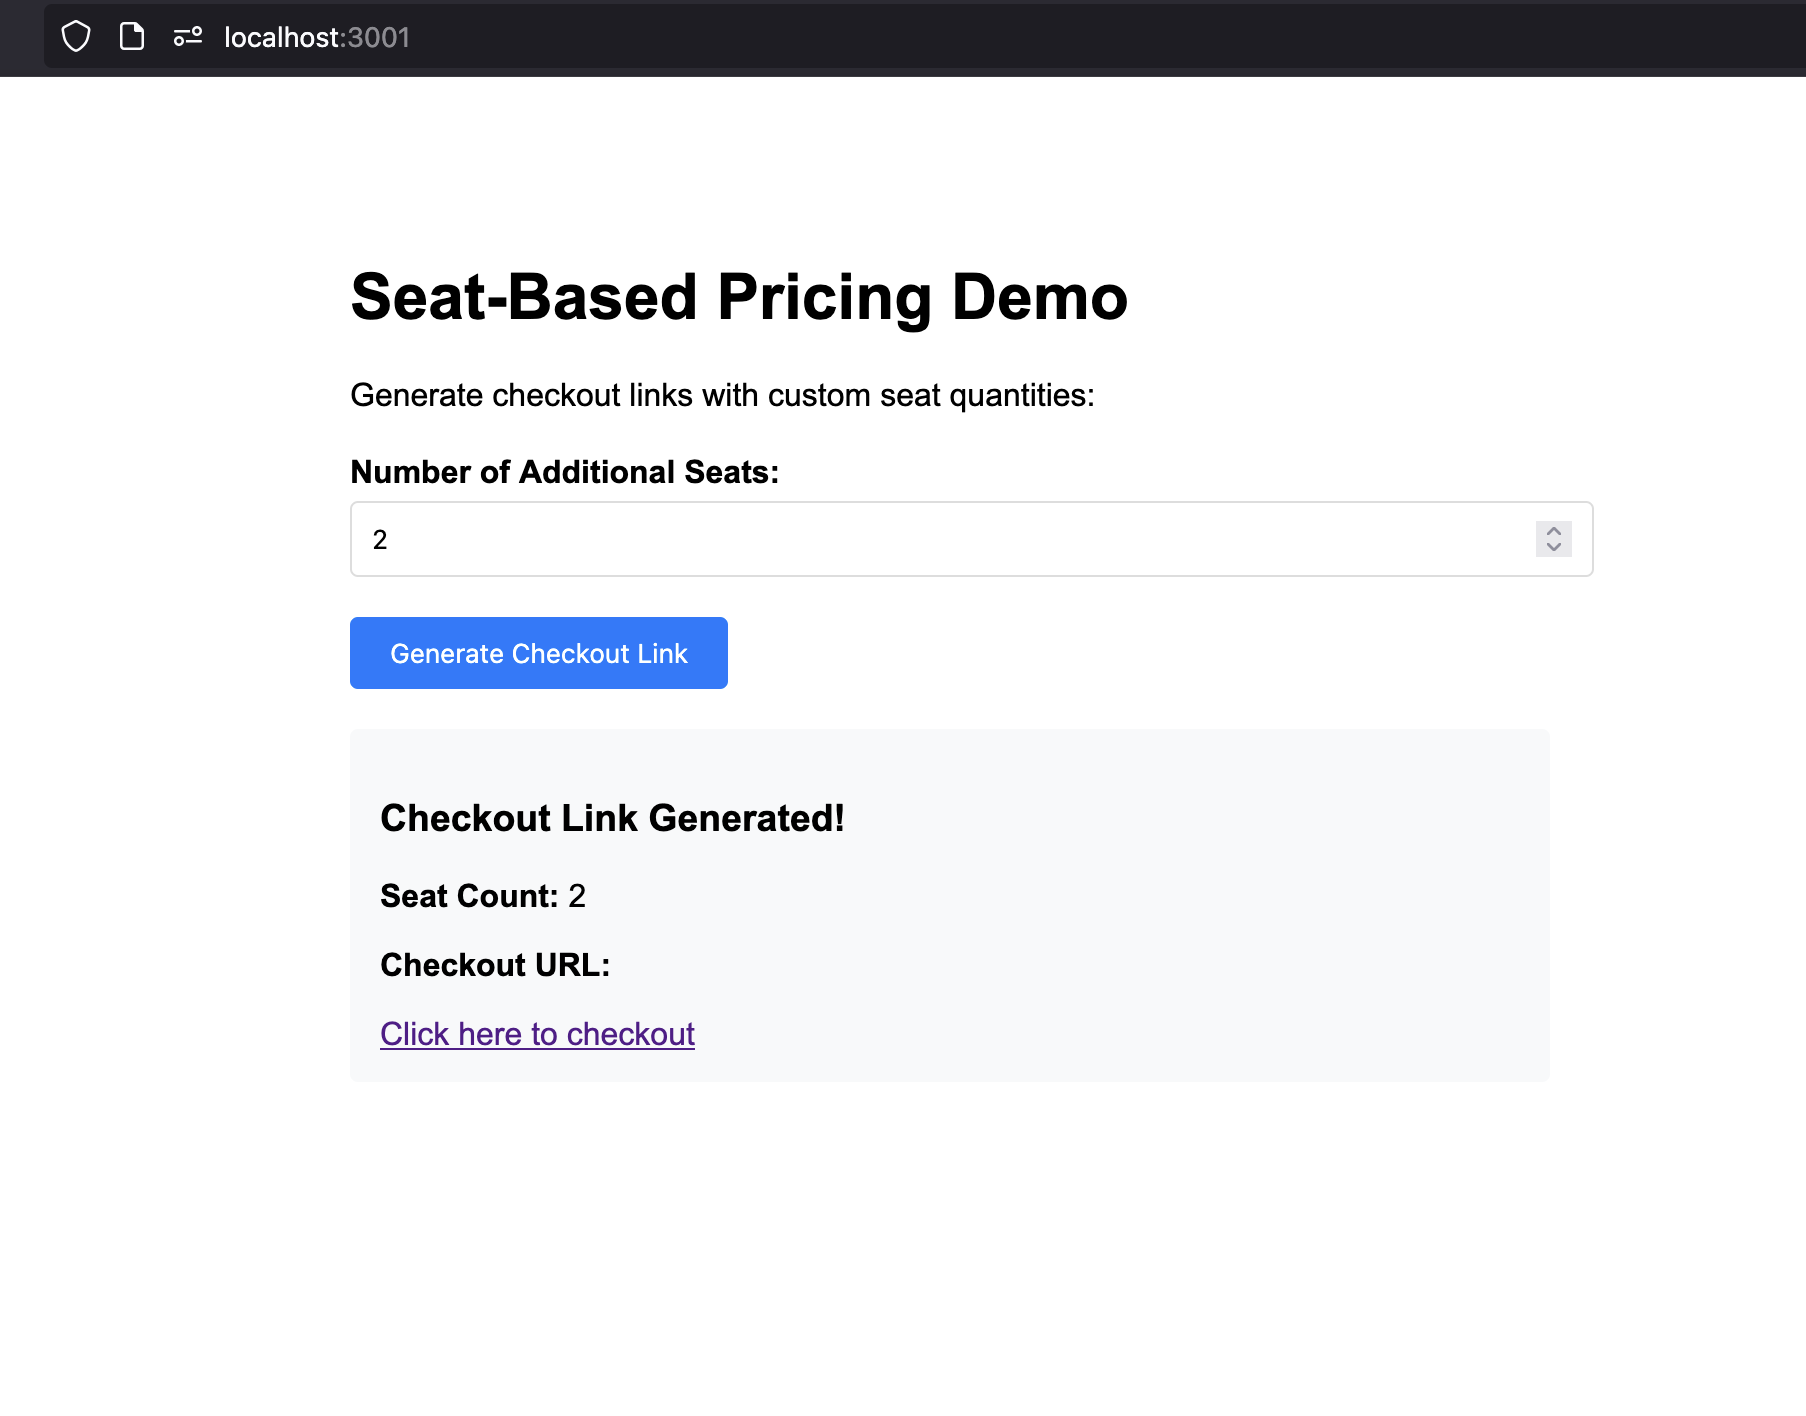
Creating base subscription product
  1. ブラウザで http://localhost:3000 にアクセス
  2. 座席ベースの価格デモインターフェイスが表示されるはずです
  3. 異なる座席数(0、3、10など)を試す
  4. 各座席数で「Generate Checkout Link」をクリック
  5. チェックアウトURLが正しく生成されていることを確認
3

Test a checkout session

  1. 追加席3席でチェックアウトリンクを生成
  2. チェックアウトURLをクリックしてDodo Paymentsのチェックアウトを開く
  3. チェックアウトに以下が表示されていることを確認:
    • 基本プラン:月額49ドル
    • 追加席:3 × 2ドル = 月額6ドル
  4. テスト購入を完了
チェックアウトには正しい価格内訳が表示され、購入を完了できるはずです。
4

Listen for webhooks and update your DB

サブスクリプションや席数の変更をデータベースと同期するには、Dodo PaymentsからのWebhookイベントを監視する必要があります。Webhookは顧客がチェックアウトを完了したり、サブスクリプションを更新したり、席数を変更したときにバックエンドに通知します。Webhookエンドポイントを設定し、イベントを処理する手順については、公式のDodo Payments Webhookガイドを参照してください:

Dodo Payments Webhooks Documentation

サブスクリプションと席数管理のためにWebhookイベントを安全に受信および処理する方法を学びます。

トラブルシューティング

一般的な問題とその解決策:
考えられる原因:
  • 無効な製品IDまたはアドオンID
  • APIキーに十分な権限がない
  • アドオンがサブスクリプションに正しく関連付けられていない
  • ネットワーク接続の問題
解決策:
  1. Dodo Paymentsダッシュボードに製品とアドオンIDが存在することを確認
  2. アドオンがサブスクリプションに正しく添付されていることを確認
  3. APIキーにチェックアウトセッション作成の権限があることを確認
  4. 単純なGETリクエストでAPI接続性をテスト

おめでとうございます!座席ベースの価格設定を実装しました

Dodo Paymentsを使用して座席ベースの価格設定システムを成功裏に作成しました!達成したことは次のとおりです:

Base Subscription

5席含むサブスクリプション製品を月額49ドルで作成しました

Seat Add-ons

追加席用のアドオンを1席あたり月額2ドルで構成しました

Checkout

カスタム座席数でチェックアウトセッションを生成するAPIを構築しました

Web Interface

異なる座席数をテストするためのシンプルなWebインターフェイスを作成しました
この例は席数ベースの価格設定の最小限の実装のみを示しています。本番環境では、堅牢なエラーハンドリング、認証、データ検証、セキュリティ対策を追加し、アプリケーションの要件に合わせてロジックを調整してください。