

- 토큰용 custom credit entitlement와 이를 차감하는 meter를 생성합니다.
- 초과 사용량 허용 여부와 관계없이 크레딧을 구독 플랜에 연결하고, 일회성 추가 충전 제품에도 연결합니다.
- Dodo Payments를 통해 토큰을 청구하는 endpoint에서 OpenAI를 호출합니다.
- SDK로 고객의 실시간 크레딧 잔액을 읽습니다.
- 웹훅 서명을 검증하고 Dodo Payments credit events를 라우팅합니다.
구축할 내용
NeuralAPI는 세 가지 제품을 판매합니다.- Dodo Payments account. 모든 작업은 test mode에서 진행합니다.
- OpenAI API key.
- Node.js 22 이상 및 TypeScript와 Node.js에 대한 기본 지식.
1단계: 토큰 크레딧 entitlement 생성
두 플랜과 추가 충전 팩에서 공유할 credit entitlement를 생성합니다. 이 entitlement는 NeuralAPI가 판매하는 토큰 단위를 정의합니다.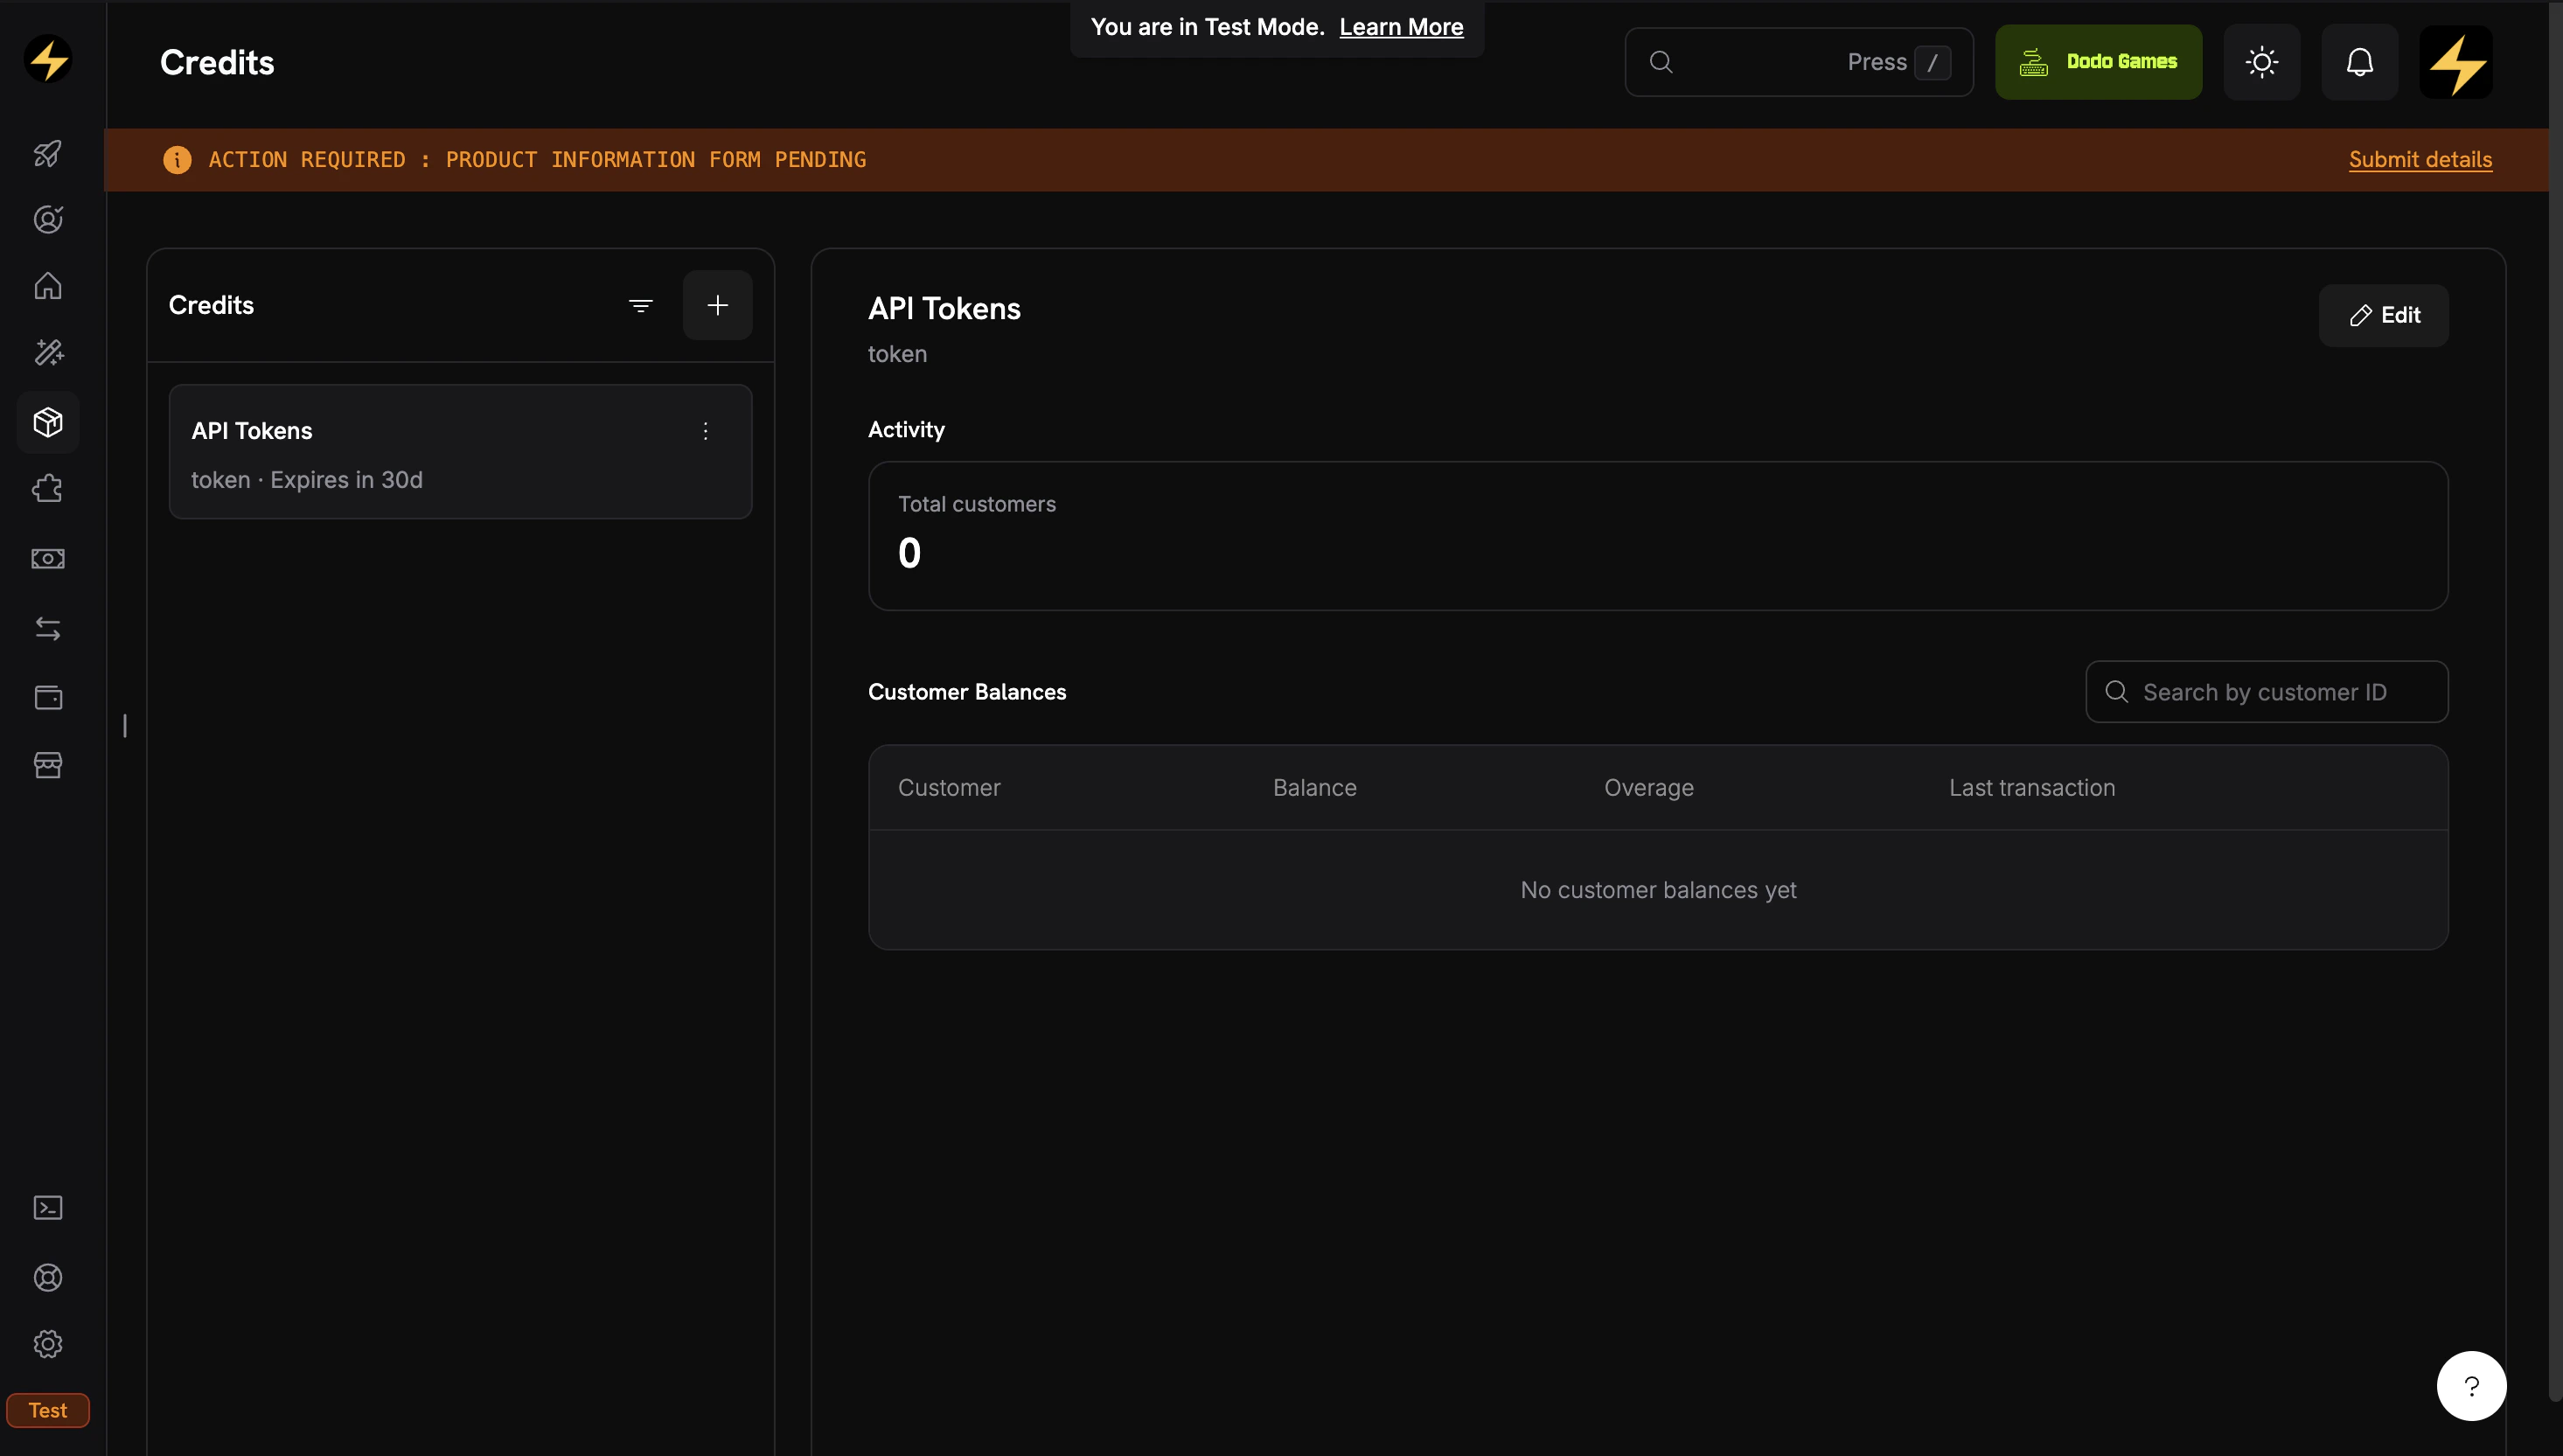
The Credits tab under Products shows all your credit entitlements.
Navigate to Credits
- Dodo Payments dashboard에 로그인합니다.
- 사이드바에서 Products를 클릭합니다.
- Credits 탭을 선택합니다.
- Create Credit을 클릭합니다.
Configure the Credit Unit
API TokensCredit Type: Custom UnitUnit Name: tokenDefine Precision: 0. 토큰 수는 정수입니다.Credit Expiry: 30 days. 크레딧은 발급 후 30일이 지나면 만료되며, 이는 월별 billing cycle과 일치합니다.Skip Overage at the Credit Level
Save and Copy the Credit ID
cde_로 시작합니다.API Tokens credit entitlement가 준비되었습니다. 다음으로 사용량 이벤트가 크레딧을 차감하도록 meter를 생성합니다.2단계: 토큰 사용량용 meter 생성
meter는 수신한 사용량 이벤트를 집계합니다. meter를 크레딧에 연결하면 집계된 사용량이 고객의 크레딧 잔액에서 차감됩니다. 3단계에서 플랜 제품을 생성할 때 meter를 연결하므로 플랜 제품보다 먼저 meter를 생성하세요.Open the Meters Section
- dashboard 사이드바에서 Products → Meters로 이동합니다.
- Create Meter를 클릭합니다.
Configure the Meter
Token Usage MeterEvent Name: api.tokens_used. 앱이 전송하는 event_name와 일치해야 합니다.Aggregation Type: Sum. 각 이벤트의 토큰 수를 합산합니다.Over Property: tokens. 값이 합산되는 metadata key입니다.Measurement Unit: tokensmeter를 생성합니다. 제품에 연결할 때 이름으로 선택합니다.3단계: 플랜 제품 생성
두 플랜 모두 일반적인 Subscription이 아니라 Usage Based Billing pricing type으로 생성합니다. meter는 Usage Based Billing 제품에 연결되며, 고객이 API를 호출할 때 크레딧을 차감하는 것도 meter입니다. Usage Based Billing 제품에는 반복되는 기본 요금($29 또는 $99)이 계속 청구되고, 그 위의 사용량은 크레딧으로 청구됩니다.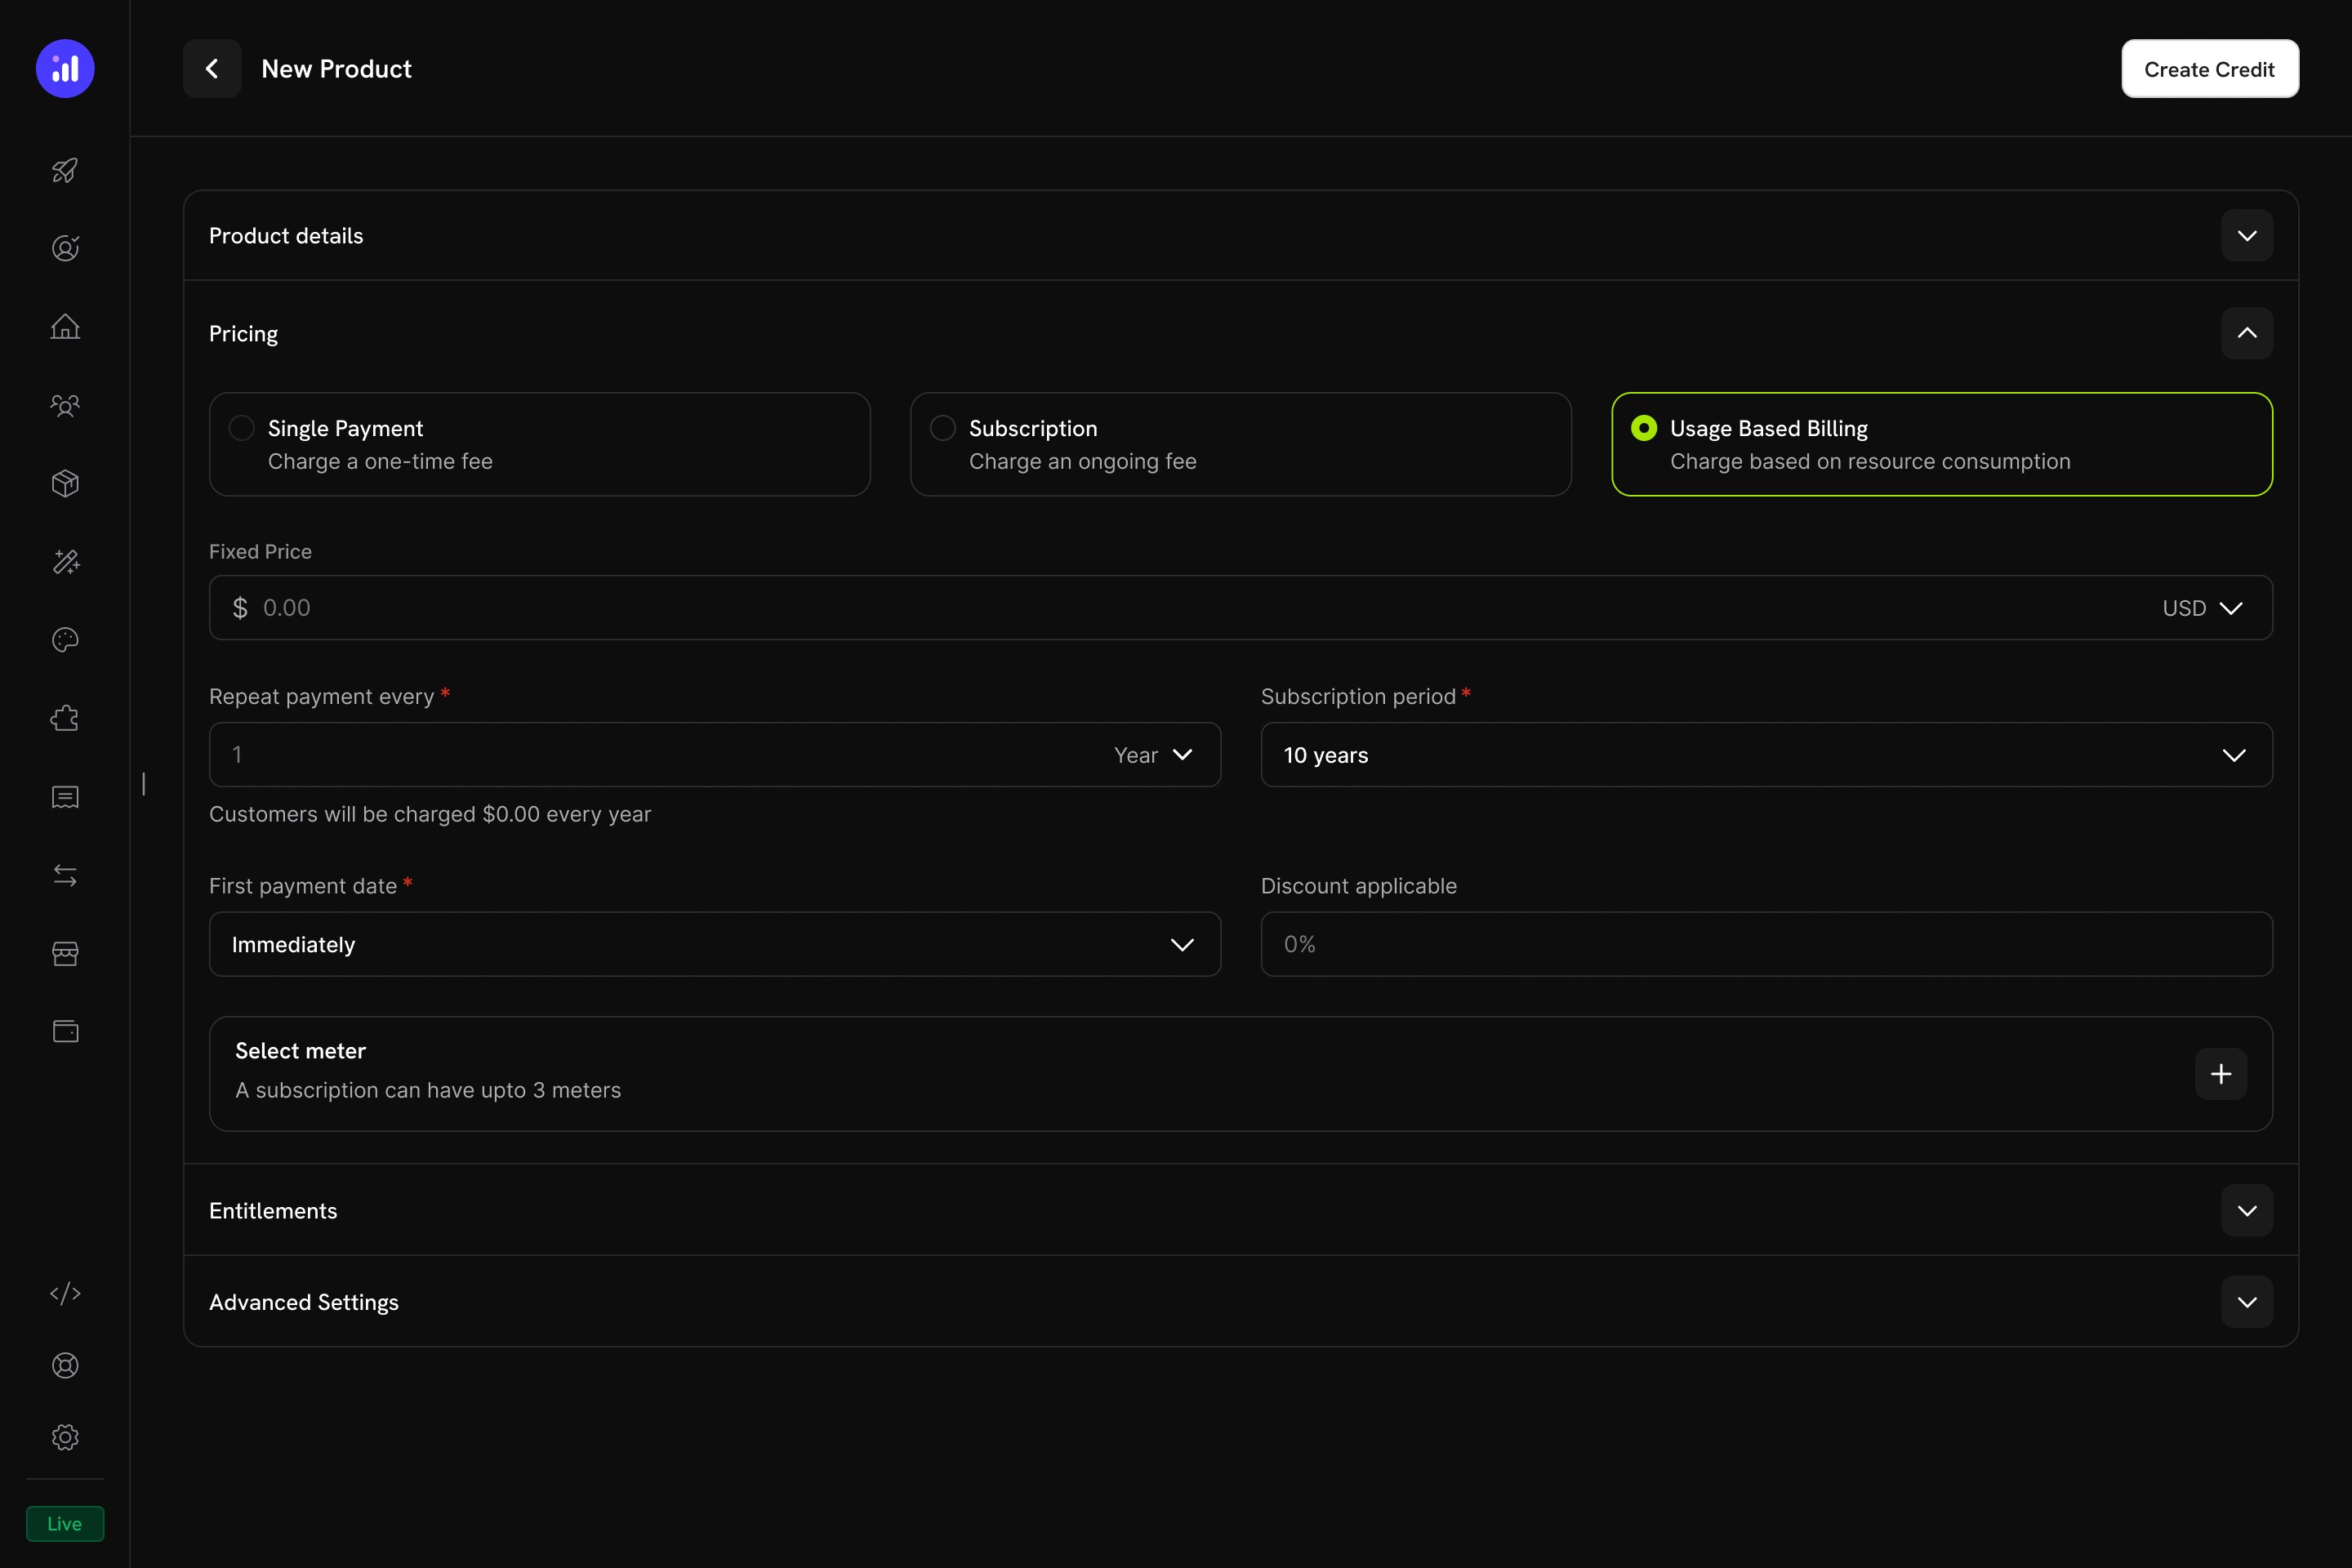
Usage Based Billing pricing type with meter configuration.
Starter Plan ($29/월 — 10M 토큰, 초과 사용량 없음)
Create the Starter Product
- Products로 이동하고 Add Product를 클릭합니다.
- Pricing Type에서 Usage Based Billing을 선택합니다.
- 다음 값을 입력합니다.
NeuralAPI StarterDescription: 10 million API tokens per month. Perfect for individual developers and small projects.Price: 29.00. 사용량이 발생하기 전에도 매월 청구되는 반복 기본 요금입니다.Repeat payment every: 1 monthCurrency: USDAttach the Meter
Token Usage Meter를 추가합니다. 그런 다음 meter를 구성합니다.- Bill usage in credits를 켭니다.
- Select credit:
API Tokens - Meter units per credit:
1. 이벤트의 각 토큰이 크레딧 하나를 차감합니다. - Free Threshold:
0. free threshold는 meter가 금액으로 청구될 때만 적용됩니다. 크레딧으로 청구할 때는 모든 단위가 잔액에서 차감됩니다.
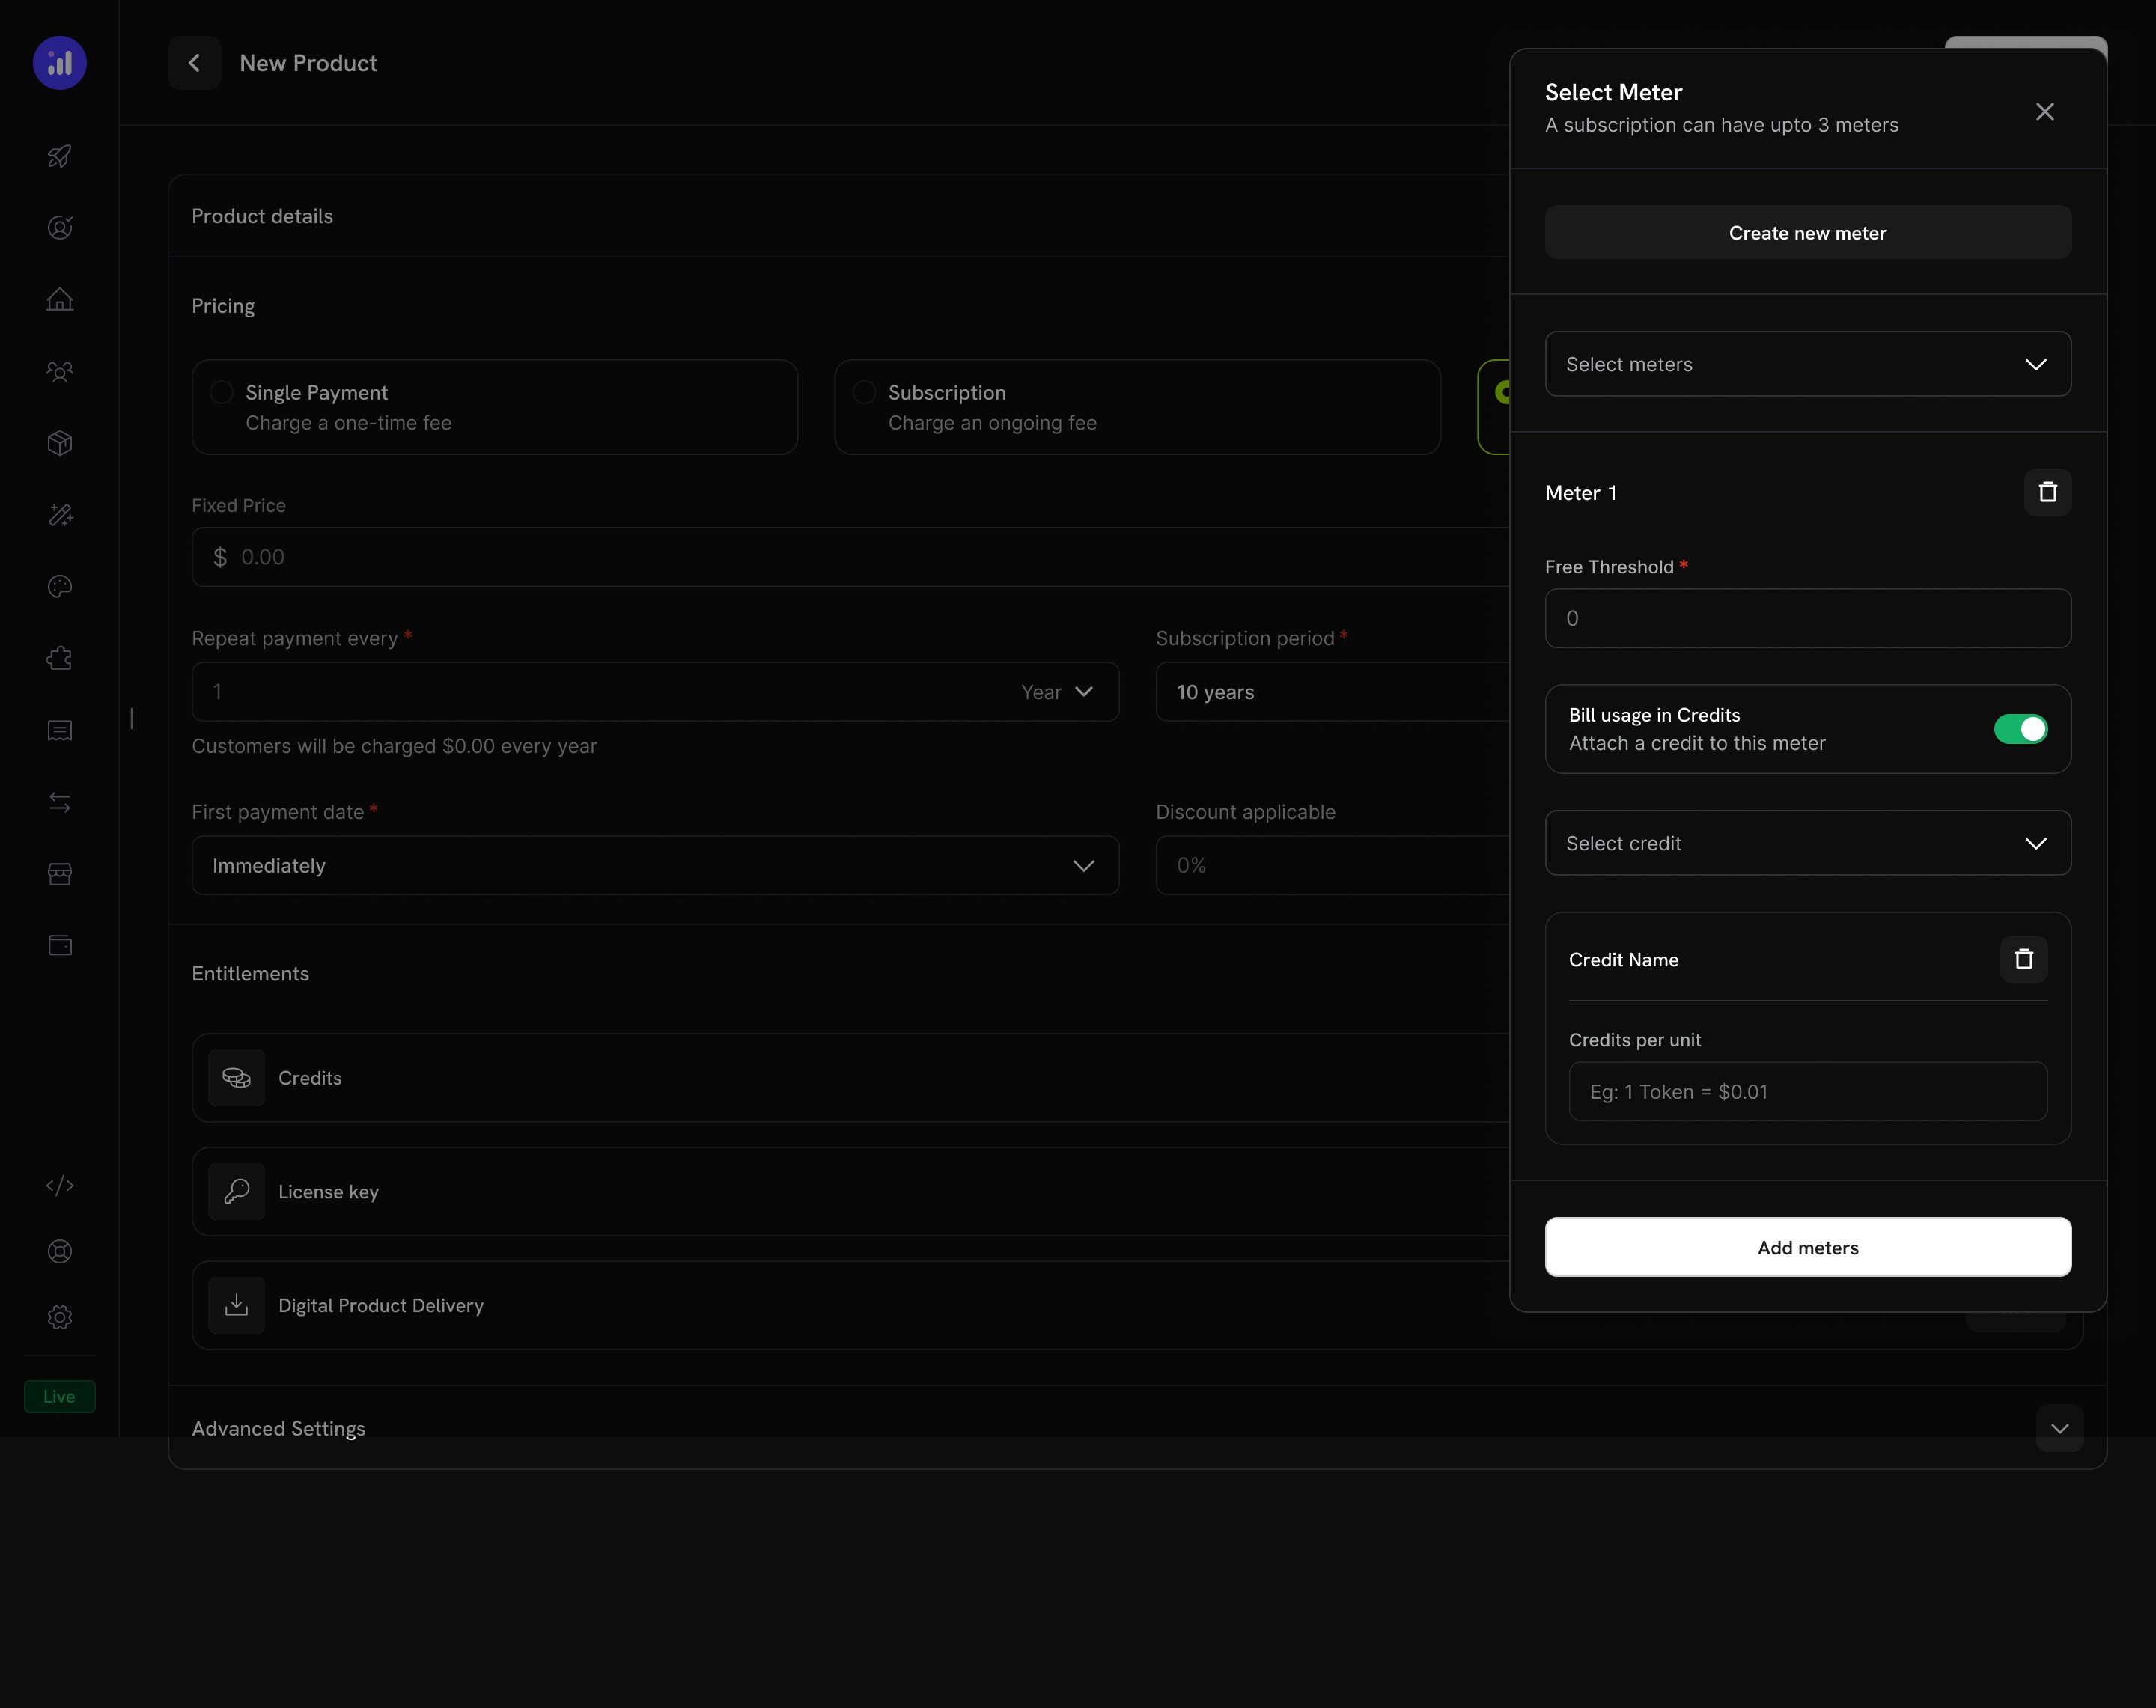
Toggle 'Bill usage in Credits' on the meter and pick the credit entitlement.
api.tokens_used 이벤트가 고객 잔액에서 차감됩니다.Configure Credit Issuance for Starter
10000000Import Default Credit Settings: 켭니다. 그러면 제품이 credit entitlement의 30일 만료 기간을 사용합니다.Allow Overage: 끕니다. 1단계의 기본 설정에 따라 초과 사용량이 비활성화되므로 Starter 고객은 잔액이 0이 되면 중단됩니다.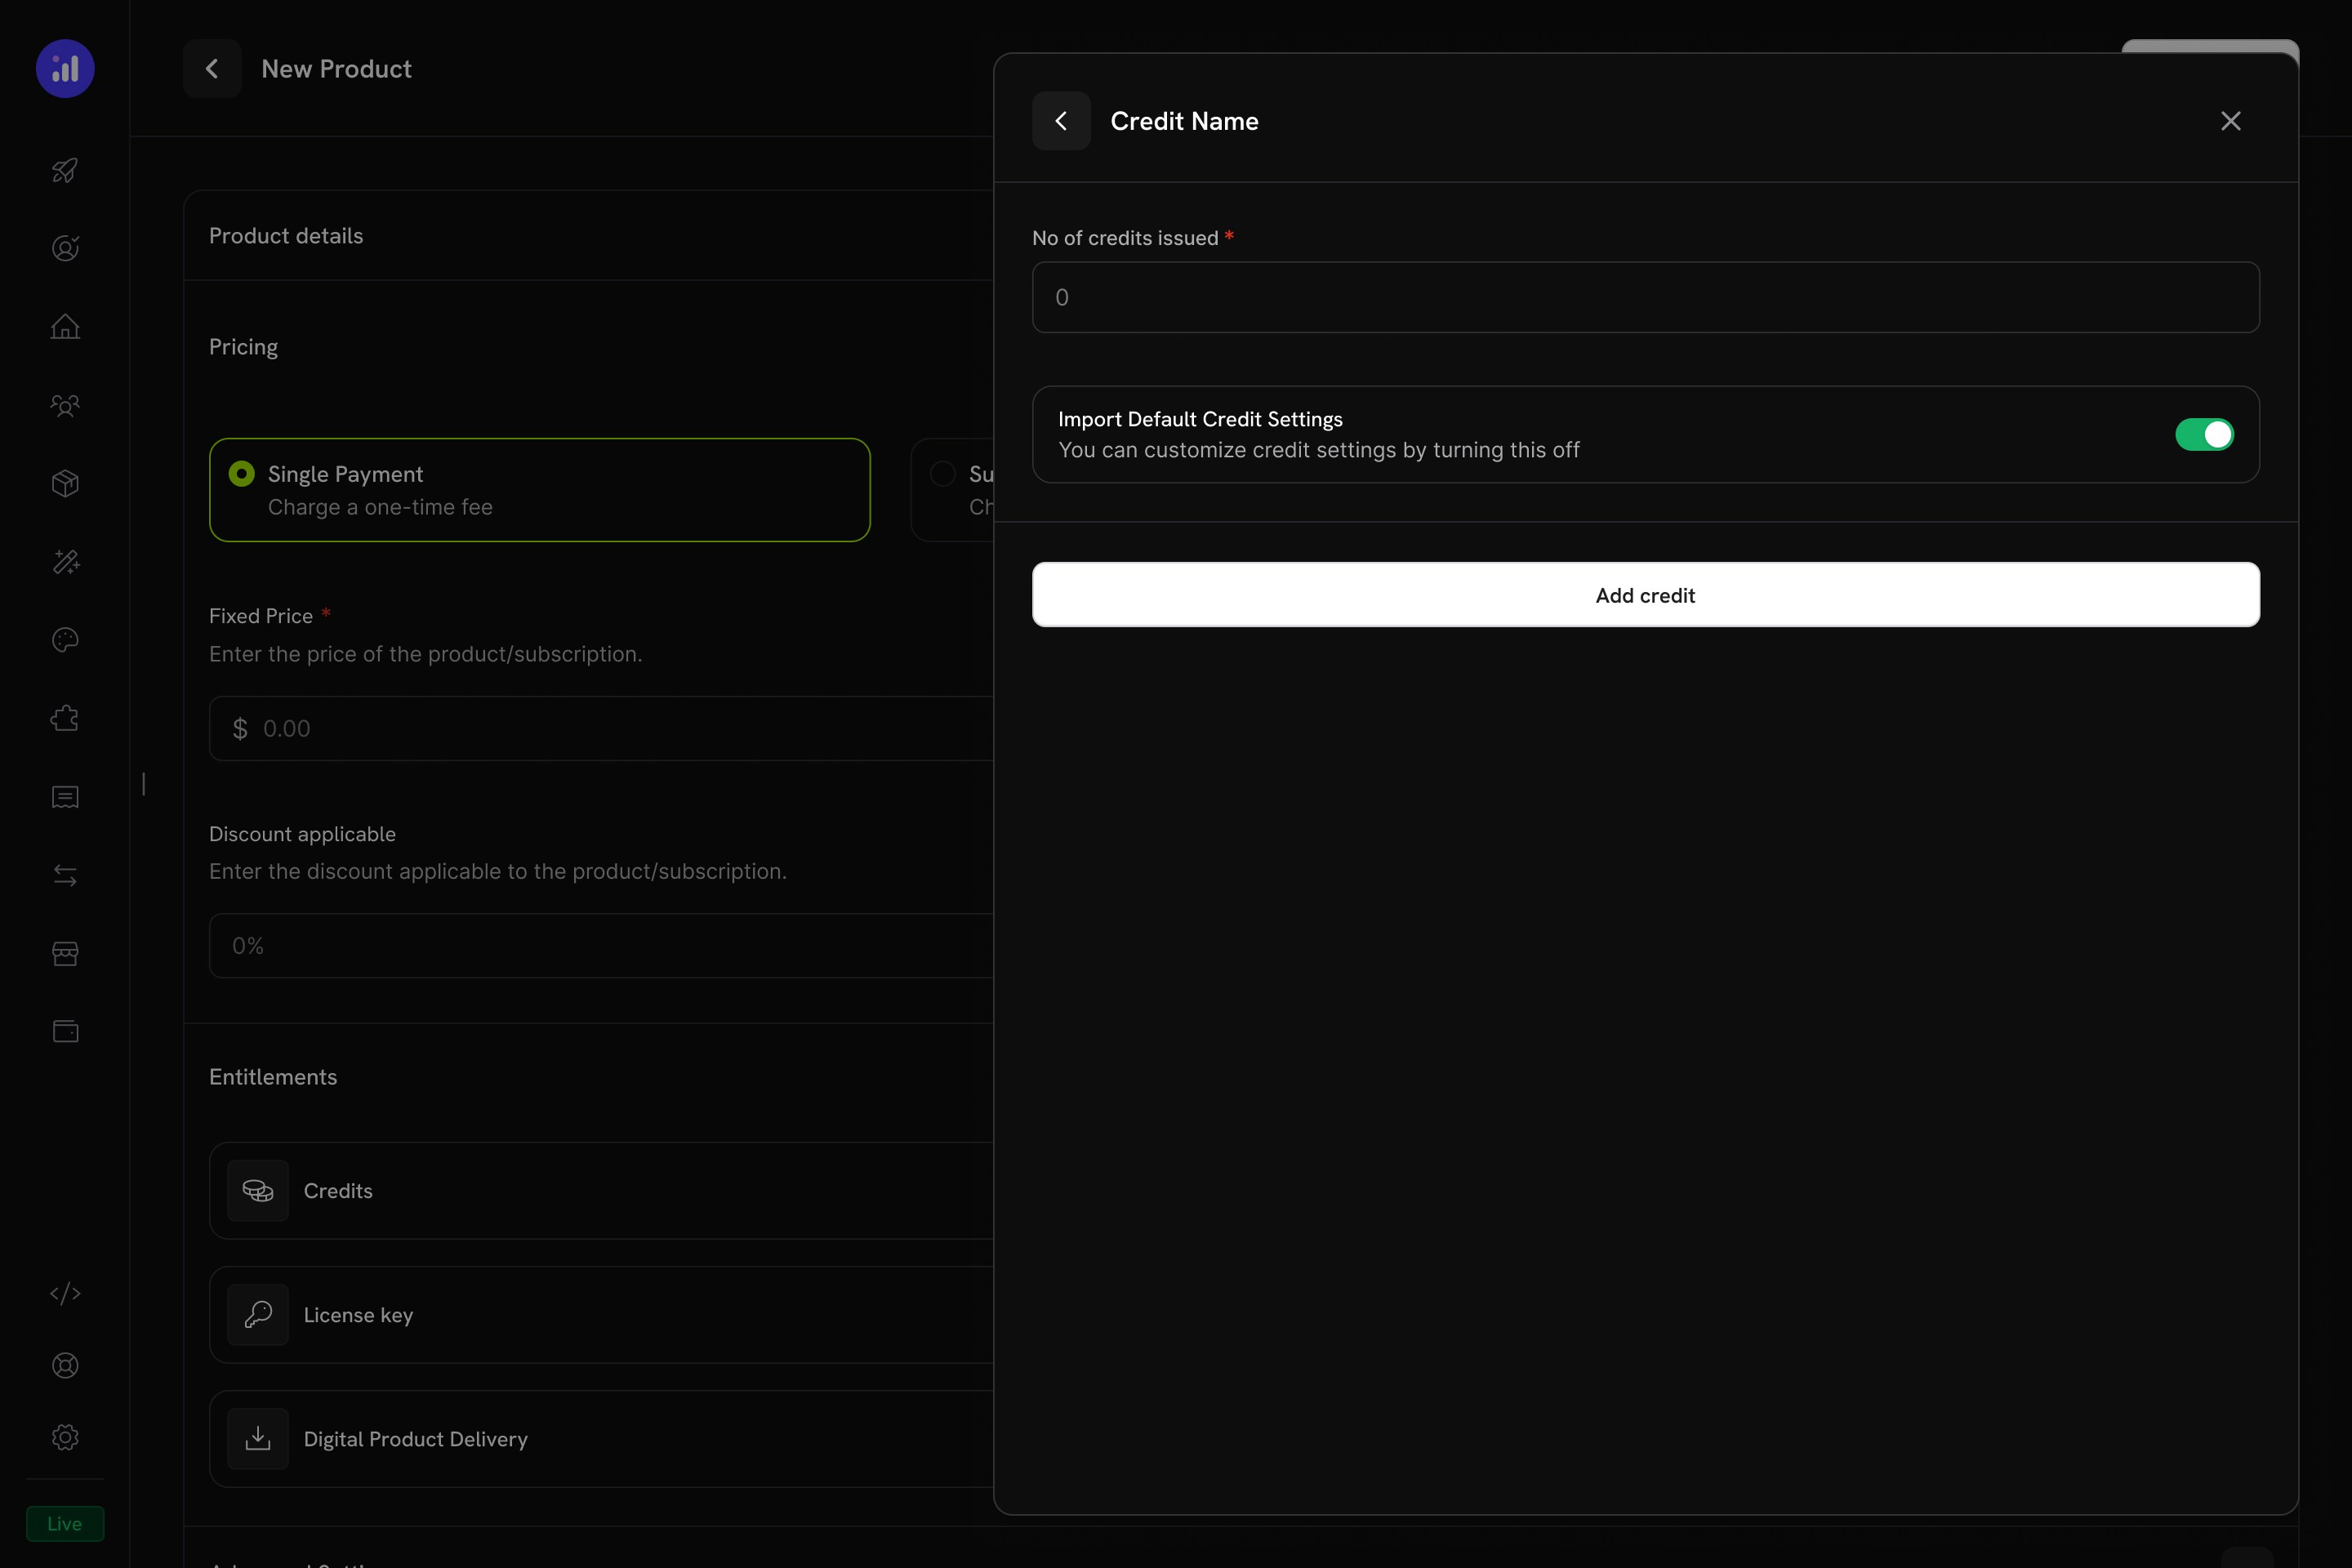
Configure credit issuance per cycle on the UBB product.
pdt_로 시작합니다.Pro Plan ($99/월 — 40M 토큰, 초과 사용량 허용)
Create the Pro Product
NeuralAPI ProDescription: 40 million API tokens per month with overage. Built for production applications.Price: 99.00Repeat payment every: 1 monthCurrency: USDAttach the Meter
Token Usage Meter를 추가하고, Bill usage in credits를 켜고, API Tokens를 선택한 다음 Meter units per credit을 1로, Free Threshold를 0로 설정합니다.Configure Credit Issuance with Overage
40000000Import Default Credit Settings: 끕니다. 그러면 이 제품에 대한 초과 사용량을 설정할 수 있습니다.Allow Overage: 켭니다.Price Per Unit: 0.000005 USD per token. 이는 1K 토큰당 $0.005 또는 1M 토큰당 $5이며, 플랜의 실질적인 토큰당 요금보다 높아 초과 사용량을 억제합니다.Overage Behavior: Bill overage at billing. 초과 사용량은 다음 invoice에 청구되며 잔액은 다시 설정됩니다.제품을 저장하고 ID를 복사합니다.4단계: 토큰 추가 충전 팩 생성
추가 충전 팩은 기존 고객의 잔액에 5,000,000 토큰을 추가하는 일회성 구매 제품입니다.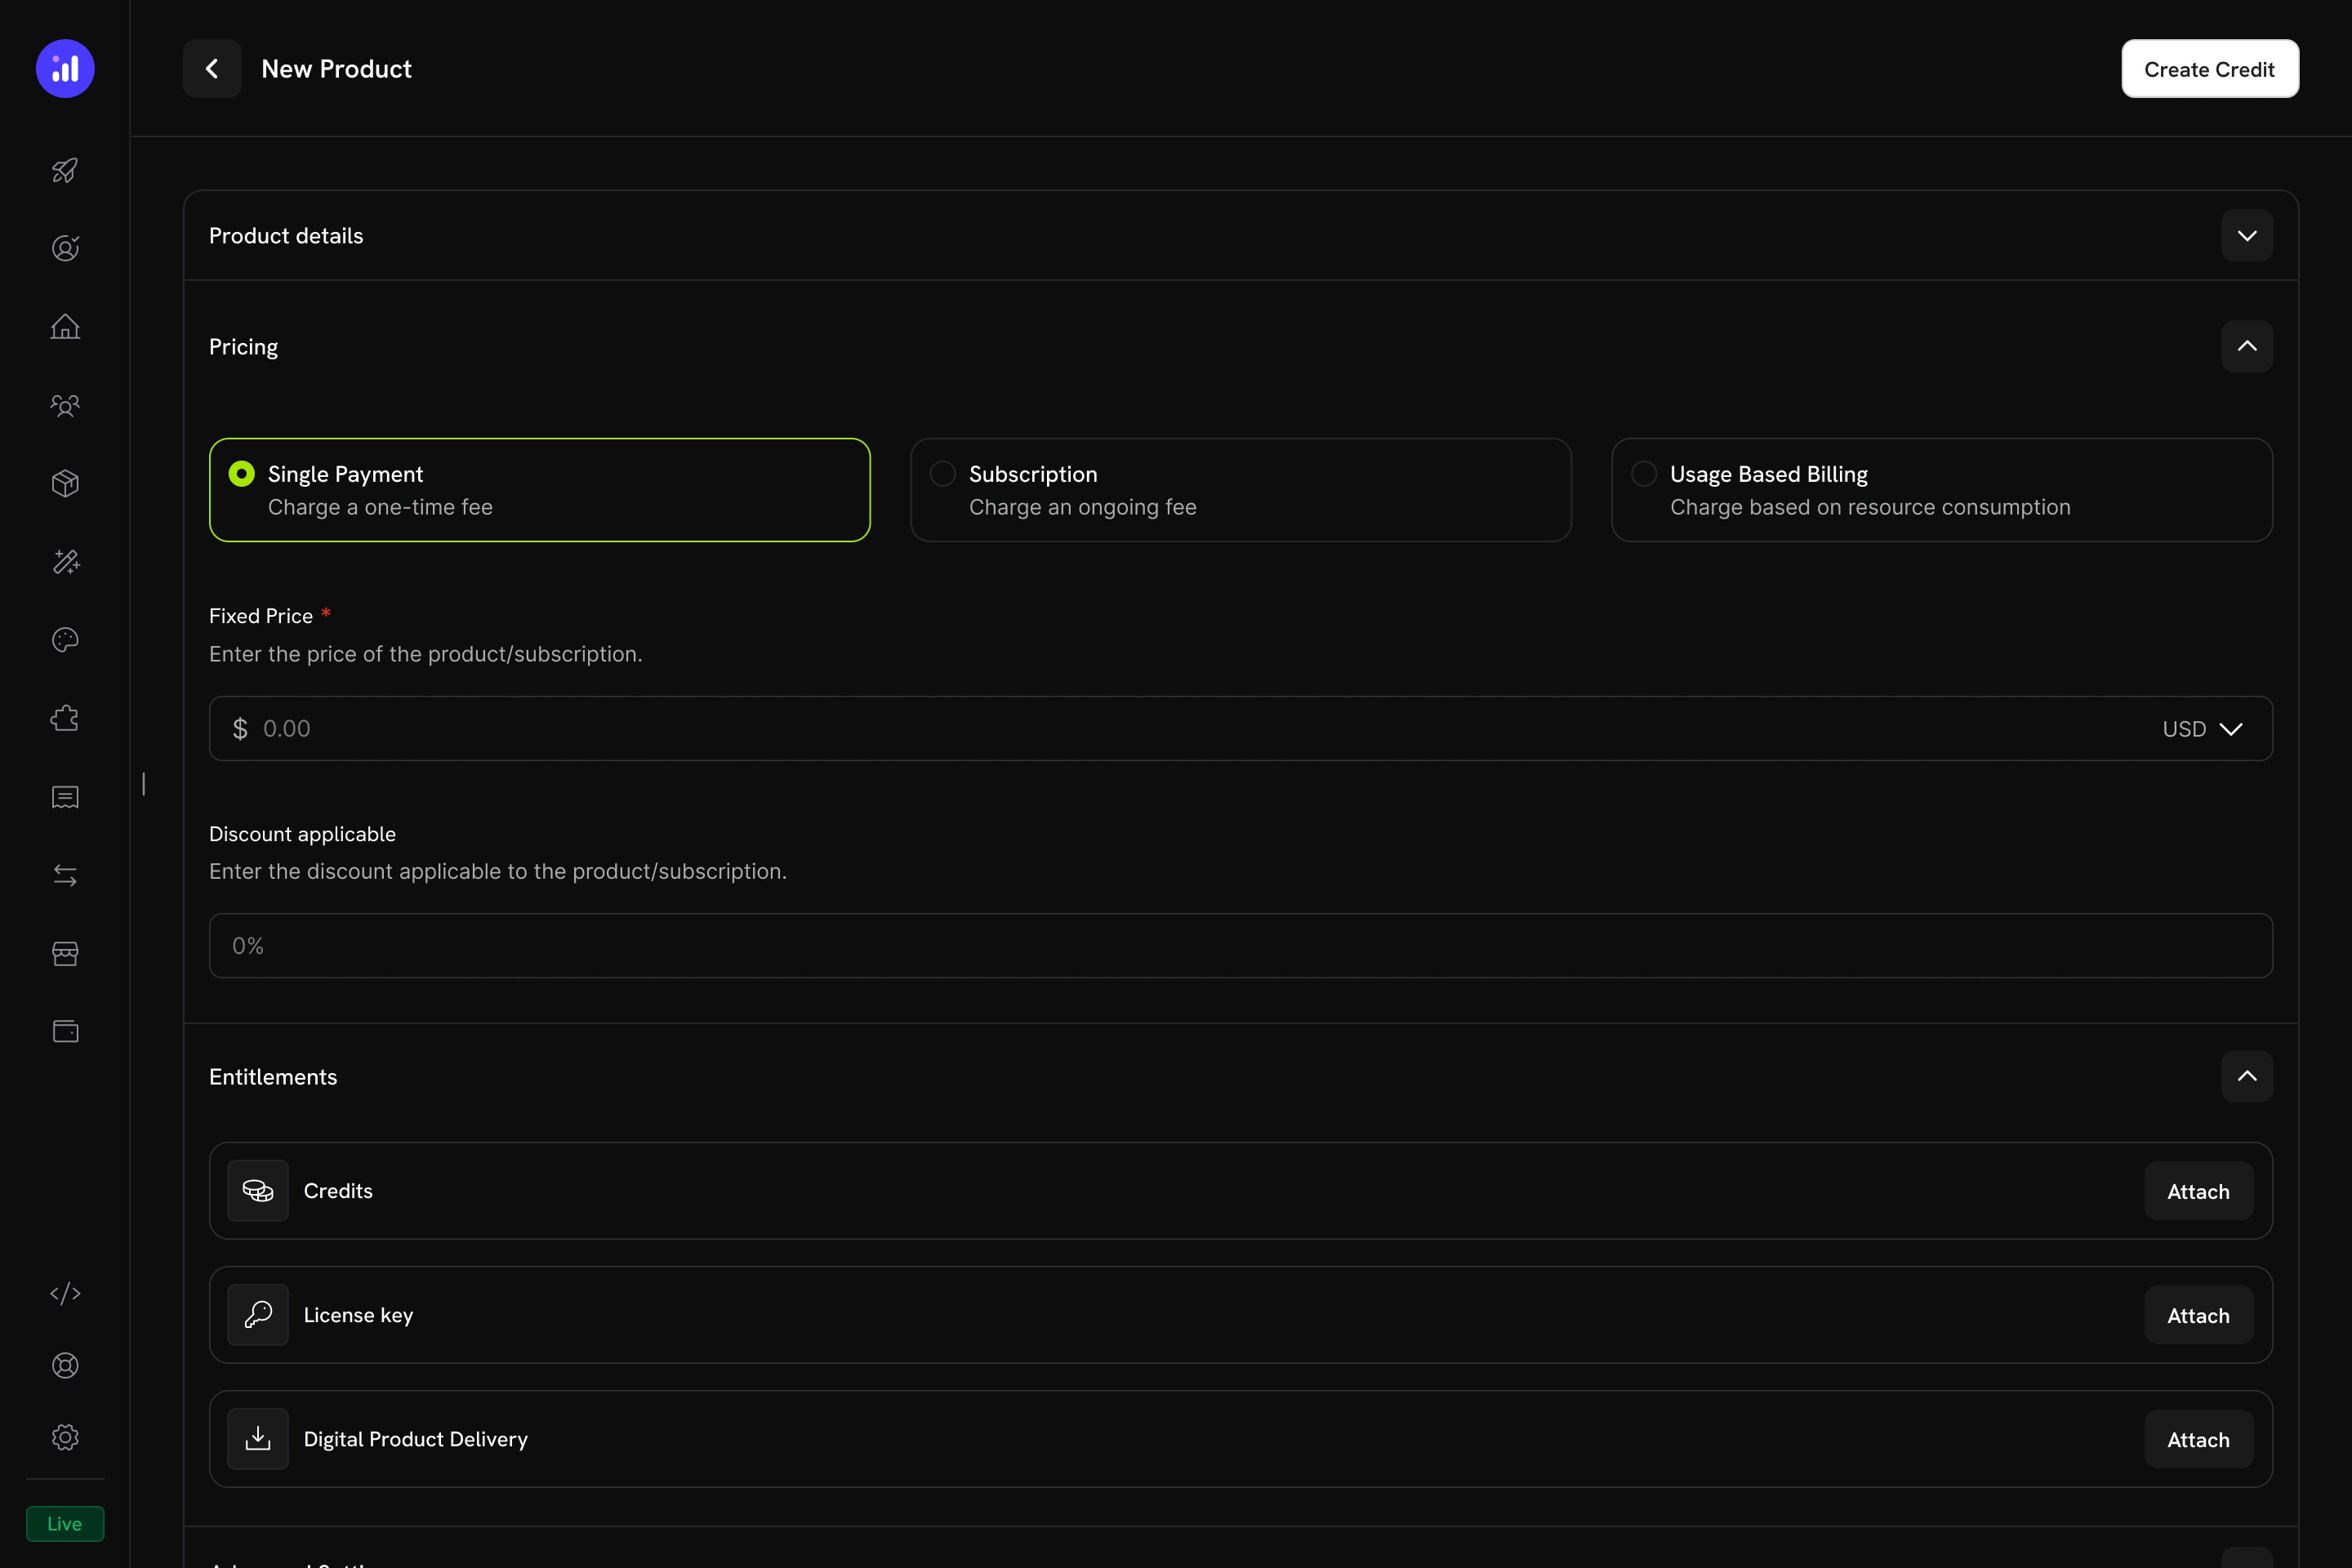
One-time pricing selected for a credit product.
Create a One-Time Product
- Products로 이동하고 Add Product를 클릭합니다.
- Pricing Type에서 One Time을 선택합니다.
- 다음 값을 입력합니다.
Token Top-Up PackDescription: Add 5 million tokens to your NeuralAPI balance.Price: 19.00Currency: USDAttach the Token Credit
- Entitlements 섹션에서 Credits 옆의 Attach를 클릭합니다.
API Tokens를 선택합니다.- No of credits issued를
5000000로 설정합니다. - Import Default Credit Settings를 끄고 기본 30일 만료를 재정의합니다.
- Credit Expiry를 Custom으로 설정하고
365일을 입력합니다. - 제품을 저장합니다.
5단계: 백엔드 구축
Express server를 구축합니다. 이 서버는 구독 및 추가 충전 checkout을 생성하고, OpenAI를 호출하여 토큰을 청구하고, 잔액을 읽으며, credit webhook events를 수신합니다.Set Up Your Project
tsconfig.json을 생성합니다.package.json scripts를 업데이트합니다.Set Up Environment Variables
.env를 생성합니다.DODO_PAYMENTS_WEBHOOK_KEY를 입력합니다.Implement the Server
src/server.ts를 생성하세요. completion endpoint는 대량 요청에 적합한 OpenAI의 gpt-6-luna 모델을 호출합니다. package.json 탭에는 전체 dependency 목록이 표시됩니다:How Deductions Happen
- handler가 OpenAI를 호출하고
usage.total_tokens를 읽습니다. 예를 들어 1532입니다. event_name: api.tokens_used및metadata: { tokens: 1532 }와 함께 하나의 사용량 event를 수집합니다.Token Usage Meter가 고객별로 event를 집계합니다. 백그라운드 worker가 매분 새로운 event를 처리합니다.- meter가 Bill usage in credits를 통해
API Tokenscredit에 요금을 부과하므로, Dodo Payments는 고객의 grant 중 가장 먼저 만료되는 것부터 시작해 1532 credits를 차감합니다(FIFO). - 초과 사용이 활성화되어 있고 잔액이 소진되면 부족한 금액이 추적되고 다음 invoice에서 청구됩니다.
Step 6: Demo Frontend 추가
브라우저에서 모든 flow를 테스트할 수 있도록public/index.html를 생성하세요. 페이지는 고객 ID를 localStorage에 저장하므로, 로그인한 앱에서처럼 subscribe, generate, top-up이 하나의 identity를 공유합니다:
Step 7: Webhook 연결
Webhook을 사용하면 서버가 잔액 변경에 반응할 수 있습니다. 예를 들어 잔액이 부족해지는 고객에게 이메일을 보낼 수 있습니다.Expose Your Local Server
ngrok-free.app로 끝납니다.Register the Webhook in Dodo Payments
- dashboard에서 Developer → Webhooks로 이동하고 Add endpoint를 클릭합니다.
- 자체 tunnel host를 사용해 URL
https://your-tunnel.ngrok-free.app/webhooks/dodo을 입력합니다. - 다음 event를 최소한 선택합니다:
credit.addedcredit.deductedcredit.overage_charged
- Create endpoint를 클릭한 다음 endpoint의 Overview 탭에서 signing secret을 복사합니다.
- 이를
.env에DODO_PAYMENTS_WEBHOOK_KEY로 붙여넣은 다음npm run dev를 다시 시작합니다.
Step 8: 전체 Flow 테스트
Subscribe a Test Customer
npm run dev를 실행합니다.http://localhost:3000를 엽니다.- Pro를 선택하고 test email address와 이름을 입력한 다음 Get Checkout Link를 클릭합니다. test card details를 사용해 checkout을 완료합니다.
- dashboard에서 Customers로 이동하고 가장 최근의 customer를 연 다음,
cus_로 시작하는 ID를 복사합니다. - demo의 Logged-in customer ID field에 ID를 붙여넣고 Save를 클릭합니다.
Generate an AI Response
total_tokens를 읽은 다음 사용량 event를 수집하고 response를 반환합니다.Test the Top-Up Flow
credit.added event가 표시됩니다.Troubleshooting
Credits not deducting after usage events
Credits not deducting after usage events
- meter의 event name이 전송한
event_name와 일치하지 않습니다.api.tokens_used는 대소문자를 구분합니다. - meter가 product의
API Tokenscredit에 연결되지 않았습니다. product의 meter configuration을 열고 Bill usage in credits가 활성화되어 있는지 확인하세요. metadata.tokenskey가 meter의 Over Property와 일치하지 않습니다.- 고객의 grant가 만료되었습니다. 고객의 credit history를 확인하세요.
- Products → Meters에서 meter를 열고 product attachment에 연결된 credit name이 표시되는지 확인합니다.
- meter의 Events 탭을 엽니다. 수집된 event는 차감 전에도 여기에 표시됩니다.
- Customers에서 customer를 열고 Credits 탭을 선택합니다. ledger entry는 1~2분 이내에 표시됩니다.
Balance always shows 0 or 'customer not found'
Balance always shows 0 or 'customer not found'
- 고객이 checkout을 완료하지 않았습니다. 크레딧은 결제가 성공한 후에만 발급됩니다.
- 잘못된
customer_id로 조회하고 있습니다. 자체 database의 ID가 아니라 dashboard에서cus_로 시작하는 ID를 사용하세요. .env의CREDIT_ENTITLEMENT_ID가 product에 연결된 credit과 일치하지 않습니다.
Overage not working for Pro plan customers
Overage not working for Pro plan customers
- Pro product의 credit attachment에서 초과 사용이 활성화되지 않았습니다. credit의 설정은 기본값일 뿐입니다.
- 고객이 Pro가 아닌 Starter를 사용하고 있습니다.
- Overage Limit이 0으로 설정되어 있습니다.
0.000005인지 확인합니다(백만 tokens당 $5). 앞쪽의 0을 확인하세요. 이 field는 1K tokens당 가격이 아니라 token당 가격을 입력합니다.Webhook verification failed in logs
Webhook verification failed in logs
- Body parsing 순서 문제입니다.
express.json()가/webhooks/dodo에서express.raw()보다 먼저 실행되었습니다. SDK에는 파싱된 JSON이 아니라 request의 raw bytes가 필요합니다. DODO_PAYMENTS_WEBHOOK_KEY에 잘못된 signing secret이 들어 있습니다.- reverse proxy가 request header를 다시 작성합니다.
app.use('/webhooks/dodo', express.raw(...)) line이 server.ts의 app.use(express.json())보다 앞에 있는지 확인하세요.도움이 필요하신가요?
축하합니다! NeuralAPI의 Credit-Based Billing을 구축했습니다
이제 NeuralAPI는 checkout부터 차감까지 크레딧을 기준으로 청구합니다:Token Credit Entitlement
Tiered Plans, One Credit
One-Time Top-Up Pack
Deduction Through a Meter
Live Balance API
Verified Webhook Pipeline
/credits/:customerId및/api/generate에 authentication을 추가하세요. 현재 상태에서는 누구나 임의의 customer ID로 호출할 수 있습니다. 사용자를 인증하고 서버에서 customer ID를 조회하세요.- 안정적인
event_id값을 사용하세요. 예제에서는Date.now()와 random string을 사용합니다. production에서는 request ID를 사용해 retry가 idempotent하도록 하세요. Dodo Payments는 이미 수집한event_id를 가진 event를 무시합니다. - customer-to-user mapping을 저장하세요. 첫 checkout 후 database에
customer_id를 저장해 사용자가 직접 붙여넣지 않도록 하세요. - subscription이 종료될 때의 동작을 결정하세요. Plan credit은 발급 후 30일이 지나 만료될 때까지 고객의 ledger에 유지되고, top-up credit은 365일 동안 유효합니다. tutorial의
/api/generate는 subscription status가 아니라 잔액만 확인하므로, 취소된 고객도 남은 token을 계속 사용할 수 있습니다. 이것이 고객 친화적인 기본 동작입니다. 더 엄격한 접근을 원한다면 (a)subscription.cancelledwebhook을 수신하고 subscription status에 따라/api/generate를 제한하거나, (b) 취소 시 ledger API로 사용하지 않은 plan credit을 차감하세요. 차감은 먼저 만료되는 grant에서 이루어지므로 30일 plan credit이 365일 top-up credit보다 먼저 사용됩니다. - Usage Billing dashboard를 모니터링하여 metering 이상을 조기에 발견하세요.