이 튜토리얼은 Node.js/Express 애플리케이션용 샘플 구현 코드를 제공합니다. 이 코드는 특정 프레임워크(Next.js, React, Vue 등)에 맞게 수정하고 애플리케이션 요구 사항에 따라 사용자 인터페이스를 커스터마이즈할 수 있습니다.
- 좌석 기반 가격 책정으로 구독 제품 만들기
- 추가 좌석을 위한 추가 기능 설정
- 사용자 지정 추가 기능 수량으로 결제 링크 생성
- 동적 좌석 수로 체크아웃 세션 처리
우리가 만들고 있는 것
좌석 기반 가격 모델을 만들어 보겠습니다:- 기본 요금제: 팀원 5명까지 월 $49
- 좌석 추가 기능: 추가 좌석당 월 $2
- 결제 링크: 사용자 지정 좌석 수량으로 동적 체크아웃
시작하기 전에 다음이 준비되어 있는지 확인하세요:
- Dodo Payments 계정
- TypeScript/Node.js에 대한 기본적인 이해
1단계: 좌석 추가 기능 만들기
이제 추가 좌석을 나타내는 추가 기능을 만들어야 합니다. 이 추가 기능은 기본 구독에 연결되어 고객이 추가 좌석을 구매할 수 있도록 합니다.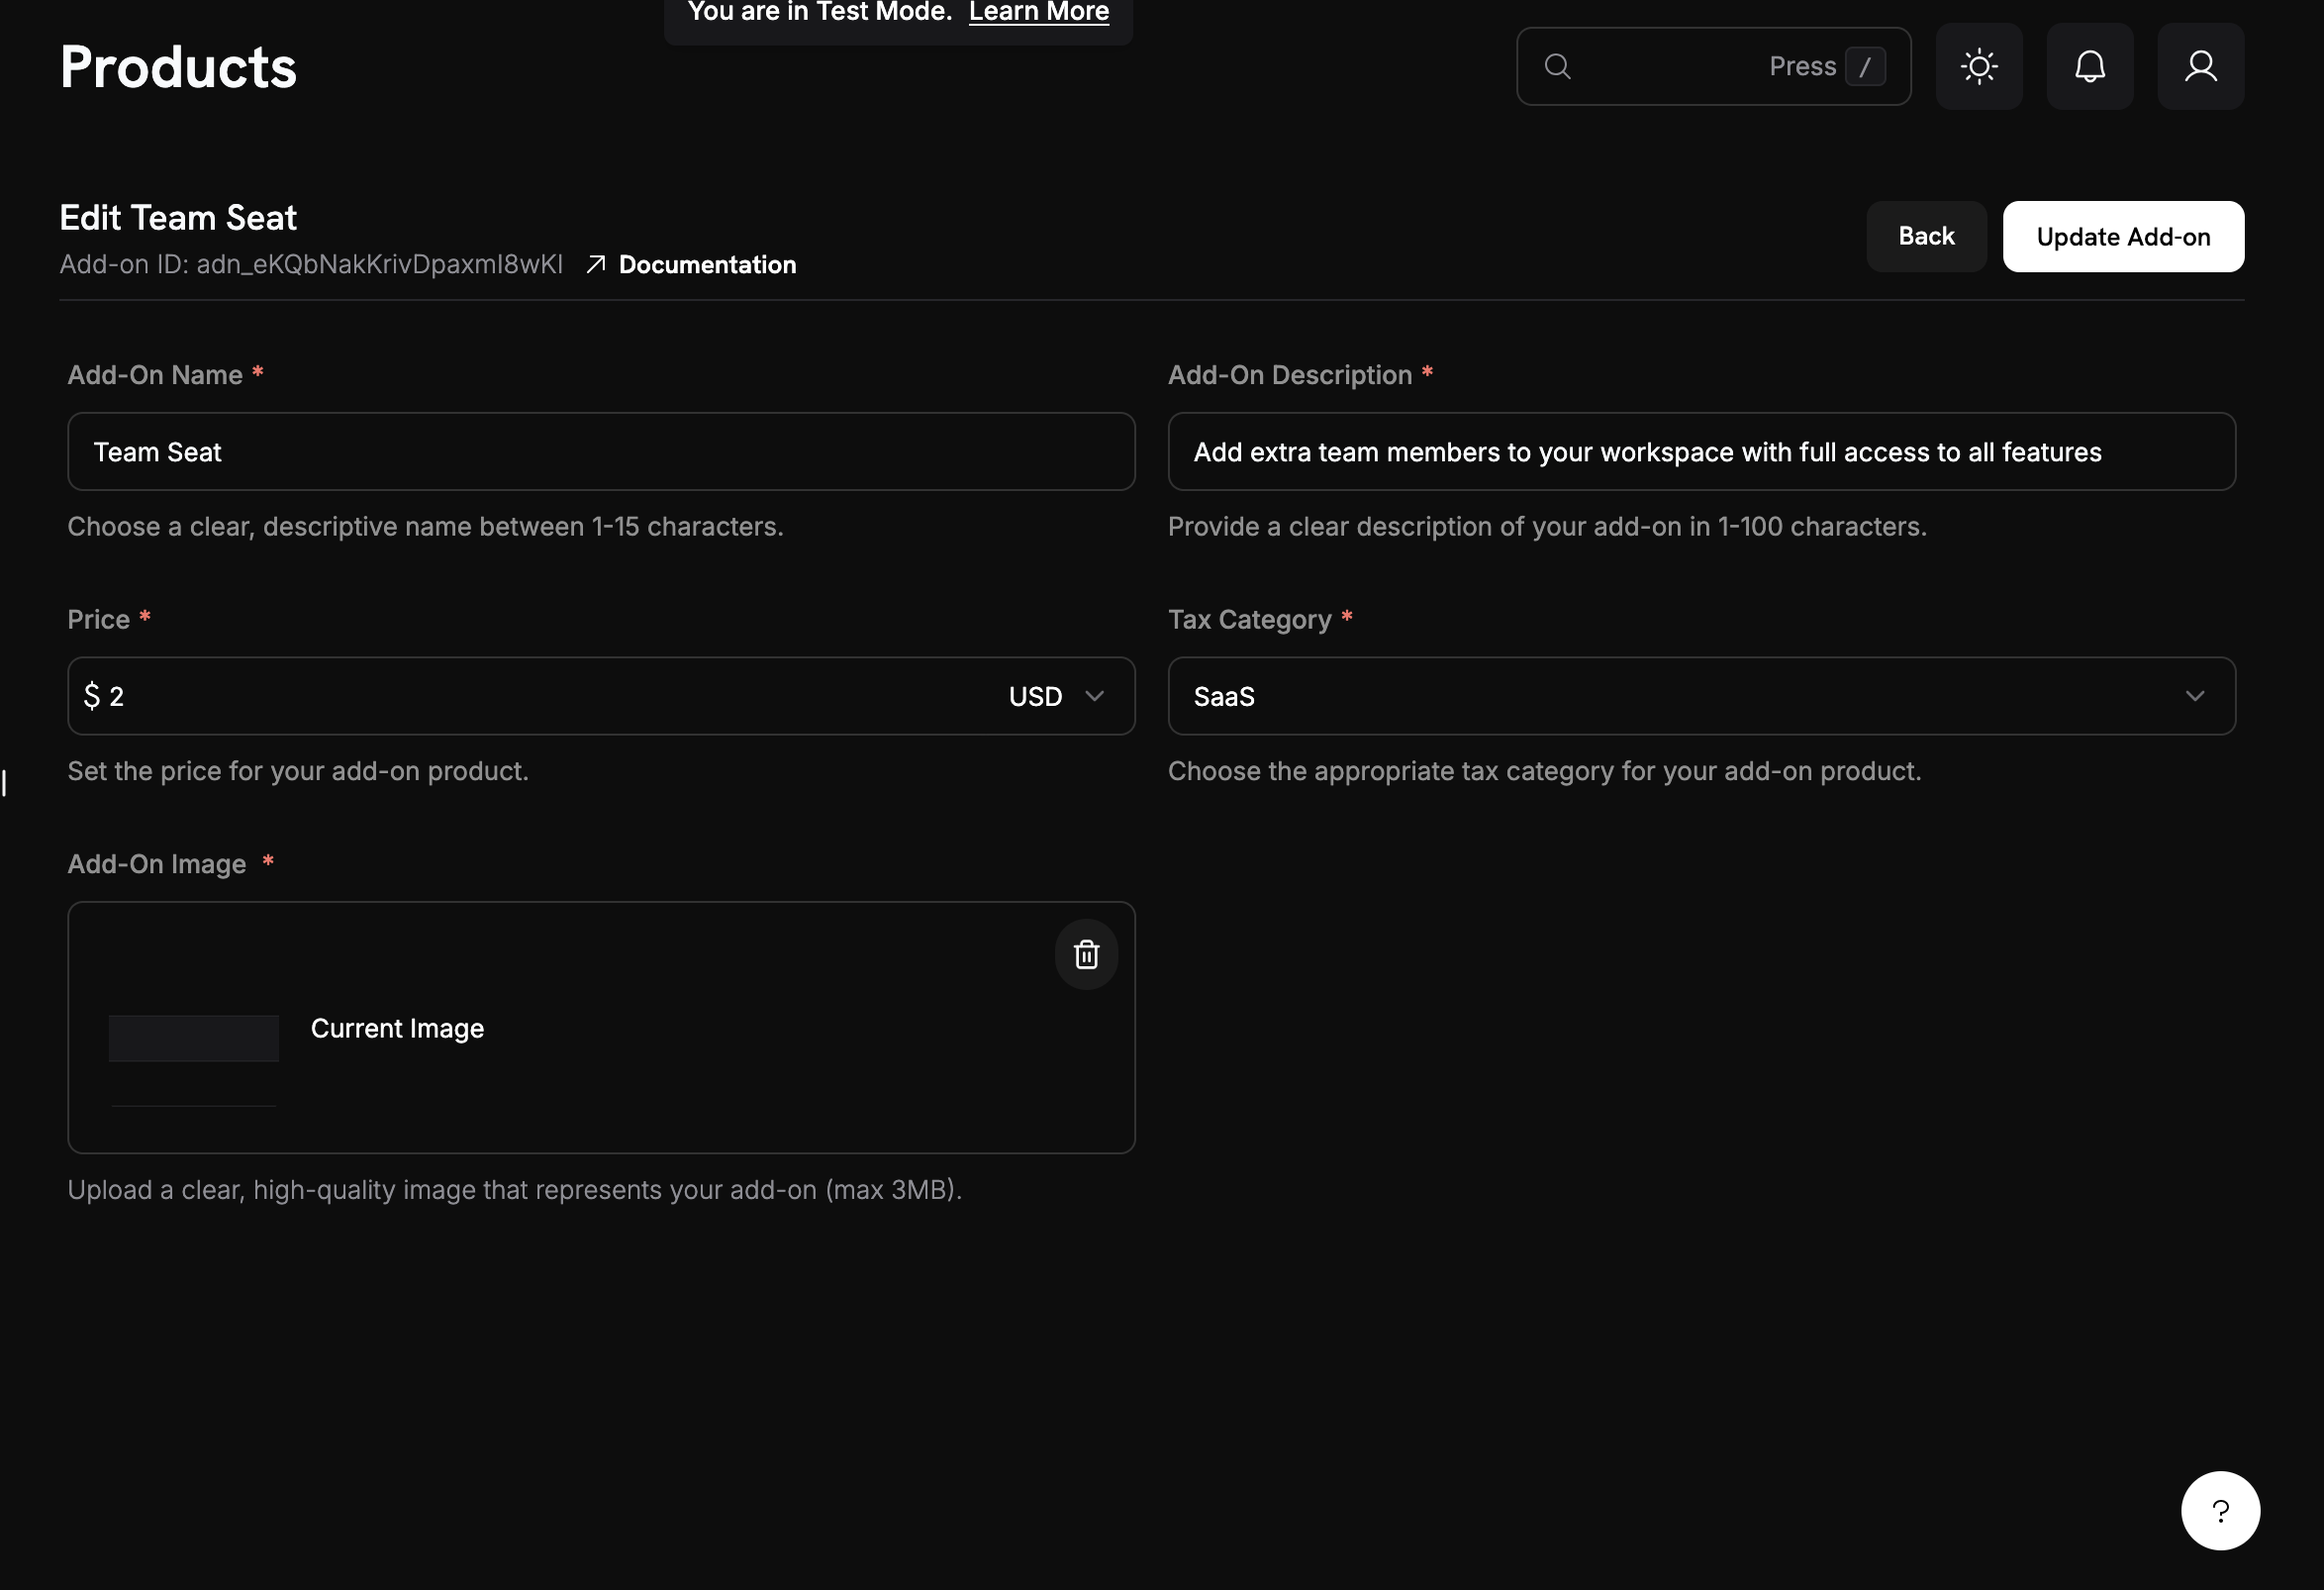
1
Navigate to Add-Ons
- Dodo Payments 대시보드에서 Products 섹션에 머물러 있습니다.
- Add-Ons 탭을 클릭하세요.
- Create Add-On을 클릭하세요.
2
Enter add-on details
다음 값을 좌석 추가 기능에 입력하세요:Add-On Name:
Additional Team SeatDescription: Add extra team members to your workspace with full access to all featuresPrice: → 2.00를 입력하세요통화: 기본 구독 통화와 일치해야 합니다.세금 카테고리: 제품에 적합한 카테고리를 선택하세요.3
Save your add-on
- 모든 설정을 검토합니다:
- 이름: Additional Team Seat
- 가격: $2.00/월
- Create Add-On을 클릭하세요.
추가 기능이 생성되었습니다! 좌석 추가 기능을 이제 구독에 연결할 수 있습니다.
2단계: 기본 구독 제품 만들기
팀원 5명이 포함된 기본 구독 제품을 만드는 것으로 시작하겠습니다. 이것이 좌석 기반 가격 모델의 기초가 될 것입니다.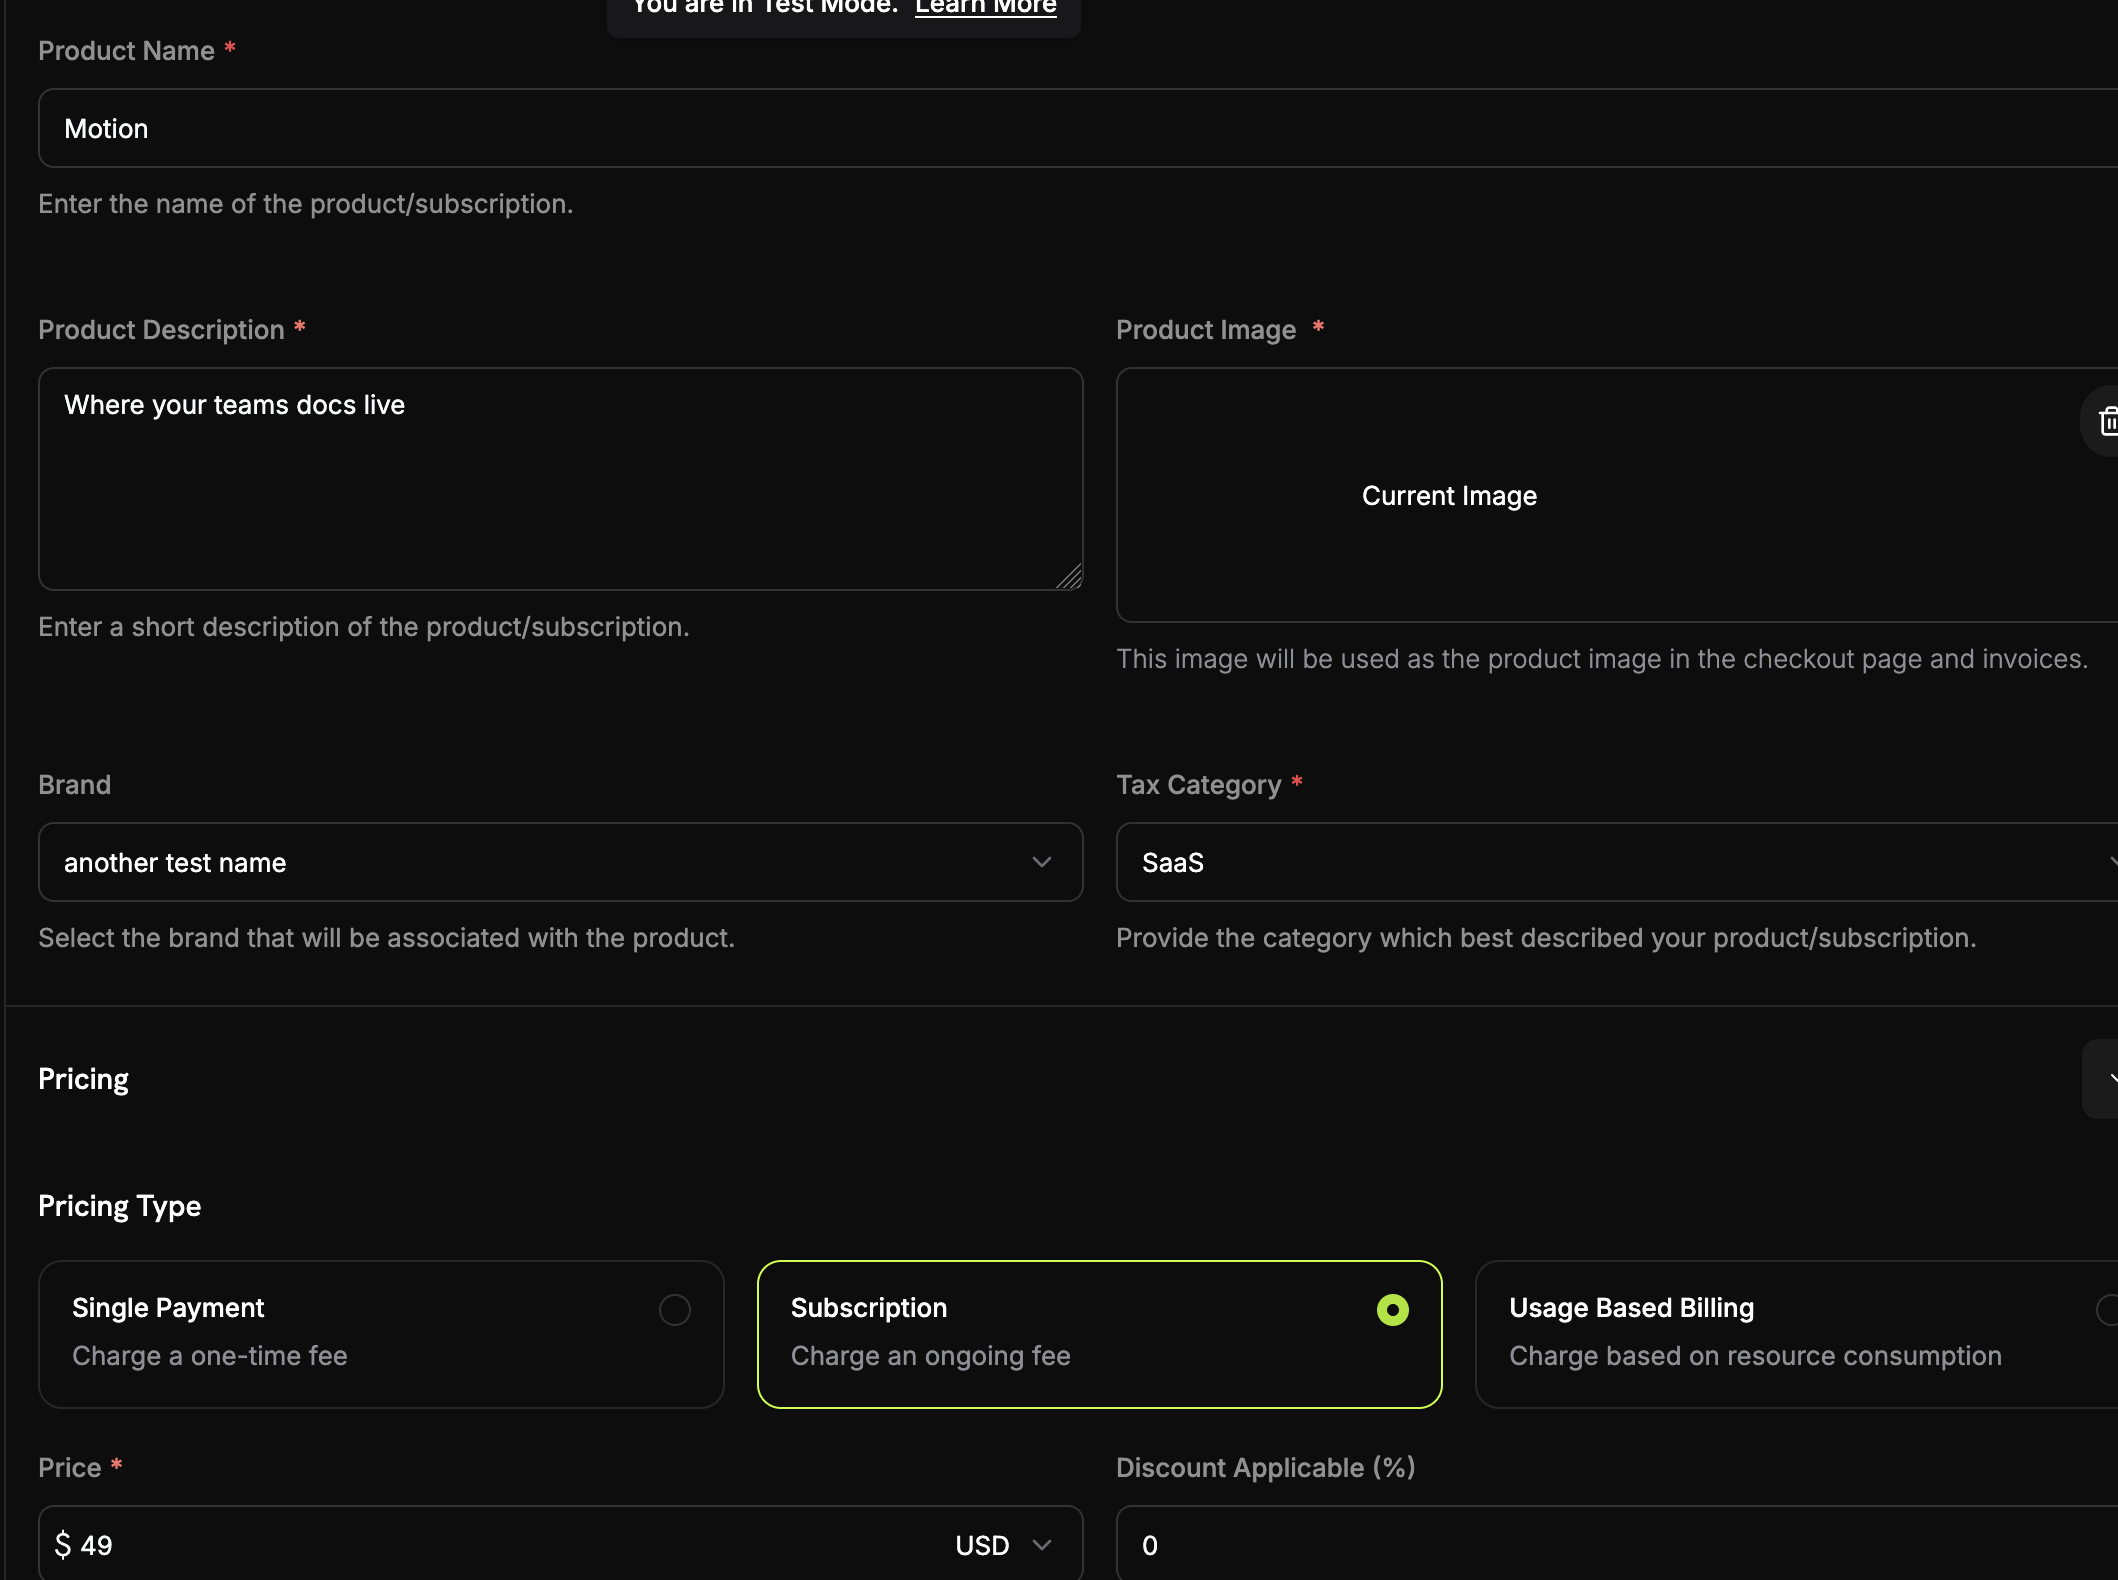
1
Navigate to Products
- Dodo Payments 대시보드에 로그인하세요.
- 왼쪽 사이드바에서 Products를 클릭하세요.
- Create Product 버튼을 클릭하세요.
- 상품 유형으로 Subscription을 선택하세요.
2
Fill in the subscription details
이제 기본 요금제에 대한 구체적인 세부 정보를 입력합니다:Product Name:
MotionDescription: Where your team's documentation lives.Recurring Price: → 49.00를 입력하세요Billing Cycle: → Monthly를 선택하세요Currency: 원하는 통화를 선택하세요(예: USD)3단계: 추가 기능을 구독에 연결하기
이제 고객이 체크아웃 중에 추가 좌석을 구매할 수 있도록 기본 구독과 좌석 추가 기능을 연결해야 합니다.1
Attach the seat add-on
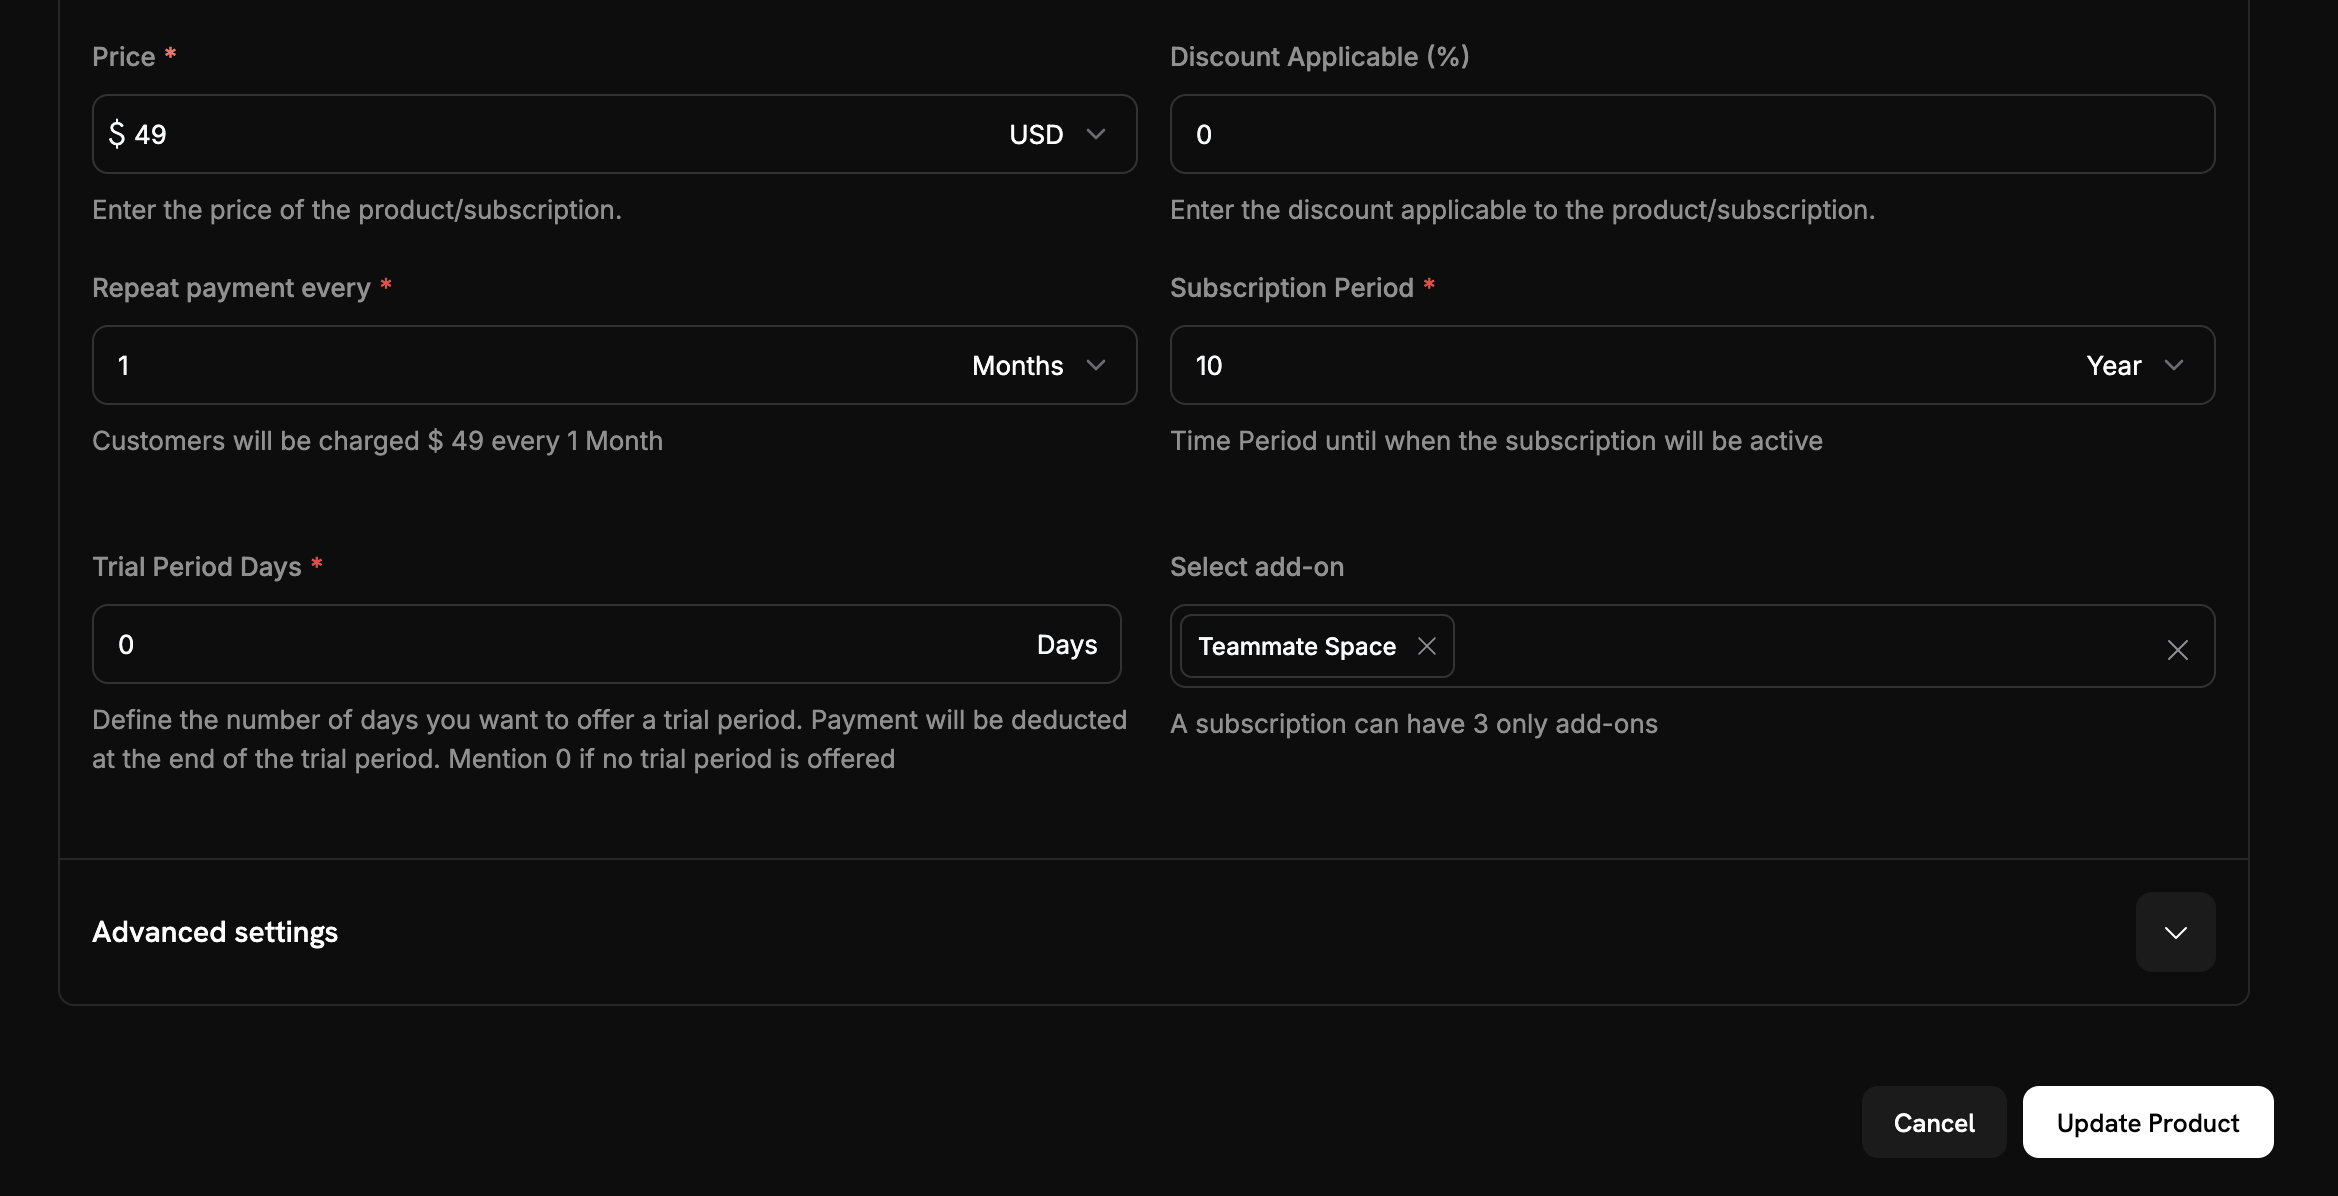
- 추가 기능 섹션으로 스크롤하세요.
- 추가 기능 추가를 클릭하세요.
- 드롭다운에서 좌석 추가 기능을 선택하세요.
- 구독 구성에 추가 기능이 표시되는지 확인하세요.
2
Save subscription changes
- 구독 설정을 전체적으로 검토하세요:
- 기본 요금제: 5석에 $49/월
- 추가 기능: 추가 좌석당 $2/월
- 무료 체험: 14일
- Save Changes를 클릭하세요.
좌석 기반 가격 책정이 설정되었습니다! 고객은 이제 기본 요금제를 구매하고 필요에 따라 추가 좌석을 더할 수 있습니다.
4단계: 사용자 지정 추가 기능 수량으로 결제 링크 생성하기
이제 사용자 지정 추가 기능 수량으로 결제 링크를 생성하는 Express.js 애플리케이션을 만들어 보겠습니다. 여기서 좌석 기반 가격 책정의 진정한 힘이 발휘됩니다 - 추가 좌석 수에 따라 동적으로 체크아웃 세션을 생성할 수 있습니다.1
Set up your project
새로운 Node.js 프로젝트를 만들고 필요한 종속성을 설치하세요:
tsconfig.json 파일을 생성하세요:2
Create your environment file
Dodo Payments API 키를 저장할
.env 파일을 생성하세요:3
Implement the checkout session creation
다음 코드를 포함한
src/server.ts 파일을 생성하세요:4
Add a simple web interface
쉬운 테스트를 위해
public/index.html 파일을 생성하세요:웹 인터페이스가 생성되었습니다! 이제 다양한 좌석 수를 테스트할 수 있는 간단한 UI가 생겼습니다.
5
Serve static files
HTML 파일을 제공하기 위해
src/server.ts에 다음을 추가하세요:정적 파일이 구성되었습니다! 데모 인터페이스를 보려면
http://localhost:3000로 이동하세요.5단계: 구현 테스트하기
좌석 기반 가격 책정 구현이 제대로 작동하는지 테스트해 보겠습니다.1
Start your server
.env파일에 올바른 API 키가 있는지 확인하세요.- 코드의 상품 및 추가 기능 ID를 Dodo Payments 대시보드의 실제 값으로 업데이트하세요.
- 서버를 시작하세요:
서버가 성공적으로 시작되며 “Server running on
http://localhost:3000”이 표시되어야 합니다.2
Test the web interface
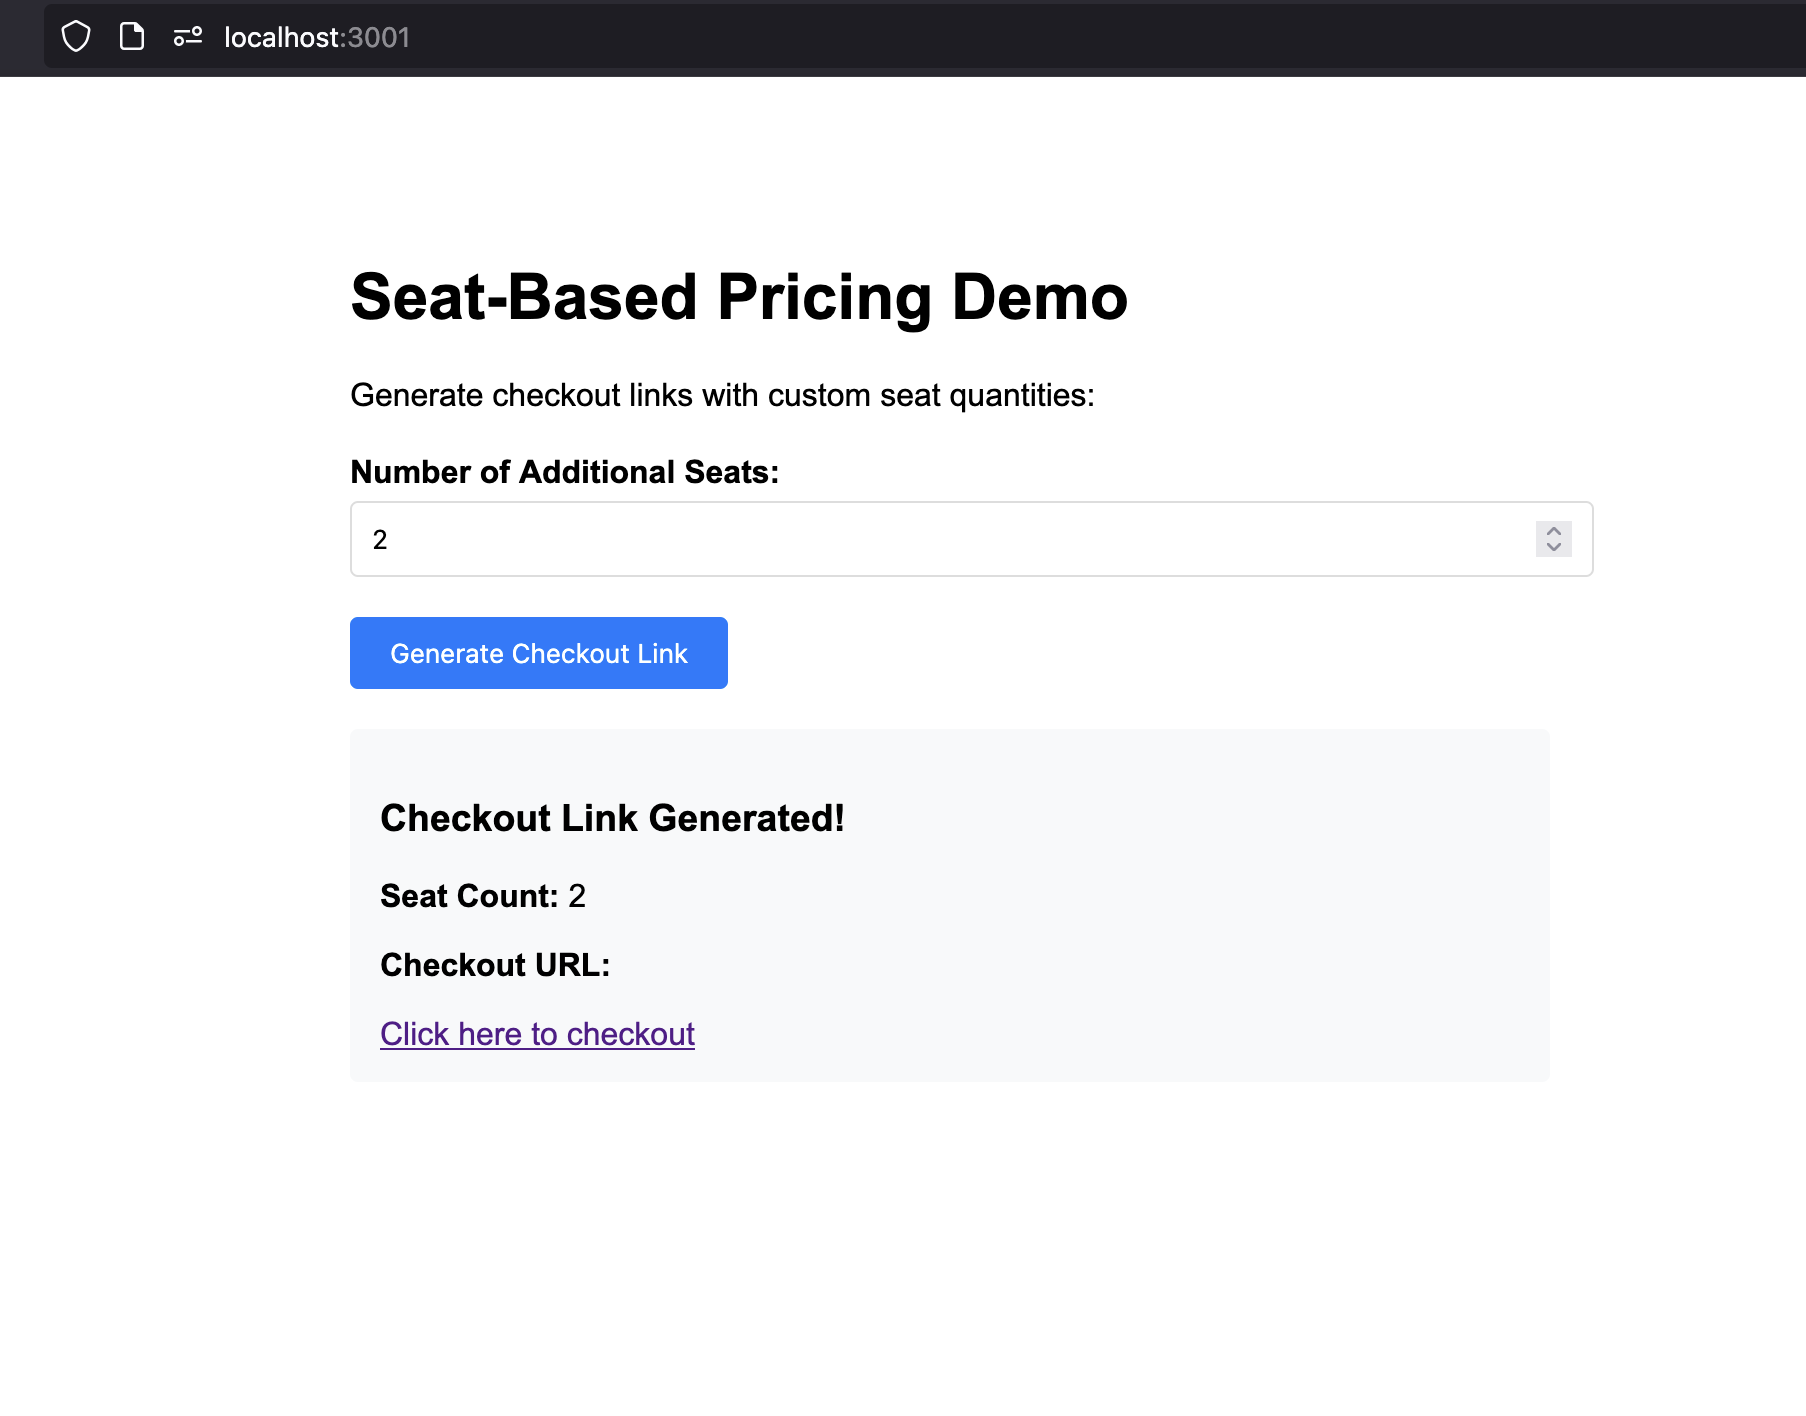
- 브라우저를 열고
http://localhost:3000로 이동하세요. - 좌석 기반 가격 데모 인터페이스가 표시되는지 확인하세요.
- 다양한 좌석 수(0, 3, 10 등)를 시도하세요.
- 각 수량에 대해 “Generate Checkout Link”를 클릭하세요.
- 체크아웃 URL이 올바르게 생성되었는지 확인하세요.
3
Test a checkout session
- 추가 좌석 3개로 체크아웃 링크를 생성하세요.
- 체크아웃 URL을 클릭하여 Dodo Payments 체크아웃을 엽니다.
- 체크아웃에 다음 내용이 표시되는지 확인하세요:
- 기본 요금제: $49/월
- 추가 좌석: 3 × 6/월
- 테스트 구매를 완료하세요.
체크아웃은 올바른 가격 내역을 표시하고 구매를 완료할 수 있어야 합니다.
4
Listen for webhooks and update your DB
구독 및 좌석 변경 사항과 데이터베이스를 동기화하려면 Dodo Payments의 웹훅 이벤트를 수신해야 합니다. 웹훅은 고객이 체크아웃을 완료하거나 구독을 업데이트하거나 좌석 수를 변경할 때 백엔드에 알립니다.웹훅 엔드포인트를 설정하고 이벤트를 처리하는 방법에 대한 단계별 지침은 공식 Dodo Payments 웹훅 가이드를 참조하세요:
Dodo Payments Webhooks Documentation
구독 및 좌석 관리를 위해 웹훅 이벤트를 안전하게 수신하고 처리하는 방법을 알아보세요.
문제 해결
일반적인 문제와 그 해결 방법:Checkout creation failing
Checkout creation failing
가능한 원인:
- 제품 ID 또는 추가 기능 ID가 유효하지 않음
- API 키에 권한이 부족함
- 추가 기능이 구독에 제대로 연결되지 않음
- 네트워크 연결 문제
- Dodo Payments 대시보드에 제품 및 추가 기능 ID가 존재하는지 확인하세요.
- 추가 기능이 구독에 제대로 연결되었는지 확인하세요.
- API 키에 체크아웃 세션 생성 권한이 있는지 확인하세요.
- 간단한 GET 요청으로 API 연결을 테스트하세요.
축하합니다! 좌석 기반 가격 책정을 구현했습니다.
Dodo Payments로 좌석 기반 가격 책정 시스템을 성공적으로 만들었습니다! 다음을 달성했습니다:Base Subscription
5석이 포함된 구독 상품을 월 $49에 생성했습니다.
Seat Add-ons
추가 좌석당 $2로 추가 기능을 구성했습니다.
Checkout
맞춤 좌석 수로 체크아웃 세션을 생성하는 API를 구축했습니다.
Web Interface
다양한 좌석 수를 테스트할 수 있는 간단한 웹 인터페이스를 만들었습니다.
이 예시는 좌석 기반 가격 책정의 최소 구현만을 보여줍니다. 실제 운영에서는 철저한 오류 처리, 인증, 데이터 검증, 보안 조치를 추가하고 애플리케이션 요구사항에 맞게 로직을 조정해야 합니다.