This tutorial provides sample implementation code for a Node.js/Express application. You can modify this code for your specific framework (Next.js, React, Vue, etc.) and customize the user interface according to your application’s needs.
- Create subscription products with seat-based pricing
- Set up add-ons for additional seats
- Generate payment links with custom add-on quantities
- Handle checkout sessions with dynamic seat counts
What We’re Building
Let’s create a seat-based pricing model:- Base Plan: $49/month for up to 5 team members
- Seat Add-on: $2/month per additional seat
- Payment Links: Dynamic checkout with custom seat quantities
Before we start, make sure you have:
- A Dodo Payments account
- Basic familiarity with TypeScript/Node.js
Step 1: Create Your Seat Add-On
Now we need to create an add-on that represents additional seats. This add-on will be attached to our base subscription and allow customers to purchase additional seats.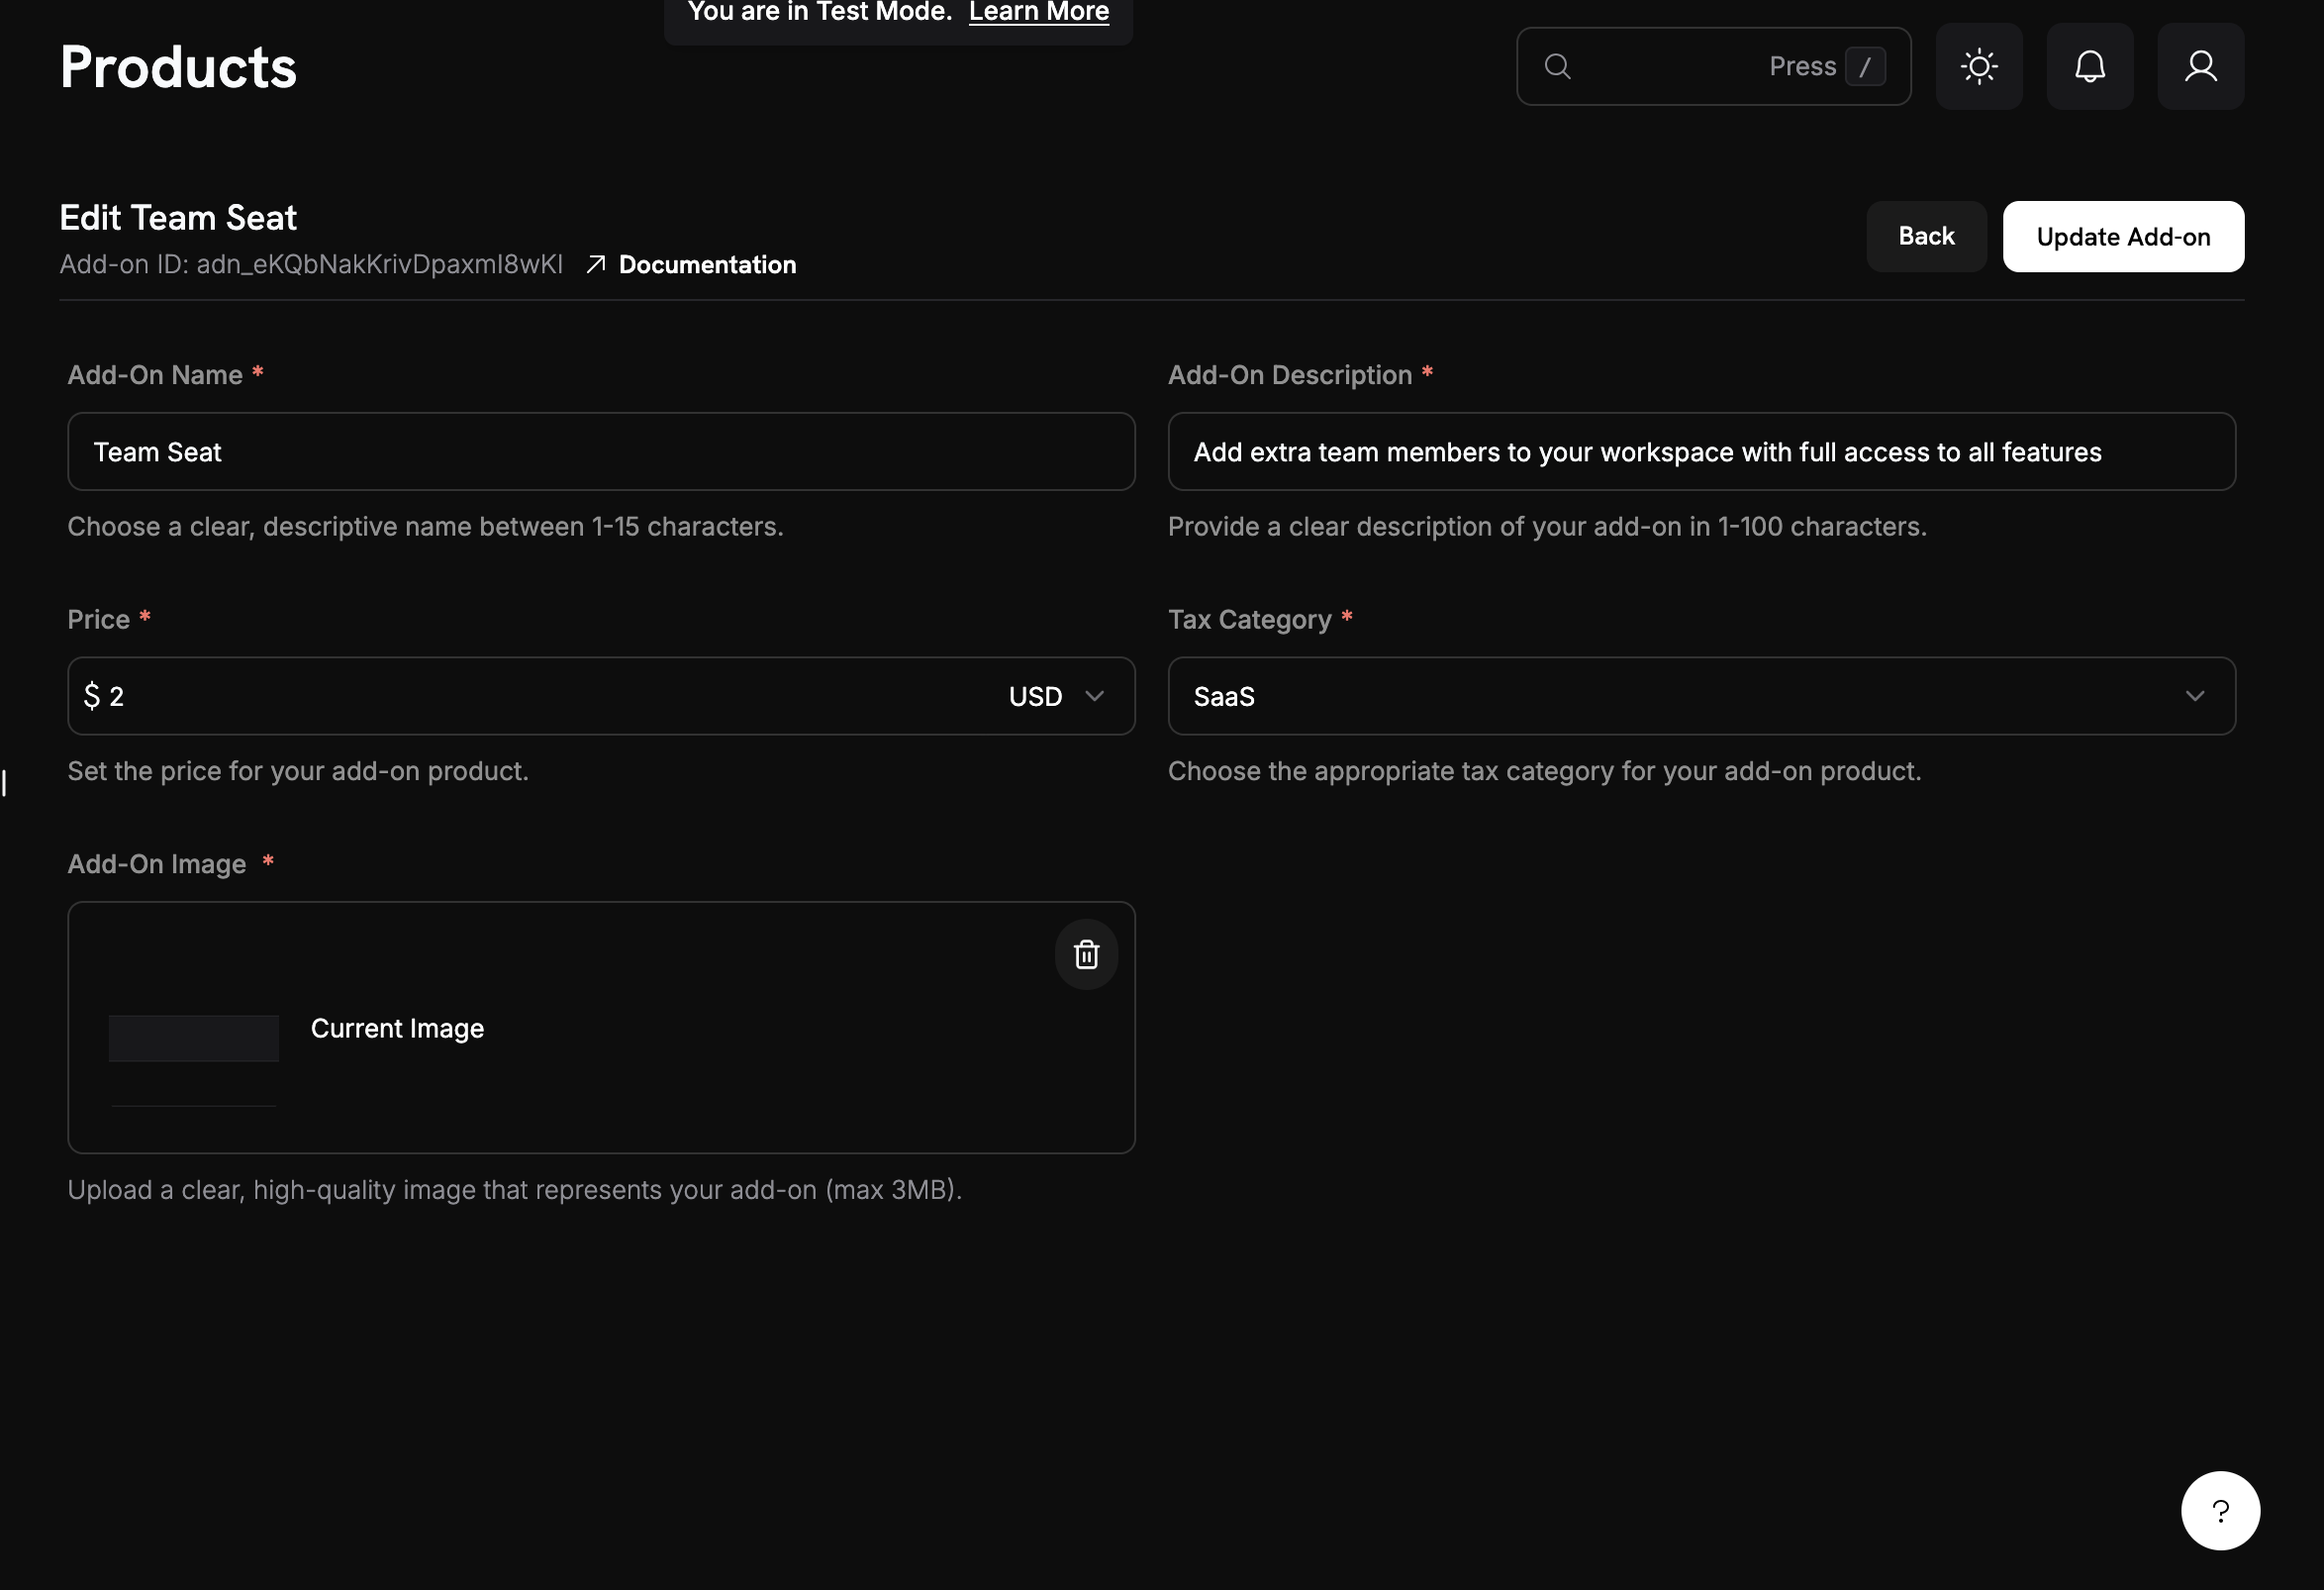
1
Navigate to Add-Ons
- In your Dodo Payments dashboard, stay in the Products section
- Click on the Add-Ons tab
- Click Create Add-On
2
Enter add-on details
Fill in these values for our seat add-on:Add-On Name:
Additional Team SeatDescription: Add extra team members to your workspace with full access to all featuresPrice: Enter → 2.00Currency: Must match your base subscription currencyTax Category: Select appropriate category for your product.3
Save your add-on
- Review all your settings:
- Name: Additional Team Seat
- Price: $2.00/month
- Click Create Add-On
Add-on created! Your seat add-on is now available to attach to subscriptions.
Step 2: Create Your Base Subscription Product
We’ll start by creating a base subscription product that includes 5 team members. This will be the foundation of our seat-based pricing model.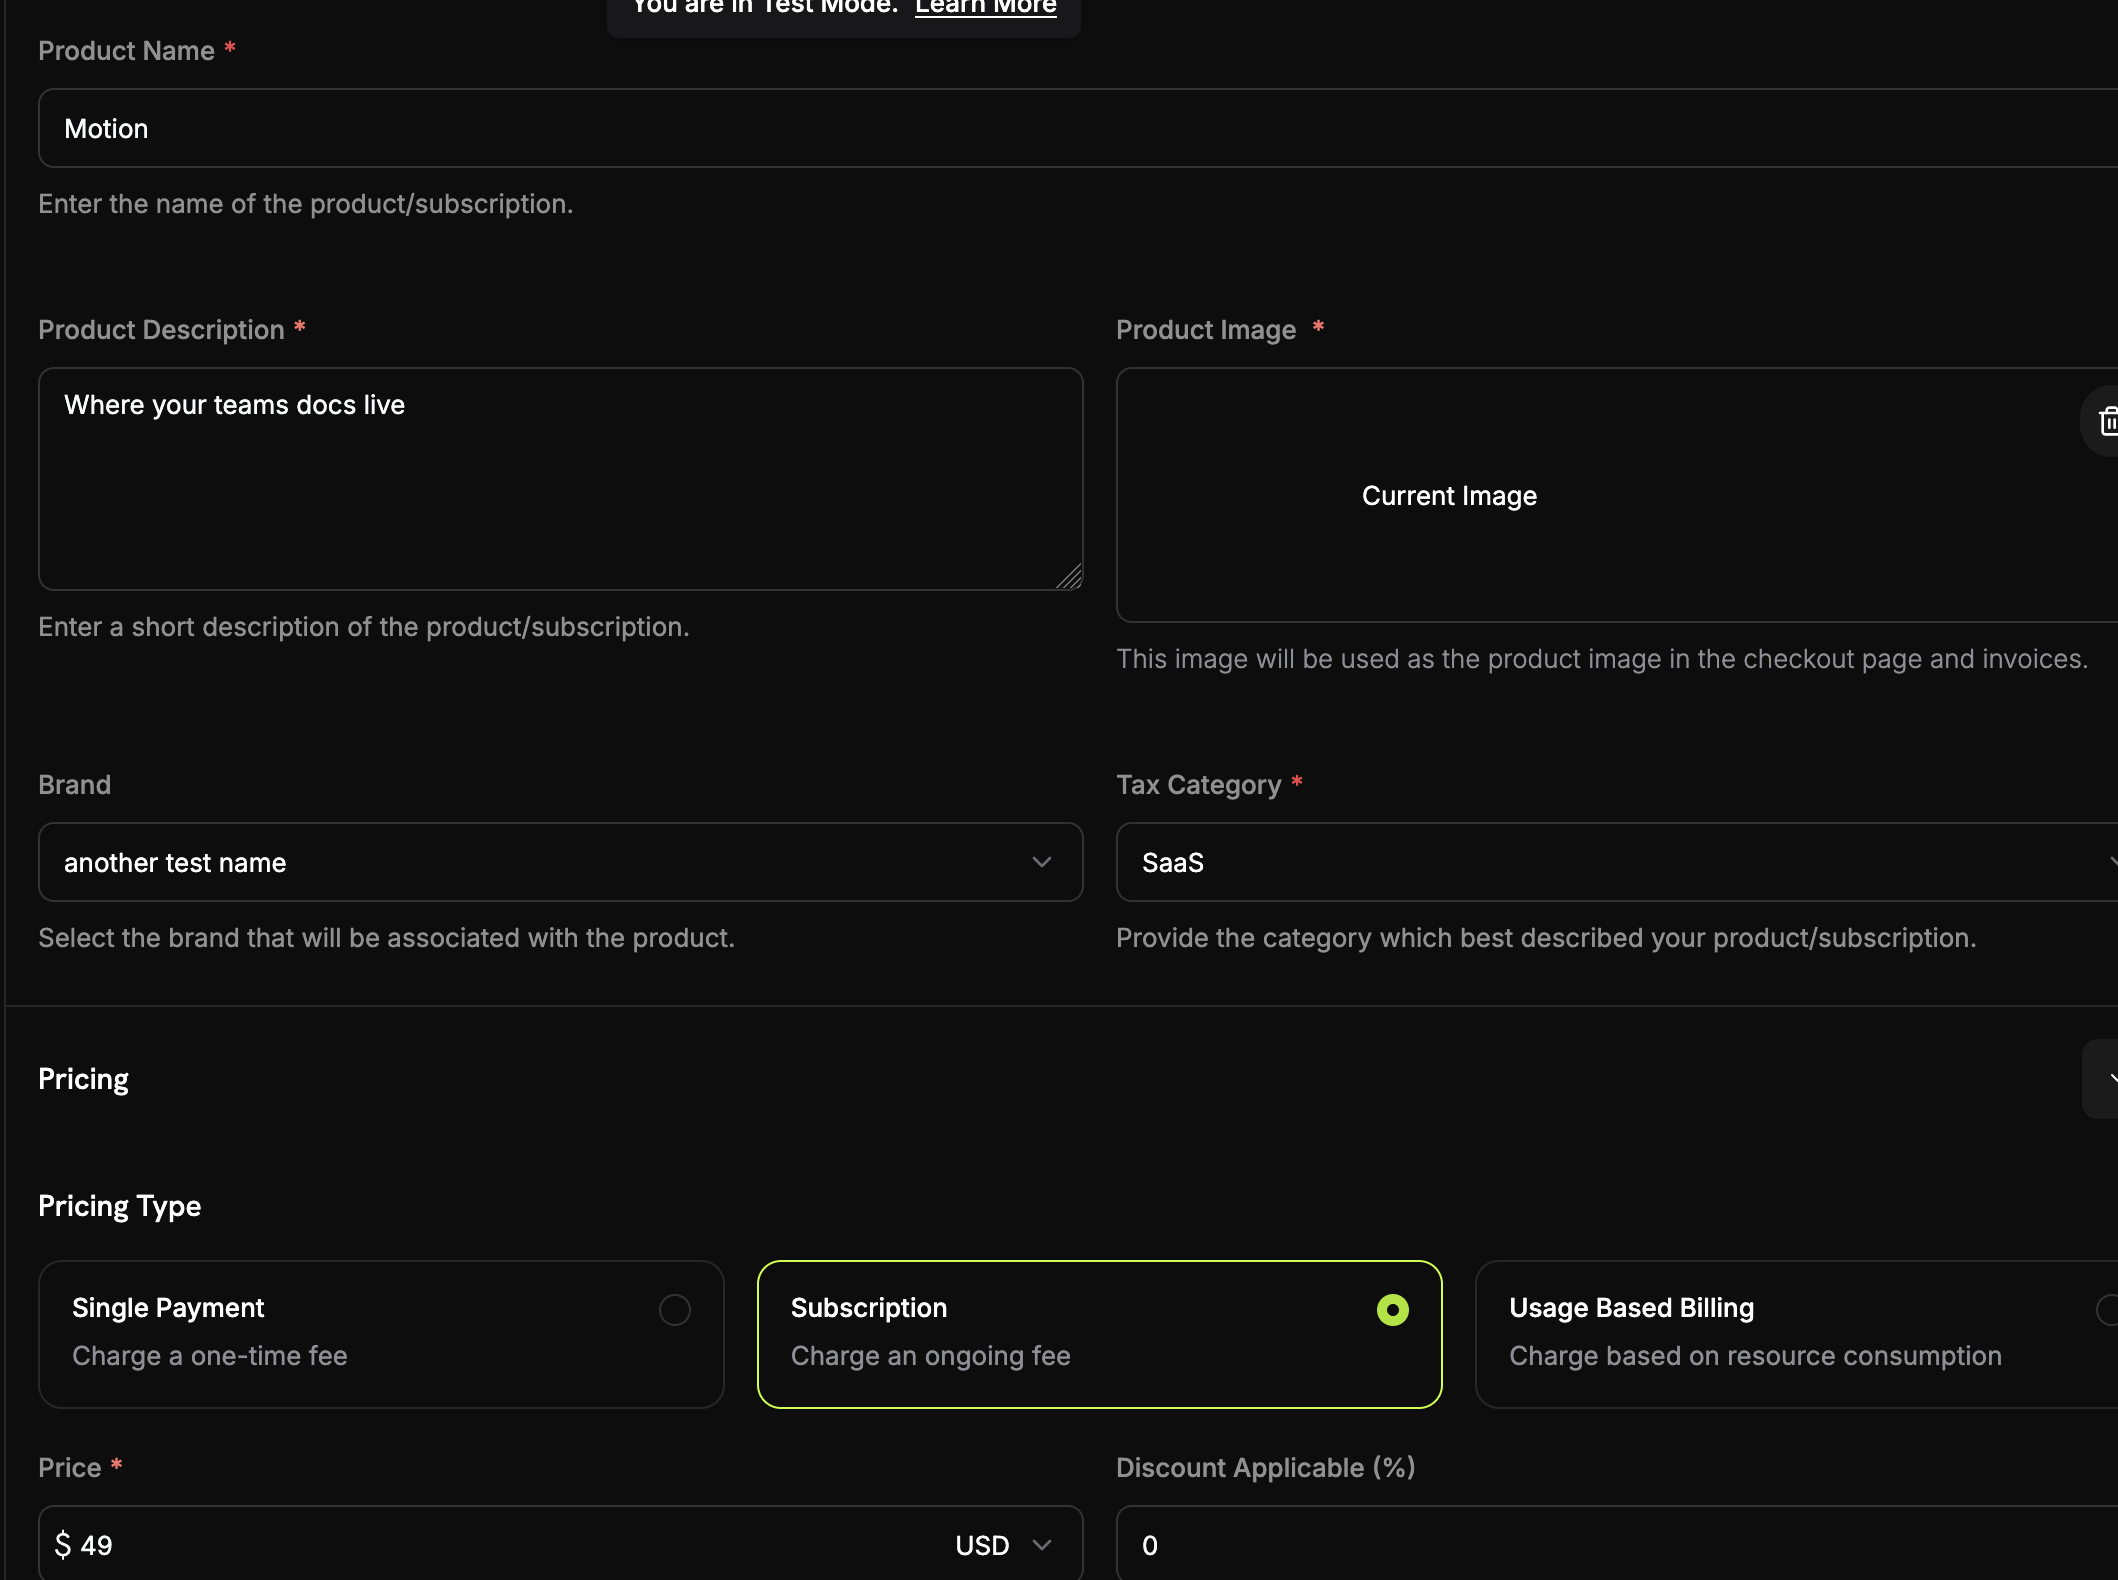
1
Navigate to Products
- Log into your Dodo Payments dashboard
- Click on Products in the left sidebar
- Click the Create Product button
- Select Subscription as the product type
2
Fill in the subscription details
Now we’ll enter the specific details for our base plan:Product Name:
MotionDescription: Where your team's documentation lives.Recurring Price: Enter → 49.00Billing Cycle: Select → MonthlyCurrency: Select your preferred currency (e.g., USD)Step 3: Connect Add-On to Subscription
Now we need to associate our seat add-on with the base subscription so customers can purchase additional seats during checkout.1
Attach the seat add-on
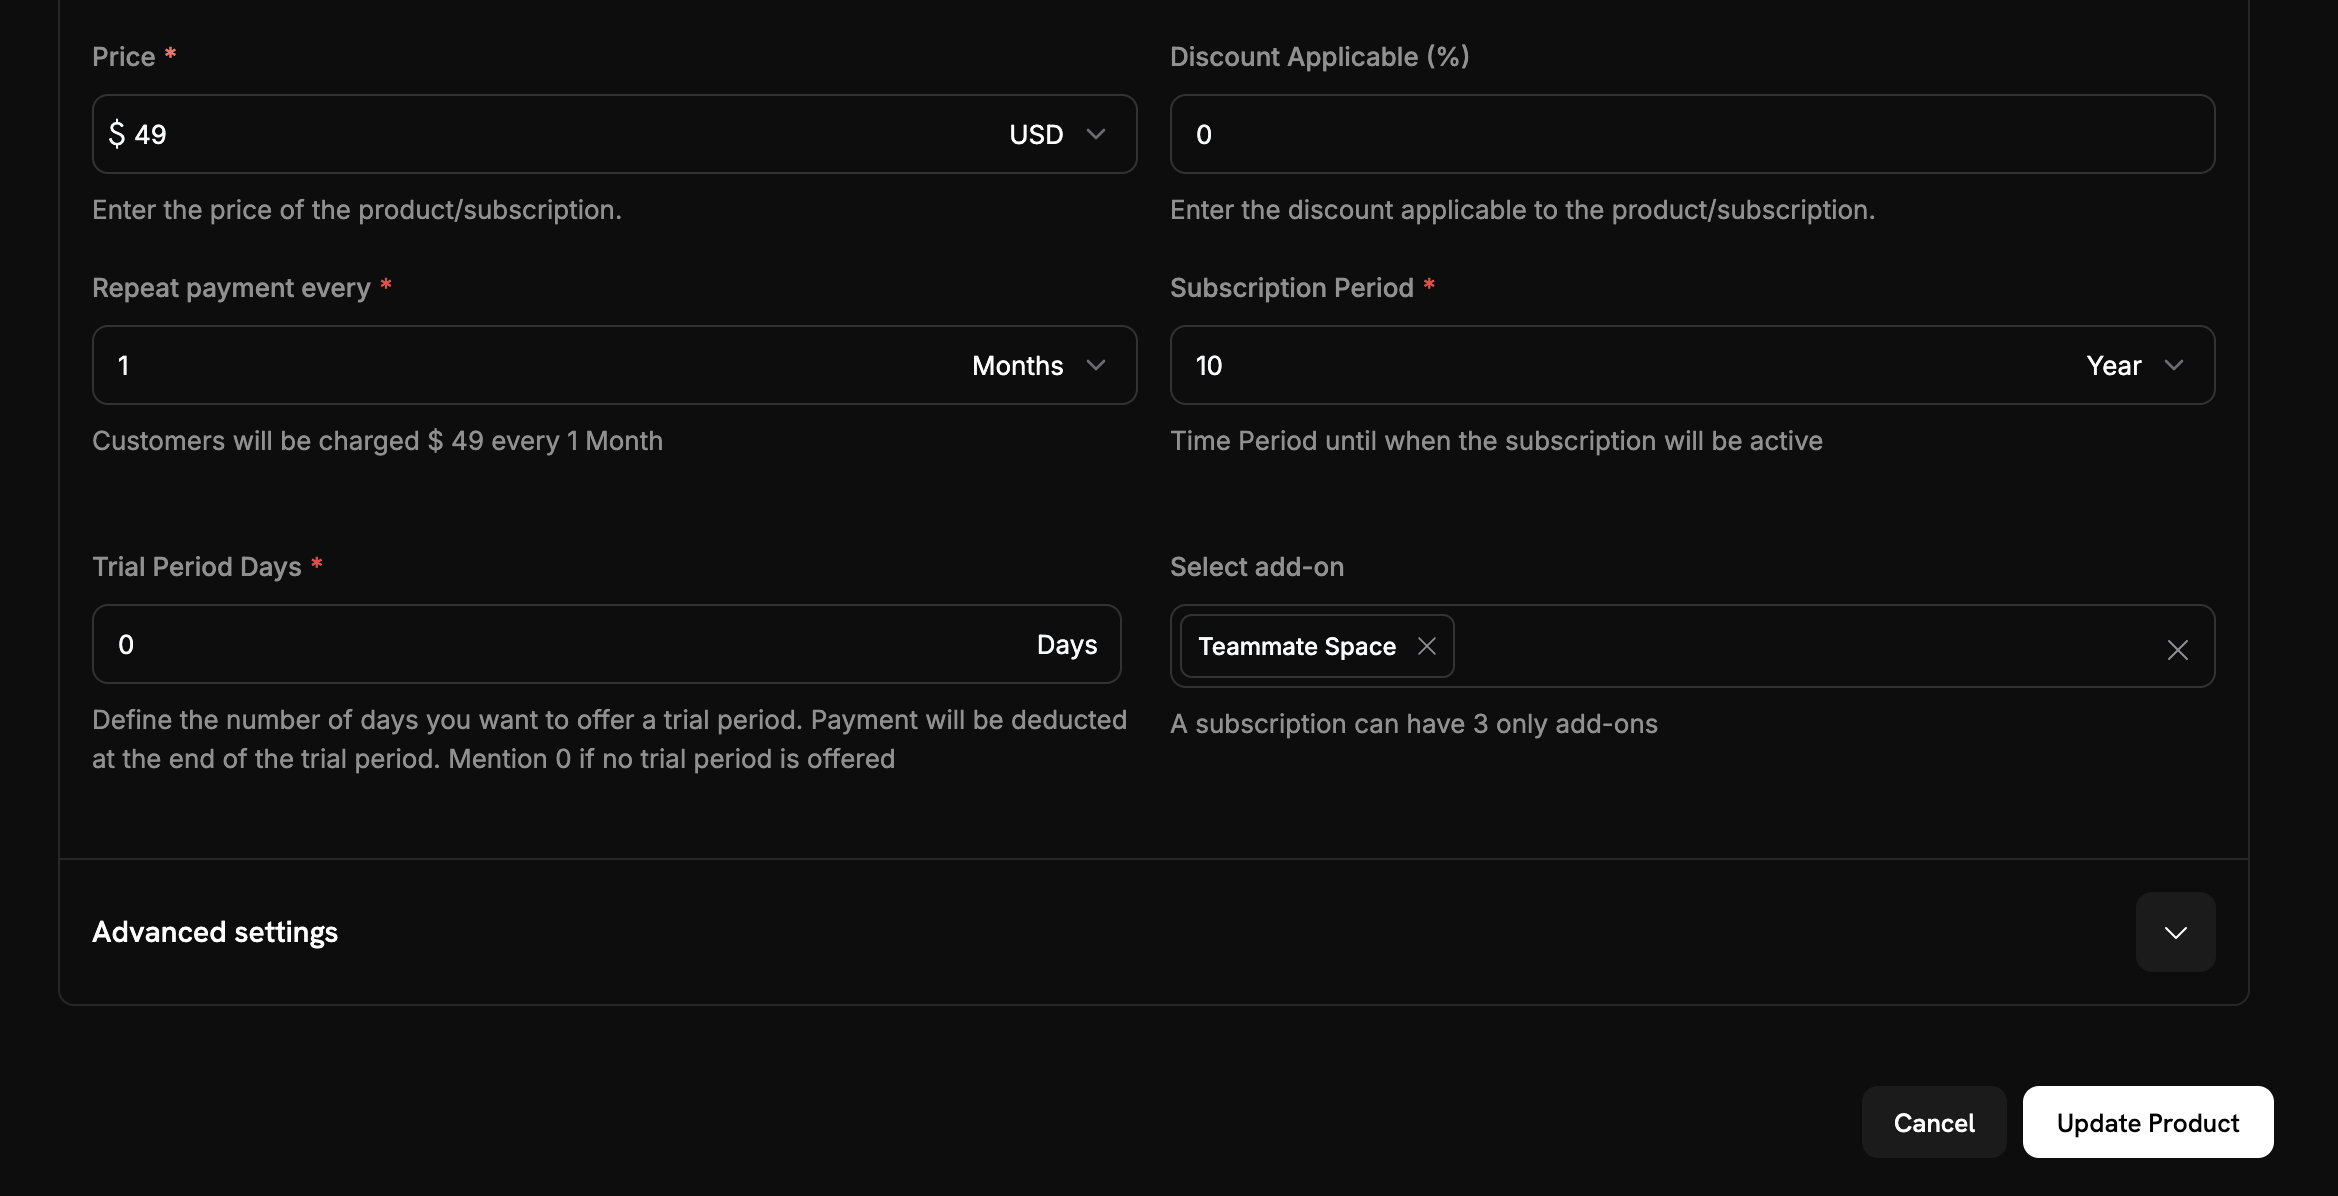
- Scroll down to the Add-Ons section
- Click Add Add-Ons
- From the dropdown, select your seat add-on
- Confirm that it appears in your subscription configuration
2
Save subscription changes
- Review your complete subscription setup:
- Base plan: $49/month for 5 seats
- Add-on: $2/month per additional seat
- Free trial: 14 days
- Click Save Changes
Seat-based pricing configured! Customers can now purchase your base plan and add extra seats as needed.
Step 4: Generate Payment Links with Custom Add-on Quantities
Now let’s create an Express.js application that generates payment links with custom add-on quantities. This is where the real power of seat-based pricing comes in - you can dynamically create checkout sessions with any number of additional seats.1
Set up your project
Create a new Node.js project and install the required dependencies:Create a
tsconfig.json file:2
Create your environment file
Create a
.env file with your Dodo Payments API key:3
Implement the checkout session creation
Create a
src/server.ts file with the following code:4
Add a simple web interface
Create a
public/index.html file for easy testing:Web interface created! You now have a simple UI to test different seat quantities.
5
Serve static files
Add this to your
src/server.ts to serve the HTML file:Static files configured! Visit
http://localhost:3000 to see your demo interface.Step 5: Test Your Implementation
Let’s test our seat-based pricing implementation to make sure everything works correctly.1
Start your server
- Make sure you have your
.envfile with the correct API key - Update the product and add-on IDs in your code with the actual values from your Dodo Payments dashboard
- Start your server:
Your server should start successfully and show “Server running on http://localhost:3000”
2
Test the web interface
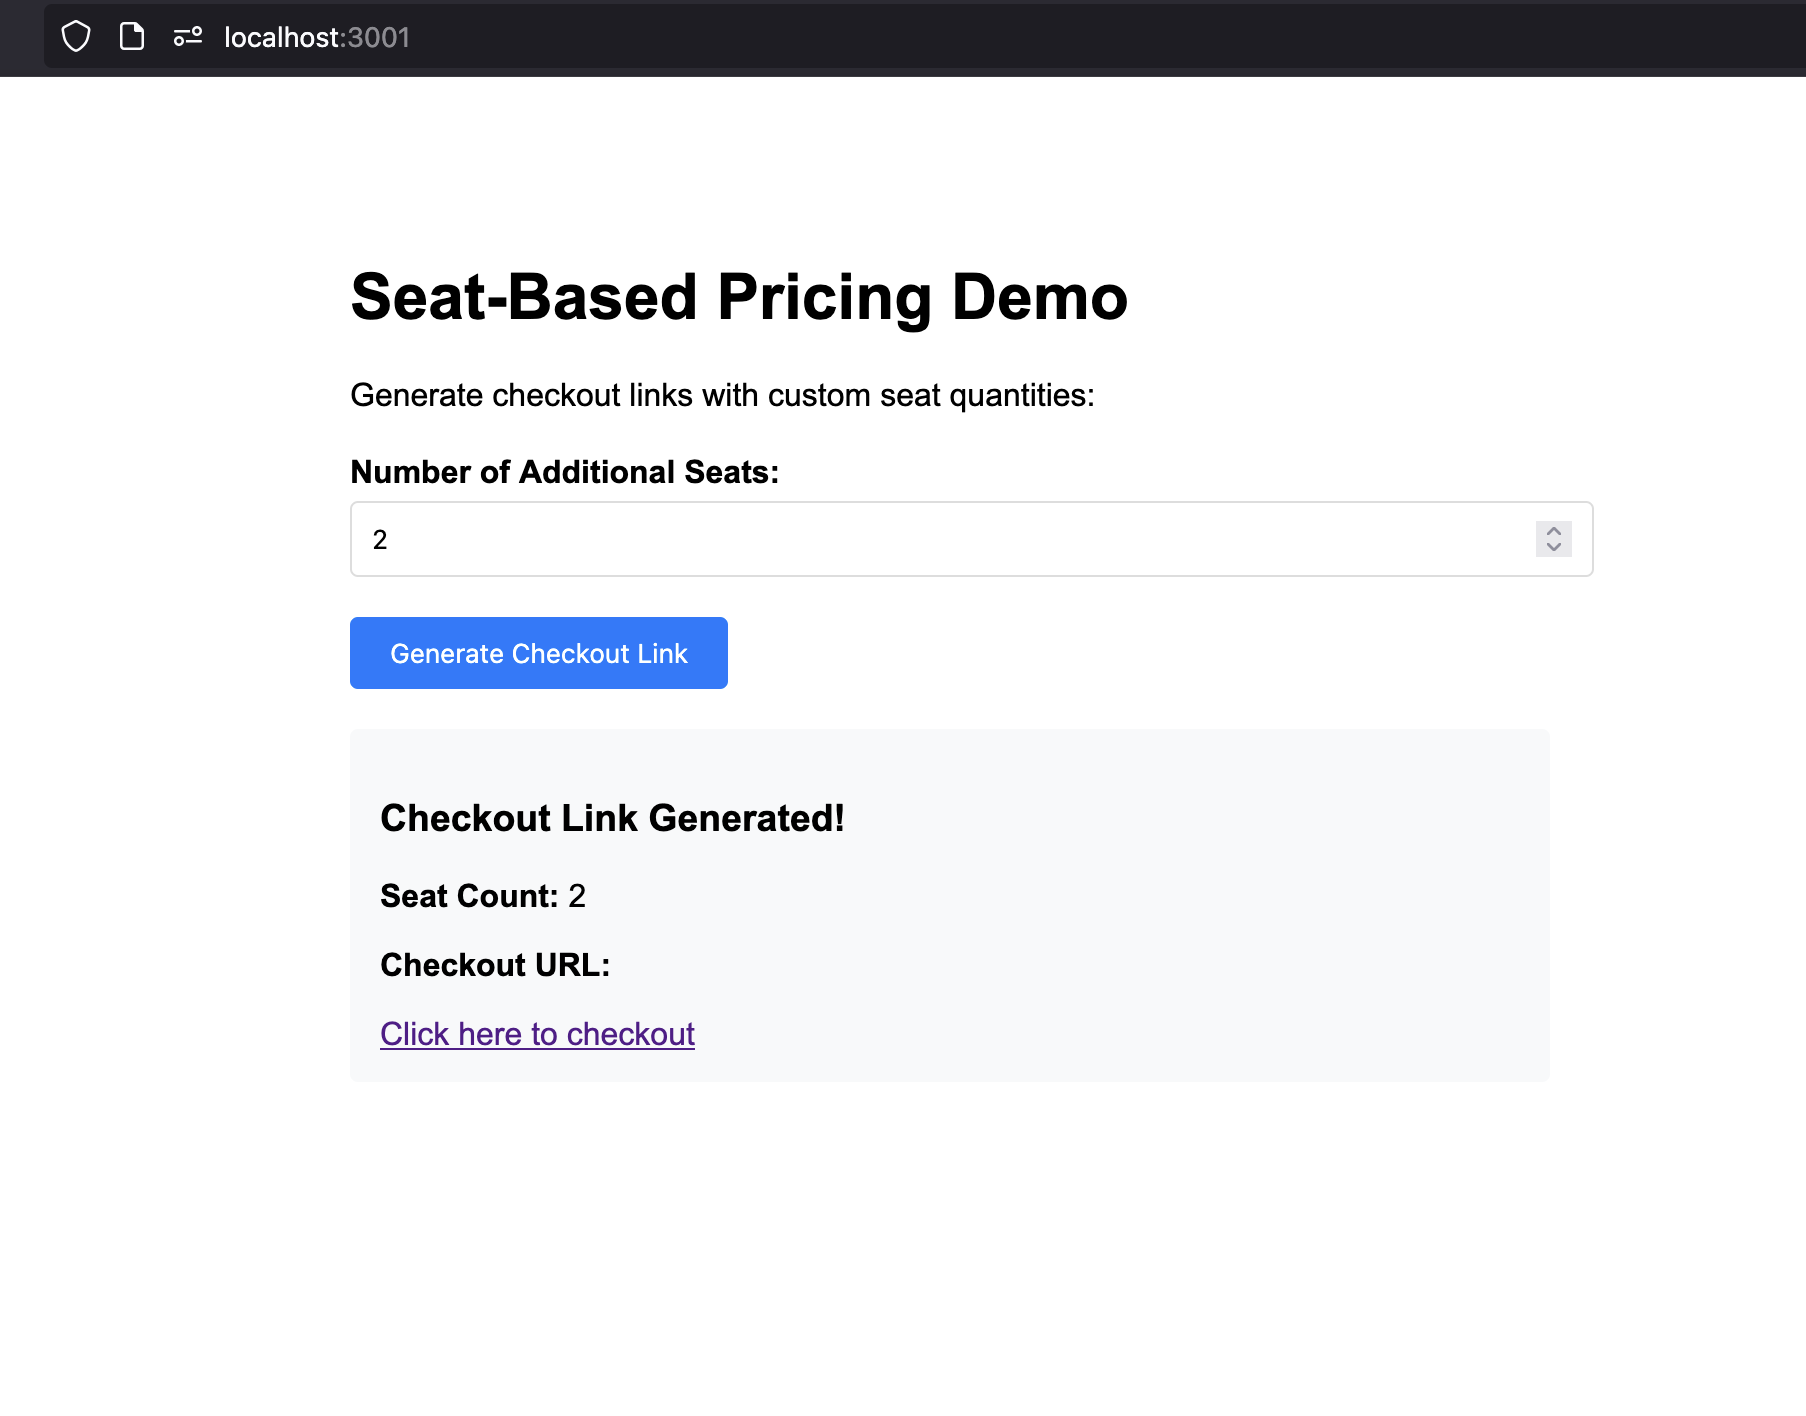
- Open your browser and go to
http://localhost:3000 - You should see the seat-based pricing demo interface
- Try different seat quantities (0, 3, 10, etc.)
- Click “Generate Checkout Link” for each quantity
- Verify that the checkout URLs are generated correctly
3
Test a checkout session
- Generate a checkout link with 3 additional seats
- Click the checkout URL to open the Dodo Payments checkout
- Verify that the checkout shows:
- Base plan: $49/month
- Additional seats: 3 × 2 dollars = $6/month
- Complete the test purchase
The checkout should display the correct pricing breakdown and allow you to complete the purchase.
4
Listen for webhooks and update your DB
To keep your database in sync with subscription and seat changes, you need to listen for webhook events from Dodo Payments. Webhooks notify your backend when a customer completes checkout, updates their subscription, or changes seat counts.Follow the official Dodo Payments webhooks guide for step-by-step instructions on setting up webhook endpoints and handling events:
Dodo Payments Webhooks Documentation
Learn how to securely receive and process webhook events for subscription and seat management.
Troubleshooting
Common issues and their solutions:Checkout creation failing
Checkout creation failing
Possible causes:
- Invalid product ID or add-on ID
- API key doesn’t have sufficient permissions
- Add-on not properly associated with subscription
- Network connectivity issues
- Verify product and add-on IDs exist in your Dodo Payments dashboard
- Check that add-on is properly attached to the subscription
- Ensure API key has checkout session creation permissions
- Test API connectivity with a simple GET request
Congratulations! You’ve Implemented Seat-Based Pricing
You’ve successfully created a seat-based pricing system with Dodo Payments! Here’s what you accomplished:Base Subscription
Created a subscription product with 5 included seats at $49/month
Seat Add-ons
Configured add-ons for additional seats at $2/month per seat
Checkout
Built an API that generates checkout sessions with custom seat quantities
Web Interface
Created a simple web interface for testing different seat quantities
This example demonstrates only a minimal implementation of seat-based pricing. For production use, you should add robust error handling, authentication, data validation, security measures, and adapt the logic to fit your application’s requirements.