Let Sentra write your integration code for you.
Use our AI assistant in VS Code, Cursor, or Windsurf to generate SDK/API code, LLM Blueprint integration code, webhooks, and more - just by describing what you want.
Try Sentra: AI-Powered Integration →
In this tutorial, you’ll build an AI chat application with automatic usage-based billing. We’ll create everything from scratch: the billing meter, product configuration, and application code that powers conversations and tracks token usage in real-time.
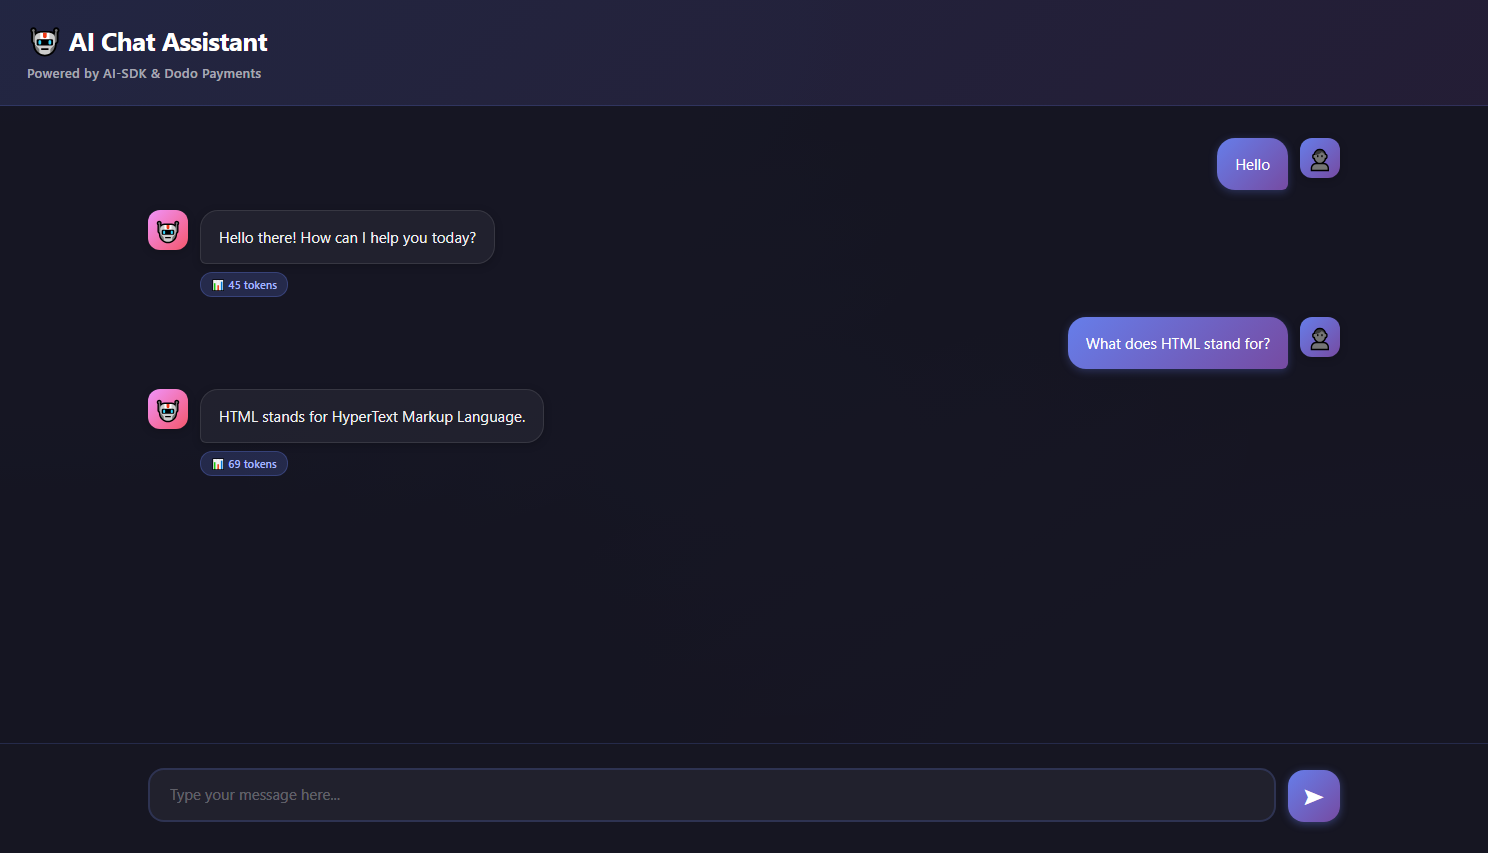
This tutorial provides a complete working application with both backend and frontend. The chat app uses Google’s Gemini AI and automatically tracks token usage without any manual counting required.
By the end of this tutorial, you’ll have a working chat application that:
  • Powers AI conversations using Google Gemini (AI SDK)
  • Automatically tracks token usage (no manual code)
  • Charges customers based on actual token consumption
  • Includes a beautiful chat interface
AI Chat Demo

What We’re Building

Let’s start by understanding our AI chat service:
  • Service: AI-powered chat using Google Gemini (AI SDK)
  • Pricing Model: Pay-per-token ($0.01 per 1,000 tokens)
  • Free Tier: 10,000 free tokens per customer per month
  • Features: Conversation history, automatic token tracking
Before we start, make sure you have:

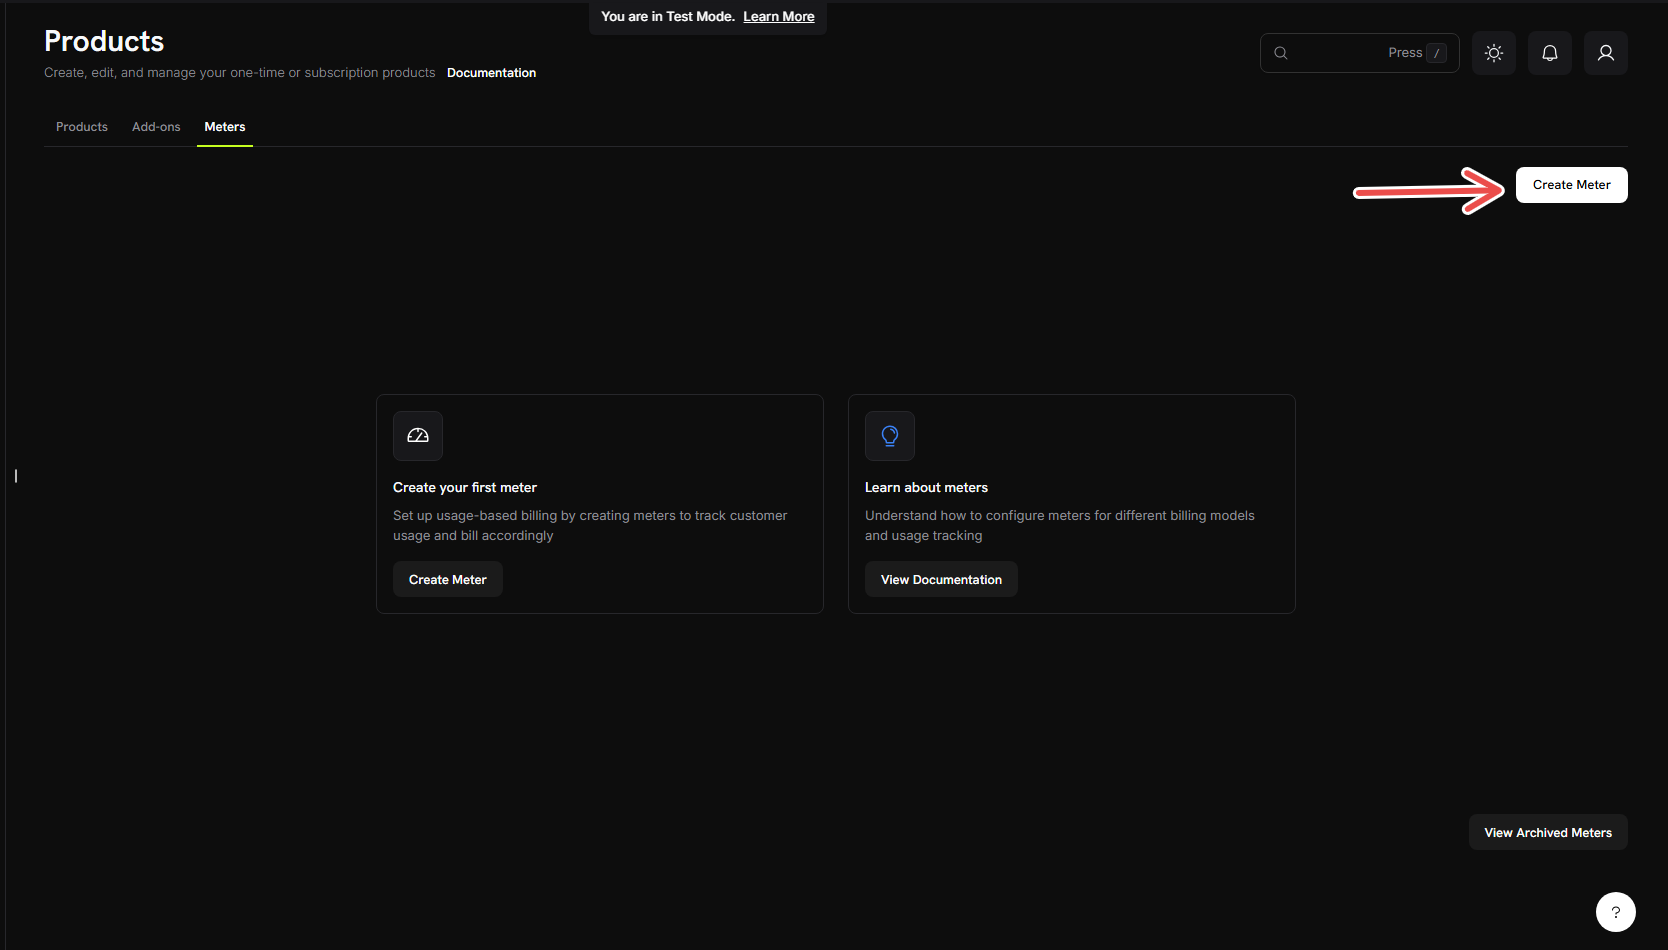
Step 1: Create Your Usage Meter

We’ll start by creating a meter in your Dodo Payments dashboard that will track AI token usage.
What we’re building: A meter named “AI Token Usage Meter” that sums up all tokens consumed in chat conversations.
1

Open the Meters section

  1. Log into your Dodo Payments dashboard
  2. Click on Products in the left sidebar
  3. Click on Meters
  4. Click the Create Meter button
Create Meter
You should see a form where we’ll configure our token tracking.
2

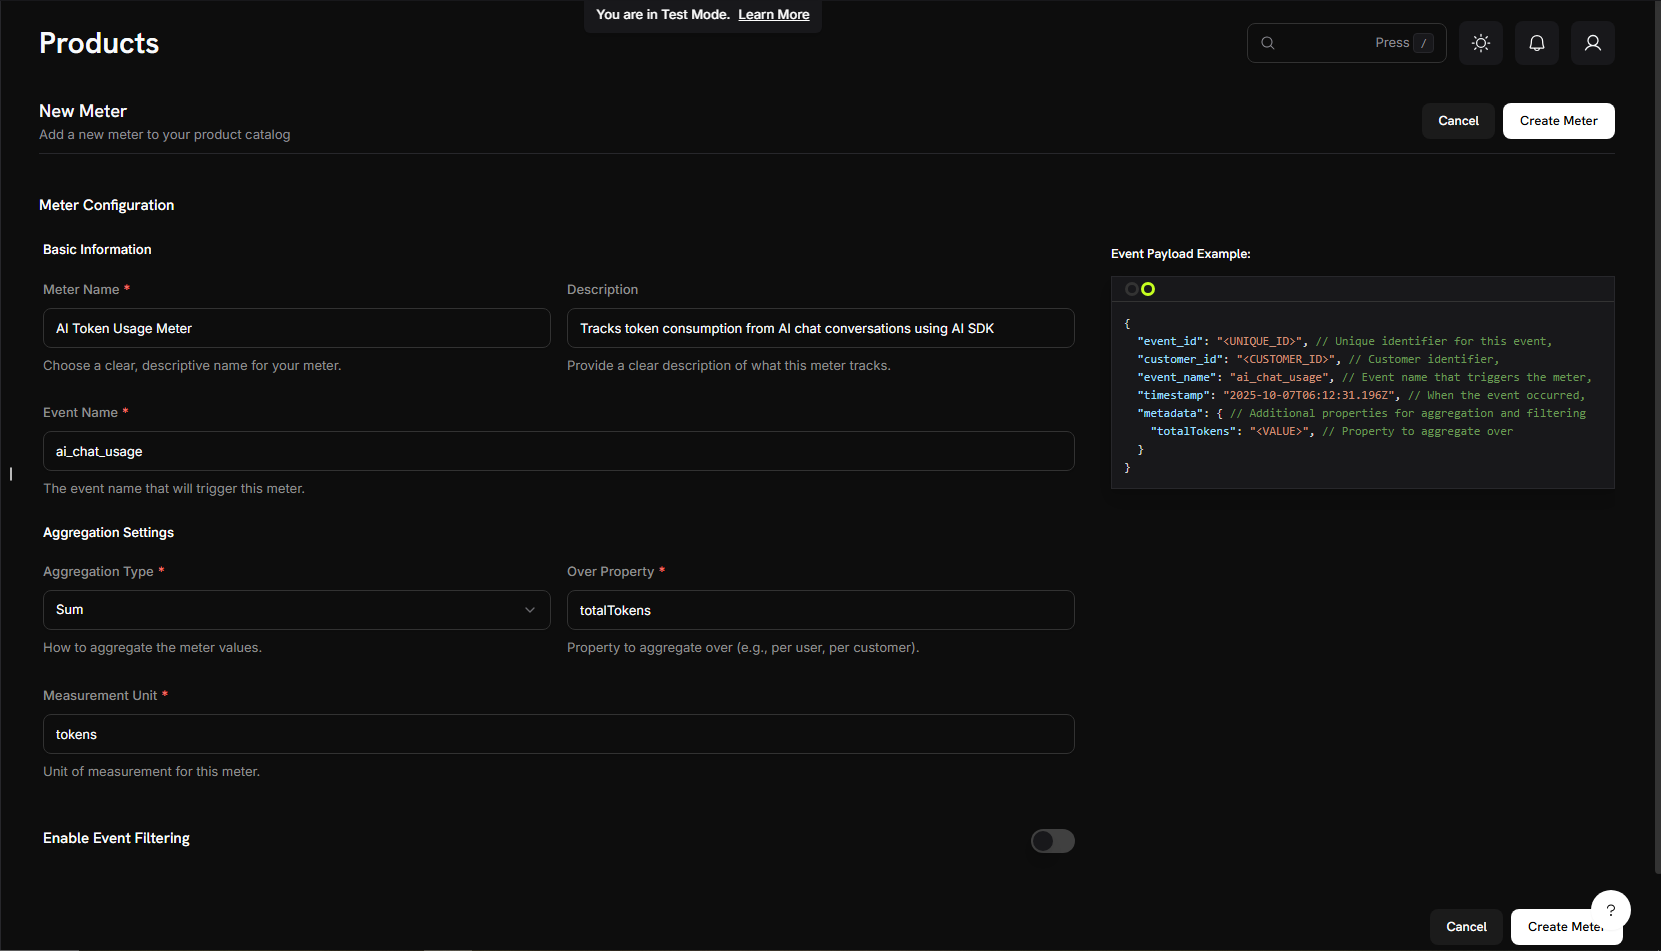
Fill in the basic meter information

Now we’ll enter the specific details for our AI chat service:Meter NameAI Token Usage MeterDescriptionTracks token consumption from AI chat conversations using AI SDKEvent Nameai_chat_usage
The event name ai_chat_usage must match exactly what we’ll send from our application code later. Event names are case-sensitive!
3

Configure how we count tokens

Set up the aggregation (how the meter counts our events):Aggregation Type: Select Sum from the dropdownAggregate Over: Type → totalTokensMeasurement Unit: Type → tokens
We’re using “Sum” because we want to add up all tokens consumed across multiple chat messages. The SDK automatically sends totalTokens in each event.
4

Create your meter

  1. Double-check all your settings match the values above
  2. Click Create Meter
Meter Configuration
Meter created! Your “AI Token Usage Meter” is now ready to start counting tokens. Next, we’ll connect it to a billing product.

Step 2: Get Your API Keys

Before we build the app, let’s gather the API keys we’ll need.
1

Get Dodo Payments API Key

  1. In your Dodo Payments dashboard, go to DevelopersAPI Keys
  2. Click Create API Key
  3. Copy the API key - it will look like test_abc123...
Save this API key - we’ll add it to our .env file later.
2

Get Google AI API Key

  1. Visit aistudio.google.com
  2. Click Get API Key
  3. Create a new API key or use an existing one
  4. Copy the key
Keep this key safe - we’ll also add it to our .env file.

Step 3: Create Your Billing Product

Now we need to create a product that defines our pricing ($0.01 per 1,000 tokens with 10,000 free tokens). This connects our meter to actual billing.
What we’re building: A product called “AI Chat Service” that charges based on token consumption with a generous free tier.
1

Navigate to Products

  1. In your Dodo Payments dashboard, click Products in the left sidebar
  2. Click Create Product
  3. Select Usage-Based as the product type
This tells Dodo Payments that billing will be based on meter usage, not a fixed subscription.
2

Enter product details

Fill in the required details:Product Name: → AI Chat ServiceDescription: → AI-powered chat service with automatic token-based billingProduct Image: Upload a relevant image
These will appear on customer invoices, so make them clear and professional.
3

Connect your meter

Before connecting your meter, make sure you have selected Usage Based Billing as the price type for your product.Additionally, set the Fixed Price to 0 to ensure customers are only charged based on their usage, with no base fee.Now, link the meter you just created:
  1. Scroll down to the Associated Meter section
  2. Click Add Meters
  3. From the dropdown, select “AI Token Usage Meter” (the one you created earlier)
  4. Confirm that it appears in your product configuration
Your meter is now successfully connected to this product.
4

Set your pricing

Here’s where we define our business model:Price Per Unit: Enter →
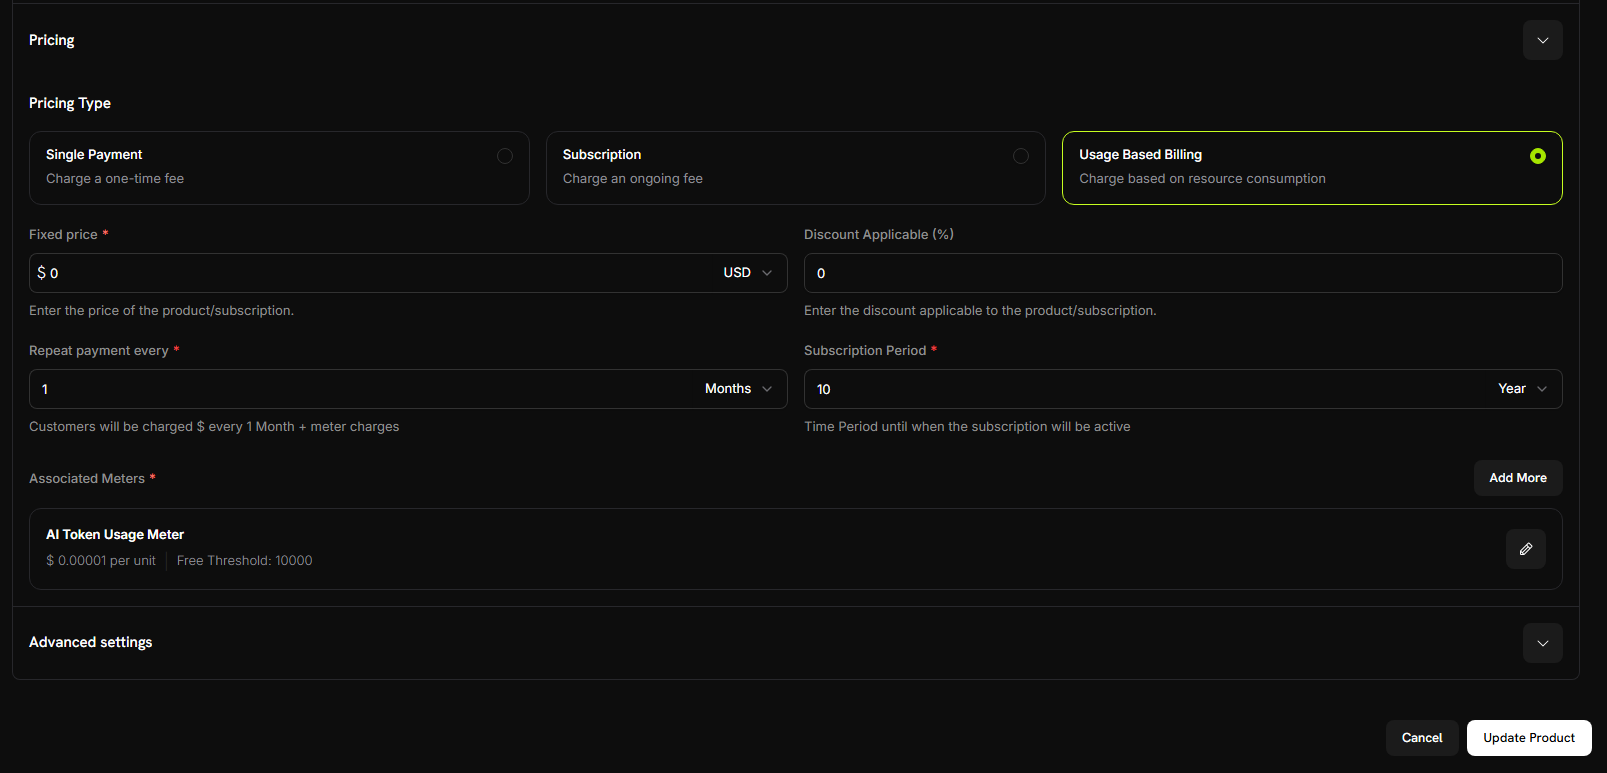
 0.00001 (this is 0.01per1,000tokensor0.01 per 1,000 tokens or 0.00001 per token)Free Threshold: Enter → 10000 (customers get 10,000 free tokens per month)
Product Pricing
How billing works: If a customer uses 25,000 tokens in a month, they’ll be charged for 15,000 tokens (25,000 - 10,000 free) = 15,000 × 0.00001=0.00001 = 0.15
5

Save your product

  1. Review all your settings:
    • Name: AI Chat Service
    • Meter: AI Token Usage Meter
    • Price: $0.01 per 1,000 tokens
    • Free tier: 10,000 tokens
  2. Click Save Changes
Product created! Your billing is now configured. Customers will automatically be charged based on their token usage.

Step 4: Make a Test Purchase

Before we start building the app, let’s create a test customer by making a purchase.
1

Get your payment link

  1. In your Dodo Payments dashboard, go to Products
  2. Find your “AI Chat Service” product
  3. Click the Share button next to your product
  4. Copy the payment link that appears
2

Complete a test purchase

  1. Open the payment link in a new browser tab
  2. Enter test payment details and complete purchase
After successful payment, you’ll have a customer ID that we’ll use in our application code.
3

Find your customer ID

  1. Go back to your Dodo Payments dashboard
  2. Navigate to Sales -> Customers in the left sidebar
  3. Find the customer you just created (with the test email)
  4. Copy the customer ID - it will look like cus_123
Save this customer ID - we’ll use it when testing our chat application.

Step 5: Build the Chat Application

Now we have our billing setup complete and a test customer created. Let’s build the AI chat application with automatic token tracking.
1

Set up your project

Create a new directory and initialize the project:
mkdir ai-chat-app
cd ai-chat-app
npm init -y
2

Install dependencies

Install the packages we need:
npm install express ai @ai-sdk/google @dodopayments/ingestion-blueprints dotenv
npm install --save-dev typescript @types/express @types/node tsx
3

Configure TypeScript

Create tsconfig.json:
tsconfig.json
{
  "compilerOptions": {
    "target": "ES2020",
    "module": "ESNext",
    "moduleResolution": "node",
    "esModuleInterop": true,
    "strict": true,
    "skipLibCheck": true,
    "outDir": "./dist",
    "rootDir": "./src"
  },
  "include": ["src/**/*"],
  "exclude": ["node_modules"]
}
Update package.json to add the module type and scripts:
package.json
{
  "type": "module",
  "scripts": {
    "dev": "tsx src/server.ts",
    "build": "tsc",
    "start": "node dist/server.js"
  }
}
4

Create project structure

Create the folders and files:
mkdir src public
5

Set up environment variables

Create a .env file in your project root:
.env
DODO_PAYMENTS_API_KEY=your_dodo_api_key_here
DODO_ENVIRONMENT=test_mode
GOOGLE_GENERATIVE_AI_API_KEY=your_google_api_key_here
PORT=3000
Replace the placeholder values with your actual API keys from Step 2.
6

Create the backend server

Create src/server.ts and copy this complete server code:
Here’s the complete AI chat server with integrated billing:
import express, { Request, Response } from 'express';
import { generateText } from 'ai';
import { google } from '@ai-sdk/google';
import { createLLMTracker } from '@dodopayments/ingestion-blueprints';
import 'dotenv/config';

const app = express();
app.use(express.json());
app.use(express.static('public'));

// Replace with your test customer ID
const CUSTOMER_ID = 'cus_123';

// Create tracker once with your meter event name
const llmTracker = createLLMTracker({
  apiKey: process.env.DODO_PAYMENTS_API_KEY!,
  environment: process.env.DODO_ENVIRONMENT as 'test_mode' | 'live_mode',
  eventName: 'ai_chat_usage', // Must match your meter configuration
});

// Chat endpoint with conversation support
app.post('/chat', async (req: Request, res: Response) => {
  try {
    const { messages } = req.body;

    if (!messages || !Array.isArray(messages)) {
      return res.status(400).json({ 
        error: 'Missing required field: messages (array)' 
      });
    }

    // Wrap AI SDK with automatic token tracking
    const trackedClient = llmTracker.wrap({
      client: { generateText },
      customerId: CUSTOMER_ID
    });

    // Generate AI response - tokens are automatically tracked!
    const response = await trackedClient.generateText({
      model: google('gemini-2.5-flash'),
      messages: messages
    });

    res.json({
      message: response.text,
      usage: {
        totalTokens: response.usage.totalTokens
      }
    });

  } catch (error: any) {
    console.error('Chat error:', error);
    res.status(500).json({ 
      error: 'Failed to process chat',
      details: error.message 
    });
  }
});

const PORT = process.env.PORT || 3000;
app.listen(PORT, () => {
  console.log(`🚀 Server running at http://localhost:${PORT}`);
  console.log(`📊 Tracking event: ai_chat_usage`);
  console.log(`👤 Customer ID: ${CUSTOMER_ID}`);
  console.log(`🔧 Environment: ${process.env.DODO_ENVIRONMENT}`);
});

Step 6: Add the Chat Interface

Now let’s add a beautiful chat interface with full conversation history! Create public/index.html:
public/index.html
<!DOCTYPE html>
<html lang="en">
  <head>
    <meta charset="UTF-8" />
    <meta name="viewport" content="width=device-width, initial-scale=1.0" />
    <title>AI Chat with Usage Billing</title>
    <style>
      * {
        margin: 0;
        padding: 0;
        box-sizing: border-box;
      }

      body {
        font-family: "Inter", -apple-system, BlinkMacSystemFont, "Segoe UI",
          Roboto, sans-serif;
        background: #0f0f1e;
        background-image: radial-gradient(
            at 0% 0%,
            rgba(102, 126, 234, 0.15) 0px,
            transparent 50%
          ),
          radial-gradient(
            at 100% 100%,
            rgba(118, 75, 162, 0.15) 0px,
            transparent 50%
          ),
          radial-gradient(
            at 50% 50%,
            rgba(102, 126, 234, 0.05) 0px,
            transparent 50%
          );
        height: 100vh;
        display: flex;
        justify-content: center;
        align-items: center;
        padding: 0;
        position: relative;
        overflow: hidden;
        margin: 0;
      }

      .chat-container {
        background: rgba(22, 22, 35, 0.95);
        border: 1px solid rgba(102, 126, 234, 0.2);
        border-radius: 0;
        box-shadow: 0 10px 40px rgba(0, 0, 0, 0.5);
        width: 100%;
        max-width: 100%;
        height: 100vh;
        display: flex;
        flex-direction: column;
        overflow: hidden;
        position: relative;
        z-index: 1;
      }

      .chat-header {
        background: linear-gradient(
          135deg,
          rgba(102, 126, 234, 0.15) 0%,
          rgba(118, 75, 162, 0.15) 100%
        );
        border-bottom: 1px solid rgba(102, 126, 234, 0.2);
        color: white;
        padding: 24px 28px;
        position: relative;
        overflow: hidden;
      }

      .chat-header h1 {
        font-size: 26px;
        margin-bottom: 6px;
        font-weight: 700;
        letter-spacing: -0.5px;
        color: #fff;
      }

      .chat-header p {
        font-size: 13px;
        opacity: 0.6;
        font-weight: 500;
        letter-spacing: 0.3px;
      }

      .chat-messages {
        flex: 1;
        overflow-y: auto;
        padding: 32px 10%;
        background: transparent;
        will-change: scroll-position;
        scroll-behavior: smooth;
      }

      .chat-messages::-webkit-scrollbar {
        width: 6px;
      }

      .chat-messages::-webkit-scrollbar-track {
        background: rgba(255, 255, 255, 0.05);
      }

      .chat-messages::-webkit-scrollbar-thumb {
        background: rgba(102, 126, 234, 0.3);
        border-radius: 3px;
      }

      .chat-messages::-webkit-scrollbar-thumb:hover {
        background: rgba(102, 126, 234, 0.5);
      }

      .message {
        margin-bottom: 20px;
        display: flex;
        gap: 12px;
        animation: slideIn 0.2s ease-out;
      }

      @keyframes slideIn {
        from {
          opacity: 0;
          transform: translateY(10px);
        }

        to {
          opacity: 1;
          transform: translateY(0);
        }
      }

      .message.user {
        flex-direction: row-reverse;
      }

      .message-avatar {
        width: 40px;
        height: 40px;
        border-radius: 12px;
        display: flex;
        align-items: center;
        justify-content: center;
        font-size: 20px;
        flex-shrink: 0;
        box-shadow: 0 2px 8px rgba(0, 0, 0, 0.2);
      }

      .message.user .message-avatar {
        background: linear-gradient(135deg, #667eea 0%, #764ba2 100%);
      }

      .message.assistant .message-avatar {
        background: linear-gradient(135deg, #f093fb 0%, #f5576c 100%);
      }

      .message-content {
        max-width: 65%;
      }

      .message-bubble {
        padding: 14px 18px;
        border-radius: 18px;
        line-height: 1.6;
        word-wrap: break-word;
        font-size: 15px;
        position: relative;
      }

      .message.user .message-bubble {
        background: linear-gradient(135deg, #667eea 0%, #764ba2 100%);
        color: white;
        border-bottom-right-radius: 6px;
        box-shadow: 0 2px 8px rgba(102, 126, 234, 0.3);
      }

      .message.assistant .message-bubble {
        background: rgba(255, 255, 255, 0.05);
        color: rgba(255, 255, 255, 0.95);
        border: 1px solid rgba(255, 255, 255, 0.1);
        border-bottom-left-radius: 6px;
        box-shadow: 0 2px 8px rgba(0, 0, 0, 0.2);
      }

      .message-meta {
        display: flex;
        gap: 10px;
        margin-top: 8px;
        font-size: 11px;
        color: rgba(255, 255, 255, 0.4);
        font-weight: 500;
      }

      .message.user .message-meta {
        justify-content: flex-end;
      }

      .token-badge {
        background: rgba(102, 126, 234, 0.2);
        color: #a8b9ff;
        padding: 4px 10px;
        border-radius: 12px;
        font-weight: 600;
        border: 1px solid rgba(102, 126, 234, 0.3);
      }

      .chat-input-area {
        padding: 24px 10% 32px;
        background: rgba(22, 22, 35, 0.95);
        border-top: 1px solid rgba(102, 126, 234, 0.2);
      }

      .input-wrapper {
        display: flex;
        gap: 12px;
        align-items: flex-end;
      }

      #messageInput {
        flex: 1;
        background: rgba(255, 255, 255, 0.05);
        border: 2px solid rgba(102, 126, 234, 0.2);
        border-radius: 16px;
        padding: 14px 20px;
        font-size: 15px;
        font-family: inherit;
        resize: none;
        max-height: 120px;
        transition: border-color 0.2s ease, background 0.2s ease;
        color: white;
        will-change: border-color;
        overflow: hidden;
        scrollbar-width: none;
        /* Firefox */
      }

      #messageInput::-webkit-scrollbar {
        display: none;
      }

      #messageInput::placeholder {
        color: rgba(255, 255, 255, 0.3);
      }

      #messageInput:focus {
        outline: none;
        border-color: #667eea;
        background: rgba(255, 255, 255, 0.08);
      }

      #sendBtn {
        background: linear-gradient(135deg, #667eea 0%, #764ba2 100%);
        color: white;
        border: none;
        width: 52px;
        height: 52px;
        border-radius: 16px;
        cursor: pointer;
        display: flex;
        align-items: center;
        justify-content: center;
        font-size: 22px;
        transition: transform 0.1s ease, box-shadow 0.1s ease;
        flex-shrink: 0;
        box-shadow: 0 2px 8px rgba(102, 126, 234, 0.4);
        position: relative;
      }

      #sendBtn:hover:not(:disabled) {
        transform: translateY(-1px);
        box-shadow: 0 4px 12px rgba(102, 126, 234, 0.5);
      }

      #sendBtn:active:not(:disabled) {
        transform: translateY(0);
      }

      #sendBtn:disabled {
        opacity: 0.4;
        cursor: not-allowed;
        box-shadow: none;
      }

      .typing-indicator {
        display: none;
        padding: 14px 18px;
        background: rgba(255, 255, 255, 0.05);
        border: 1px solid rgba(255, 255, 255, 0.1);
        border-radius: 18px;
        border-bottom-left-radius: 6px;
        box-shadow: 0 2px 8px rgba(0, 0, 0, 0.2);
        width: fit-content;
      }

      .typing-indicator.show {
        display: block;
      }

      .typing-dots {
        display: flex;
        gap: 6px;
      }

      .typing-dots span {
        width: 10px;
        height: 10px;
        border-radius: 50%;
        background: #667eea;
        animation: typing 1.4s infinite ease-in-out;
        will-change: transform, opacity;
      }

      .typing-dots span:nth-child(2) {
        animation-delay: 0.2s;
      }

      .typing-dots span:nth-child(3) {
        animation-delay: 0.4s;
      }

      @keyframes typing {
        0%,
        60%,
        100% {
          transform: translateY(0) scale(1);
          opacity: 0.6;
        }

        30% {
          transform: translateY(-12px) scale(1.1);
          opacity: 1;
        }
      }

      .error-message {
        background: rgba(239, 68, 68, 0.15);
        color: #fca5a5;
        padding: 14px 18px;
        border-radius: 12px;
        margin-bottom: 12px;
        display: none;
        border: 1px solid rgba(239, 68, 68, 0.3);
        font-size: 14px;
        font-weight: 500;
      }

      .error-message.show {
        display: block;
        animation: slideIn 0.3s ease;
      }

      .empty-state {
        text-align: center;
        padding: 80px 20px;
        color: rgba(255, 255, 255, 0.5);
      }

      .empty-state-icon {
        font-size: 72px;
        margin-bottom: 20px;
        animation: float 3s ease-in-out infinite;
      }

      @keyframes float {
        0%,
        100% {
          transform: translateY(0px);
        }

        50% {
          transform: translateY(-10px);
        }
      }

      .empty-state h2 {
        font-size: 24px;
        margin-bottom: 10px;
        color: rgba(255, 255, 255, 0.9);
        font-weight: 700;
        letter-spacing: -0.5px;
      }

      .empty-state p {
        font-size: 15px;
        color: rgba(255, 255, 255, 0.4);
        font-weight: 500;
      }
    </style>
  </head>

  <body>
    <div class="chat-container">
      <div class="chat-header">
        <h1>🤖 AI Chat Assistant</h1>
        <p>Powered by AI-SDK & Dodo Payments</p>
      </div>

      <div class="chat-messages" id="chatMessages">
        <div class="empty-state" id="emptyState">
          <div class="empty-state-icon">💬</div>
          <h2>Start a Conversation</h2>
          <p>Ask me anything! Your token usage is automatically tracked.</p>
        </div>
      </div>

      <div class="chat-input-area">
        <div class="error-message" id="errorMessage"></div>
        <div class="input-wrapper">
          <textarea
            id="messageInput"
            placeholder="Type your message here..."
            rows="1"
          ></textarea>
          <button id="sendBtn" onclick="sendMessage()"></button>
        </div>
      </div>
    </div>

    <script>
      let conversationHistory = [];

      const messageInput = document.getElementById("messageInput");
      let resizeTimeout;
      messageInput.addEventListener("input", function () {
        clearTimeout(resizeTimeout);
        resizeTimeout = setTimeout(() => {
          this.style.height = "auto";
          this.style.height = Math.min(this.scrollHeight, 120) + "px";
        }, 10);
      });

      // Send message on Enter (Shift+Enter for new line)
      messageInput.addEventListener("keydown", function (e) {
        if (e.key === "Enter" && !e.shiftKey) {
          e.preventDefault();
          sendMessage();
        }
      });

      async function sendMessage() {
        const input = document.getElementById("messageInput");
        const message = input.value.trim();

        if (!message) return;

        // Hide empty state
        document.getElementById("emptyState").style.display = "none";

        // Hide error
        document.getElementById("errorMessage").classList.remove("show");

        // Add user message to UI
        addMessage("user", message);

        // Add to conversation history
        conversationHistory.push({
          role: "user",
          content: message,
        });

        // Clear input
        input.value = "";
        input.style.height = "auto";

        // Show typing indicator
        showTypingIndicator();

        // Disable send button
        const sendBtn = document.getElementById("sendBtn");
        sendBtn.disabled = true;

        try {
          const response = await fetch("/chat", {
            method: "POST",
            headers: {
              "Content-Type": "application/json",
            },
            body: JSON.stringify({
              messages: conversationHistory,
            }),
          });

          const data = await response.json();

          if (!response.ok) {
            throw new Error(data.error || "Failed to get response");
          }

          // Hide typing indicator
          hideTypingIndicator();

          // Add assistant response to UI
          addMessage("assistant", data.message, data.usage);

          // Add to conversation history
          conversationHistory.push({
            role: "assistant",
            content: data.message,
          });
        } catch (error) {
          hideTypingIndicator();
          showError(error.message);
          // Remove the last user message from history since it failed
          conversationHistory.pop();
        } finally {
          sendBtn.disabled = false;
        }
      }

      function addMessage(role, content, usage = null) {
        const messagesDiv = document.getElementById("chatMessages");

        const messageDiv = document.createElement("div");
        messageDiv.className = `message ${role}`;

        const avatar = role === "user" ? "👤" : "🤖";

        let metaHTML = "";
        if (usage) {
          metaHTML = `
                    <div class="message-meta">
                        <span class="token-badge">📊 ${usage.totalTokens} tokens</span>
                    </div>
                `;
        }

        messageDiv.innerHTML = `
                <div class="message-avatar">${avatar}</div>
                <div class="message-content">
                    <div class="message-bubble">${escapeHtml(content)}</div>
                    ${metaHTML}
                </div>
            `;

        messagesDiv.appendChild(messageDiv);
        requestAnimationFrame(() => {
          messagesDiv.scrollTop = messagesDiv.scrollHeight;
        });
      }

      function showTypingIndicator() {
        const messagesDiv = document.getElementById("chatMessages");

        const typingDiv = document.createElement("div");
        typingDiv.className = "message assistant";
        typingDiv.id = "typingIndicator";
        typingDiv.innerHTML = `
                <div class="message-avatar">🤖</div>
                <div class="typing-indicator show">
                    <div class="typing-dots">
                        <span></span>
                        <span></span>
                        <span></span>
                    </div>
                </div>
            `;

        messagesDiv.appendChild(typingDiv);
        requestAnimationFrame(() => {
          messagesDiv.scrollTop = messagesDiv.scrollHeight;
        });
      }

      function hideTypingIndicator() {
        const typingIndicator = document.getElementById("typingIndicator");
        if (typingIndicator) {
          typingIndicator.remove();
        }
      }

      function showError(message) {
        const errorDiv = document.getElementById("errorMessage");
        errorDiv.textContent = "❌ " + message;
        errorDiv.classList.add("show");
      }

      function escapeHtml(text) {
        const div = document.createElement("div");
        div.textContent = text;
        return div.innerHTML.replace(/\n/g, "<br>");
      }
    </script>
  </body>
</html>

Step 7: Test Your Chat Application

Time to test our AI chat app and see the billing in action! Let’s make sure everything works end-to-end.
What we’re testing: We’ll have some conversations with the AI, verify the token events reach Dodo Payments, and confirm billing calculations are correct.
1

Start the server

First, make sure everything is set up:
  1. Verify your .env file has all the API keys from Step 2
  2. Start the development server:
npm run dev
You should see:
🚀 Server running at http://localhost:3000
📊 Tracking event: ai_chat_usage
👤 Customer ID: {YOUR CUSTOMER_ID}
🔧 Environment: test_mode
Server is running! Time to chat.
2

Open the chat interface

  1. Open your browser
  2. Navigate to http://localhost:3000
  3. You should see the beautiful chat interface
Make sure you update the CUSTOMER_ID in server.ts with your actual test customer ID from Step 4.
3

Have your first conversation

Let’s test it out! Try these messages:
  1. “What is artificial intelligence?”
  2. “How does machine learning work?”
  3. “Can you explain neural networks?”
Watch the token usage display update after each response!
If you see the AI responding and token counts appearing, your app is working!
4

Check your Dodo Payments dashboard

Now let’s verify the events are being received:
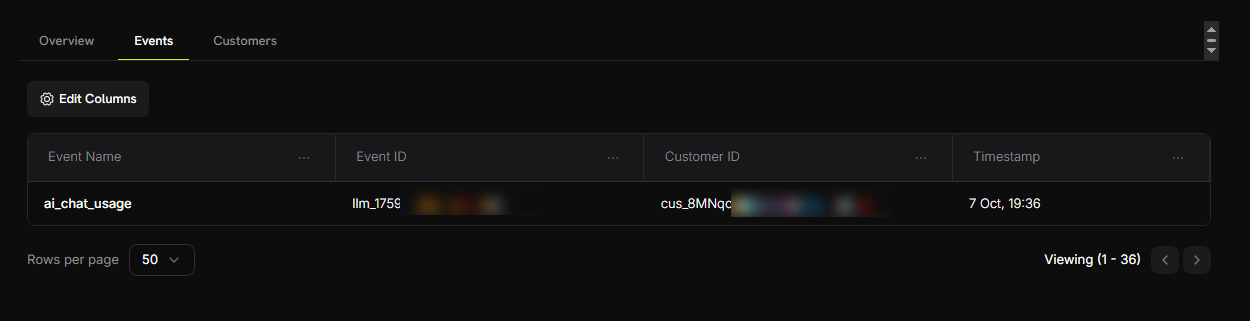
  1. Open your Dodo Payments dashboard
  2. Go to Usage BillingAI Token Usage Meter
  3. Click on the Events tab
  4. You should see your chat events listed
What to look for:
  • Event names: ai_chat_usage
  • Customer ID: Your test customer id
Meter Events
You should see one event for each message you sent!
5

Verify token counting

Let’s send some more messages and check if the token aggregation is working:
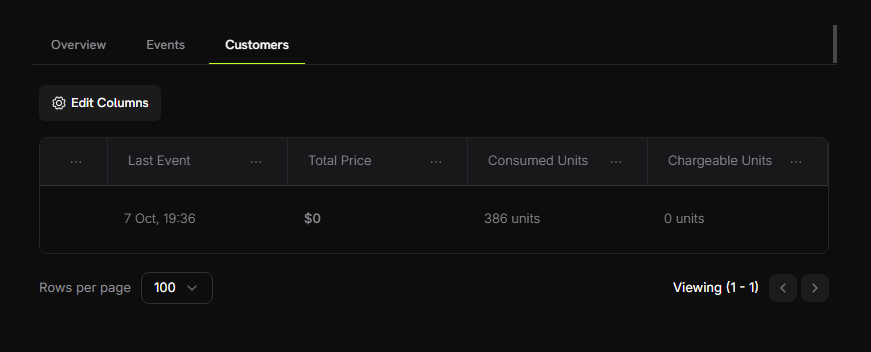
  1. In your meter, go to the Customers tab
  2. Find your test customer
  3. Check the “Consumed Units” column - it should show the total tokens used
Meter Customer Tokens
The meter is summing up all totalTokens values automatically!
6

Test the free tier

Let’s use enough tokens to exceed the free tier:
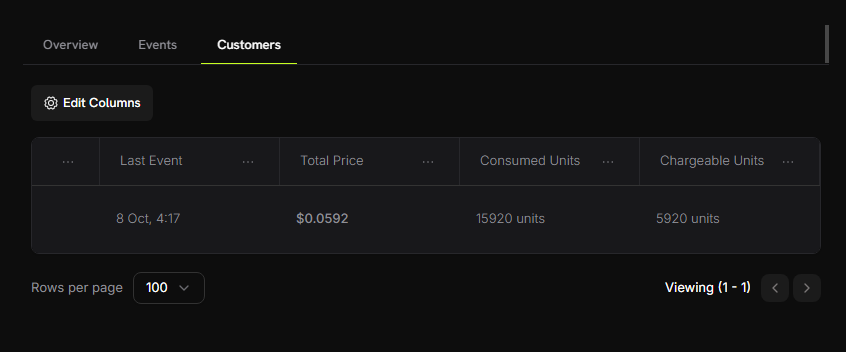
  1. Have several more conversations (aim for ~15,000+ total tokens)
  2. Check your Customers tab in meter dashboard again
  3. You should now see:
    • Consumed Units: 15,000+ tokens
    • Chargeable Units: 5,000 (10,000 free tokens applied)
    • Total Price: ~$0.05
Free Tier Test
Success! Your usage-based billing is working perfectly. Customers will be automatically charged based on their actual token consumption.

Troubleshooting

Common issues and their solutions:
Possible causes:
  • Event name doesn’t match meter configuration exactly
  • Customer ID doesn’t exist in your account
  • API key is invalid or expired
  • Network connectivity issues
Solutions:
  1. Verify event name matches meter configuration exactly (case-sensitive: ai_chat_usage)
  2. Check that customer ID exists in Dodo Payments dashboard
  3. Test API key with a simple API call
  4. Check server logs for error messages
Possible causes:
  • Model not returning usage information
  • Incorrect SDK version
Solutions:
  1. Test if model returns usage:
const response = await generateText({...});
console.log('Usage:', response.usage);
  1. Update to latest Blueprints SDK: npm install @dodopayments/ingestion-blueprints@latest
Possible causes:
  • Wrong API key for environment
  • Extra spaces or quotes in .env file
Solutions:
  • Ensure test key starts with test_, live key starts with live_
  • Remove any quotes around keys in .env file
  • Generate a new key if needed
Need help?

Congratulations! You Built an AI Chat App

You now have a fully functional AI chat application with automatic token usage tracking and billing powered by Dodo Payments. 🎉

Learn More

I