

Quick Start
Platform Examples
Checkout Customization
Mobile Recipes
Dodo Payments ships an official checkout SDK for Android, iOS, React Native, and Flutter. Each SDK opens the checkout URL, captures the return, and parses the result behind one typed
start(...) call, and each one includes abandoned-session recovery. Build the flow by hand only if none of the SDKs fits your stack.Prerequisites
Before you start, you need:- A Dodo Payments account.
- An API key from Developer → API Keys and a webhook signing secret from Developer → Webhooks.
- An Android, iOS, React Native, or Flutter app.
- A backend server that creates checkout sessions. The API key stays on this server.
Integration Workflow
Your backend makes every Dodo Payments API call. Your app only asks your backend for a checkout URL, opens it, and shows the result.The
status in the deep link tells your app what to show the customer. It is not proof of payment. Grant access from the payment.succeeded or subscription.active webhook on your backend, not from the mobile result.1
Backend: Create Checkout Session
Your backend creates a checkout session with your API key and returns its
checkout_url to the app. Set the session’s return_url to the deep link your app registers, for example myapp://checkout/return.Checkout Session API Docs
Security: Create checkout sessions on your backend server, never in the mobile app. Anyone can extract an API key from an app binary.
2
Mobile: Get Checkout URL
Your app calls your backend to get the checkout URL. Authenticate this request with the signed-in user’s own session token. In each example,
userSessionToken is that token and CheckoutResponse is your own response type.- iOS (Swift)
- Android (Kotlin)
- React Native (JavaScript)
- Flutter (Dart)
Security: The app talks only to your backend, never directly to the Dodo Payments API.
3
Mobile: Open Checkout in Browser
Open the checkout URL in the platform’s system browser surface. The official checkout SDK for your platform does this for you and returns a typed result.
Pick your mobile SDK
4
Backend: Handle Payment Completion
Grant access when your backend receives the
payment.succeeded or subscription.active webhook. Use the result from the return URL only to update the app’s screen.Choose Your SDK
Every mobile SDK has the same contract. Onestart(...) call opens Dodo Payments hosted checkout in the platform’s system browser surface and returns a typed CheckoutResult whose status is succeeded, failed, cancelled, pending, or expired. No SDK holds an API key or calls the Dodo Payments API, and all four support abandoned-session recovery.
Android
iOS
React Native
Flutter
Registering a Callback URL Scheme
All four SDKs return control to your app through a custom URL scheme that you choose, for examplemyapp://checkout/return. Register it once per platform:
- Android
- iOS
- Expo
android/app/build.gradle
returnUrl.To build the flow yourself, open the
checkout_url in the platform’s system browser surface (a Custom Tab on Android, SFSafariViewController on iOS), intercept the navigation to your return_url, and read the status and payment_id query parameters. The SDKs do this for you.Appearance Customization
Every SDK accepts an optionalcustomization parameter on start(...) or CheckoutParams. It controls the system browser surface: the toolbar, the buttons, and how the browser is presented. The checkout page’s own theme is separate. You set it on your server with customization.theme_config when you create the checkout session.
The options are grouped by platform, because a Custom Tab on Android and SFSafariViewController on iOS expose different native controls. Every field is optional. An unset field leaves the platform’s own default in place.
Android - Custom Tab
Android - Custom Tab
Color
Toolbar background color.
Navigation bar color.
Divider color above the navigation bar.
'default' | 'back'
default shows the system “X” icon; back draws a back arrow instead.'start' | 'end'
Which side of the toolbar the close button appears on.
Shows the toolbar’s share icon.
boolean
Shows the page title under the URL in the toolbar.
boolean
Lets the toolbar auto-hide as the page scrolls.
boolean
Shows “Bookmark this page” in the overflow menu.
boolean
Shows “Download page” in the overflow menu.
'system' | 'light' | 'dark'
Forces light or dark appearance regardless of the device’s system setting.
iOS - SFSafariViewController
iOS - SFSafariViewController
'done' | 'close' | 'cancel'
Label or icon for the dismiss button.
'pageSheet' | 'fullScreen'
Standard:"pageSheet"
pageSheet presents checkout as a card that the customer can swipe to dismiss. fullScreen covers the whole screen.boolean
Lets the toolbar collapse on scroll. It has a visible effect only when
presentationStyle is fullScreen. With pageSheet, the bars stay pinned.'system' | 'light' | 'dark'
Forces light or dark appearance regardless of the device’s system setting.
android and ios option groups. The native SDKs take only their own platform’s options.
- React Native
- Flutter
- Android (Kotlin)
- iOS (Swift)
Checkout Page Customization
The checkout page itself (which fields appear, the theme, and which payment methods show) is set on your server when you create the checkout session. Appearance Customization covers only the browser surface around it. The parameters below have the most effect on mobile conversion. Diese Parameter befinden sich an drei Stellen in der Anfrage für die Checkout-Session: auf der obersten Ebene, incustomization oder in feature_flags. Die Spalte Where it goes nennt für jeden Parameter das entsprechende Objekt. Platziere jeden Parameter in dem angegebenen Objekt, da ein Parameter im falschen Objekt keine Wirkung hat.
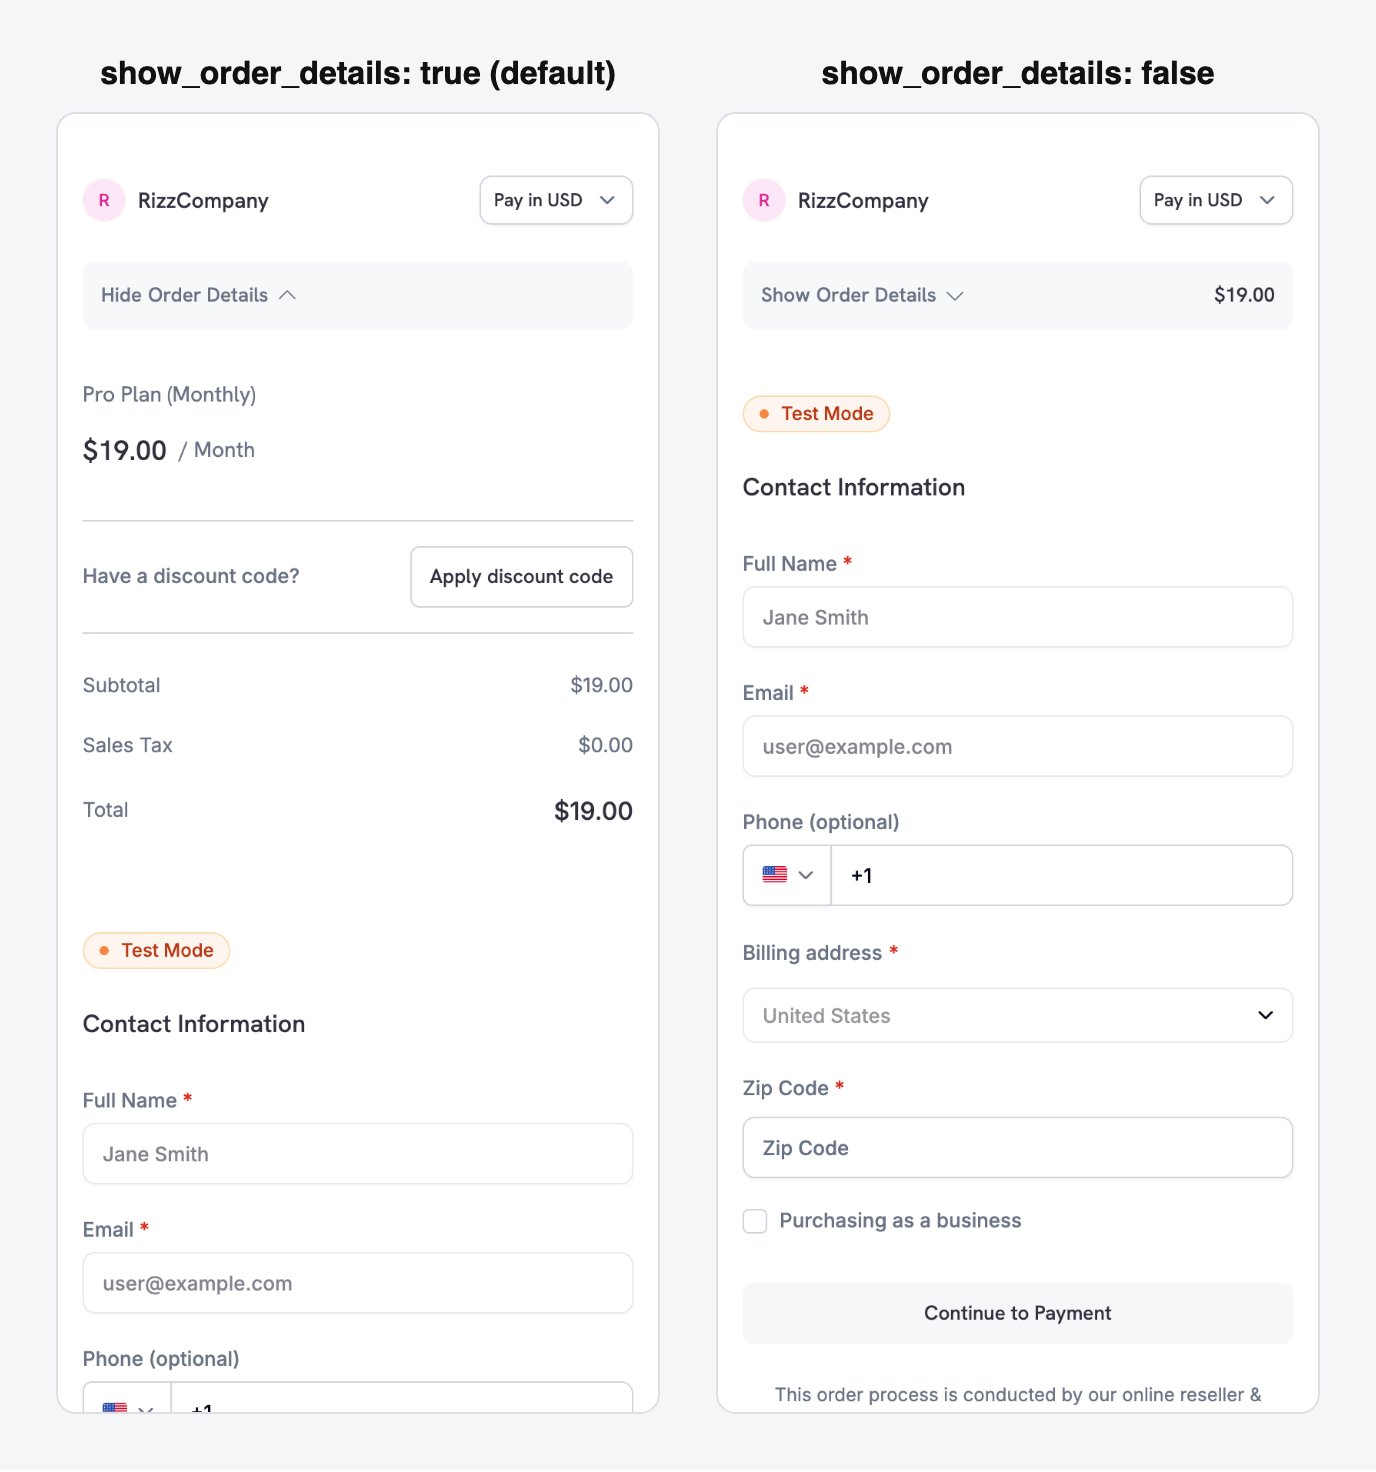
show_order_details: false moves the contact and payment fields above the fold, instead of behind the order summary.
minimal_address: true to collect only a postcode instead of the full street, city, and state fields:
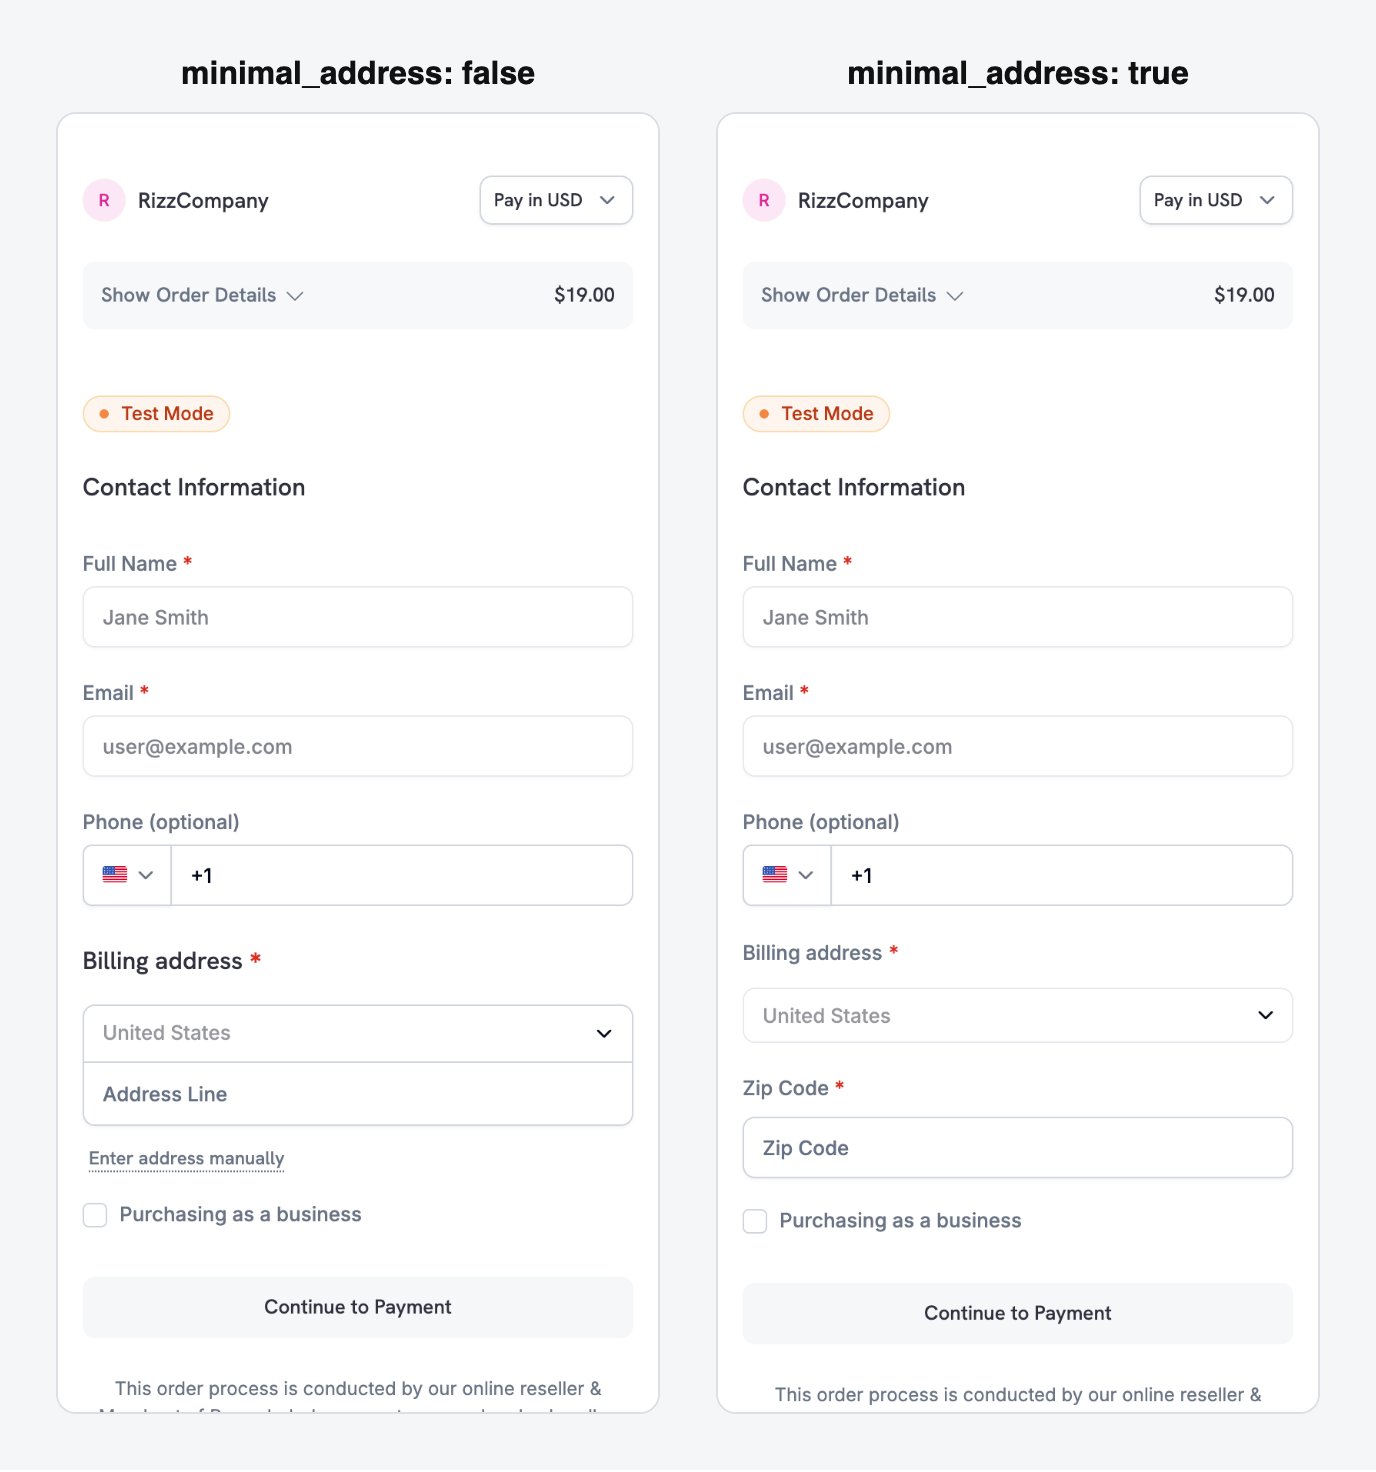
minimal_address: true reduces the billing address to a single postcode field.
theme: "system" so the checkout follows the device’s light or dark mode preference:
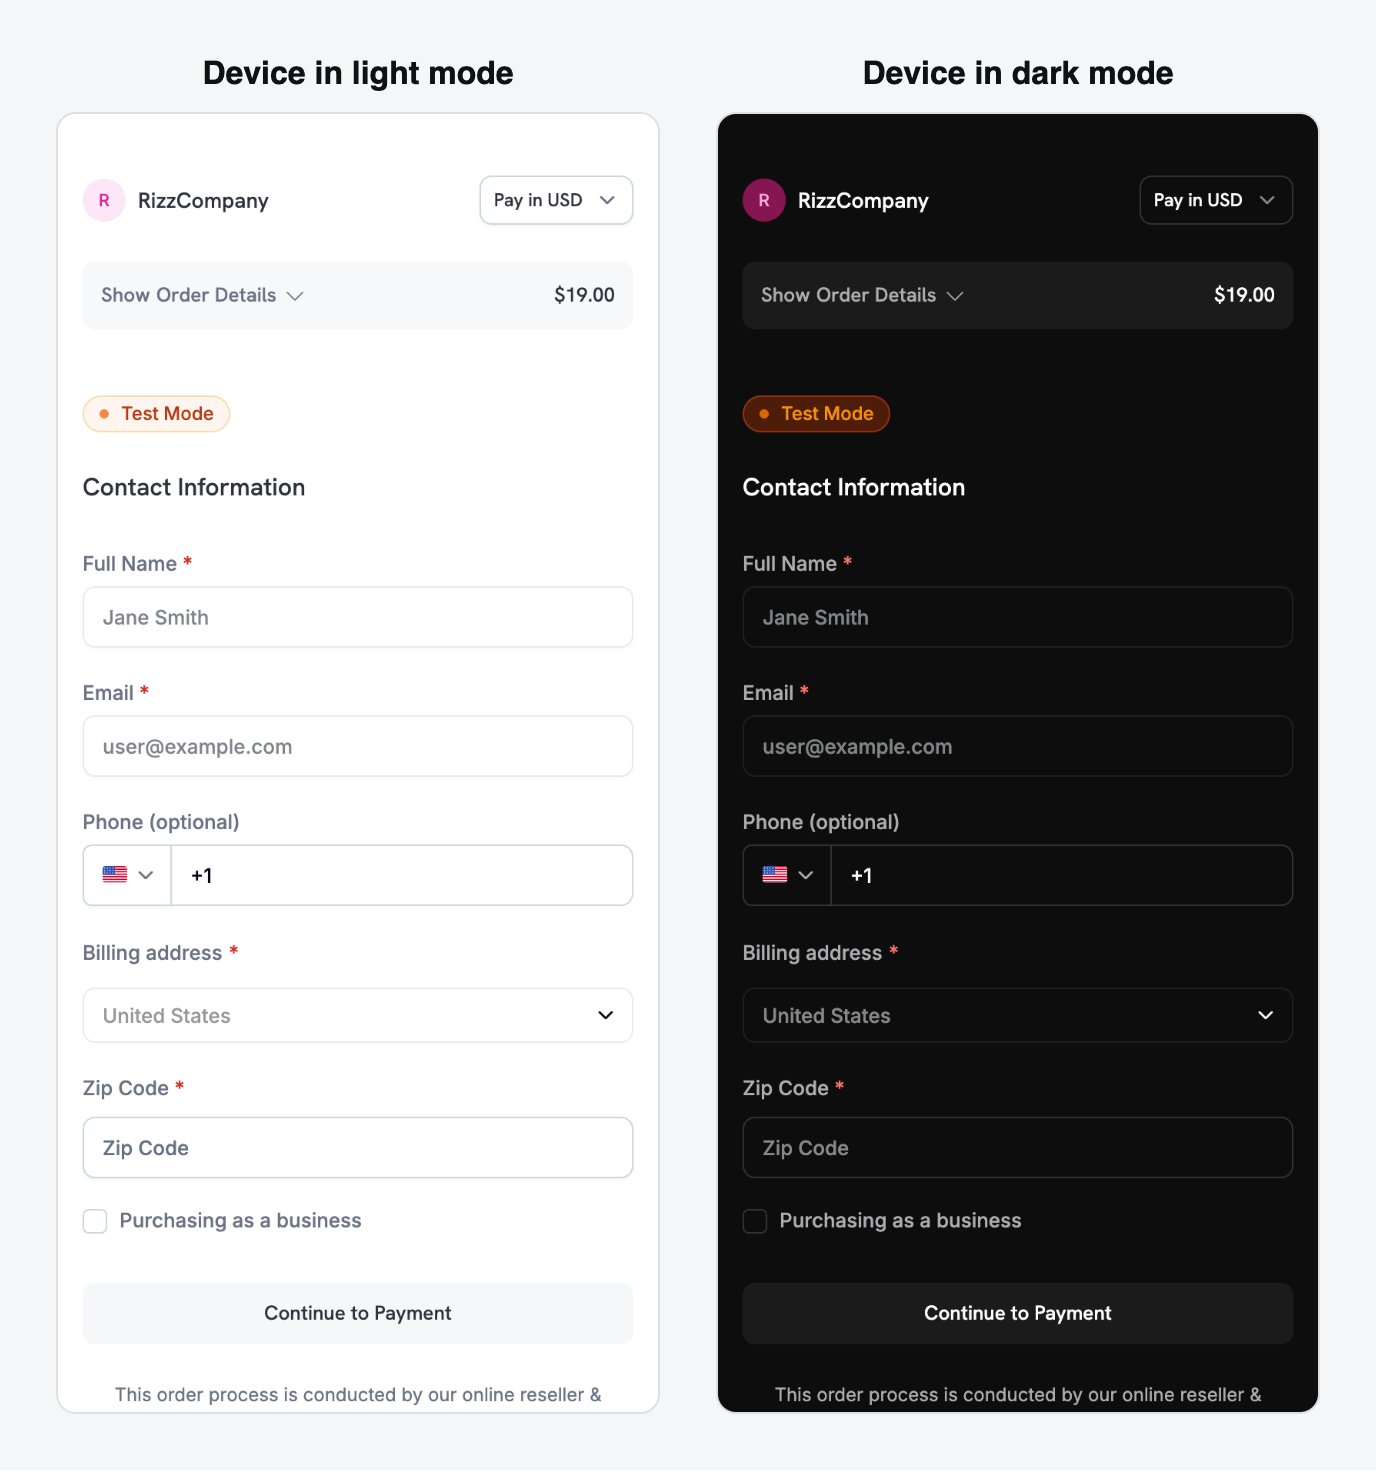
With theme: system, the checkout follows the device's light or dark appearance automatically.
Payment methods depend on the product type. Apple Pay and Cash App Pay support non-zero recurring subscriptions. One-time payments can use every payment method enabled for your business. See Payment Methods.
Full checkout session parameter reference
Mobile-Optimized Recipes
Each recipe is a complete checkout session request that your backend sends. Pick the one that matches your scenario and replace the product ID with your own. The Node.js and Python clients are set up in the first recipe, and the other recipes reuse them.Minimal Mobile Checkout - fastest path to payment
Minimal Mobile Checkout - fastest path to payment
Use this recipe for the shortest form: payment methods at the top, only a postcode for the address, no discount field, and a theme that follows the device.
- Node.js SDK
- Python SDK
See Checkout Sessions for all available parameters and their defaults.
Use this recipe when the checkout page must look like part of your app. It sets your brand colors, a border radius, and a custom pay button label.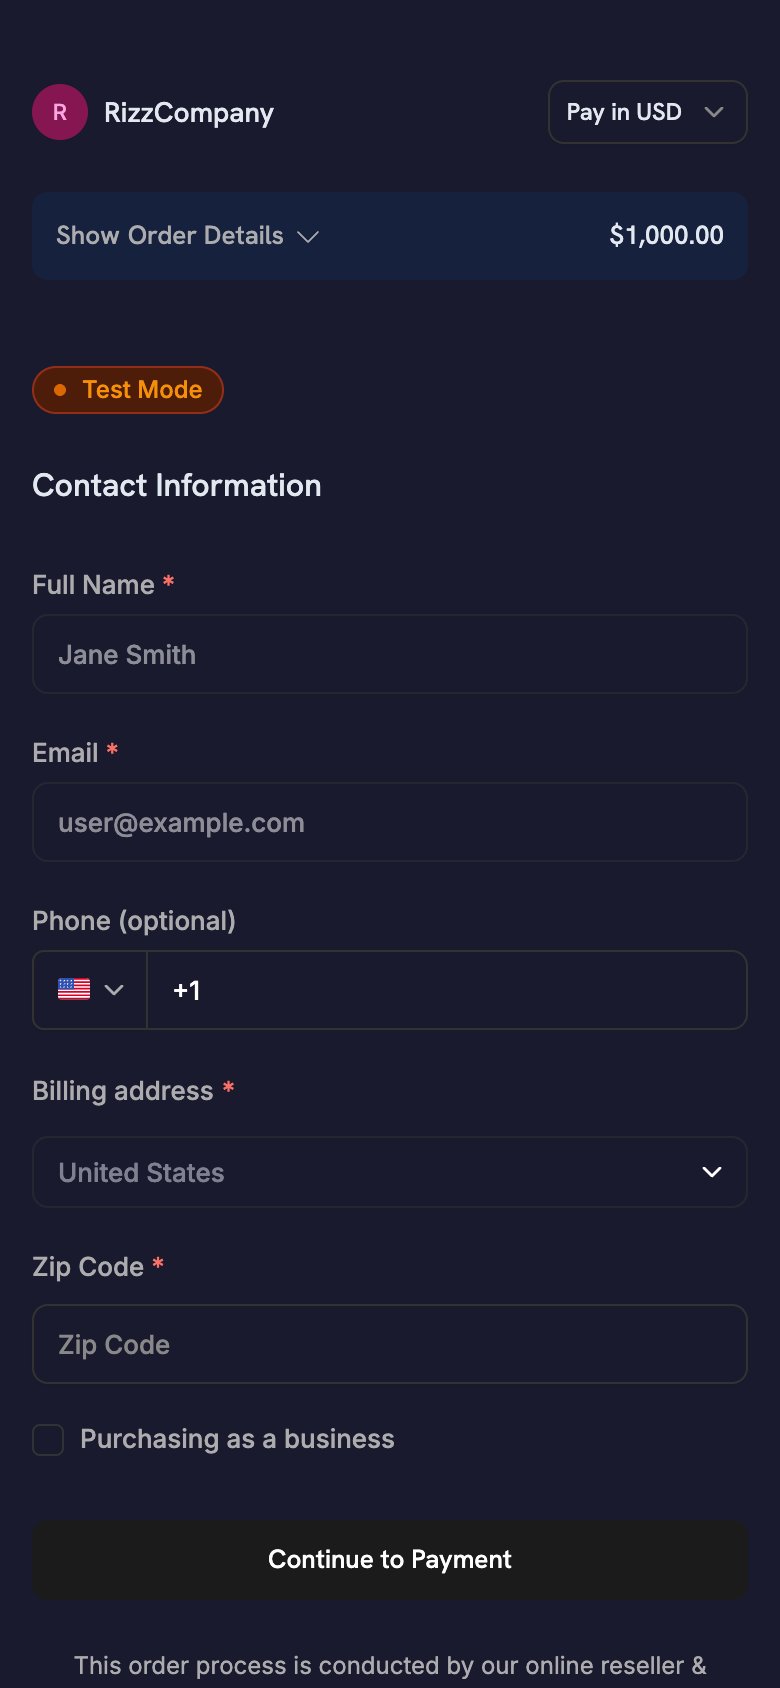
- Node.js SDK
- Python SDK
theme_config accepts separate dark and light objects, so the palette follows the device’s appearance. For every color key and the font option, see Checkout Sessions.One-Click Returning Customer - saved card, instant confirmation
One-Click Returning Customer - saved card, instant confirmation
Use this recipe for signed-in customers who have paid before. Pass the customer’s
customer_id, their saved payment_method_id, and confirm: true to skip the checkout form. With a payment_method_id, the session charges the saved method directly and returns no checkout_url, so your app has nothing to open. Learn the outcome from webhooks.- Node.js SDK
- Python SDK
Grant access when your backend receives the
payment.succeeded webhook. Any status your app shows is a UI hint only.Subscription with Free Trial - trial before first charge
Subscription with Free Trial - trial before first charge
Use this recipe for a subscription product with a free trial before the first charge.
trial_period_days sets the trial length for this session.- Node.js SDK
- Python SDK
Grant access when your backend receives the
subscription.active webhook, not when the mobile SDK returns. For the full webhook flow, see the Subscription Integration Guide.On-Demand Mandate - save a card for future variable charges
On-Demand Mandate - save a card for future variable charges
Use this recipe to save a customer’s payment method for later charges, such as wallet top-ups, pay-as-you-go, or BNPL, without showing a subscription label. The customer authorizes the payment method once, and you charge variable amounts later.
Apps that charge by usage follow this pattern. For example, an astrology app charges a pre-authorized card for each session instead of on a fixed schedule.
- Node.js SDK
- Python SDK
For the full charge flow, webhook events, and retry policies, see On-Demand Subscriptions.
Subscription Flows from Mobile
A mobile app starts a subscription with the same checkout session flow as a one-time payment. The SDK opens hosted checkout, the customer subscribes, and your app handles the deep-link return. Your backend manages the rest of the subscription lifecycle.Regular Recurring Subscriptions
For billing at a fixed interval, such as monthly or yearly, create a checkout session with a subscription product and a deep-linkreturn_url. Your backend receives subscription.active when the subscription starts.
Apple Pay and Cash App Pay support non-zero recurring subscriptions.
On-Demand Subscriptions
An on-demand subscription authorizes a customer’s payment method once, so you can charge variable amounts later. Use it for wallet top-ups, pay-as-you-go, and any charge whose amount you don’t know in advance. For the full request body, see the On-Demand Mandate recipe. On mobile, keep these points in mind:- Set
show_on_demand_tag: falseso the checkout page doesn’t show subscription or on-demand wording. Customers who save a card for top-ups don’t expect subscription terms. - After the customer authorizes the mandate, your backend receives
subscription.active. Store thesubscription_id, because every later charge uses it.
Subscription with Free Trial
To offer a trial before the first charge, passsubscription_data.trial_period_days in the checkout session. The customer authorizes a payment method at signup, and Dodo Payments charges it when the trial ends. For the full request body, see the Subscription with Free Trial recipe.
Upgrades and Downgrades
Your backend changes plans through the API, not through a new checkout session. Dodo Payments calculates proration with the proration mode you choose. To let customers change plans themselves, link to the Customer Portal.Subscription Integration Guide
On-Demand Subscriptions
Upgrade / Downgrade
Customer Portal
Reducing Checkout Drop-Offs
Auf einem kleinen Bildschirm erfordert das Ausfüllen jedes Formularfelds mehr Aufwand. Die folgenden Einstellungen für die Checkout-Session verkürzen das Formular und reduzieren Abbrüche.Optimize the Form
These settings shorten the checkout form on mobile:Pre-Fill Customer Data
Each field you pre-fill is one the customer doesn’t have to type:- New customers: set
customer.emailandcustomer.namefrom your auth session. - Returning customers: set
customer.customer_idto use the customer’s stored details. - Currency: pass
billing_currencyandbilling_address.countrytogether.
Recovery Tools
Recovery tools bring back customers whose checkout or renewal didn’t complete:Abandoned Cart Recovery
Payment Retries
Subscription Dunning
Recovery Overview
Best Practices
- Sicherheit: Hinterlege niemals einen API-Schlüssel in deiner App. Erstelle Checkout-Sessions in deinem Backend und übergib der App nur den
checkout_url. - Berechtigung: Behandle
CheckoutResult.statusals UI-Hinweis. Gewähre Zugriff erst, nachdem dein Backend die Zahlung bestätigt hat. - User Experience: Zeige einen Ladestatus an, während dein Backend die Session erstellt. Werte
cancellednicht als Fehler, da die Zahlung möglicherweise trotzdem erfolgreich war. - Testing: Verwende den Testmodus und Testkarten und prüfe den Round Trip der Rückgabe-URL sowohl auf einem echten Gerät als auch in einem Simulator.
- Conversion: Setze
show_order_details: falseundminimal_address: true. Zusammen platzieren sie Zahlungsmethoden above the fold und entfernen die meisten Adressfelder. - Währung: Übergebe sowohl
billing_currencyals auchbilling_address.country. Wenn du einen der beiden Werte weglässt, kann Adaptive Currency die Abrechnungswährung anhand der IP-Adresse des Kunden auswählen. - On-demand billing: Setze
show_on_demand_tag: false, wenn du On-demand-Abonnements ausschließlich zum Speichern einer Karte verwendest. Kunden, die ein Wallet aufladen, erwarten keine Formulierungen zu Abonnements. - Wiederherstellung: Aktiviere Abandoned Cart Recovery im Dashboard, um Kunden, die den Checkout nicht abschließen, eine E-Mail zu senden.
Fehlerbehebung
Häufige Probleme
- Callback trifft nie ein: Das Schema in
returnUrlmuss mit dem registrierten Schema übereinstimmen. Unter Android ist dies derdodoCallbackScheme-Manifest-Platzhalter. Unter iOS ist es derInfo.plist-URL-Typ. React-Native- und Flutter-Apps benötigen beide; in Expo setzt das Config-Plugin beide. - Checkout kehrt unter iOS zum Browser statt zu deiner App zurück: Deine App leitet die eingehende URL nicht weiter. Rufe
DodoCheckout.handleOpenURL(url)aus.onOpenURL,scene(_:openURLContexts:)oder einem React-Native-ListenerLinkingauf. PLATFORM_ERRORunter Android: Die häufigste Ursache ist ein nicht übereinstimmendes Schema. Das Problem tritt auch auf, wenn deinMainActivityandroid:taskAffinity=""setzt (den Standardwertflutter create), wodurch bei einigen Android-OEM-Builds der laufende Checkout verloren gehen kann.ALREADY_IN_PROGRESS: Ein Checkout ist noch geöffnet. Warte, bis der vorherige abgeschlossen ist, oder schließe ihn, bevor du einen weiteren startest.- Build schlägt mit einem nicht aufgelösten Platzhalter fehl: Du hast das Android SDK hinzugefügt, aber
manifestPlaceholders["dodoCallbackScheme"]nicht gesetzt. - Zahlung war erfolgreich, aber Zugriff wurde nicht gewährt: Deine App gewährt Zugriff anhand des mobilen Ergebnisses. Gewähre Zugriff stattdessen anhand des
payment.succeeded- odersubscription.active-Webhooks. - Apple Pay oder Google Pay wird auf Mobilgeräten nicht angezeigt: Prüfe, ob der Checkout in einer eingebetteten WebView geladen wird (
WKWebViewoder AndroidWebView). Öffne ihn mit dem SDK oder in der Browser-Oberfläche des Systems: unter Android in einem Custom Tab oder unter iOS inSFSafariViewControlleroderASWebAuthenticationSession.
Zusätzliche Ressourcen
- Leitfaden zur Zahlungsintegration
- Webhook-Dokumentation
- Testprozess
- Technische FAQs
- Anpassung der Checkout-Session
- On-Demand-Abonnements
- Upgrade/Downgrade von Abonnements
- Abandoned Cart Recovery
- Customer Portal