

Questo tutorial fornisce codice di esempio per un’applicazione da terminale. Puoi adattare il codice al tuo framework, ad esempio React, Vue o Angular, e al modo in cui la tua applicazione raccoglie l’input dell’utente.
- Genera immagini con il modello
gpt-image-2.5-flaredi OpenAI. - Tiene traccia di ogni generazione di immagini per la fatturazione.
- Addebita ai clienti le immagini che generano.
- Gestisce due livelli di qualità,
mediumehigh.
Cosa creeremo
PixelGen AI funziona in questo modo:- Servizio: generazione di immagini AI con OpenAI Image API
- Modello di prezzo: pagamento per immagine ($0.05 per immagine)
- Piano gratuito: 10 immagini gratuite per cliente al mese
- Opzioni di qualità: immagini di qualità
mediumehigh, allo stesso prezzo
- Un account Dodo Payments.
- Accesso all’API di OpenAI. OpenAI potrebbe richiedere la verifica dell’organizzazione API prima di consentirti di utilizzare i modelli GPT Image.
- Node.js 22 o versione successiva e una conoscenza pratica di TypeScript e Node.js.
Passaggio 1: crea il tuo meter di utilizzo
Crea un meter nella dashboard di Dodo Payments che tenga traccia di ogni immagine generata dal servizio. Il meter conta gli eventi fatturabili.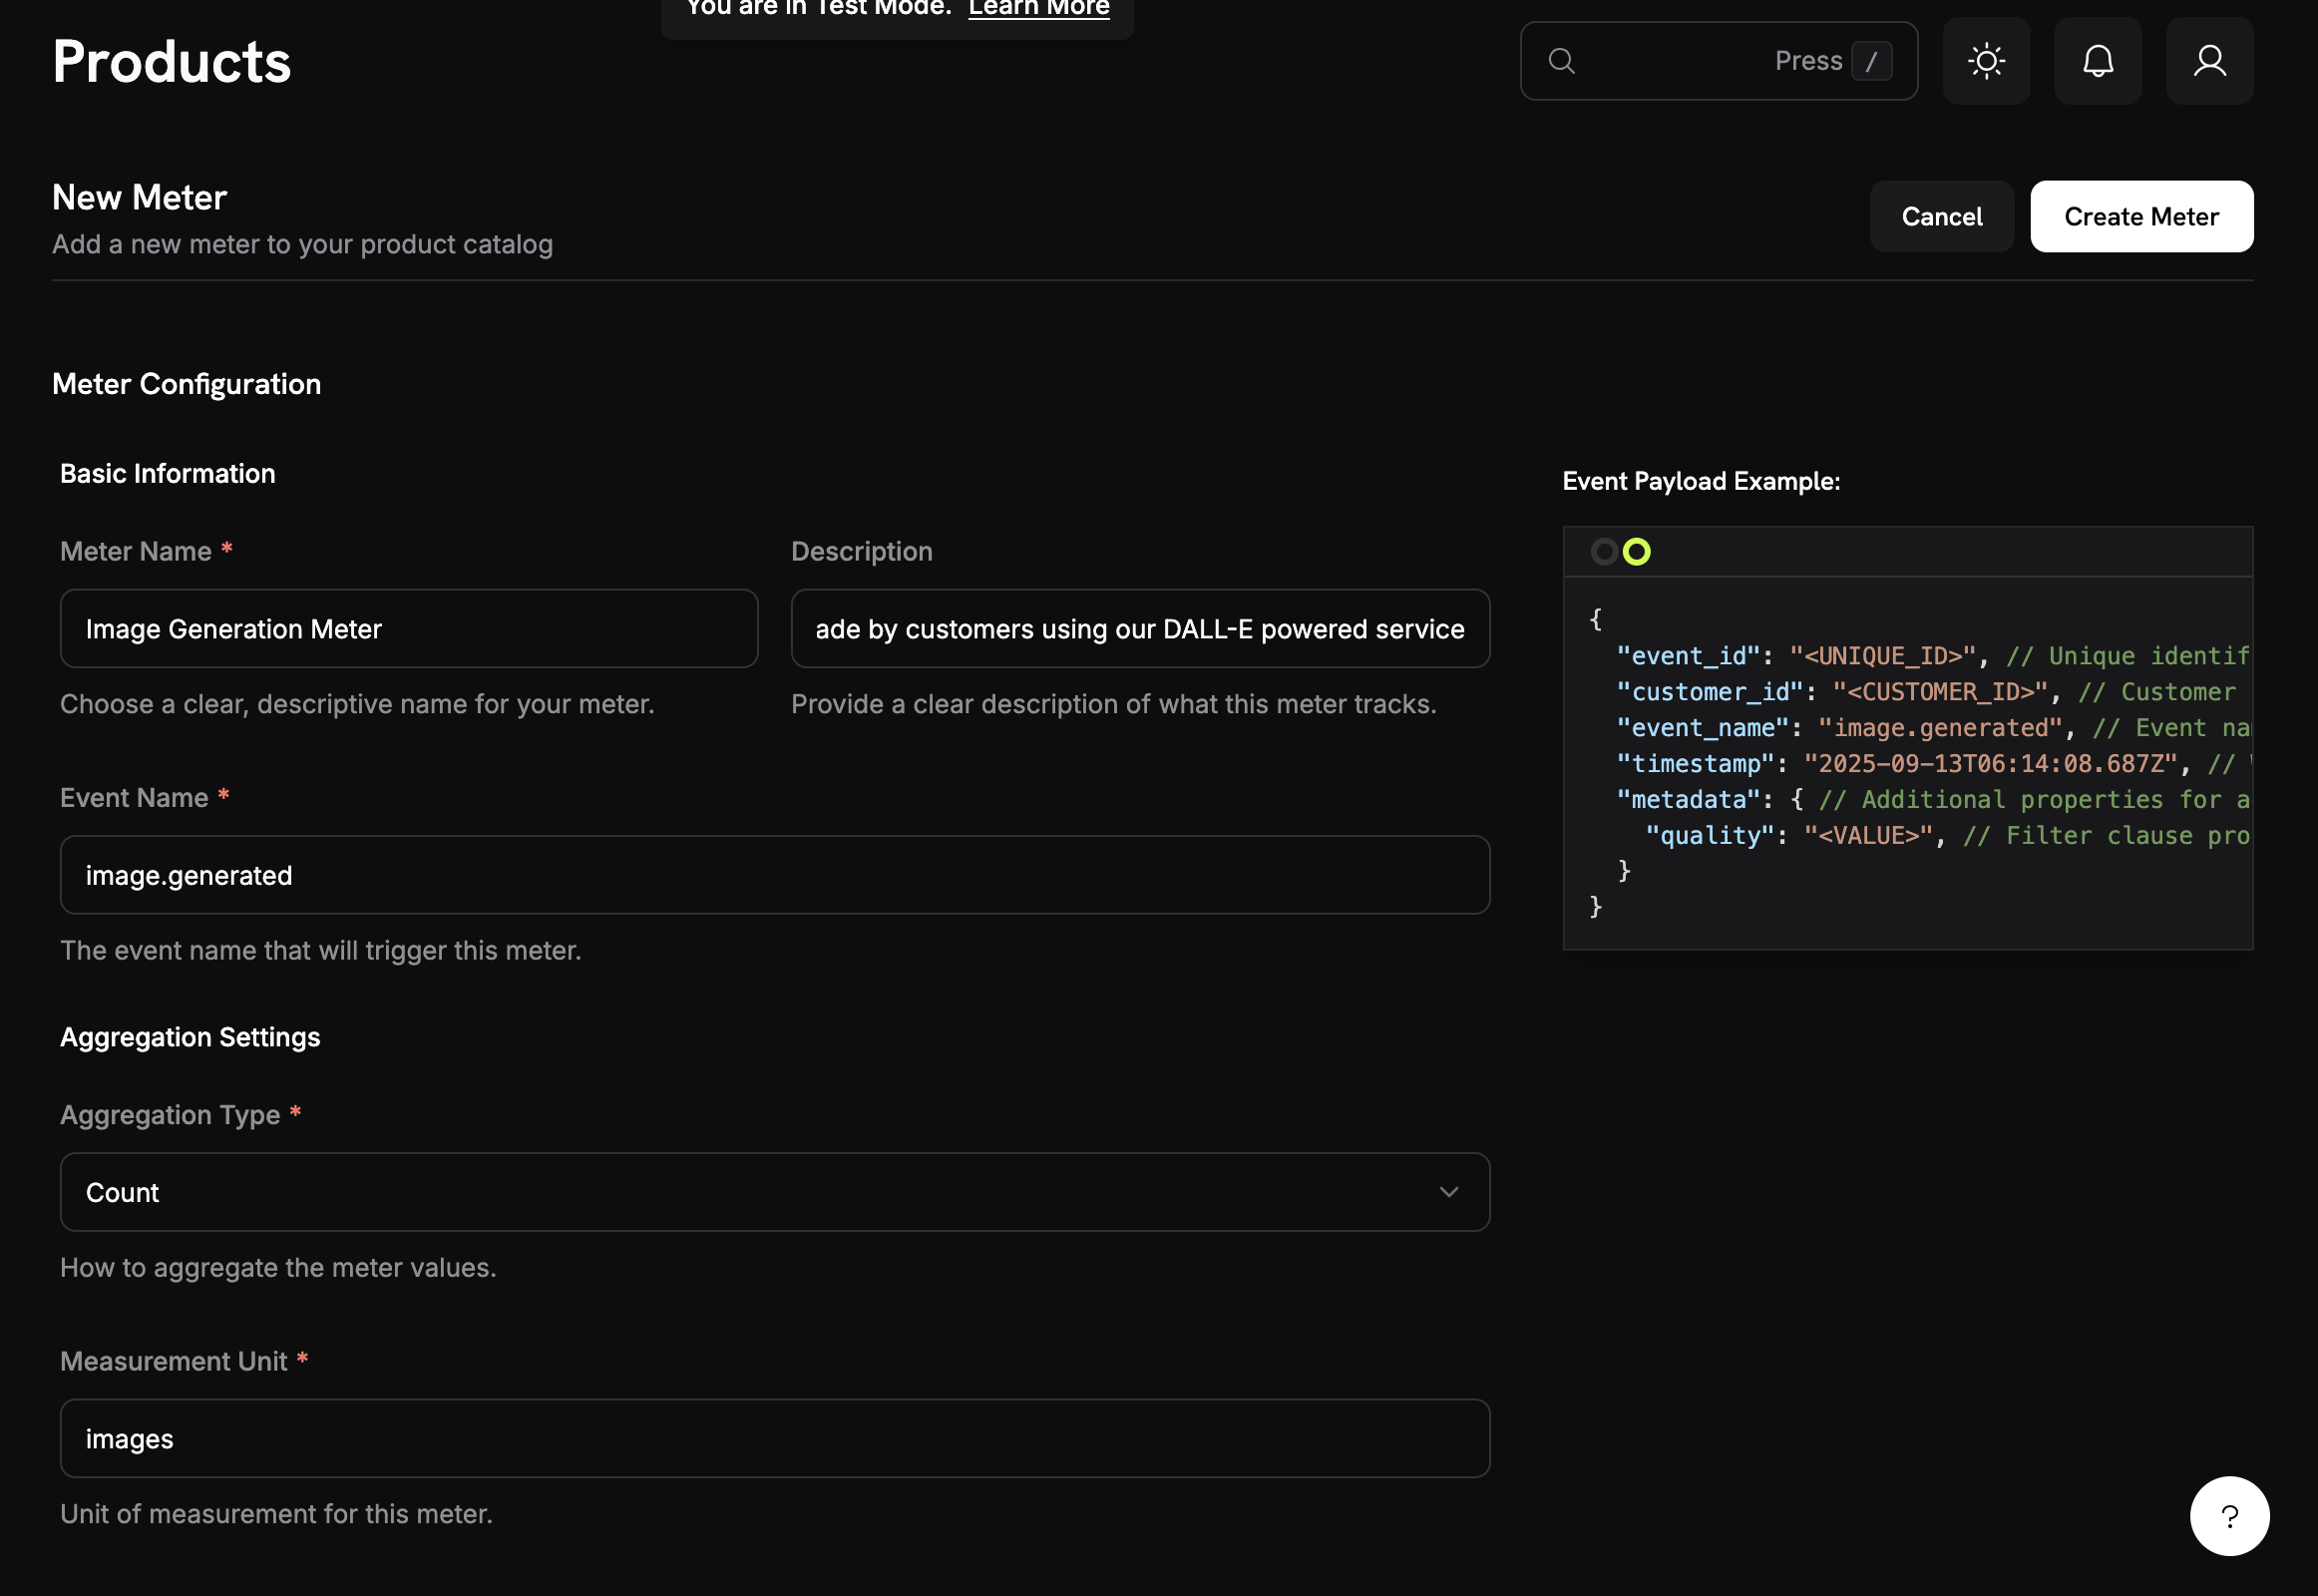
1
Open the Meters Section
- Accedi alla dashboard di Dodo Payments.
- Vai a Products → Meters nella barra laterale.
- Fai clic su Create Meter.
2
Enter the Meter Details
Inserisci i dettagli per PixelGen AI:Meter Name:
Image Generation MeterDescrizione: Tracks each AI image generation request made by customers using our OpenAI image serviceEvent Name: image.generated3
Configure How Images Are Counted
Imposta l’aggregazione, che controlla il modo in cui il meter combina gli eventi:Aggregation Type: CountMeasurement Unit:
imagesCount fattura per immagine generata, non in base alle dimensioni o al tempo di generazione. Ogni immagine generata correttamente corrisponde a un’unità fatturabile.
4
Add Quality Filtering
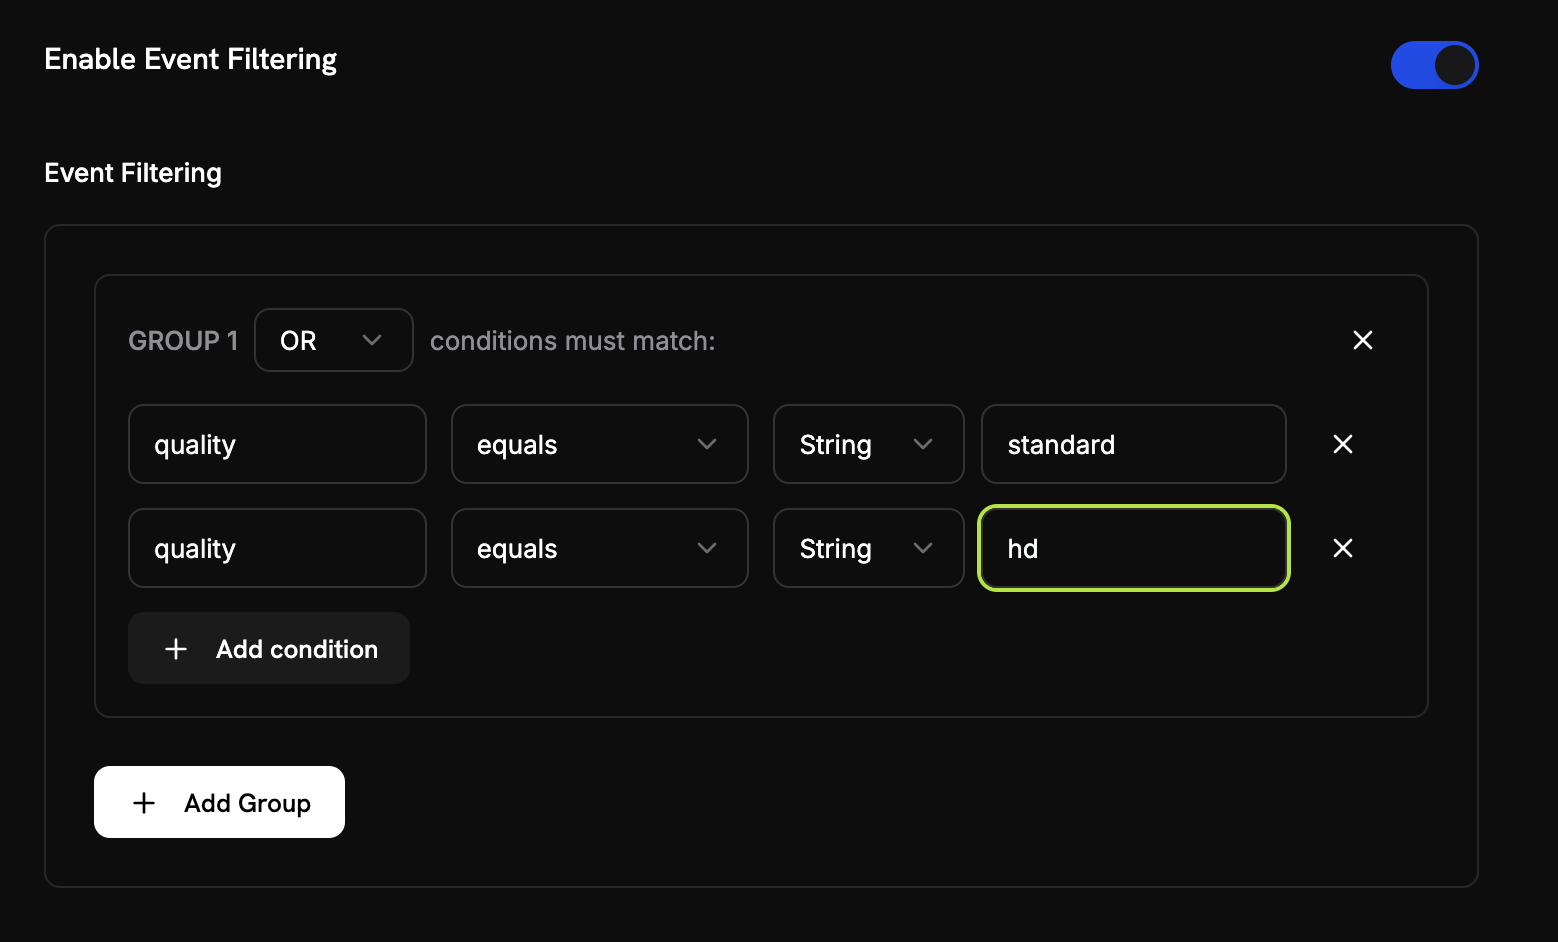
- Attiva Enable Event Filtering.
- Imposta la logica di corrispondenza su OR, in modo che un evento venga conteggiato quando una qualsiasi condizione corrisponde.
- Aggiungi la prima condizione:
- Chiave:
quality - Operatore:
equals - Valore:
medium
- Chiave:
- Fai clic su Add condition e aggiungi la seconda:
- Chiave:
quality - Operatore:
equals - Valore:
high
- Chiave:
5
Create Your Meter
- Verifica che ogni impostazione corrisponda ai valori indicati sopra. Non puoi modificare un meter dopo averlo creato.
- Fai clic su Create Meter.
Meter creato. Il “Image Generation Meter” è pronto per contare le generazioni di immagini. Ora collegalo a un prodotto di fatturazione.
Passaggio 2: crea il tuo prodotto di fatturazione
Crea un prodotto che definisca il prezzo: $0.05 per immagine, con 10 immagini gratuite. Il prodotto collega il meter alla fatturazione.1
Navigate to Products
- Nella dashboard di Dodo Payments, fai clic su Products nella barra laterale.
- Fai clic su Add Product.
- In Pricing Type, seleziona Usage Based Billing.
2
Enter Product Details
Inserisci questi valori:Product Name:
PixelGen AI - Image GenerationDescription: AI-powered image generation service with pay-per-use billingProduct Image: carica un’immagine chiara e pertinente.Il nome e la descrizione vengono visualizzati sulle fatture dei clienti.
3
Connect Your Meter
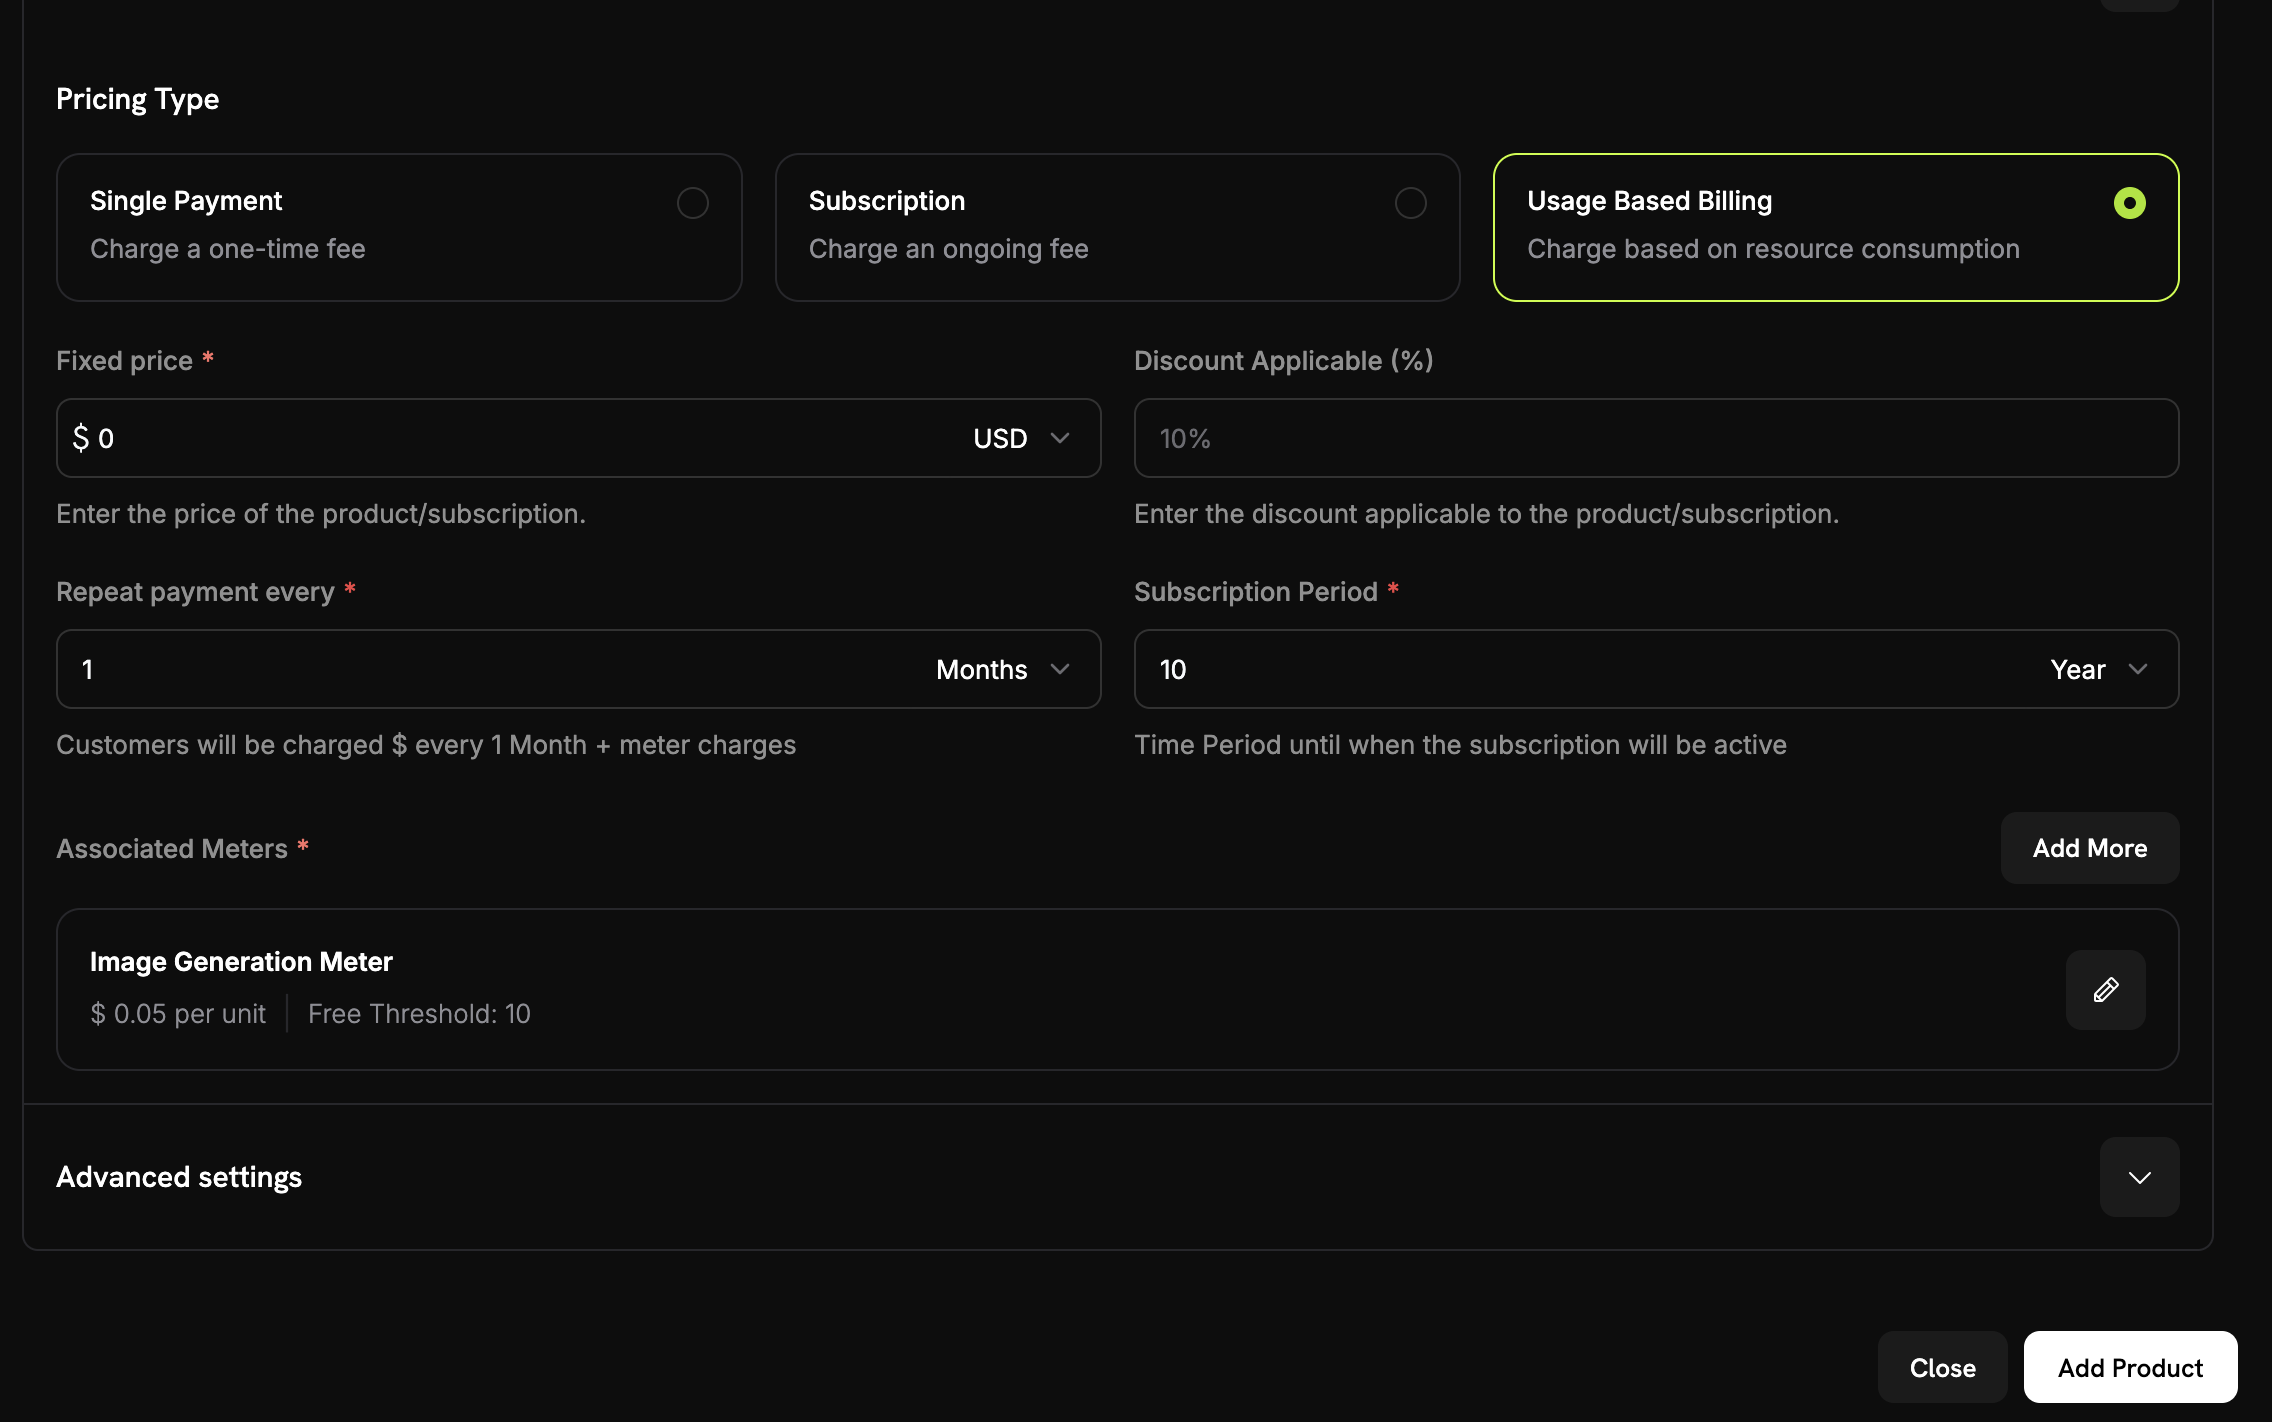
0, in modo che i clienti paghino solo per l’utilizzo, senza costi fissi.Quindi collega il meter che hai creato:- Scorri fino alla sezione Associated Meters.
- Fai clic su Add meters.
- Seleziona “Image Generation Meter” dal menu a discesa.
- Verifica che il meter venga visualizzato nella configurazione del prodotto.
Il meter è collegato al prodotto.
4
Set Your Pricing
Definisci il prezzo per immagine e il livello gratuito: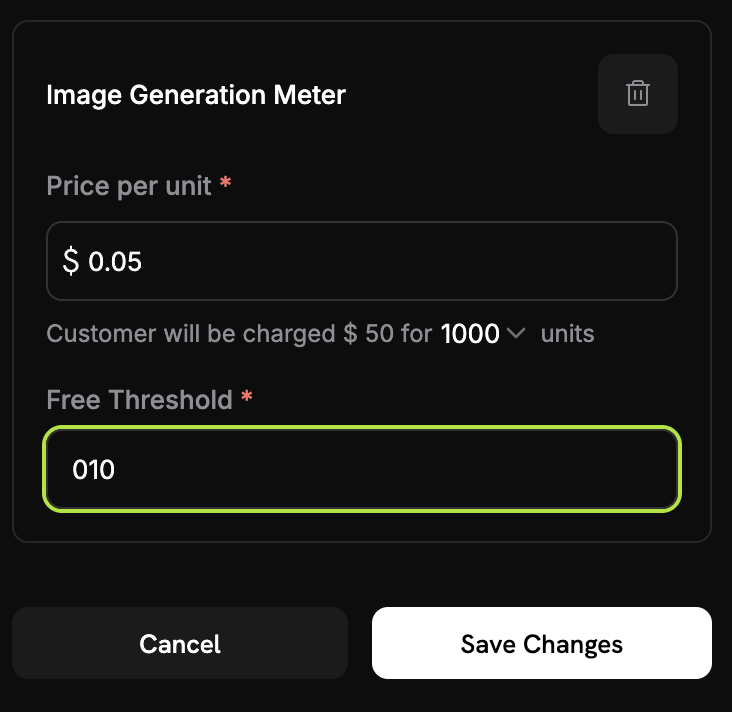
0.05, ovvero $0.05 per immagine.Free Threshold: 10. Ogni cliente riceve 10 immagini gratuite al mese.5
Save Your Product
- Esamina le impostazioni:
- Name: PixelGen AI - Image Generation
- Meter: Image Generation Meter
- Price: $0.05 per image
- Free tier: 10 images
- Fai clic su Save Changes.
Prodotto creato. La fatturazione è configurata e ai clienti vengono addebitate le immagini che generano.
Passaggio 3: effettua un acquisto di test
Acquista una volta il prodotto in modalità test. L’acquisto crea il cliente per il quale l’app invia gli eventi di utilizzo.1
Get Your Payment Link
- Nella dashboard di Dodo Payments, vai a Products.
- Trova il prodotto “PixelGen AI - Image Generation”.
- Fai clic su Share accanto al prodotto.
- Copia il link di pagamento.
https://test.checkout.dodopayments.com/buy/pdt_IgPWlRsfpbPd5jQKezzW1?quantity=1.2
Complete a Test Purchase
- Apri il link di pagamento in una nuova scheda del browser.
- Inserisci i dati di pagamento di test e completa l’acquisto.
Dopo che il pagamento è andato a buon fine, l’acquisto crea un cliente. Il codice dell’applicazione utilizza l’ID di quel cliente.
3
Find Your Customer ID
- Torna alla dashboard di Dodo Payments.
- Vai a Sales → Customers nella barra laterale.
- Trova il cliente che hai creato usando il suo indirizzo email di test.
- Copia l’ID del cliente. È simile a
cus_abc123def456.
Salva questo ID cliente. L’applicazione di esempio lo imposta nel codice, così ogni evento viene registrato per questo cliente.
Passaggio 4: crea l’applicazione di esempio
Dopo aver configurato la fatturazione e creato un cliente di test, crea l’applicazione di esempio PixelGen AI. Genera un’immagine e la segnala a Dodo Payments ai fini della fatturazione.L’esempio chiama il modello
gpt-image-2.5-flare di OpenAI tramite Image API. Image API restituisce dati immagine codificati in base64, quindi l’esempio salva ogni immagine come file PNG. La parte relativa a Dodo Payments (il meter, il prodotto e l’evento di utilizzo image.generated) non dipende dal modello.1
Set Up Your Project
Crea una directory e inizializza il progetto:
2
Install Dependencies
Installa i pacchetti:
3
Create the Main Application
Crea un file chiamato
index.ts e incolla il codice dell’applicazione riportato di seguito..env e package.json:
Passaggio 5: testa l’applicazione di esempio
Testa PixelGen AI dall’inizio alla fine e osserva l’utilizzo arrivare a Dodo Payments.1
Set Up Your Environment
- Crea un file
.envnella directorypixelgen-ai. - Aggiungi le tue chiavi API:
- Installa le dipendenze ed esegui l’app:
2
Generate Your First Test Image
Quando l’app si avvia, stampa:Inserisci questo prompt: “A cute robot painting a landscape”L’output è simile a questo. Le righe di debug della richiesta stampate da
sendUsageEvent sono omesse:Se l’output include “Usage event sent successfully”, l’integrazione della fatturazione funziona.
3
Generate a Few More Images
Genera altre due o tre immagini per testare più eventi. Esegui
npm start una volta per immagine, usando questi prompt:- “A sunset over mountains with purple clouds”
- “A steampunk coffee machine in a Victorian kitchen”
- “A friendly dragon reading a book in a library”
4
Check Your Dodo Payments Dashboard
Verifica che Dodo Payments riceva gli eventi:
- Apri la dashboard di Dodo Payments.
- Vai a Products → Meters e apri Image Generation Meter.
- Seleziona la scheda Events.
- Trova gli eventi di generazione delle immagini nell’elenco.
- Nome dell’evento:
image.generated - ID cliente: l’ID del tuo cliente di test
L’elenco contiene un evento per ogni immagine generata.
5
Verify Billing Calculations
Controlla il conteggio dell’utilizzo: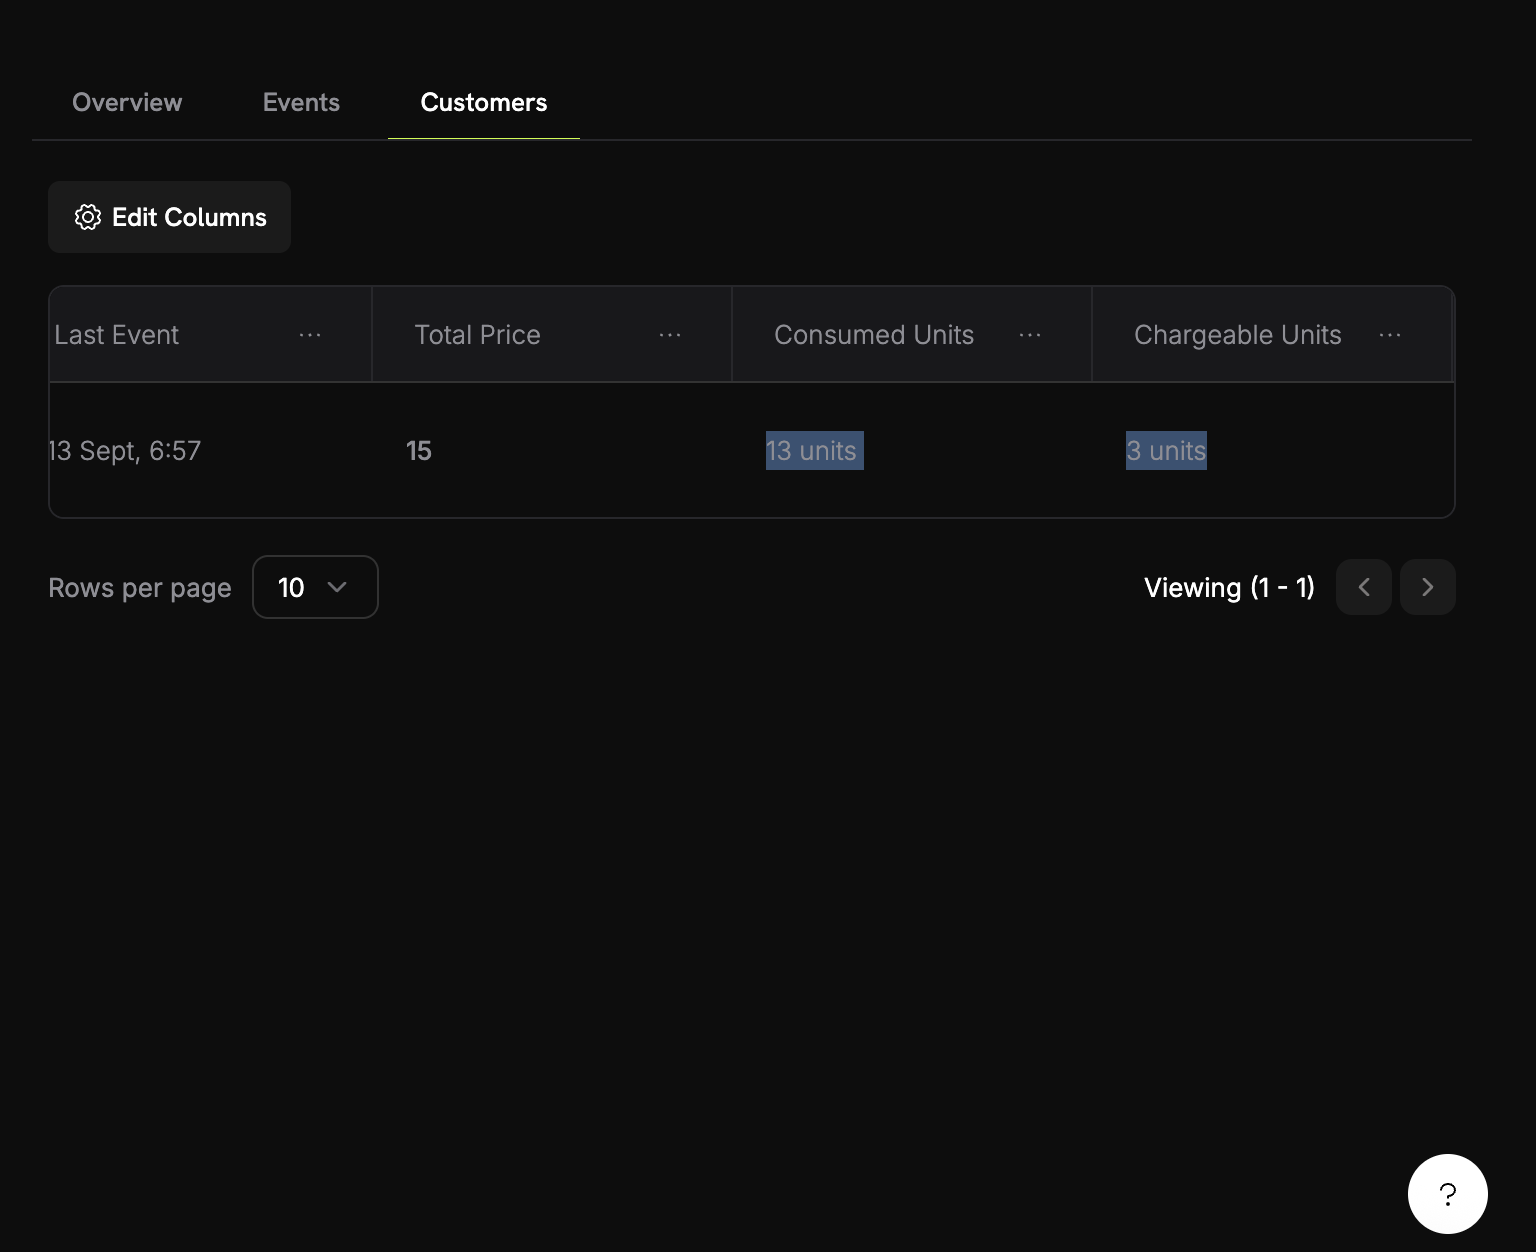
- Nel meter, seleziona la scheda Customers.
- Trova il tuo cliente di test.
- Controlla la colonna Consumed Units.
6
Test the Billing Threshold
Supera il livello gratuito per visualizzare la fatturazione:
- Genera altre 8 immagini, per un totale di 12.
- Apri di nuovo la scheda Customers del meter.
- Controlla i valori:
- Consumed Units: 12
- Chargeable Units: 2 (12 − 10 gratuite)
- Total Price: $0.10
La fatturazione basata sull’utilizzo funziona. Ai clienti vengono addebitate le immagini che generano.
Risoluzione dei problemi
Problemi comuni e relative soluzioni:Events not appearing in dashboard
Events not appearing in dashboard
Possibili cause:
- Il nome dell’evento non corrisponde esattamente alla configurazione del meter
- L’ID cliente non esiste nel tuo account
- La chiave API non è valida o è scaduta
- Problemi di connettività di rete
- Verifica che il nome dell’evento corrisponda esattamente al meter. Distingue tra maiuscole e minuscole.
- Verifica che l’ID cliente esista in Dodo Payments.
- Testa la chiave API con una semplice chiamata API.
- Controlla la connettività di rete e le impostazioni del firewall.