> ## Documentation Index
> Fetch the complete documentation index at: https://docs.dodopayments.com/llms.txt
> Use this file to discover all available pages before exploring further.
# 기능 플래그 권한
> 구매를 통해 애플리케이션 내 기능을 제어합니다. 기능 플래그 권한은 결제 시 즉시 기능을 제공하며, 취소 시 자동으로 해지합니다.
기능 플래그 권한은 Dodo Payments를 결제 인식 기능 플래그 저장소로 전환합니다. 기능 플래그 `advanced_reports`를 제품에 연결하면, 모든 결제 고객이 API를 통해 확인하거나 웹훅과 동기화하여 애플리케이션이 확인할 수 있는 권한을 부여받습니다. 외부 플랫폼, OAuth, 전달 단계가 필요 없습니다 — 권한 자체가 기능입니다.
## 전달 내용
Dodo Payments를 벗어나지 않습니다 — 권한 자체가 전달물입니다:
* 구매 시, 권한이 생성되어 즉시 `delivered`로 이동합니다. `pending` 단계가 없으며, 고객 행동도 없고 전달 실패 위험이 없습니다.
* 권한은 유형화된 `feature` 페이로드를 가집니다: `{ "feature_type": "boolean", "feature_id": "advanced_reports" }`. 애플리케이션은 `feature_id`를 읽어 어떤 기능을 해제할지 결정합니다.
* 취소, 환불 또는 수동 해지는 권한을 `revoked`로 이동시키며, 애플리케이션에서 플래그가 사라지는 것을 봅니다.
일반적인 사용 사례로는 플랜 기반 기능 게이팅(프로는 분석 기능 해제), 추가 기능(“API 액세스” 업그레이드), 일회성 구매로 판매되는 얼리 액세스 프로그램 등이 있습니다.
`feature_id`는 권한 전반에서 고유하지 않은 상인이 선택한 식별자입니다. 예를 들어, 월간 및 연간 프로 플랜이 동일한 `advanced_reports`를 제공하는 두 개의 권한이 있을 수 있습니다.
## 기능 플래그 생성
Dodo Payments 대시보드에서 **권한**으로 이동하여 \*\*+\*\*를 클릭하여 새 권한을 시작한 다음, **기능 플래그**를 선택합니다.
대시보드에 표시될 **표시 이름**, 애플리케이션이 확인할 **기능 ID**(이름에서 하나를 제안함), 팀이 제어하는 내용을 알 수 있는 **설명**을 플래그에 입력하세요.
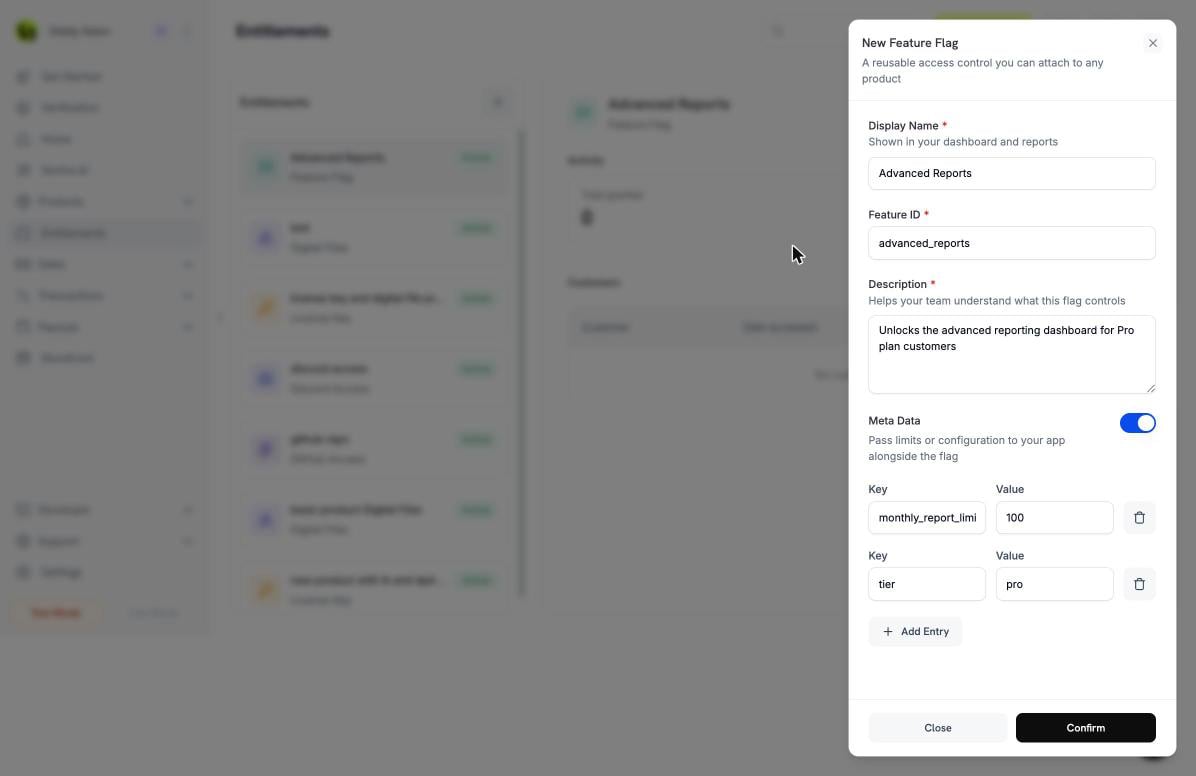 **메타 데이터**를 전환하여 플래그와 함께 애플리케이션에 전달될 키 값 구성을 첨부하세요 — 제한, 등급 이름, 할당량 등. [Attach limits with metadata](#attach-limits-with-metadata)를 참조하세요.
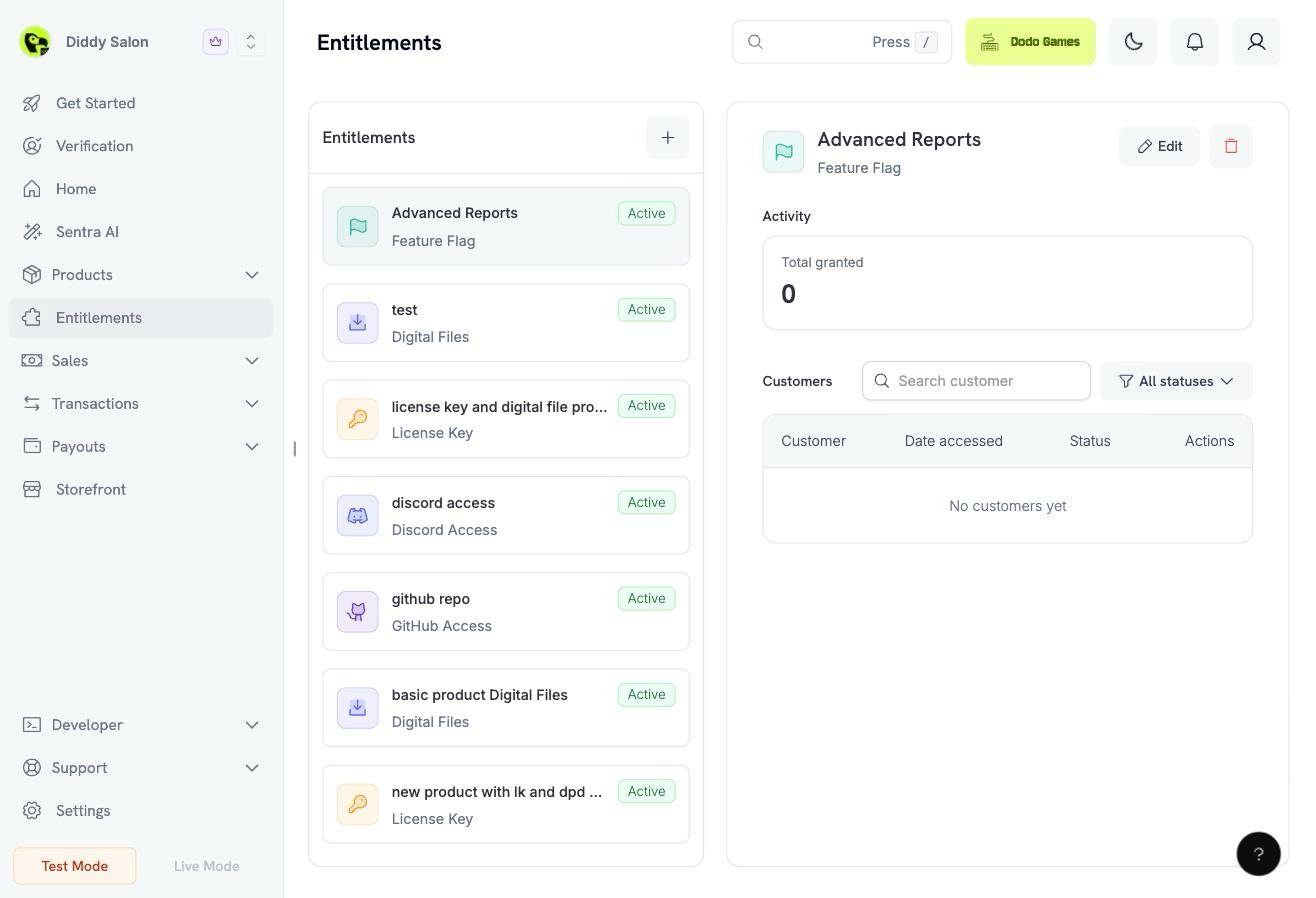
**확인**을 클릭합니다. 플래그는 제품에 붙이기 위해 권한 목록에 나타납니다.
**메타 데이터**를 전환하여 플래그와 함께 애플리케이션에 전달될 키 값 구성을 첨부하세요 — 제한, 등급 이름, 할당량 등. [Attach limits with metadata](#attach-limits-with-metadata)를 참조하세요.
**확인**을 클릭합니다. 플래그는 제품에 붙이기 위해 권한 목록에 나타납니다.
 ## 제품에 첨부
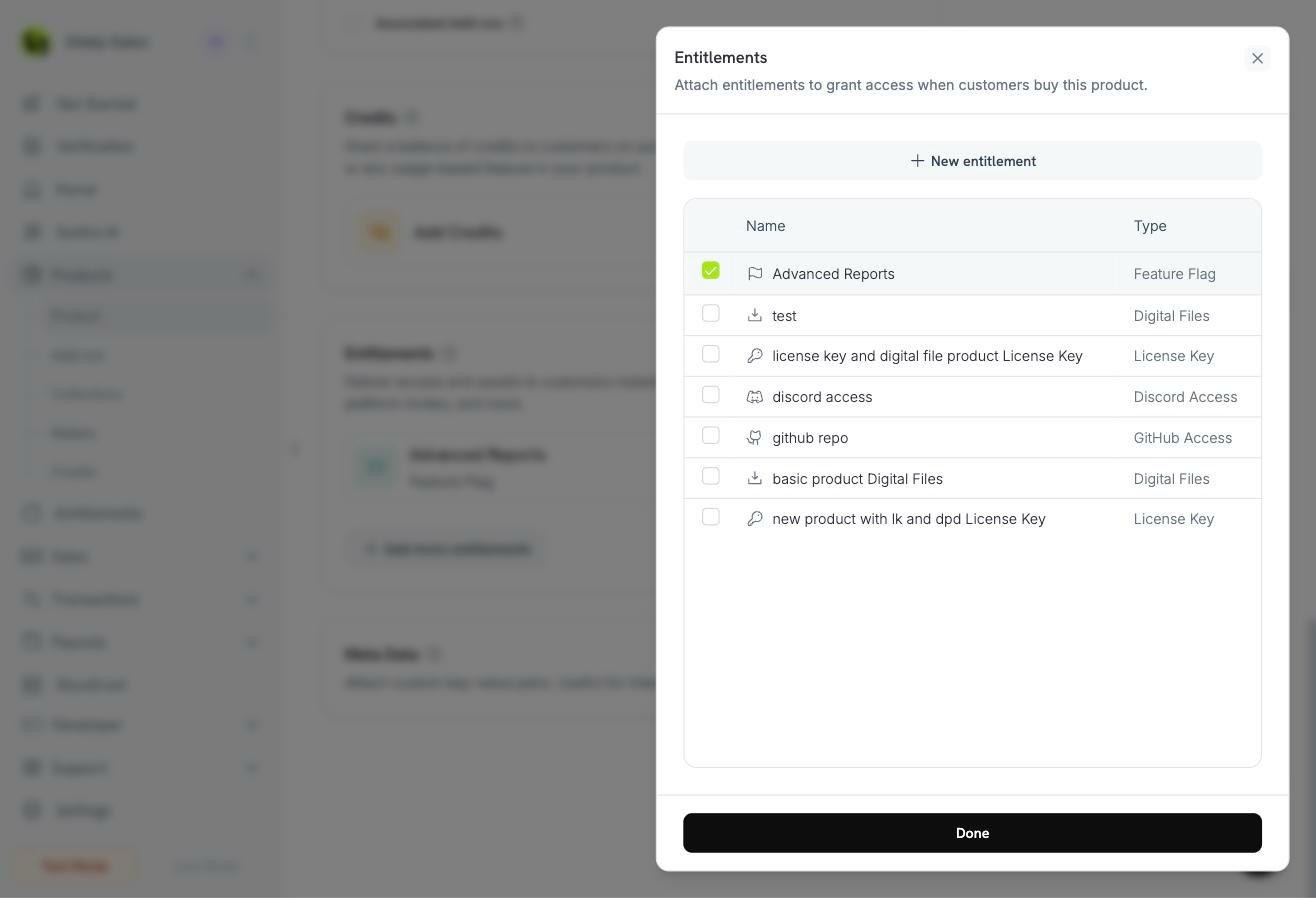
제품을 열거나 하나를 생성한 후, **권한** 카드를 찾아서 \*\*+\*\*를 클릭하여 기존 권한을 첨부하세요. 기능 플래그를 선택하고 **완료**를 클릭합니다.
## 제품에 첨부
제품을 열거나 하나를 생성한 후, **권한** 카드를 찾아서 \*\*+\*\*를 클릭하여 기존 권한을 첨부하세요. 기능 플래그를 선택하고 **완료**를 클릭합니다.
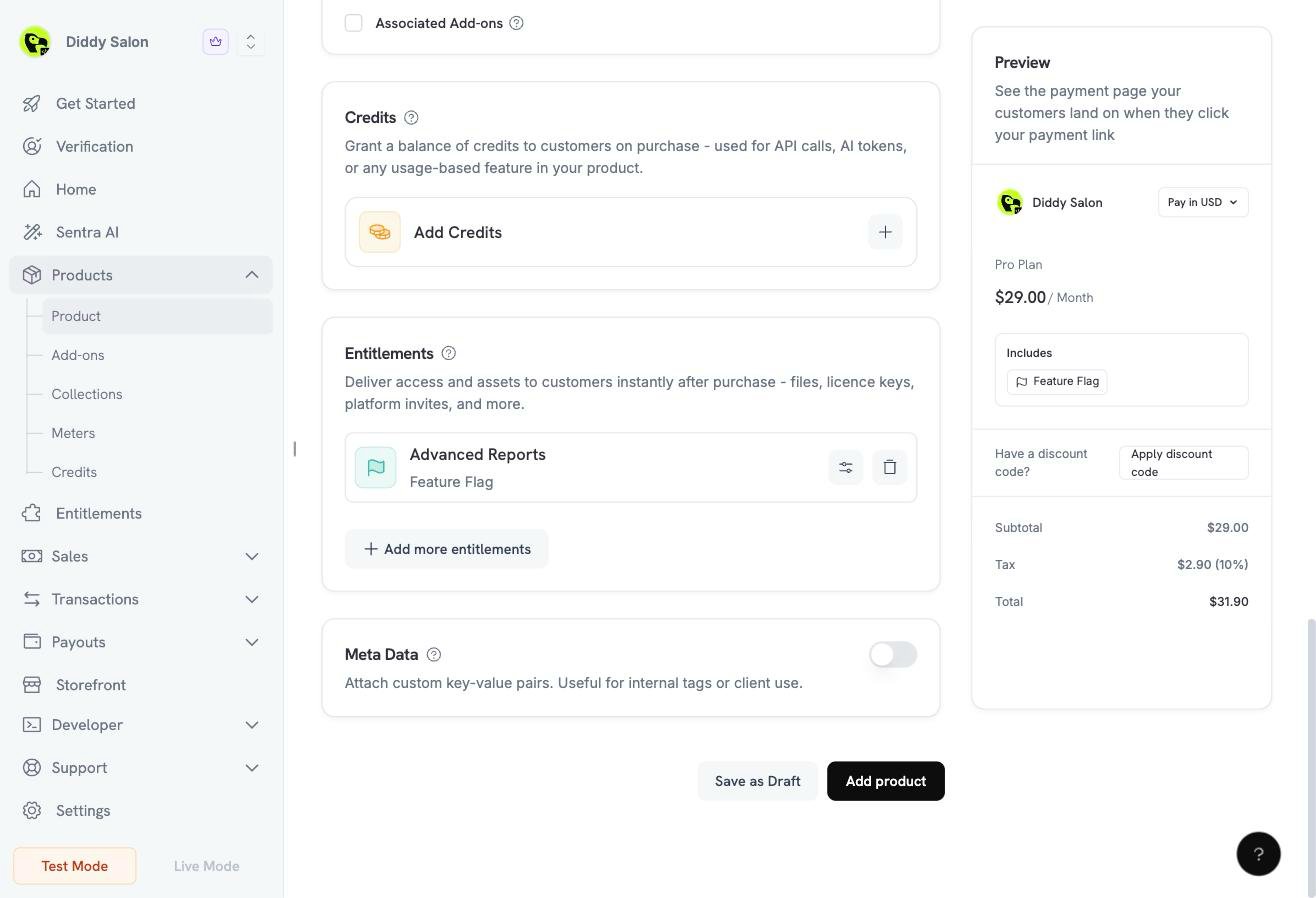
 첨부된 플래그는 제품 폼에 표시되고, 체크아웃 미리보기는 **포함** 아래에 이를 나열합니다.
 ## 필수 구성
| 필드 | 필수 | 설명 |
| -------------- | -- | ------------------------------------------------------ |
| `feature_id` | 예 | 애플리케이션이 확인하는 식별자, 예: `advanced_reports`. 권한 간 고유하지 않음. |
| `feature_type` | 예 | 부여된 기능 유형. 현재는 `boolean`만 지원됨. |
### API를 통한 생성
```typescript TypeScript theme={null} theme={null}
import DodoPayments from 'dodopayments';
const client = new DodoPayments({
bearerToken: process.env['DODO_PAYMENTS_API_KEY'],
environment: 'test_mode',
});
const entitlement = await client.entitlements.create({
name: 'Advanced Reports',
integration_type: 'feature_flag',
integration_config: {
feature_type: 'boolean',
feature_id: 'advanced_reports',
},
metadata: {
tier: 'pro',
monthly_report_limit: 100,
},
});
```
```python Python theme={null} theme={null}
client.entitlements.create(
name="Advanced Reports",
integration_type="feature_flag",
integration_config={
"feature_type": "boolean",
"feature_id": "advanced_reports",
},
metadata={
"tier": "pro",
"monthly_report_limit": 100,
},
)
```
```go Go theme={null} theme={null}
client.Entitlements.New(ctx, dodopayments.EntitlementNewParams{
Name: dodopayments.F("Advanced Reports"),
IntegrationType: dodopayments.F(dodopayments.EntitlementIntegrationTypeFeatureFlag),
IntegrationConfig: dodopayments.F[dodopayments.IntegrationConfigUnionParam](
dodopayments.IntegrationConfigFeatureFlagConfigParam{
FeatureType: dodopayments.F(dodopayments.FeatureTypeBoolean),
FeatureID: dodopayments.F("advanced_reports"),
},
),
})
```
***
## 메타데이터로 제한 부착
부울 플래그는 "이 고객이 기능을 가지고 있는가?"를 답합니다. 메타데이터는 "어떤 구성으로?"를 답합니다. 권한 메타데이터는 문자열, 정수, 숫자 및 부울 값을 수용하며, 각 권한은 생성 순간에 권한의 메타데이터를 **동결 스냅샷**으로 받아들입니다.
이 스냅샷 동작은 메타데이터가 플랜 제한에 안전하게 사용될 수 있게 합니다:
* 나중에 권한 메타데이터를 수정해도 **미래** 권한에만 영향을 미칩니다. 고객은 구매한 한도치를 유지합니다.
* 스냅샷은 권한의 `metadata` 필드로 반환됩니다. 따라서 하나의 API 호출은 플래그 및 그 구성을 모두 제공합니다.
예를 들어, `advanced_reports` 플래그가 `{ "tier": "pro", "monthly_report_limit": 100 }`와 함께 있으면 애플리케이션은 대시보드를 잠금 해제하고 100 보고 한도를 적용할 수 있습니다. 이후에 한도를 250으로 상향 조정하면 기존 고객은 새로운 권한을 받을 때까지 100에 머물러 있습니다(예: 플랜 변경 후).
메타데이터는 제한 및 구성용으로 사용하고 `feature_id`는 정체성용으로만 사용하세요. ID에 제한을 인코딩하면(`advanced_reports_100`) 변경 시마다 새로운 플래그가 필요하며 애플리케이션의 확인을 깨뜨립니다.
***
## 고객의 기능 확인
고객의 제공된 기능 플래그 권한을 나열하고 활성화된 기능 세트를 만듭니다. 엔드포인트는 모든 권한에 걸쳐 권한당 한 행을 반환하며 `integration_type` 및 `status`로 필터링할 수 있습니다.
```typescript TypeScript theme={null} theme={null}
const features = new Map>();
for await (const grant of client.customers.listEntitlementGrants('cus_abc123', {
integration_type: 'feature_flag',
status: 'Delivered',
})) {
if (grant.feature) {
features.set(grant.feature.feature_id, grant.metadata ?? {});
}
}
if (features.has('advanced_reports')) {
const limit = features.get('advanced_reports')?.monthly_report_limit;
// unlock the dashboard, enforce the limit
}
```
```python Python theme={null} theme={null}
page = client.customers.list_entitlement_grants(
customer_id="cus_abc123",
integration_type="feature_flag",
status="Delivered",
)
features = {
grant.feature.feature_id: grant.metadata
for grant in page.items
if grant.feature
}
if "advanced_reports" in features:
limit = features["advanced_reports"].get("monthly_report_limit")
```
```go Go theme={null} theme={null}
page, _ := client.Customers.ListEntitlementGrants(
ctx, "cus_abc123",
dodopayments.CustomerListEntitlementGrantsParams{
IntegrationType: dodopayments.F("feature_flag"),
Status: dodopayments.F("Delivered"),
},
)
features := map[string]bool{}
for _, grant := range page.Items {
if grant.Feature.FeatureID != "" {
features[grant.Feature.FeatureID] = true
}
}
```
`feature` 페이로드는 `feature_flag` 권한에만 할당됩니다. 이는 다른 모든 통합 유형에 대해 `null`입니다. 전체 응답 형태는 [List Customer Grants](/api-reference/entitlements/list-customer-grants) API 참조를 확인하세요.
모든 요청에서 API를 확인하면 핫 패스에 지연이 추가됩니다. 고객별 기능 세트를 짧은 TTL(분 단위, 시간 단위가 아님)로 캐시하고, 권한 상태가 변경될 때 웹훅 핸들러에서 캐시를 무효화하십시오. 이 조합은 검사를 빠르게 하고 해지를 거의 즉시 처리합니다.
***
## 라이프사이클
기능 플래그 권한은 [권한 라이프사이클](/features/entitlements/introduction#how-grants-work) 표준을 따르며 한 가지 단순화가 있습니다: 전달 단계가 없으므로 권한은 `pending`에 멈추지 않으며 `failed`로 이동하지 않습니다.
| 트리거 | 효과 |
| ------------------ | ---------------------------------------------------------- |
| 일회성 지불 성공 / 구독 활성화 | 권한이 `status: delivered` 및 `delivered_at` 설정으로 생성됩니다. |
| 구독 보류, 취소 또는 만료 | 권한이 일치하는 `revocation_reason`로 해지됩니다. |
| 일회성 지불 환불 | 권한이 `revocation_reason: refund`로 해지됩니다. |
| 구독 복구(예: 비용 추심 성공) | 해지된 권한이 `delivered`로 복구됩니다. 동일한 권한 `id`, 해지 필드가 지워집니다. |
| 수동 API 해지 | 권한이 `revocation_reason: manual`로 해지됩니다. 갱신 시 자동 복구되지 않습니다. |
권한은 권한 및 고객당 멱등적입니다: 고객이 플래그에 대한 해지되지 않은 권한이 있는 동안 반복 구매 및 갱신은 중복을 생성하지 않습니다.
***
## 웹훅
[`entitlement_grant.*` 이벤트](/developer-resources/webhooks/intents/entitlement-grant)에 구독하여 기능 플래그를 자체 데이터베이스에 반영하십시오. :
* `entitlement_grant.created` — 이미 `delivered` 상태로 `feature` 페이로드와 함께 도착합니다. 기능을 활성화합니다.
* `entitlement_grant.delivered` — 이전에 해지된 권한이 복구될 때 실행됩니다. 기능을 다시 활성화합니다.
* `entitlement_grant.revoked` — 접근이 철회되었습니다. 기능을 비활성화하고 `revocation_reason`을 확인하여 메시지를 결정합니다.
```typescript TypeScript theme={null} theme={null}
app.post('/webhooks/dodo', async (req, res) => {
const event = req.body;
if (event.type.startsWith('entitlement_grant.') && event.data.feature) {
const { customer_id, feature } = event.data;
const enabled = event.type !== 'entitlement_grant.revoked';
await db.customerFeatures.upsert({
customerId: customer_id,
featureId: feature.feature_id,
enabled,
config: event.data.metadata ?? {},
});
}
res.sendStatus(200);
});
```
기능 플래그에는 `entitlement_grant.failed`가 없습니다. 전달은 완전히 Dodo Payments 내에서 이루어지며 실패할 수 없습니다.
***
## 예제: 프로 플랜이 고급 보고서 해제
1. **플래그 생성.** `feature_id: advanced_reports`과 메타데이터 `{ "tier": "pro", "monthly_report_limit": 100 }`.
2. **프로 플랜 구독 제품에 첨부합니다.**
3. **고객이 구독합니다.** Dodo Payments가 `delivered` 권한을 생성하고 `entitlement_grant.created`를 실행합니다. 웹훅 핸들러는 100의 한도로 고객을 위해 `advanced_reports`을 활성화합니다.
4. **앱이 기능을 제어합니다.** 대시보드가 로드될 때 캐시된 기능 세트를 확인하고(`listEntitlementGrants` 호출) `advanced_reports`가 있을 때만 보고서 탭을 렌더링합니다.
5. **고객이 취소합니다.** Dodo Payments가 권한을 해지하고 `entitlement_grant.revoked`를 실행하여 핸들러가 기능을 비활성화합니다. 나중에 고객이 비용 추심을 통해 복구되면, `entitlement_grant.delivered`가 이를 복원합니다 — 코드 변경 필요 없음.
***
## 모범 사례
* **안정적인 snake\_case 기능 ID를 사용하세요.** 애플리케이션 코드가 이 문자열을 확인합니다; 이름 변경은 양쪽에 걸쳐 파괴적인 변경입니다.
* **기능당 하나의 플래그.** 단일 `pro_bundle`보다는 `advanced_reports` + `api_access`을 두 개의 권한으로 사용하는 것이 좋습니다 — 해지 및 계획 혼합이 깨끗하게 유지됩니다.
* **상태를 웹훅에서 구동하고 API로 확인하세요.** 웹훅은 데이터베이스를 최신 상태로 유지하고, 목록 엔드포인트는 조정 작업 및 캐시 누락에 대한 진실의 출처입니다.
* **`revoked`를 즉시 처리합니다.** 해지된 플래그는 고객이 더 이상 기능에 비용을 지불하지 않음을 의미합니다. 다음 세션이 아닌 다음 요청에서 제한하십시오.
* **제한을 코드가 아닌 메타데이터에 넣습니다.** 할당량을 변경하는 것은 권한을 편집하는 것만 필요합니다 — 새로운 고객은 자동으로 이를 수용하고 기존 권한은 구매한 스냅샷을 유지합니다.
* **Use stable, snake\_case feature ids.** Your application code checks these strings; renaming one is a breaking change on both sides.
* **One flag per capability.** Prefer `advanced_reports` + `api_access` as two entitlements over a single `pro_bundle` — revocation and plan mixes stay clean.
* **Drive state from webhooks, verify with the API.** Webhooks keep your database current; the list endpoint is the source of truth for reconciliation jobs and cache misses.
* **Treat `revoked` as immediate.** A revoked flag means the customer is no longer paying for the feature. Gate on the next request, not the next session.
* **Put limits in metadata, not in code.** Changing a quota then only requires editing the entitlement — new customers pick it up automatically while existing grants keep their purchased snapshot.
## 필수 구성
| 필드 | 필수 | 설명 |
| -------------- | -- | ------------------------------------------------------ |
| `feature_id` | 예 | 애플리케이션이 확인하는 식별자, 예: `advanced_reports`. 권한 간 고유하지 않음. |
| `feature_type` | 예 | 부여된 기능 유형. 현재는 `boolean`만 지원됨. |
### API를 통한 생성
```typescript TypeScript theme={null} theme={null}
import DodoPayments from 'dodopayments';
const client = new DodoPayments({
bearerToken: process.env['DODO_PAYMENTS_API_KEY'],
environment: 'test_mode',
});
const entitlement = await client.entitlements.create({
name: 'Advanced Reports',
integration_type: 'feature_flag',
integration_config: {
feature_type: 'boolean',
feature_id: 'advanced_reports',
},
metadata: {
tier: 'pro',
monthly_report_limit: 100,
},
});
```
```python Python theme={null} theme={null}
client.entitlements.create(
name="Advanced Reports",
integration_type="feature_flag",
integration_config={
"feature_type": "boolean",
"feature_id": "advanced_reports",
},
metadata={
"tier": "pro",
"monthly_report_limit": 100,
},
)
```
```go Go theme={null} theme={null}
client.Entitlements.New(ctx, dodopayments.EntitlementNewParams{
Name: dodopayments.F("Advanced Reports"),
IntegrationType: dodopayments.F(dodopayments.EntitlementIntegrationTypeFeatureFlag),
IntegrationConfig: dodopayments.F[dodopayments.IntegrationConfigUnionParam](
dodopayments.IntegrationConfigFeatureFlagConfigParam{
FeatureType: dodopayments.F(dodopayments.FeatureTypeBoolean),
FeatureID: dodopayments.F("advanced_reports"),
},
),
})
```
***
## 메타데이터로 제한 부착
부울 플래그는 "이 고객이 기능을 가지고 있는가?"를 답합니다. 메타데이터는 "어떤 구성으로?"를 답합니다. 권한 메타데이터는 문자열, 정수, 숫자 및 부울 값을 수용하며, 각 권한은 생성 순간에 권한의 메타데이터를 **동결 스냅샷**으로 받아들입니다.
이 스냅샷 동작은 메타데이터가 플랜 제한에 안전하게 사용될 수 있게 합니다:
* 나중에 권한 메타데이터를 수정해도 **미래** 권한에만 영향을 미칩니다. 고객은 구매한 한도치를 유지합니다.
* 스냅샷은 권한의 `metadata` 필드로 반환됩니다. 따라서 하나의 API 호출은 플래그 및 그 구성을 모두 제공합니다.
예를 들어, `advanced_reports` 플래그가 `{ "tier": "pro", "monthly_report_limit": 100 }`와 함께 있으면 애플리케이션은 대시보드를 잠금 해제하고 100 보고 한도를 적용할 수 있습니다. 이후에 한도를 250으로 상향 조정하면 기존 고객은 새로운 권한을 받을 때까지 100에 머물러 있습니다(예: 플랜 변경 후).
메타데이터는 제한 및 구성용으로 사용하고 `feature_id`는 정체성용으로만 사용하세요. ID에 제한을 인코딩하면(`advanced_reports_100`) 변경 시마다 새로운 플래그가 필요하며 애플리케이션의 확인을 깨뜨립니다.
***
## 고객의 기능 확인
고객의 제공된 기능 플래그 권한을 나열하고 활성화된 기능 세트를 만듭니다. 엔드포인트는 모든 권한에 걸쳐 권한당 한 행을 반환하며 `integration_type` 및 `status`로 필터링할 수 있습니다.
```typescript TypeScript theme={null} theme={null}
const features = new Map>();
for await (const grant of client.customers.listEntitlementGrants('cus_abc123', {
integration_type: 'feature_flag',
status: 'Delivered',
})) {
if (grant.feature) {
features.set(grant.feature.feature_id, grant.metadata ?? {});
}
}
if (features.has('advanced_reports')) {
const limit = features.get('advanced_reports')?.monthly_report_limit;
// unlock the dashboard, enforce the limit
}
```
```python Python theme={null} theme={null}
page = client.customers.list_entitlement_grants(
customer_id="cus_abc123",
integration_type="feature_flag",
status="Delivered",
)
features = {
grant.feature.feature_id: grant.metadata
for grant in page.items
if grant.feature
}
if "advanced_reports" in features:
limit = features["advanced_reports"].get("monthly_report_limit")
```
```go Go theme={null} theme={null}
page, _ := client.Customers.ListEntitlementGrants(
ctx, "cus_abc123",
dodopayments.CustomerListEntitlementGrantsParams{
IntegrationType: dodopayments.F("feature_flag"),
Status: dodopayments.F("Delivered"),
},
)
features := map[string]bool{}
for _, grant := range page.Items {
if grant.Feature.FeatureID != "" {
features[grant.Feature.FeatureID] = true
}
}
```
`feature` 페이로드는 `feature_flag` 권한에만 할당됩니다. 이는 다른 모든 통합 유형에 대해 `null`입니다. 전체 응답 형태는 [List Customer Grants](/api-reference/entitlements/list-customer-grants) API 참조를 확인하세요.
모든 요청에서 API를 확인하면 핫 패스에 지연이 추가됩니다. 고객별 기능 세트를 짧은 TTL(분 단위, 시간 단위가 아님)로 캐시하고, 권한 상태가 변경될 때 웹훅 핸들러에서 캐시를 무효화하십시오. 이 조합은 검사를 빠르게 하고 해지를 거의 즉시 처리합니다.
***
## 라이프사이클
기능 플래그 권한은 [권한 라이프사이클](/features/entitlements/introduction#how-grants-work) 표준을 따르며 한 가지 단순화가 있습니다: 전달 단계가 없으므로 권한은 `pending`에 멈추지 않으며 `failed`로 이동하지 않습니다.
| 트리거 | 효과 |
| ------------------ | ---------------------------------------------------------- |
| 일회성 지불 성공 / 구독 활성화 | 권한이 `status: delivered` 및 `delivered_at` 설정으로 생성됩니다. |
| 구독 보류, 취소 또는 만료 | 권한이 일치하는 `revocation_reason`로 해지됩니다. |
| 일회성 지불 환불 | 권한이 `revocation_reason: refund`로 해지됩니다. |
| 구독 복구(예: 비용 추심 성공) | 해지된 권한이 `delivered`로 복구됩니다. 동일한 권한 `id`, 해지 필드가 지워집니다. |
| 수동 API 해지 | 권한이 `revocation_reason: manual`로 해지됩니다. 갱신 시 자동 복구되지 않습니다. |
권한은 권한 및 고객당 멱등적입니다: 고객이 플래그에 대한 해지되지 않은 권한이 있는 동안 반복 구매 및 갱신은 중복을 생성하지 않습니다.
***
## 웹훅
[`entitlement_grant.*` 이벤트](/developer-resources/webhooks/intents/entitlement-grant)에 구독하여 기능 플래그를 자체 데이터베이스에 반영하십시오. :
* `entitlement_grant.created` — 이미 `delivered` 상태로 `feature` 페이로드와 함께 도착합니다. 기능을 활성화합니다.
* `entitlement_grant.delivered` — 이전에 해지된 권한이 복구될 때 실행됩니다. 기능을 다시 활성화합니다.
* `entitlement_grant.revoked` — 접근이 철회되었습니다. 기능을 비활성화하고 `revocation_reason`을 확인하여 메시지를 결정합니다.
```typescript TypeScript theme={null} theme={null}
app.post('/webhooks/dodo', async (req, res) => {
const event = req.body;
if (event.type.startsWith('entitlement_grant.') && event.data.feature) {
const { customer_id, feature } = event.data;
const enabled = event.type !== 'entitlement_grant.revoked';
await db.customerFeatures.upsert({
customerId: customer_id,
featureId: feature.feature_id,
enabled,
config: event.data.metadata ?? {},
});
}
res.sendStatus(200);
});
```
기능 플래그에는 `entitlement_grant.failed`가 없습니다. 전달은 완전히 Dodo Payments 내에서 이루어지며 실패할 수 없습니다.
***
## 예제: 프로 플랜이 고급 보고서 해제
1. **플래그 생성.** `feature_id: advanced_reports`과 메타데이터 `{ "tier": "pro", "monthly_report_limit": 100 }`.
2. **프로 플랜 구독 제품에 첨부합니다.**
3. **고객이 구독합니다.** Dodo Payments가 `delivered` 권한을 생성하고 `entitlement_grant.created`를 실행합니다. 웹훅 핸들러는 100의 한도로 고객을 위해 `advanced_reports`을 활성화합니다.
4. **앱이 기능을 제어합니다.** 대시보드가 로드될 때 캐시된 기능 세트를 확인하고(`listEntitlementGrants` 호출) `advanced_reports`가 있을 때만 보고서 탭을 렌더링합니다.
5. **고객이 취소합니다.** Dodo Payments가 권한을 해지하고 `entitlement_grant.revoked`를 실행하여 핸들러가 기능을 비활성화합니다. 나중에 고객이 비용 추심을 통해 복구되면, `entitlement_grant.delivered`가 이를 복원합니다 — 코드 변경 필요 없음.
***
## 모범 사례
* **안정적인 snake\_case 기능 ID를 사용하세요.** 애플리케이션 코드가 이 문자열을 확인합니다; 이름 변경은 양쪽에 걸쳐 파괴적인 변경입니다.
* **기능당 하나의 플래그.** 단일 `pro_bundle`보다는 `advanced_reports` + `api_access`을 두 개의 권한으로 사용하는 것이 좋습니다 — 해지 및 계획 혼합이 깨끗하게 유지됩니다.
* **상태를 웹훅에서 구동하고 API로 확인하세요.** 웹훅은 데이터베이스를 최신 상태로 유지하고, 목록 엔드포인트는 조정 작업 및 캐시 누락에 대한 진실의 출처입니다.
* **`revoked`를 즉시 처리합니다.** 해지된 플래그는 고객이 더 이상 기능에 비용을 지불하지 않음을 의미합니다. 다음 세션이 아닌 다음 요청에서 제한하십시오.
* **제한을 코드가 아닌 메타데이터에 넣습니다.** 할당량을 변경하는 것은 권한을 편집하는 것만 필요합니다 — 새로운 고객은 자동으로 이를 수용하고 기존 권한은 구매한 스냅샷을 유지합니다.
* **Use stable, snake\_case feature ids.** Your application code checks these strings; renaming one is a breaking change on both sides.
* **One flag per capability.** Prefer `advanced_reports` + `api_access` as two entitlements over a single `pro_bundle` — revocation and plan mixes stay clean.
* **Drive state from webhooks, verify with the API.** Webhooks keep your database current; the list endpoint is the source of truth for reconciliation jobs and cache misses.
* **Treat `revoked` as immediate.** A revoked flag means the customer is no longer paying for the feature. Gate on the next request, not the next session.
* **Put limits in metadata, not in code.** Changing a quota then only requires editing the entitlement — new customers pick it up automatically while existing grants keep their purchased snapshot.