> ## Documentation Index
> Fetch the complete documentation index at: https://docs.dodopayments.com/llms.txt
> Use this file to discover all available pages before exploring further.
# 사용량 기반 청구가 포함된 AI 이미지 생성기 구축하기
> 사용량 기반 청구가 포함된 AI 이미지 생성 서비스인 PixelGen AI를 구축하는 과정을 따라가세요.
이 튜토리얼에서는 **PixelGen AI**를 구축합니다. 이는 사용량 기반 청구를 보여주는 샘플 AI 이미지 생성 서비스입니다. 우리는 청구 미터, 제품 구성 및 이미지를 생성하고 실시간으로 사용량을 추적하는 샘플 애플리케이션 코드를 처음부터 끝까지 모두 생성할 것입니다.
이 튜토리얼은 터미널 기반 애플리케이션의 샘플 구현 코드를 제공합니다. 이 코드는 특정 프레임워크(React, Vue, Angular 등)에 맞게 수정하고, 애플리케이션의 요구사항에 따라 사용자 입력 방식을 맞춤화할 수 있습니다.
이 튜토리얼이 끝나면 다음과 같은 작동하는 샘플 서비스를 갖게 됩니다:
* OpenAI의 DALL-E API를 사용하여 이미지를 생성합니다.
* 청구를 위해 모든 이미지 생성을 추적합니다.
* 사용량에 따라 고객에게 자동으로 요금을 부과합니다.
* 다양한 품질 계층(표준 vs HD)을 처리합니다.
## 우리가 구축할 내용
먼저 PixelGen AI 서비스에 대해 이해해 봅시다:
* **서비스**: OpenAI의 DALL-E API를 사용한 AI 이미지 생성
* **가격 모델**: 이미지당 요금(\$0.05 per image)
* **무료 티어**: 고객당 월 10개의 무료 이미지
* **품질 옵션**: 표준 및 HD 이미지(단순화를 위해 동일한 가격)
시작하기 전에 다음을 준비했는지 확인하세요:
* Dodo Payments 계정
* OpenAI API 접근 권한
* TypeScript/Node.js에 대한 기본 지식
## 1단계: 사용량 미터 생성하기
Dodo Payments 대시보드에서 우리 서비스가 생성하는 모든 이미지를 추적할 미터를 생성하는 것으로 시작하겠습니다. 이것은 청구 가능한 이벤트를 추적하는 "카운터"라고 생각하세요.
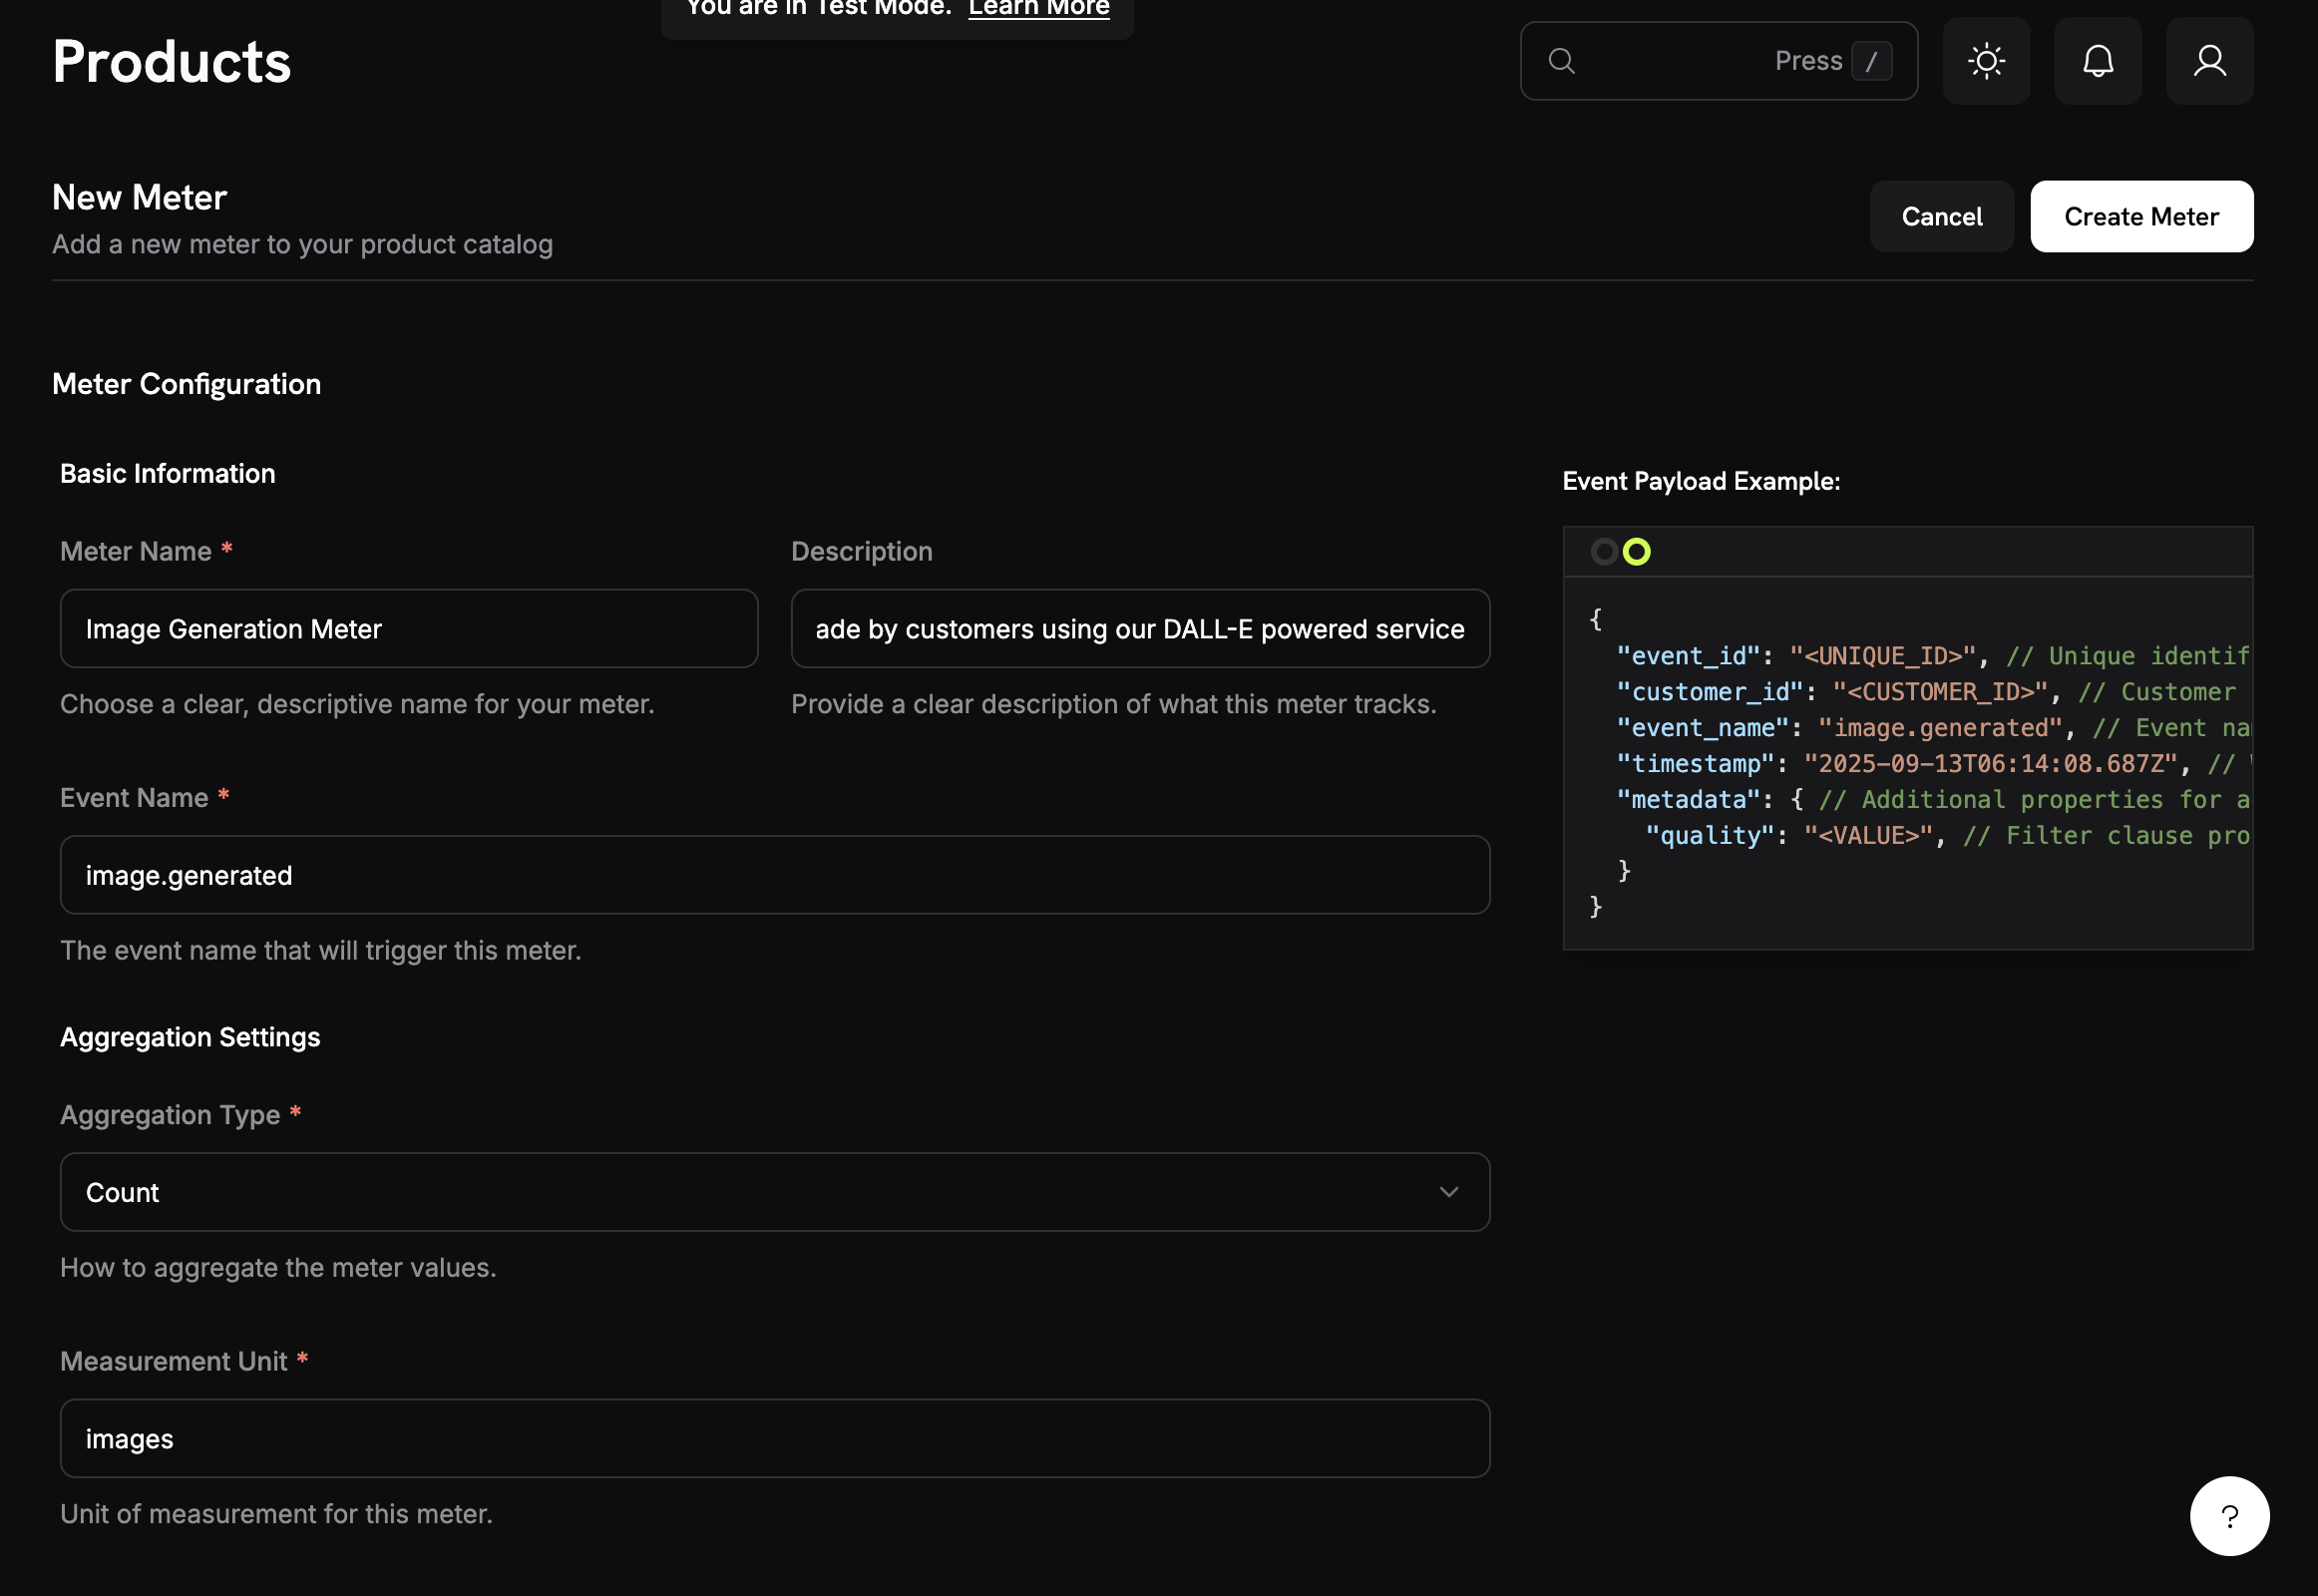 **우리가 만드는 것**: 서비스로 이미지를 생성할 때마다 횟수를 세는 "이미지 생성 미터"입니다.
1. Dodo Payments 대시보드에 로그인합니다
2. 왼쪽 사이드바에서 **Meters**를 클릭합니다
3. **Create Meter** 버튼을 클릭합니다
이미지 생성 추적을 구성할 수 있는 양식이 표시됩니다.
이제 PixelGen AI 서비스에 대한 구체적인 정보를 입력하겠습니다:
**Meter Name**: 다음 값을 정확히 복사하여 붙여넣으세요 → `Image Generation Meter`
**Description**: 다음을 복사하세요 → `Tracks each AI image generation request made by customers using our DALL-E powered service`
**Event Name**: 이것은 매우 중요합니다 - 정확히 복사하세요 → `image.generated`
이벤트 이름 `image.generated`은 나중에 애플리케이션 코드에서 전송할 값과 정확히 일치해야 합니다. 이벤트 이름은 대소문자를 구분합니다!
집계 방법(미터가 이벤트를 세는 방식)을 설정하세요:
**집계 유형**: 드롭다운에서 **Count**를 선택합니다.
**Measurement Unit**: 입력 → `images`
우리는 "Count"를 사용합니다. 이미지 크기나 생성 시간으로 청구하는 것이 아니라, 생성된 이미지별로 청구하고 싶기 때문입니다. 성공적인 이미지 생성 1회당 1 청구 단위입니다.
**우리가 만드는 것**: 서비스로 이미지를 생성할 때마다 횟수를 세는 "이미지 생성 미터"입니다.
1. Dodo Payments 대시보드에 로그인합니다
2. 왼쪽 사이드바에서 **Meters**를 클릭합니다
3. **Create Meter** 버튼을 클릭합니다
이미지 생성 추적을 구성할 수 있는 양식이 표시됩니다.
이제 PixelGen AI 서비스에 대한 구체적인 정보를 입력하겠습니다:
**Meter Name**: 다음 값을 정확히 복사하여 붙여넣으세요 → `Image Generation Meter`
**Description**: 다음을 복사하세요 → `Tracks each AI image generation request made by customers using our DALL-E powered service`
**Event Name**: 이것은 매우 중요합니다 - 정확히 복사하세요 → `image.generated`
이벤트 이름 `image.generated`은 나중에 애플리케이션 코드에서 전송할 값과 정확히 일치해야 합니다. 이벤트 이름은 대소문자를 구분합니다!
집계 방법(미터가 이벤트를 세는 방식)을 설정하세요:
**집계 유형**: 드롭다운에서 **Count**를 선택합니다.
**Measurement Unit**: 입력 → `images`
우리는 "Count"를 사용합니다. 이미지 크기나 생성 시간으로 청구하는 것이 아니라, 생성된 이미지별로 청구하고 싶기 때문입니다. 성공적인 이미지 생성 1회당 1 청구 단위입니다.
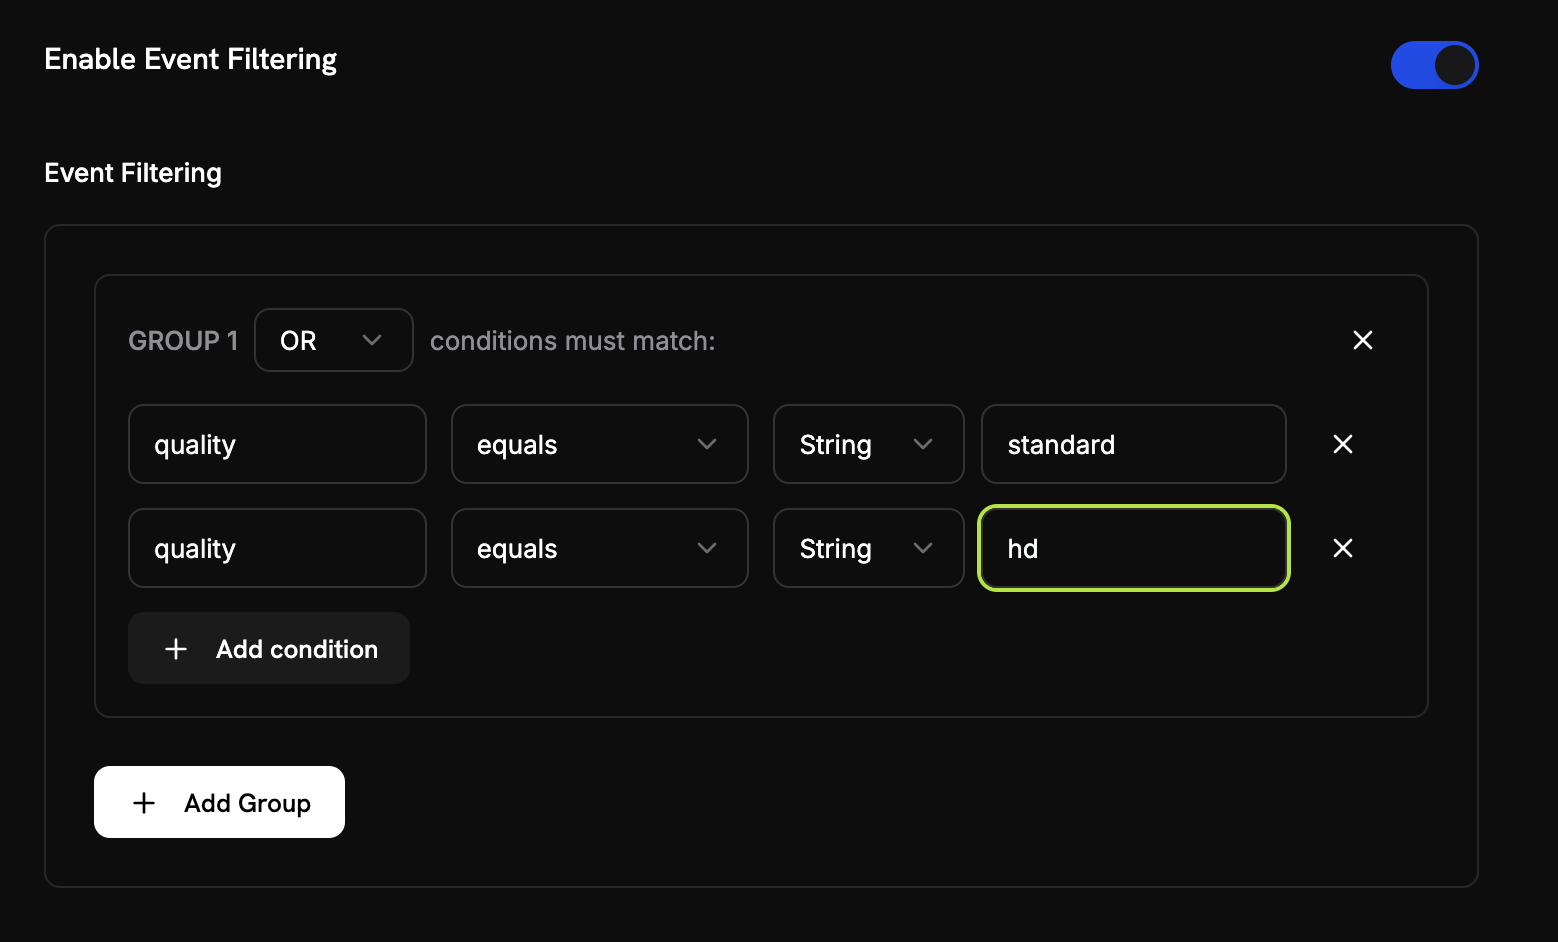 우리는 합법적인 이미지만 카운트하도록 하고 싶습니다(테스트 실행이나 실패는 제외):
1. **이벤트 필터링 사용**: 이 토글을 **켜기**
2. **필터 논리**: **OR** 선택(이는 "이 조건들 중 하나라도 참이면 계산"이라는 의미입니다)
3. **첫 번째 조건 추가**:
* Property Key: `quality`
* Comparator: `equals`
* Value: `standard`
4. **"조건 추가" 클릭** 후 두 번째 조건을 입력합니다:
* Property Key: `quality`
* Comparator: `equals`
* Value: `hd`
이 설정은 품질이 "standard" 또는 "hd"인 이벤트만 계산하여 테스트 이벤트나 잘못된 요청을 걸러냅니다.
1. 위 값과 설정이 모두 일치하는지 다시 확인하세요
2. **Create Meter**를 클릭하세요
**미터가 생성되었습니다!** 이제 "이미지 생성 미터"가 이미지 생성 횟수를 세기 시작할 준비가 되었습니다. 다음으로 이 미터를 청구 상품에 연결하겠습니다.
## 2단계: 청구 제품 생성하기
이제 가격(\$0.05 per image 및 10개의 무료 이미지)을 정의하는 제품을 생성해야 합니다. 이는 미터를 실제 청구에 연결합니다.
**우리가 만드는 것**: "PixelGen AI - Image Generation"이라는 상품으로, 매달 처음 10장 무료 이미지 이후에는 이미지당 \$0.05를 청구합니다.
1. Dodo Payments 대시보드에서 왼쪽 사이드바의 **Products**를 클릭하세요
2. **Create Product**를 클릭하세요
3. 상품 유형으로 **Usage-Based**를 선택하세요
이렇게 하면 고정 구독이 아니라 미터 사용량 기준으로 청구된다는 의미가 Dodo Payments에 전달됩니다.
PixelGen AI 서비스에 대해 다음 값을 정확히 입력하세요:
**Product Name**: 다음을 복사하세요 → `PixelGen AI - Image Generation`
**Description**: 다음을 복사하세요 → `AI-powered image generation service with pay-per-use billing`
**제품 이미지**: 명확하고 관련성 있는 이미지를 업로드합니다.
이 값들은 고객 청구서에 표시되므로 명확하고 전문적으로 작성하세요.
우리는 합법적인 이미지만 카운트하도록 하고 싶습니다(테스트 실행이나 실패는 제외):
1. **이벤트 필터링 사용**: 이 토글을 **켜기**
2. **필터 논리**: **OR** 선택(이는 "이 조건들 중 하나라도 참이면 계산"이라는 의미입니다)
3. **첫 번째 조건 추가**:
* Property Key: `quality`
* Comparator: `equals`
* Value: `standard`
4. **"조건 추가" 클릭** 후 두 번째 조건을 입력합니다:
* Property Key: `quality`
* Comparator: `equals`
* Value: `hd`
이 설정은 품질이 "standard" 또는 "hd"인 이벤트만 계산하여 테스트 이벤트나 잘못된 요청을 걸러냅니다.
1. 위 값과 설정이 모두 일치하는지 다시 확인하세요
2. **Create Meter**를 클릭하세요
**미터가 생성되었습니다!** 이제 "이미지 생성 미터"가 이미지 생성 횟수를 세기 시작할 준비가 되었습니다. 다음으로 이 미터를 청구 상품에 연결하겠습니다.
## 2단계: 청구 제품 생성하기
이제 가격(\$0.05 per image 및 10개의 무료 이미지)을 정의하는 제품을 생성해야 합니다. 이는 미터를 실제 청구에 연결합니다.
**우리가 만드는 것**: "PixelGen AI - Image Generation"이라는 상품으로, 매달 처음 10장 무료 이미지 이후에는 이미지당 \$0.05를 청구합니다.
1. Dodo Payments 대시보드에서 왼쪽 사이드바의 **Products**를 클릭하세요
2. **Create Product**를 클릭하세요
3. 상품 유형으로 **Usage-Based**를 선택하세요
이렇게 하면 고정 구독이 아니라 미터 사용량 기준으로 청구된다는 의미가 Dodo Payments에 전달됩니다.
PixelGen AI 서비스에 대해 다음 값을 정확히 입력하세요:
**Product Name**: 다음을 복사하세요 → `PixelGen AI - Image Generation`
**Description**: 다음을 복사하세요 → `AI-powered image generation service with pay-per-use billing`
**제품 이미지**: 명확하고 관련성 있는 이미지를 업로드합니다.
이 값들은 고객 청구서에 표시되므로 명확하고 전문적으로 작성하세요.
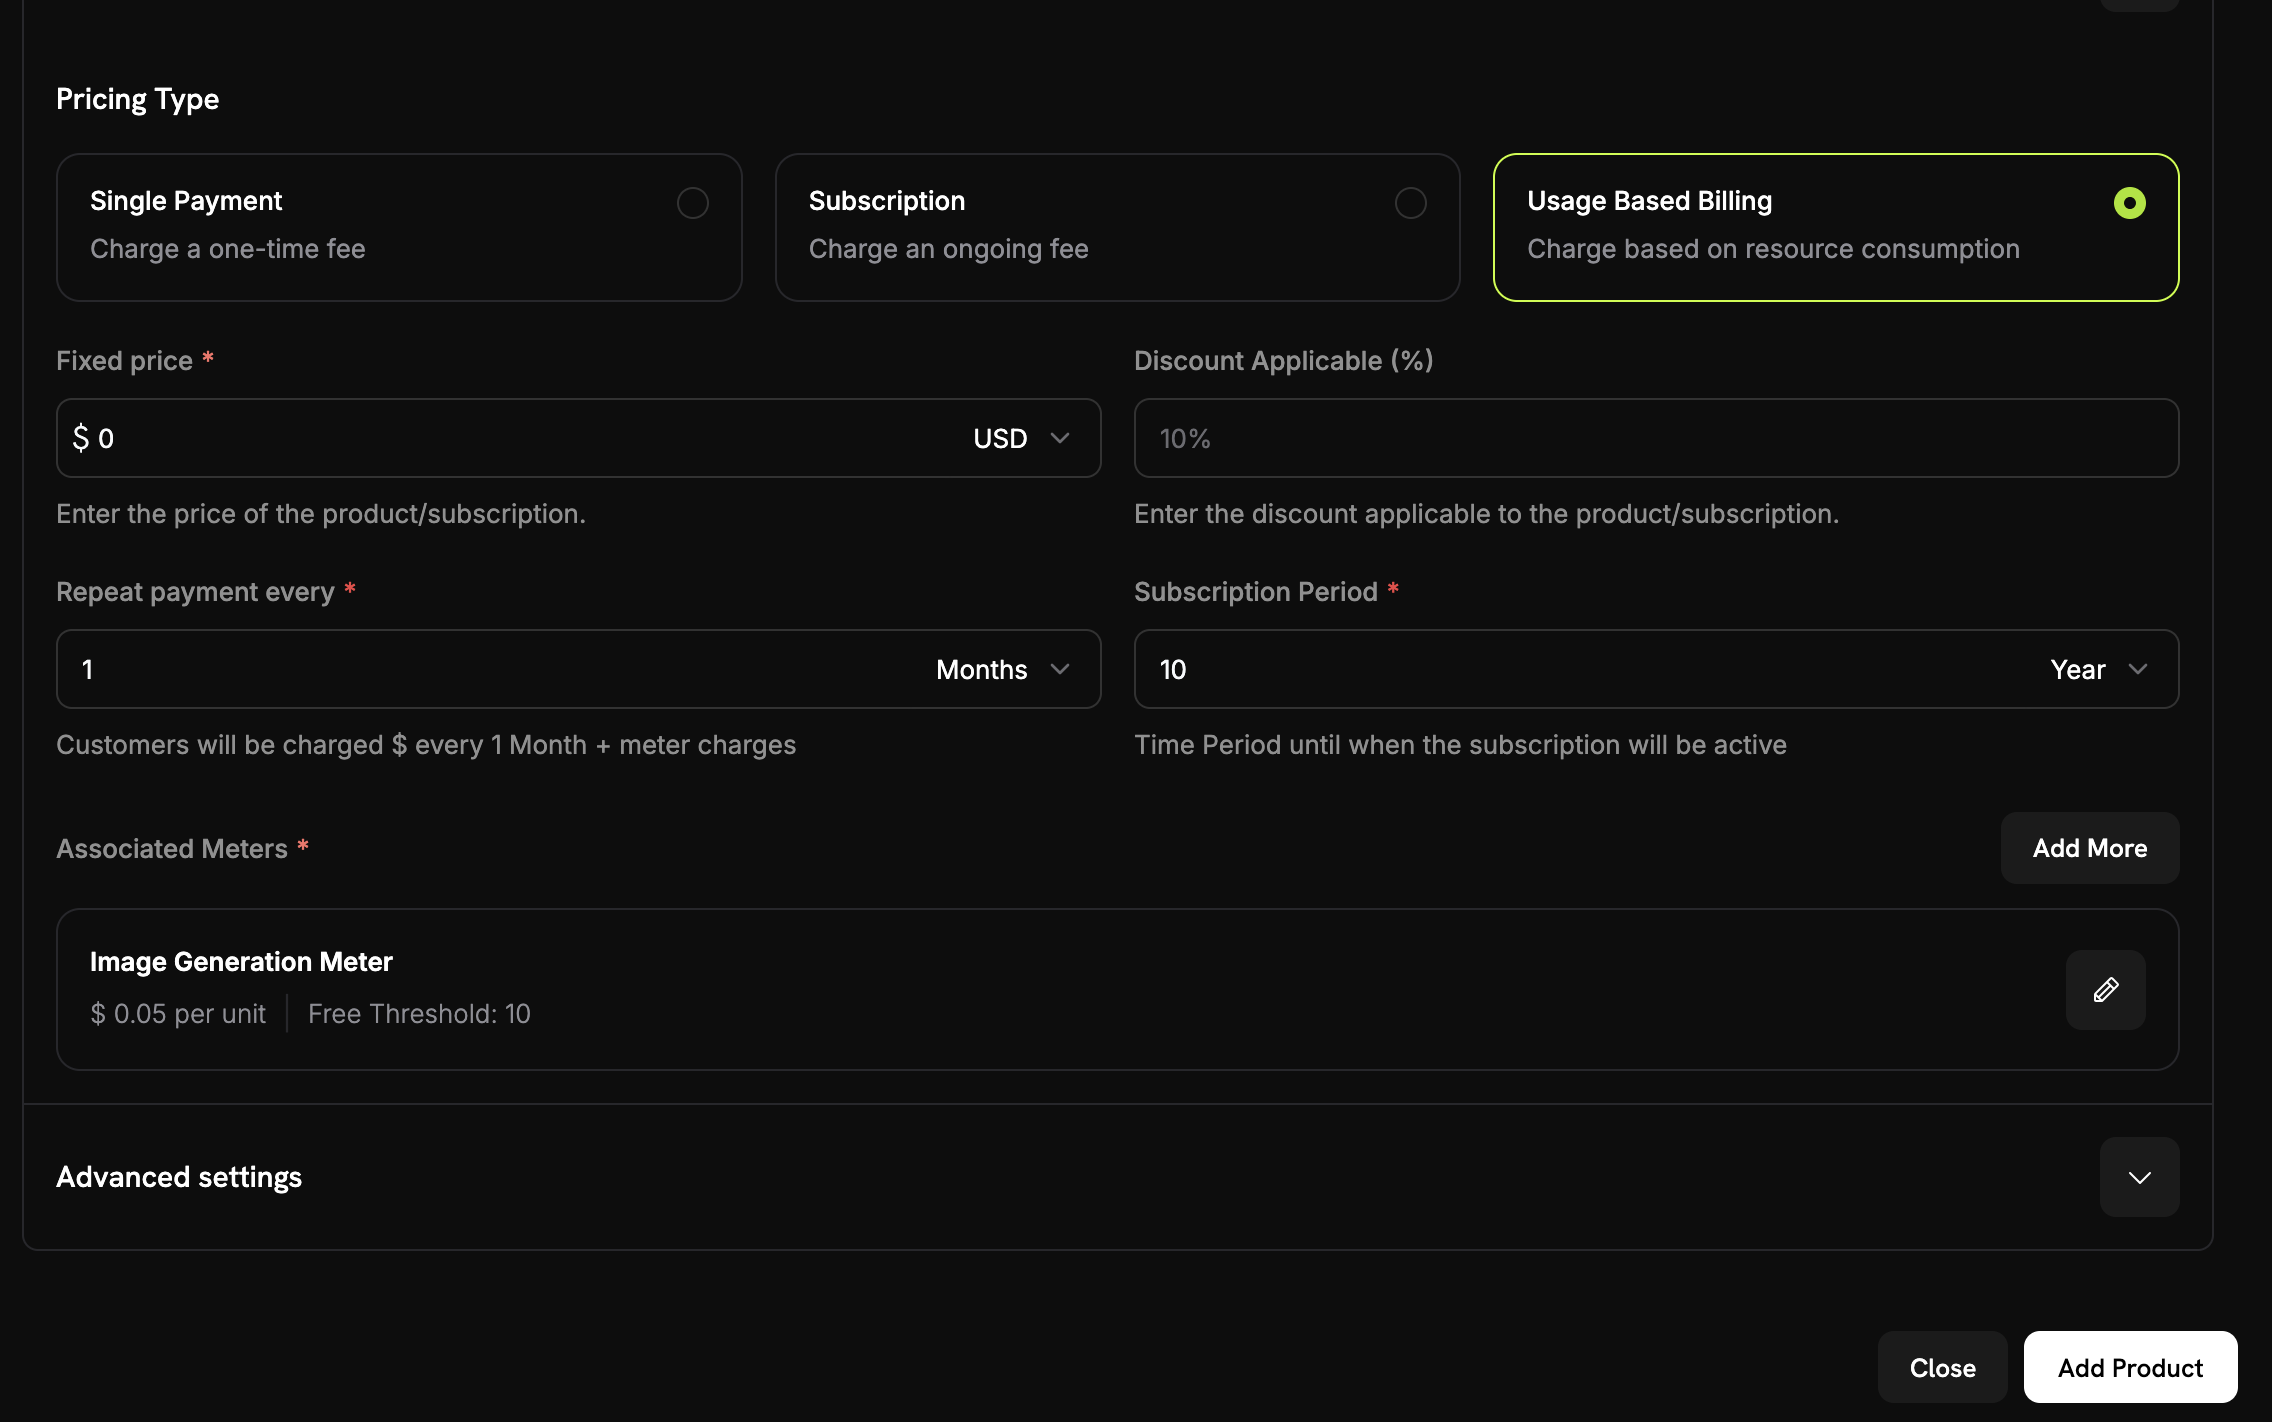 미터를 연결하기 전에 제품의 가격 유형으로 **Usage Based Billing**을 선택했는지 확인하세요.
또한 **Fixed Price**를 `0`로 설정하여 고객이 기본 요금 없이 사용량 기준으로만 청구되도록 합니다.
이제 방금 생성한 미터를 연결합니다:
1. **Associated Meter** 섹션으로 스크롤합니다.
2. **Add Meters**를 클릭합니다.
3. 드롭다운에서 **"Image Generation Meter"**(이전에 생성한 것)를 선택합니다.
4. 제품 구성에 나타나는지 확인합니다.
이제 미터가 이 상품에 성공적으로 연결되었습니다.
여기서 비즈니스 모델을 정의합니다:
미터를 연결하기 전에 제품의 가격 유형으로 **Usage Based Billing**을 선택했는지 확인하세요.
또한 **Fixed Price**를 `0`로 설정하여 고객이 기본 요금 없이 사용량 기준으로만 청구되도록 합니다.
이제 방금 생성한 미터를 연결합니다:
1. **Associated Meter** 섹션으로 스크롤합니다.
2. **Add Meters**를 클릭합니다.
3. 드롭다운에서 **"Image Generation Meter"**(이전에 생성한 것)를 선택합니다.
4. 제품 구성에 나타나는지 확인합니다.
이제 미터가 이 상품에 성공적으로 연결되었습니다.
여기서 비즈니스 모델을 정의합니다:
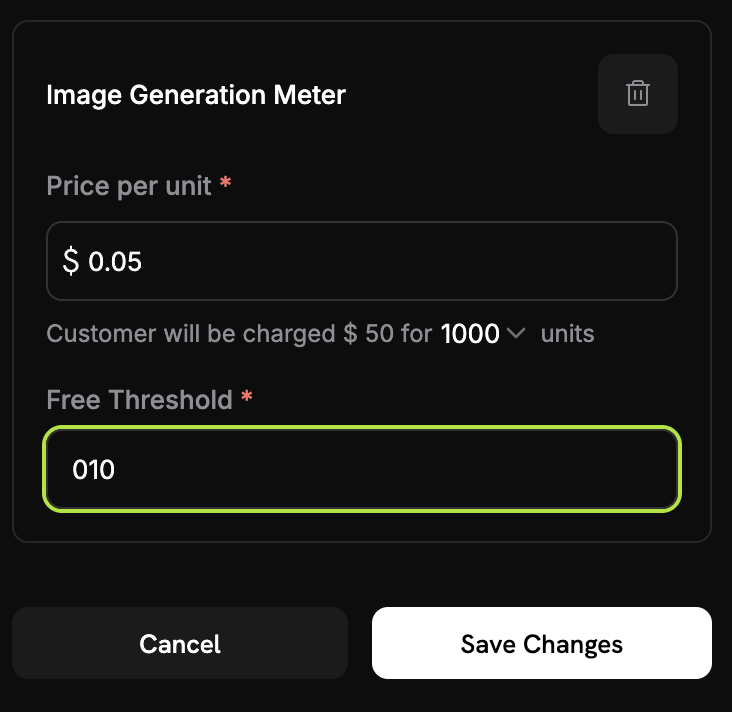 **Price Per Unit**: 다음을 입력 → `0.05` (이미지당 \$0.05)
**Free Threshold**: 다음을 입력 → `10` (고객은 매월 10장 무료 이미지 제공)
**무료 한도**: 입력하세요 → `10` (고객은 매달 10개의 무료 이미지를 받습니다)
**청구 방식**: 고객이 한 달에 25장 이미지를 생성하면, (25 - 10 무료) = 15장 × $0.05 = $0.75가 청구됩니다.
1. 모든 설정을 검토하세요:
* 이름: PixelGen AI - Image Generation
* 미터: Image Generation Meter
* 가격: 이미지당 \$0.05
* 무료 티어: 10장
2. **Save Changes**를 클릭하세요
**상품이 생성되었습니다!** 이제 청구 구성이 완료되었습니다. 고객은 이미지 생성 사용량에 따라 자동으로 청구됩니다.
## 3단계: 테스트 구매하기
사용량 이벤트를 수집하기 전에 테스트 구매를 해야 합니다.
1. Dodo Payments 대시보드에서 **Products**로 이동합니다
2. "PixelGen AI - Image Generation" 상품을 찾습니다
3. 상품 옆의 **Share** 버튼을 클릭합니다
4. 표시되는 결제 링크를 복사합니다
결제 링크는 다음과 비슷하게 생겼습니다: `https://test.checkout.dodopayments.com/buy/pdt_IgPWlRsfpbPd5jQKezzW1?quantity=1`
1. 결제 링크를 새 브라우저 탭에서 엽니다
2. 테스트 결제 정보를 입력하고 구매를 완료합니다.
결제가 성공하면 애플리케이션 코드에서 사용할 고객 ID가 생성됩니다.
1. Dodo Payments 대시보드로 돌아가기
2. 사이드바에서 **판매 → 고객**으로 이동
3. 방금 생성한 고객 찾기 (테스트 이메일 사용)
4. 고객 ID 복사 - 다음과 같은 형식임 `cus_abc123def456`
이 고객 ID를 저장하세요 - 이벤트가 제대로 추적되도록 샘플 애플리케이션 코드에 하드코딩할 것입니다.
## 4단계: 샘플 애플리케이션 구축하기
이제 청구 설정이 완료되고 테스트 고객이 생성되었습니다. 이미지를 생성하고 청구를 위해 사용량을 자동으로 추적하는 샘플 PixelGen AI 애플리케이션을 구축해 보겠습니다.
새 디렉토리를 만들고 프로젝트를 초기화하세요:
```bash theme={null}
mkdir pixelgen-ai
cd pixelgen-ai
npm init -y
```
필요한 패키지를 설치하세요:
```bash theme={null}
npm install openai dotenv
npm install -D typescript @types/node ts-node
```
`index.ts`이라는 파일을 생성하고 전체 애플리케이션 코드를 복사하세요:
다음은 청구가 통합된 전체 PixelGen AI 애플리케이션입니다:
```typescript index.ts expandable theme={null}
import 'dotenv/config';
import OpenAI from 'openai';
import * as readline from 'readline';
import { randomUUID } from 'crypto';
// Initialize OpenAI client
const openai = new OpenAI({
apiKey: process.env.OPENAI_API_KEY,
});
// Dodo Payments configuration
const DODO_PAYMENTS_CONFIG = {
apiKey: process.env.DODO_PAYMENTS_API_KEY,
baseUrl: 'https://test.dodopayments.com',
customerId: 'cus_FX5FAB43aShGyiHJGIqjB', // Replace with your actual customer ID from Step 3
};
// DALL-E 3 pricing (as of 2024-2025)
const PRICING = {
'standard': 0.040, // $0.040 per image (1024×1024)
'hd': 0.080, // $0.080 per image (1024×1024, HD quality)
};
interface ImageGenerationOptions {
prompt: string;
model?: 'dall-e-3' | 'dall-e-2';
quality?: 'standard' | 'hd';
size?: '1024x1024' | '1792x1024' | '1024x1792';
style?: 'vivid' | 'natural';
}
interface UsageEvent {
event_id: string;
customer_id: string;
event_name: string;
timestamp: string;
metadata: {
quality: string;
};
}
/**
* Send usage event to Dodo Payments for billing tracking
*/
async function sendUsageEvent(event: UsageEvent): Promise {
try {
console.log('Sending usage event to Dodo Payments...');
console.log(`URL: ${DODO_PAYMENTS_CONFIG.baseUrl}/events/ingest`);
console.log(`API Key present: ${!!DODO_PAYMENTS_CONFIG.apiKey}`);
console.log(`API Key length: ${DODO_PAYMENTS_CONFIG.apiKey?.length || 0}`);
console.log(`Customer ID: ${DODO_PAYMENTS_CONFIG.customerId}`);
const requestBody = {
events: [event]
};
console.log('Request body:', JSON.stringify(requestBody, null, 2));
const headers = {
'Authorization': `Bearer ${DODO_PAYMENTS_CONFIG.apiKey}`,
'Content-Type': 'application/json',
}
console.log('Headers:', headers);
const response = await fetch(`${DODO_PAYMENTS_CONFIG.baseUrl}/events/ingest`, {
method: 'POST',
headers: headers,
body: JSON.stringify(requestBody),
});
console.log(`Response status: ${response.status}`);
console.log(`Response headers:`, Object.fromEntries(response.headers.entries()));
if (!response.ok) {
const errorData = await response.text();
console.log(`Error response body: ${errorData}`);
throw new Error(`HTTP ${response.status}: ${errorData}`);
}
const result = await response.json();
console.log('Usage event sent successfully');
console.log(` • Event ID: ${event.event_id}`);
console.log(` • Customer: ${event.customer_id}`);
console.log(` • Quality: ${event.metadata.quality}`);
} catch (error) {
console.error('Failed to send usage event:', error);
// In production, you might want to queue failed events for retry
throw error;
}
}
async function generateImage(options: ImageGenerationOptions) {
const startTime = Date.now();
const eventId = randomUUID();
try {
console.log('Generating image...');
console.log(`Prompt: "${options.prompt}"`);
console.log(`Quality: ${options.quality || 'standard'}`);
console.log(`Size: ${options.size || '1024x1024'}`);
const response = await openai.images.generate({
model: options.model || 'dall-e-3',
prompt: options.prompt,
n: 1,
size: options.size || '1024x1024',
quality: options.quality || 'standard',
style: options.style || 'vivid',
});
const endTime = Date.now();
const duration = (endTime - startTime) / 1000;
const cost = PRICING[options.quality || 'standard'];
// Create usage event for Dodo Payments
const usageEvent: UsageEvent = {
event_id: eventId,
customer_id: DODO_PAYMENTS_CONFIG.customerId!,
event_name: 'image.generated',
timestamp: new Date().toISOString(),
metadata: {
quality: options.quality || 'standard',
}
};
// Send usage event to Dodo Payments for billing
await sendUsageEvent(usageEvent);
console.log('\nImage generated successfully!');
console.log(`Generation Stats:`);
console.log(` • Duration: ${duration.toFixed(2)} seconds`);
console.log(` • Quality: ${options.quality || 'standard'}`);
console.log(` • Cost: $${cost.toFixed(3)}`);
console.log(` • Image URL: ${response.data?.[0]?.url}`);
if (response.data?.[0]?.revised_prompt) {
console.log(` • Revised prompt: "${response.data[0].revised_prompt}"`);
}
return {
imageUrl: response.data?.[0].url,
revisedPrompt: response.data?.[0].revised_prompt,
cost: cost,
duration: duration,
eventId: eventId,
};
} catch (error) {
console.error('Error generating image:', error);
// Send failure event for monitoring (optional)
try {
const failureEvent: UsageEvent = {
event_id: eventId,
customer_id: DODO_PAYMENTS_CONFIG.customerId!,
event_name: 'image.generation.failed',
timestamp: new Date().toISOString(),
metadata: {
quality: options.quality || 'standard',
}
};
// Note: You might want to create a separate meter for failed attempts
// await sendUsageEvent(failureEvent);
} catch (eventError) {
console.error('Failed to send failure event:', eventError);
}
throw error;
}
}
async function getUserInput(): Promise {
const rl = readline.createInterface({
input: process.stdin,
output: process.stdout
});
return new Promise((resolve) => {
rl.question('Enter your image prompt: ', (answer) => {
rl.close();
resolve(answer);
});
});
}
async function main() {
console.log('PixelGen AI - Image Generator with Usage Billing\n');
// Validate environment variables
const requiredEnvVars = [
'OPENAI_API_KEY',
'DODO_PAYMENTS_API_KEY'
];
for (const envVar of requiredEnvVars) {
if (!process.env[envVar]) {
console.error(`Error: ${envVar} environment variable is not set.`);
console.log('Please set all required environment variables:');
console.log('export OPENAI_API_KEY="your-openai-key"');
console.log('export DODO_PAYMENTS_API_KEY="your-dodo-api-key"');
console.log('Note: Customer ID is hardcoded in the application');
process.exit(1);
}
}
try {
const prompt = await getUserInput();
if (!prompt.trim()) {
console.log('No prompt provided. Exiting...');
return;
}
const result = await generateImage({
prompt: prompt.trim(),
quality: 'standard', // Change to 'hd' for higher quality (costs more)
size: '1024x1024',
style: 'vivid'
});
console.log('\nProcess completed successfully!');
console.log(`Billing Information:`);
console.log(` • Total cost: $${result.cost.toFixed(3)}`);
console.log(` • Event ID: ${result.eventId}`);
console.log(` • Billing will be processed automatically via Dodo Payments`);
} catch (error) {
console.error('Application error:', error);
process.exit(1);
}
}
// Run the application
if (require.main === module) {
main().catch(console.error);
}
```
```bash .env theme={null}
# Create .env file with your API keys
OPENAI_API_KEY=your_openai_api_key_here
DODO_PAYMENTS_API_KEY=your_DODO_PAYMENTS_payments_api_key_here
# Note: Customer ID is hardcoded in the application code
```
```typescript package.json theme={null}
{
"name": "pixelgen-ai",
"version": "1.0.0",
"description": "AI Image Generation with Usage-Based Billing",
"main": "index.js",
"scripts": {
"start": "ts-node index.ts",
"build": "tsc",
"dev": "ts-node --watch index.ts"
},
"dependencies": {
"openai": "^4.0.0",
"dotenv": "^16.0.0"
},
"devDependencies": {
"@types/node": "^20.0.0",
"typescript": "^5.0.0",
"ts-node": "^10.0.0"
}
}
```
## 5단계: 샘플 애플리케이션 테스트하기
이제 샘플 PixelGen AI 서비스를 테스트하고 청구가 작동하는지 확인할 시간입니다! 모든 것이 끝에서 끝까지 작동하는지 확인해 보겠습니다.
**우리가 테스트할 것**: 이미지를 몇 장 생성해 이벤트가 Dodo Payments에 도달하는지 확인하고, 청구 계산이 정확한지 검증합니다.
먼저 다음을 모두 구성했는지 확인하세요:
1. `.env` 파일을 `pixelgen-ai` 디렉토리에 생성합니다
2. 실제 API 키를 추가하세요:
```bash theme={null}
OPENAI_API_KEY=sk-your-actual-openai-key
DODO_PAYMENTS_API_KEY=your-actual-dodo-api-key
# Customer ID is hardcoded in the application
```
3. 의존성을 설치하고 앱을 실행합니다:
```bash theme={null}
npm install
npm start
```
실제 API 키를 사용하고 3단계에서 얻은 실제 고객 ID로 코드 내 하드코딩된 값을 업데이트하세요!
앱을 시작하면 다음이 표시됩니다:
```
PixelGen AI - Image Generator with Usage Billing
Enter your image prompt:
```
이 프롬프트를 시도해 보세요: **"귀여운 로봇이 풍경을 그리는 모습"**
다음과 같은 출력이 표시되어야 합니다:
```
Generating image...
Prompt: "A cute robot painting a landscape"
Quality: standard
Size: 1024x1024
Sending usage event to Dodo Payments...
Usage event sent successfully
• Event ID: 550e8400-e29b-41d4-a716-446655440000
• Customer: cus_atXa1lklCRRzMicTqfiw2
• Quality: standard
Image generated successfully!
Generation Stats:
• Duration: 8.45 seconds
• Quality: standard
• Cost: $0.040
• Image URL: https://oaidalleapi...
```
"Usage event sent successfully"가 표시되면 청구 통합이 정상 작동 중입니다!
이제 2\~3개의 이미지를 더 생성하여 여러 이벤트를 테스트해보세요. 다음 프롬프트를 시도해보세요:
1. **"보라색 구름이 있는 산 위의 일몰"**
2. **"빅토리아 시대 주방의 스팀펑크 커피 머신"**
3. **"도서관에서 책을 읽고 있는 친근한 드래곤"**
각 실행 시 "Usage event sent successfully" 메시지가 나오는지 확인하세요.
이제 이벤트가 제대로 수신되는지 확인해봅시다:
1. Dodo Payments 대시보드를 엽니다.
2. *Usage Billing* → \***Meters** → **Image Generation Meter**로 이동합니다.
3. **Events** 탭을 클릭합니다.
4. 이미지 생성 이벤트가 나열되어야 합니다.
**확인할 항목**:
* 이벤트 이름: `image.generated`
* 고객 ID: 테스트 고객 ID
생성한 이미지마다 하나의 이벤트가 표시되어야 합니다!
사용량 집계가 작동하는지 확인해봅시다:
**Price Per Unit**: 다음을 입력 → `0.05` (이미지당 \$0.05)
**Free Threshold**: 다음을 입력 → `10` (고객은 매월 10장 무료 이미지 제공)
**무료 한도**: 입력하세요 → `10` (고객은 매달 10개의 무료 이미지를 받습니다)
**청구 방식**: 고객이 한 달에 25장 이미지를 생성하면, (25 - 10 무료) = 15장 × $0.05 = $0.75가 청구됩니다.
1. 모든 설정을 검토하세요:
* 이름: PixelGen AI - Image Generation
* 미터: Image Generation Meter
* 가격: 이미지당 \$0.05
* 무료 티어: 10장
2. **Save Changes**를 클릭하세요
**상품이 생성되었습니다!** 이제 청구 구성이 완료되었습니다. 고객은 이미지 생성 사용량에 따라 자동으로 청구됩니다.
## 3단계: 테스트 구매하기
사용량 이벤트를 수집하기 전에 테스트 구매를 해야 합니다.
1. Dodo Payments 대시보드에서 **Products**로 이동합니다
2. "PixelGen AI - Image Generation" 상품을 찾습니다
3. 상품 옆의 **Share** 버튼을 클릭합니다
4. 표시되는 결제 링크를 복사합니다
결제 링크는 다음과 비슷하게 생겼습니다: `https://test.checkout.dodopayments.com/buy/pdt_IgPWlRsfpbPd5jQKezzW1?quantity=1`
1. 결제 링크를 새 브라우저 탭에서 엽니다
2. 테스트 결제 정보를 입력하고 구매를 완료합니다.
결제가 성공하면 애플리케이션 코드에서 사용할 고객 ID가 생성됩니다.
1. Dodo Payments 대시보드로 돌아가기
2. 사이드바에서 **판매 → 고객**으로 이동
3. 방금 생성한 고객 찾기 (테스트 이메일 사용)
4. 고객 ID 복사 - 다음과 같은 형식임 `cus_abc123def456`
이 고객 ID를 저장하세요 - 이벤트가 제대로 추적되도록 샘플 애플리케이션 코드에 하드코딩할 것입니다.
## 4단계: 샘플 애플리케이션 구축하기
이제 청구 설정이 완료되고 테스트 고객이 생성되었습니다. 이미지를 생성하고 청구를 위해 사용량을 자동으로 추적하는 샘플 PixelGen AI 애플리케이션을 구축해 보겠습니다.
새 디렉토리를 만들고 프로젝트를 초기화하세요:
```bash theme={null}
mkdir pixelgen-ai
cd pixelgen-ai
npm init -y
```
필요한 패키지를 설치하세요:
```bash theme={null}
npm install openai dotenv
npm install -D typescript @types/node ts-node
```
`index.ts`이라는 파일을 생성하고 전체 애플리케이션 코드를 복사하세요:
다음은 청구가 통합된 전체 PixelGen AI 애플리케이션입니다:
```typescript index.ts expandable theme={null}
import 'dotenv/config';
import OpenAI from 'openai';
import * as readline from 'readline';
import { randomUUID } from 'crypto';
// Initialize OpenAI client
const openai = new OpenAI({
apiKey: process.env.OPENAI_API_KEY,
});
// Dodo Payments configuration
const DODO_PAYMENTS_CONFIG = {
apiKey: process.env.DODO_PAYMENTS_API_KEY,
baseUrl: 'https://test.dodopayments.com',
customerId: 'cus_FX5FAB43aShGyiHJGIqjB', // Replace with your actual customer ID from Step 3
};
// DALL-E 3 pricing (as of 2024-2025)
const PRICING = {
'standard': 0.040, // $0.040 per image (1024×1024)
'hd': 0.080, // $0.080 per image (1024×1024, HD quality)
};
interface ImageGenerationOptions {
prompt: string;
model?: 'dall-e-3' | 'dall-e-2';
quality?: 'standard' | 'hd';
size?: '1024x1024' | '1792x1024' | '1024x1792';
style?: 'vivid' | 'natural';
}
interface UsageEvent {
event_id: string;
customer_id: string;
event_name: string;
timestamp: string;
metadata: {
quality: string;
};
}
/**
* Send usage event to Dodo Payments for billing tracking
*/
async function sendUsageEvent(event: UsageEvent): Promise {
try {
console.log('Sending usage event to Dodo Payments...');
console.log(`URL: ${DODO_PAYMENTS_CONFIG.baseUrl}/events/ingest`);
console.log(`API Key present: ${!!DODO_PAYMENTS_CONFIG.apiKey}`);
console.log(`API Key length: ${DODO_PAYMENTS_CONFIG.apiKey?.length || 0}`);
console.log(`Customer ID: ${DODO_PAYMENTS_CONFIG.customerId}`);
const requestBody = {
events: [event]
};
console.log('Request body:', JSON.stringify(requestBody, null, 2));
const headers = {
'Authorization': `Bearer ${DODO_PAYMENTS_CONFIG.apiKey}`,
'Content-Type': 'application/json',
}
console.log('Headers:', headers);
const response = await fetch(`${DODO_PAYMENTS_CONFIG.baseUrl}/events/ingest`, {
method: 'POST',
headers: headers,
body: JSON.stringify(requestBody),
});
console.log(`Response status: ${response.status}`);
console.log(`Response headers:`, Object.fromEntries(response.headers.entries()));
if (!response.ok) {
const errorData = await response.text();
console.log(`Error response body: ${errorData}`);
throw new Error(`HTTP ${response.status}: ${errorData}`);
}
const result = await response.json();
console.log('Usage event sent successfully');
console.log(` • Event ID: ${event.event_id}`);
console.log(` • Customer: ${event.customer_id}`);
console.log(` • Quality: ${event.metadata.quality}`);
} catch (error) {
console.error('Failed to send usage event:', error);
// In production, you might want to queue failed events for retry
throw error;
}
}
async function generateImage(options: ImageGenerationOptions) {
const startTime = Date.now();
const eventId = randomUUID();
try {
console.log('Generating image...');
console.log(`Prompt: "${options.prompt}"`);
console.log(`Quality: ${options.quality || 'standard'}`);
console.log(`Size: ${options.size || '1024x1024'}`);
const response = await openai.images.generate({
model: options.model || 'dall-e-3',
prompt: options.prompt,
n: 1,
size: options.size || '1024x1024',
quality: options.quality || 'standard',
style: options.style || 'vivid',
});
const endTime = Date.now();
const duration = (endTime - startTime) / 1000;
const cost = PRICING[options.quality || 'standard'];
// Create usage event for Dodo Payments
const usageEvent: UsageEvent = {
event_id: eventId,
customer_id: DODO_PAYMENTS_CONFIG.customerId!,
event_name: 'image.generated',
timestamp: new Date().toISOString(),
metadata: {
quality: options.quality || 'standard',
}
};
// Send usage event to Dodo Payments for billing
await sendUsageEvent(usageEvent);
console.log('\nImage generated successfully!');
console.log(`Generation Stats:`);
console.log(` • Duration: ${duration.toFixed(2)} seconds`);
console.log(` • Quality: ${options.quality || 'standard'}`);
console.log(` • Cost: $${cost.toFixed(3)}`);
console.log(` • Image URL: ${response.data?.[0]?.url}`);
if (response.data?.[0]?.revised_prompt) {
console.log(` • Revised prompt: "${response.data[0].revised_prompt}"`);
}
return {
imageUrl: response.data?.[0].url,
revisedPrompt: response.data?.[0].revised_prompt,
cost: cost,
duration: duration,
eventId: eventId,
};
} catch (error) {
console.error('Error generating image:', error);
// Send failure event for monitoring (optional)
try {
const failureEvent: UsageEvent = {
event_id: eventId,
customer_id: DODO_PAYMENTS_CONFIG.customerId!,
event_name: 'image.generation.failed',
timestamp: new Date().toISOString(),
metadata: {
quality: options.quality || 'standard',
}
};
// Note: You might want to create a separate meter for failed attempts
// await sendUsageEvent(failureEvent);
} catch (eventError) {
console.error('Failed to send failure event:', eventError);
}
throw error;
}
}
async function getUserInput(): Promise {
const rl = readline.createInterface({
input: process.stdin,
output: process.stdout
});
return new Promise((resolve) => {
rl.question('Enter your image prompt: ', (answer) => {
rl.close();
resolve(answer);
});
});
}
async function main() {
console.log('PixelGen AI - Image Generator with Usage Billing\n');
// Validate environment variables
const requiredEnvVars = [
'OPENAI_API_KEY',
'DODO_PAYMENTS_API_KEY'
];
for (const envVar of requiredEnvVars) {
if (!process.env[envVar]) {
console.error(`Error: ${envVar} environment variable is not set.`);
console.log('Please set all required environment variables:');
console.log('export OPENAI_API_KEY="your-openai-key"');
console.log('export DODO_PAYMENTS_API_KEY="your-dodo-api-key"');
console.log('Note: Customer ID is hardcoded in the application');
process.exit(1);
}
}
try {
const prompt = await getUserInput();
if (!prompt.trim()) {
console.log('No prompt provided. Exiting...');
return;
}
const result = await generateImage({
prompt: prompt.trim(),
quality: 'standard', // Change to 'hd' for higher quality (costs more)
size: '1024x1024',
style: 'vivid'
});
console.log('\nProcess completed successfully!');
console.log(`Billing Information:`);
console.log(` • Total cost: $${result.cost.toFixed(3)}`);
console.log(` • Event ID: ${result.eventId}`);
console.log(` • Billing will be processed automatically via Dodo Payments`);
} catch (error) {
console.error('Application error:', error);
process.exit(1);
}
}
// Run the application
if (require.main === module) {
main().catch(console.error);
}
```
```bash .env theme={null}
# Create .env file with your API keys
OPENAI_API_KEY=your_openai_api_key_here
DODO_PAYMENTS_API_KEY=your_DODO_PAYMENTS_payments_api_key_here
# Note: Customer ID is hardcoded in the application code
```
```typescript package.json theme={null}
{
"name": "pixelgen-ai",
"version": "1.0.0",
"description": "AI Image Generation with Usage-Based Billing",
"main": "index.js",
"scripts": {
"start": "ts-node index.ts",
"build": "tsc",
"dev": "ts-node --watch index.ts"
},
"dependencies": {
"openai": "^4.0.0",
"dotenv": "^16.0.0"
},
"devDependencies": {
"@types/node": "^20.0.0",
"typescript": "^5.0.0",
"ts-node": "^10.0.0"
}
}
```
## 5단계: 샘플 애플리케이션 테스트하기
이제 샘플 PixelGen AI 서비스를 테스트하고 청구가 작동하는지 확인할 시간입니다! 모든 것이 끝에서 끝까지 작동하는지 확인해 보겠습니다.
**우리가 테스트할 것**: 이미지를 몇 장 생성해 이벤트가 Dodo Payments에 도달하는지 확인하고, 청구 계산이 정확한지 검증합니다.
먼저 다음을 모두 구성했는지 확인하세요:
1. `.env` 파일을 `pixelgen-ai` 디렉토리에 생성합니다
2. 실제 API 키를 추가하세요:
```bash theme={null}
OPENAI_API_KEY=sk-your-actual-openai-key
DODO_PAYMENTS_API_KEY=your-actual-dodo-api-key
# Customer ID is hardcoded in the application
```
3. 의존성을 설치하고 앱을 실행합니다:
```bash theme={null}
npm install
npm start
```
실제 API 키를 사용하고 3단계에서 얻은 실제 고객 ID로 코드 내 하드코딩된 값을 업데이트하세요!
앱을 시작하면 다음이 표시됩니다:
```
PixelGen AI - Image Generator with Usage Billing
Enter your image prompt:
```
이 프롬프트를 시도해 보세요: **"귀여운 로봇이 풍경을 그리는 모습"**
다음과 같은 출력이 표시되어야 합니다:
```
Generating image...
Prompt: "A cute robot painting a landscape"
Quality: standard
Size: 1024x1024
Sending usage event to Dodo Payments...
Usage event sent successfully
• Event ID: 550e8400-e29b-41d4-a716-446655440000
• Customer: cus_atXa1lklCRRzMicTqfiw2
• Quality: standard
Image generated successfully!
Generation Stats:
• Duration: 8.45 seconds
• Quality: standard
• Cost: $0.040
• Image URL: https://oaidalleapi...
```
"Usage event sent successfully"가 표시되면 청구 통합이 정상 작동 중입니다!
이제 2\~3개의 이미지를 더 생성하여 여러 이벤트를 테스트해보세요. 다음 프롬프트를 시도해보세요:
1. **"보라색 구름이 있는 산 위의 일몰"**
2. **"빅토리아 시대 주방의 스팀펑크 커피 머신"**
3. **"도서관에서 책을 읽고 있는 친근한 드래곤"**
각 실행 시 "Usage event sent successfully" 메시지가 나오는지 확인하세요.
이제 이벤트가 제대로 수신되는지 확인해봅시다:
1. Dodo Payments 대시보드를 엽니다.
2. *Usage Billing* → \***Meters** → **Image Generation Meter**로 이동합니다.
3. **Events** 탭을 클릭합니다.
4. 이미지 생성 이벤트가 나열되어야 합니다.
**확인할 항목**:
* 이벤트 이름: `image.generated`
* 고객 ID: 테스트 고객 ID
생성한 이미지마다 하나의 이벤트가 표시되어야 합니다!
사용량 집계가 작동하는지 확인해봅시다:
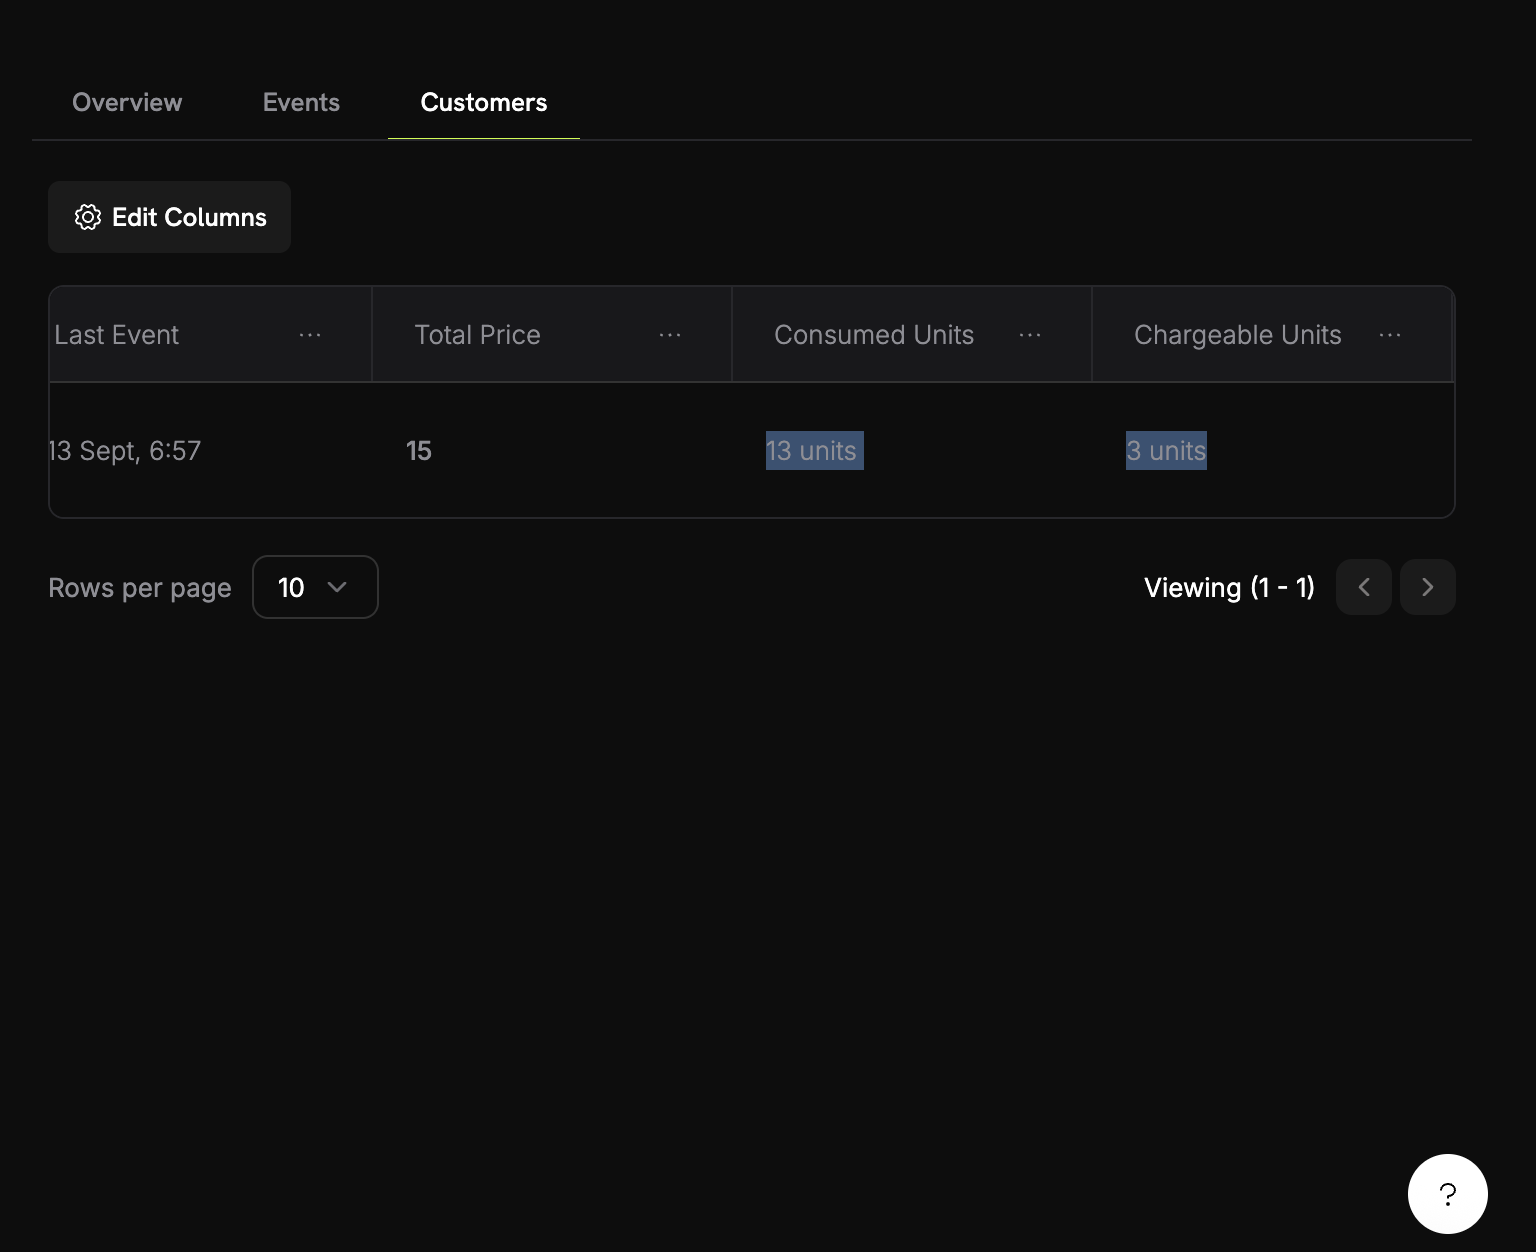 1. 미터에서 **Customers** 탭으로 이동합니다.
2. 테스트 고객을 찾습니다.
3. "Consumed Units" 열을 확인합니다.
무료 티어를 초과하여 실제 청구가 어떻게 작동하는지 확인해봅시다:
1. 이미지를 8개 더 생성합니다(총 12개에 도달).
2. 미터 대시보드를 다시 확인합니다.
3. 이제 다음과 같은 내용이 표시되어야 합니다:
* 소비된 단위: 12
* 청구 가능한 단위: 2 (12 - 10 무료)
* 청구 금액: \$0.10
**성공!** 사용량 기반 청구가 완벽히 작동 중입니다. 고객은 실제 이미지 생성 사용량에 따라 자동 청구됩니다.
## 문제 해결
일반적인 문제와 그 해결책:
**가능한 원인:**
* 이벤트 이름이 미터 구성과 정확히 일치하지 않음
* 고객 ID가 계정에 존재하지 않음
* API 키가 잘못되었거나 만료됨
* 네트워크 연결 문제
**해결 방법:**
1. 이벤트 이름이 미터 구성과 대소문자까지 정확히 일치하는지 확인하세요
2. 고객 ID가 Dodo Payments에 존재하는지 확인하세요
3. 간단한 API 호출로 API 키를 테스트하세요
4. 네트워크 연결 및 방화벽 설정을 확인하세요
## 축하합니다! PixelGen AI를 구축했습니다.
사용량 기반 청구가 포함된 AI 이미지 생성 스니펫을 성공적으로 생성했습니다! 다음과 같은 성과를 달성했습니다:
"이미지 생성 미터"를 생성하여 모든 이미지 생성 이벤트를 추적합니다
이미지당 \$0.05의 가격과 월 10장의 무료 이미지를 구성했습니다
OpenAI DALL-E를 사용해 이미지를 생성하는 작동하는 TypeScript 앱을 구축했습니다
실시간 이벤트 추적을 통합하여 고객에게 자동으로 청구합니다
1. 미터에서 **Customers** 탭으로 이동합니다.
2. 테스트 고객을 찾습니다.
3. "Consumed Units" 열을 확인합니다.
무료 티어를 초과하여 실제 청구가 어떻게 작동하는지 확인해봅시다:
1. 이미지를 8개 더 생성합니다(총 12개에 도달).
2. 미터 대시보드를 다시 확인합니다.
3. 이제 다음과 같은 내용이 표시되어야 합니다:
* 소비된 단위: 12
* 청구 가능한 단위: 2 (12 - 10 무료)
* 청구 금액: \$0.10
**성공!** 사용량 기반 청구가 완벽히 작동 중입니다. 고객은 실제 이미지 생성 사용량에 따라 자동 청구됩니다.
## 문제 해결
일반적인 문제와 그 해결책:
**가능한 원인:**
* 이벤트 이름이 미터 구성과 정확히 일치하지 않음
* 고객 ID가 계정에 존재하지 않음
* API 키가 잘못되었거나 만료됨
* 네트워크 연결 문제
**해결 방법:**
1. 이벤트 이름이 미터 구성과 대소문자까지 정확히 일치하는지 확인하세요
2. 고객 ID가 Dodo Payments에 존재하는지 확인하세요
3. 간단한 API 호출로 API 키를 테스트하세요
4. 네트워크 연결 및 방화벽 설정을 확인하세요
## 축하합니다! PixelGen AI를 구축했습니다.
사용량 기반 청구가 포함된 AI 이미지 생성 스니펫을 성공적으로 생성했습니다! 다음과 같은 성과를 달성했습니다:
"이미지 생성 미터"를 생성하여 모든 이미지 생성 이벤트를 추적합니다
이미지당 \$0.05의 가격과 월 10장의 무료 이미지를 구성했습니다
OpenAI DALL-E를 사용해 이미지를 생성하는 작동하는 TypeScript 앱을 구축했습니다
실시간 이벤트 추적을 통합하여 고객에게 자동으로 청구합니다