> ## Documentation Index
> Fetch the complete documentation index at: https://docs.dodopayments.com/llms.txt
> Use this file to discover all available pages before exploring further.

# 좌석 기반 가격 책정 및 추가 기능과 결제 링크

> Dodo Payments를 사용하여 좌석 기반 가격 책정을 위한 추가 기능을 생성하고 사용자 지정 추가 기능 수량으로 결제 링크를 생성하는 방법을 배웁니다.

이 튜토리얼에서는 Dodo Payments 추가 기능을 사용하여 좌석 기반 가격 책정을 구현하는 방법을 배웁니다. 추가 좌석을 위한 추가 기능이 포함된 구독 제품을 만들고 사용자 지정 추가 기능 수량으로 결제 링크를 생성하는 방법을 보여줍니다.

<Note>
  이 튜토리얼은 Node.js/Express 애플리케이션용 샘플 구현 코드를 제공합니다. 이 코드는 특정 프레임워크(Next.js, React, Vue 등)에 맞게 수정하고 애플리케이션 요구 사항에 따라 사용자 인터페이스를 커스터마이즈할 수 있습니다.
</Note>

이 튜토리얼이 끝나면 다음을 수행할 수 있습니다:

* 좌석 기반 가격 책정으로 구독 제품 만들기
* 추가 좌석을 위한 추가 기능 설정
* 사용자 지정 추가 기능 수량으로 결제 링크 생성
* 동적 좌석 수로 체크아웃 세션 처리

## 우리가 만들고 있는 것

좌석 기반 가격 모델을 만들어 보겠습니다:

* **기본 요금제**: 팀원 5명까지 월 \$49
* **좌석 추가 기능**: 추가 좌석당 월 \$2
* **결제 링크**: 사용자 지정 좌석 수량으로 동적 체크아웃

<Info>
  시작하기 전에 다음이 준비되어 있는지 확인하세요:

  * Dodo Payments 계정
  * TypeScript/Node.js에 대한 기본적인 이해
</Info>

## 1단계: 좌석 추가 기능 만들기

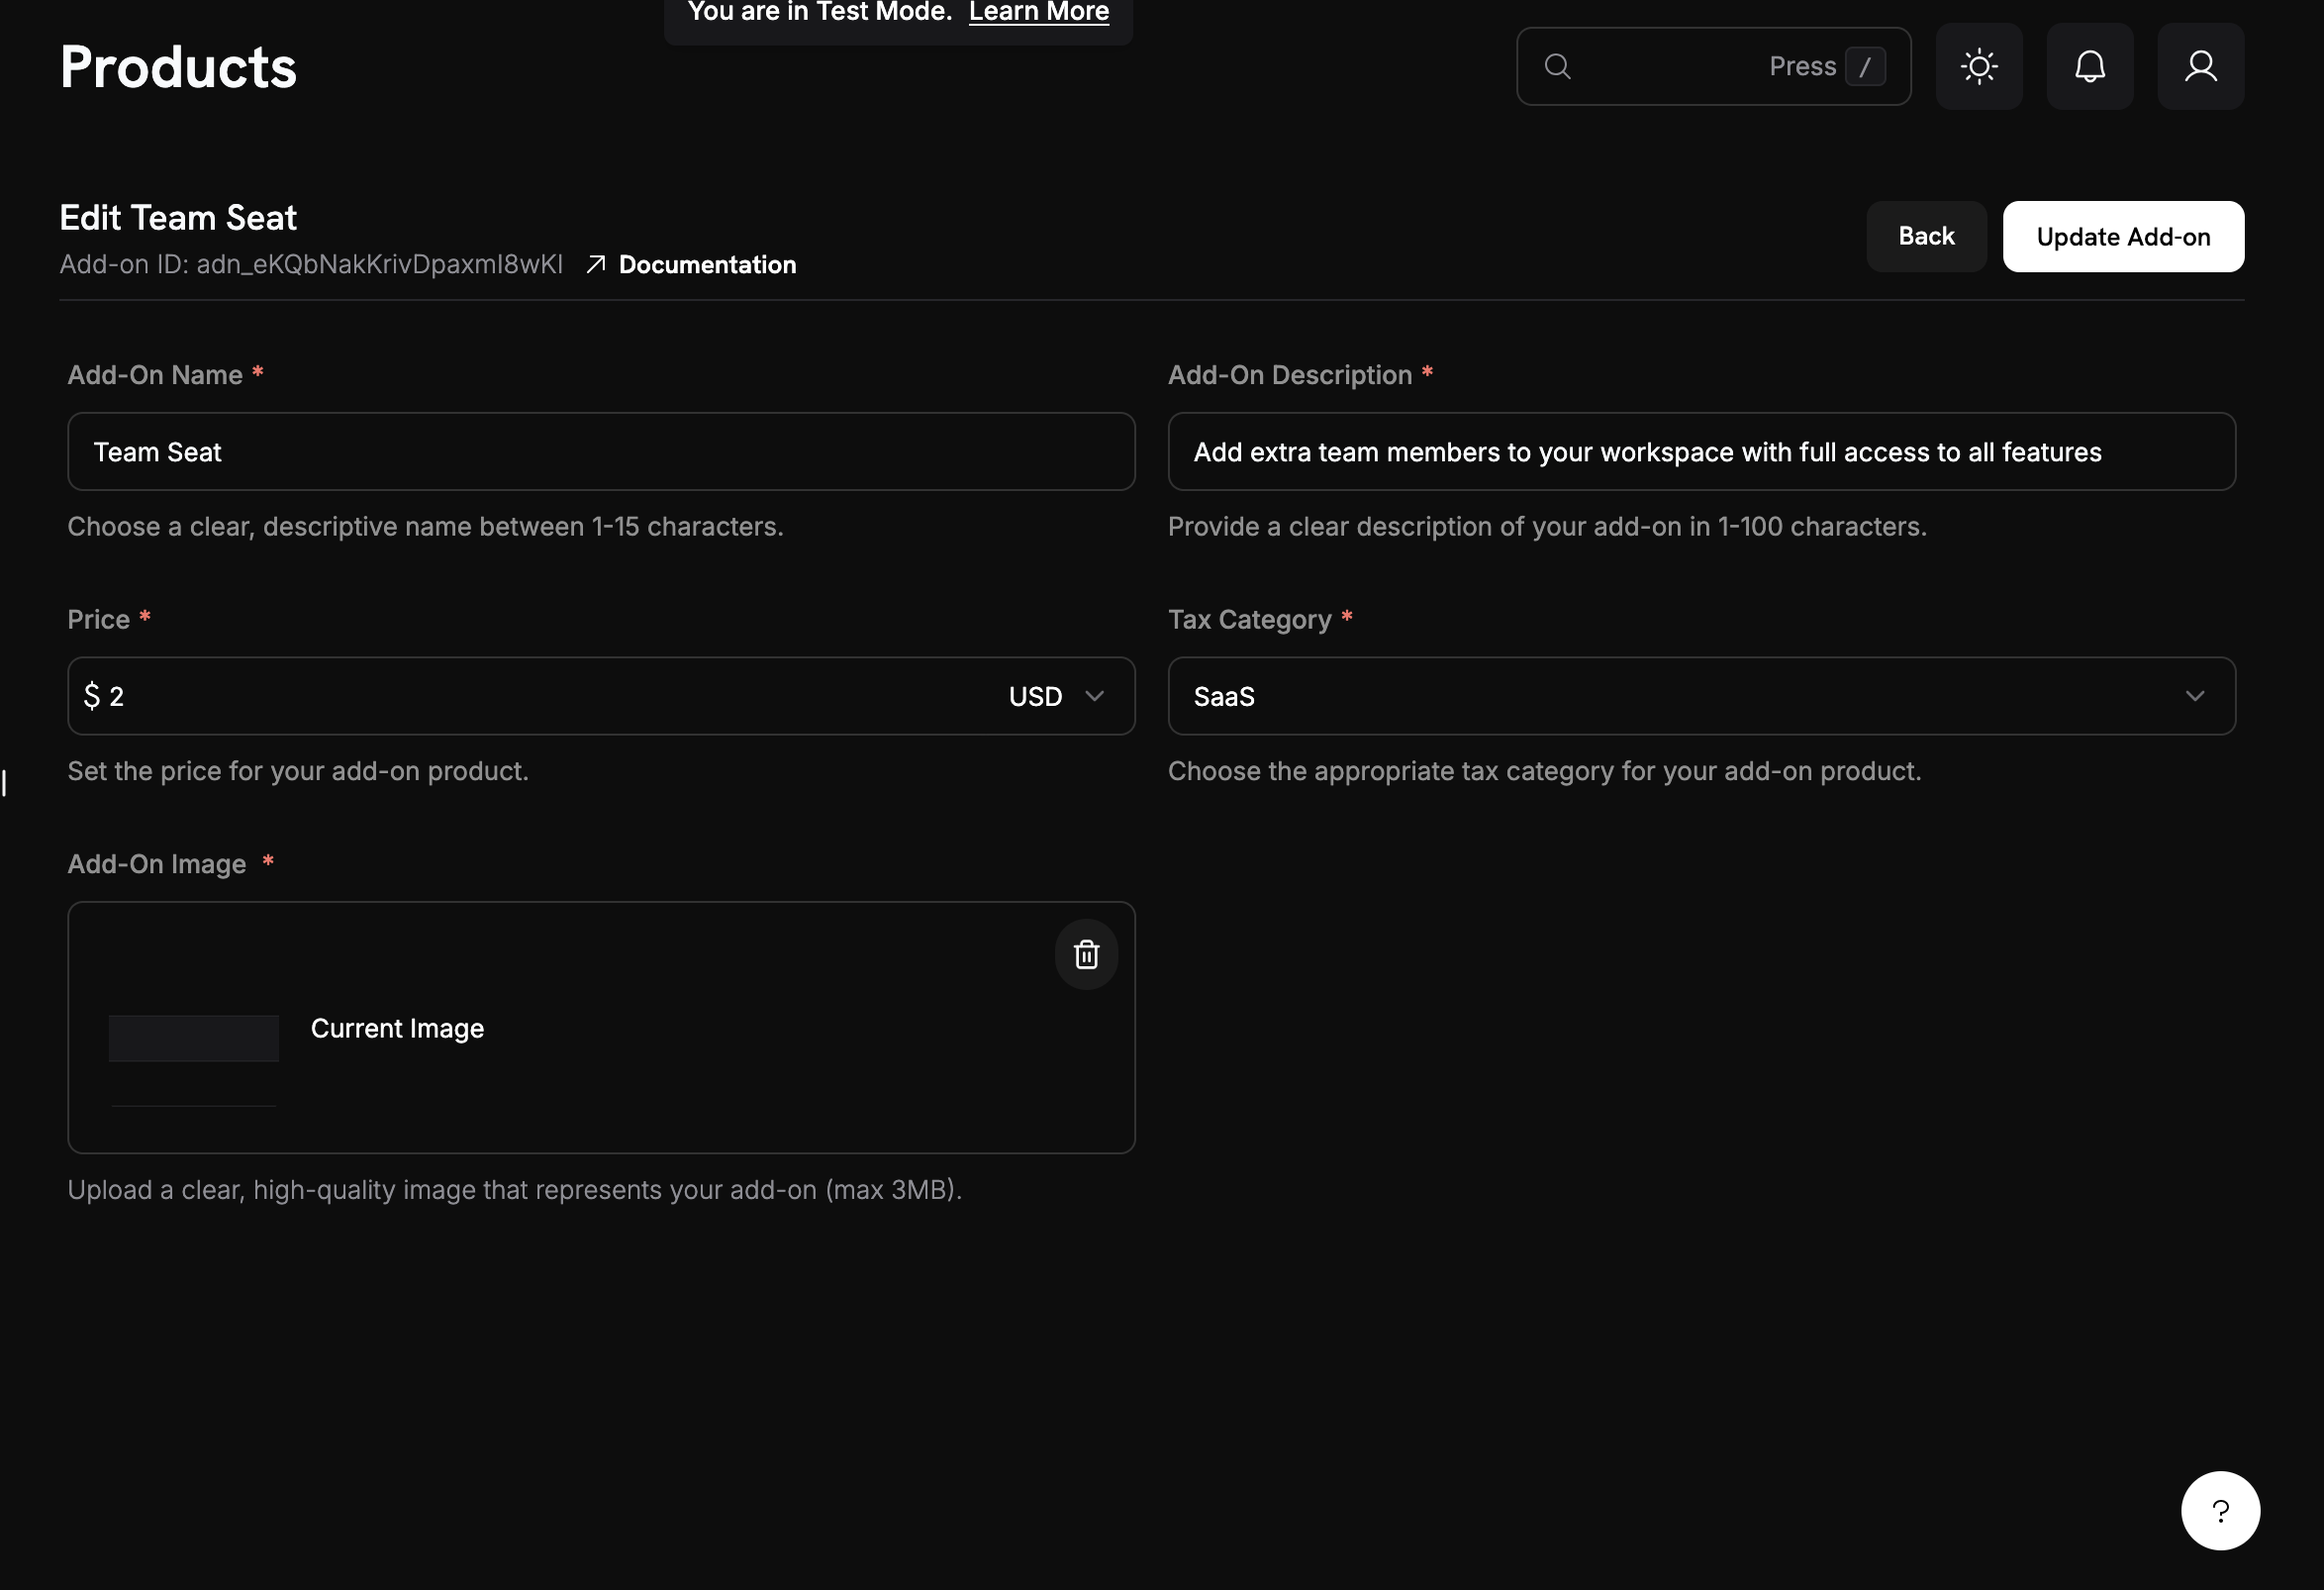
이제 추가 좌석을 나타내는 추가 기능을 만들어야 합니다. 이 추가 기능은 기본 구독에 연결되어 고객이 추가 좌석을 구매할 수 있도록 합니다.

<Frame>
  <img src="https://mintcdn.com/dodopayments/ajOhO6Du1yNsg0hy/images/cookbooks/seat-based/seat-based-addons-creation.png?fit=max&auto=format&n=ajOhO6Du1yNsg0hy&q=85&s=d2c17b4a9f2f9a1b19f537f0507656a4" alt="기본 구독 제품 생성" style={{ maxHeight: '500px', width: 'auto' }} width="2348" height="1606" data-path="images/cookbooks/seat-based/seat-based-addons-creation.png" />
</Frame>

<Tip>
  **우리가 만드는 것**: 좌석당 월 \$2이며 모든 기본 구독에 추가할 수 있는 추가 기능입니다.
</Tip>

<Steps>
  <Step title="Navigate to Add-Ons">
    1. Dodo Payments 대시보드에서 **Products** 섹션에 머물러 있습니다.
    2. **Add-Ons** 탭을 클릭하세요.
    3. **Create Add-On**을 클릭하세요.

    이제 추가 기능 생성 폼이 열립니다.
  </Step>

  <Step title="Enter add-on details">
    다음 값을 좌석 추가 기능에 입력하세요:

    **Add-On Name**: `Additional Team Seat`

    **Description**: `Add extra team members to your workspace with full access to all features`

    **Price**: → `2.00`를 입력하세요

    **통화**: 기본 구독 통화와 일치해야 합니다.

    **세금 카테고리**: 제품에 적합한 카테고리를 선택하세요.
  </Step>

  <Step title="Save your add-on">
    1. 모든 설정을 검토합니다:
       * 이름: Additional Team Seat
       * 가격: \$2.00/월
    2. **Create Add-On**을 클릭하세요.

    <Check>
      **추가 기능이 생성되었습니다!** 좌석 추가 기능을 이제 구독에 연결할 수 있습니다.
    </Check>
  </Step>
</Steps>

## 2단계: 기본 구독 제품 만들기

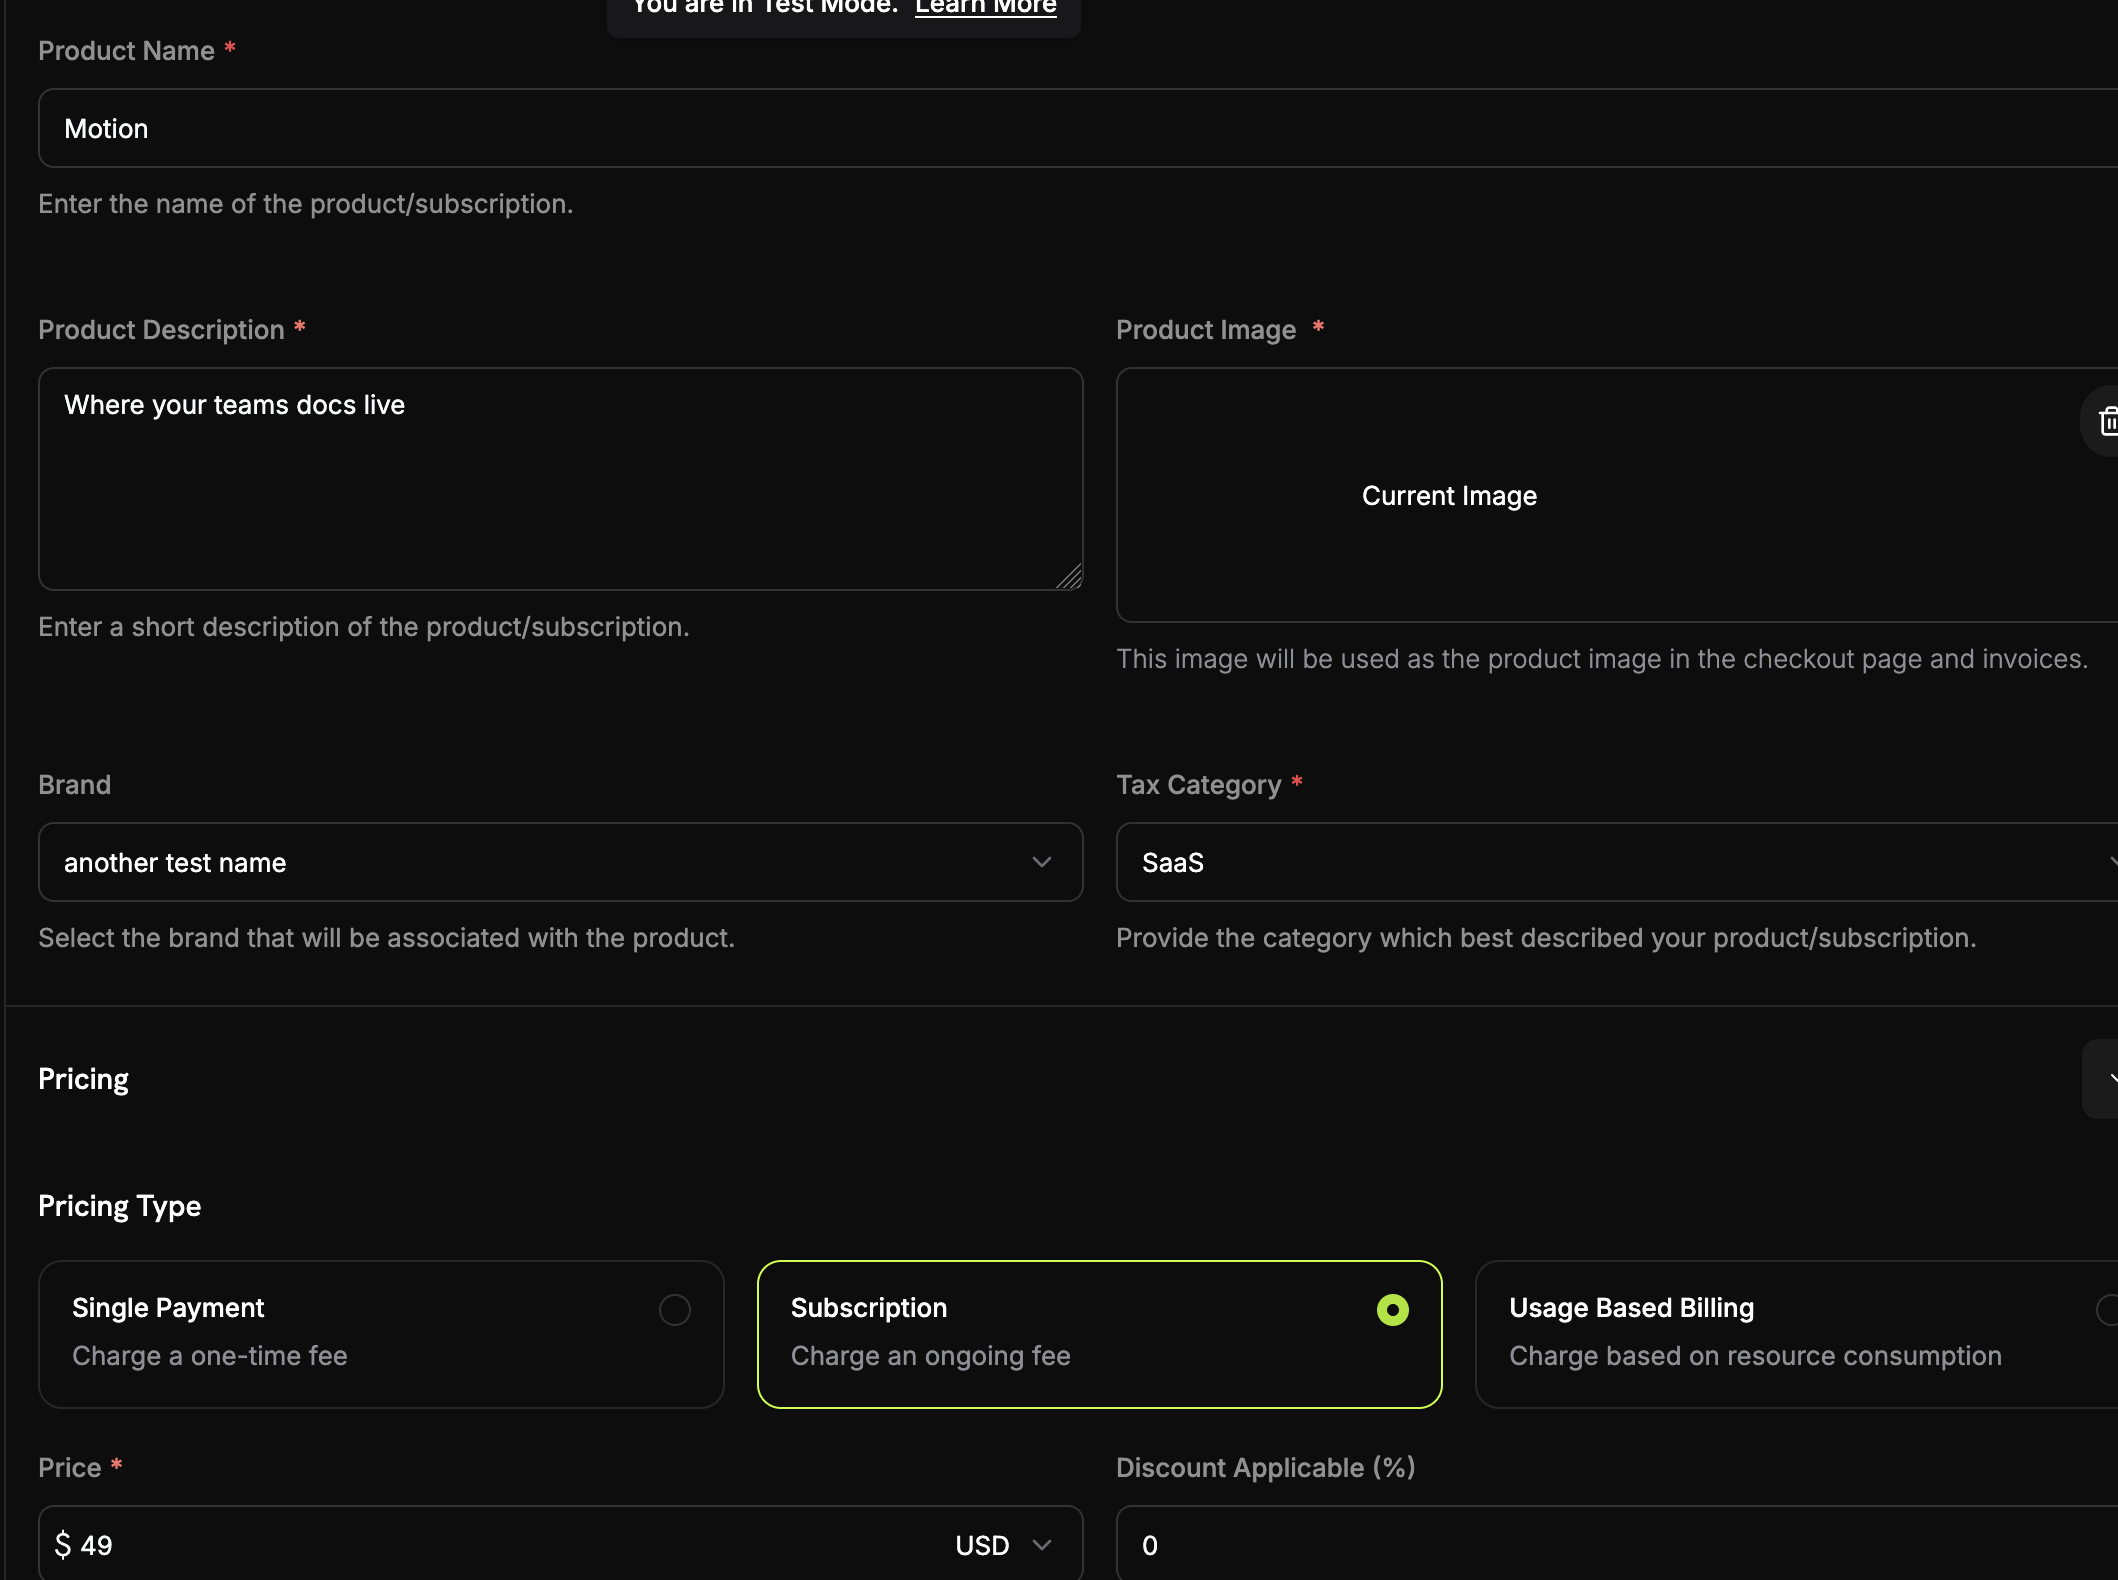
팀원 5명이 포함된 기본 구독 제품을 만드는 것으로 시작하겠습니다. 이것이 좌석 기반 가격 모델의 기초가 될 것입니다.

<Frame>
  <img src="https://mintcdn.com/dodopayments/ajOhO6Du1yNsg0hy/images/cookbooks/seat-based/seat-based-subscription.png?fit=max&auto=format&n=ajOhO6Du1yNsg0hy&q=85&s=f17e96f3d106b88b6dc32a00be535620" alt="기본 구독 제품 생성" style={{ maxHeight: '500px', width: 'auto' }} width="2118" height="1580" data-path="images/cookbooks/seat-based/seat-based-subscription.png" />
</Frame>

<Steps>
  <Step title="Navigate to Products">
    1. Dodo Payments 대시보드에 로그인하세요.
    2. 왼쪽 사이드바에서 **Products**를 클릭하세요.
    3. **Create Product** 버튼을 클릭하세요.
    4. 상품 유형으로 **Subscription**을 선택하세요.

    기본 구독을 구성할 수 있는 폼이 표시됩니다.
  </Step>

  <Step title="Fill in the subscription details">
    이제 기본 요금제에 대한 구체적인 세부 정보를 입력합니다:

    **Product Name**: `Motion`

    **Description**: `Where your team's documentation lives.`

    **Recurring Price**: → `49.00`를 입력하세요

    **Billing Cycle**: → `Monthly`를 선택하세요

    **Currency**: 원하는 통화를 선택하세요(예: `USD`)
  </Step>
</Steps>

## 3단계: 추가 기능을 구독에 연결하기

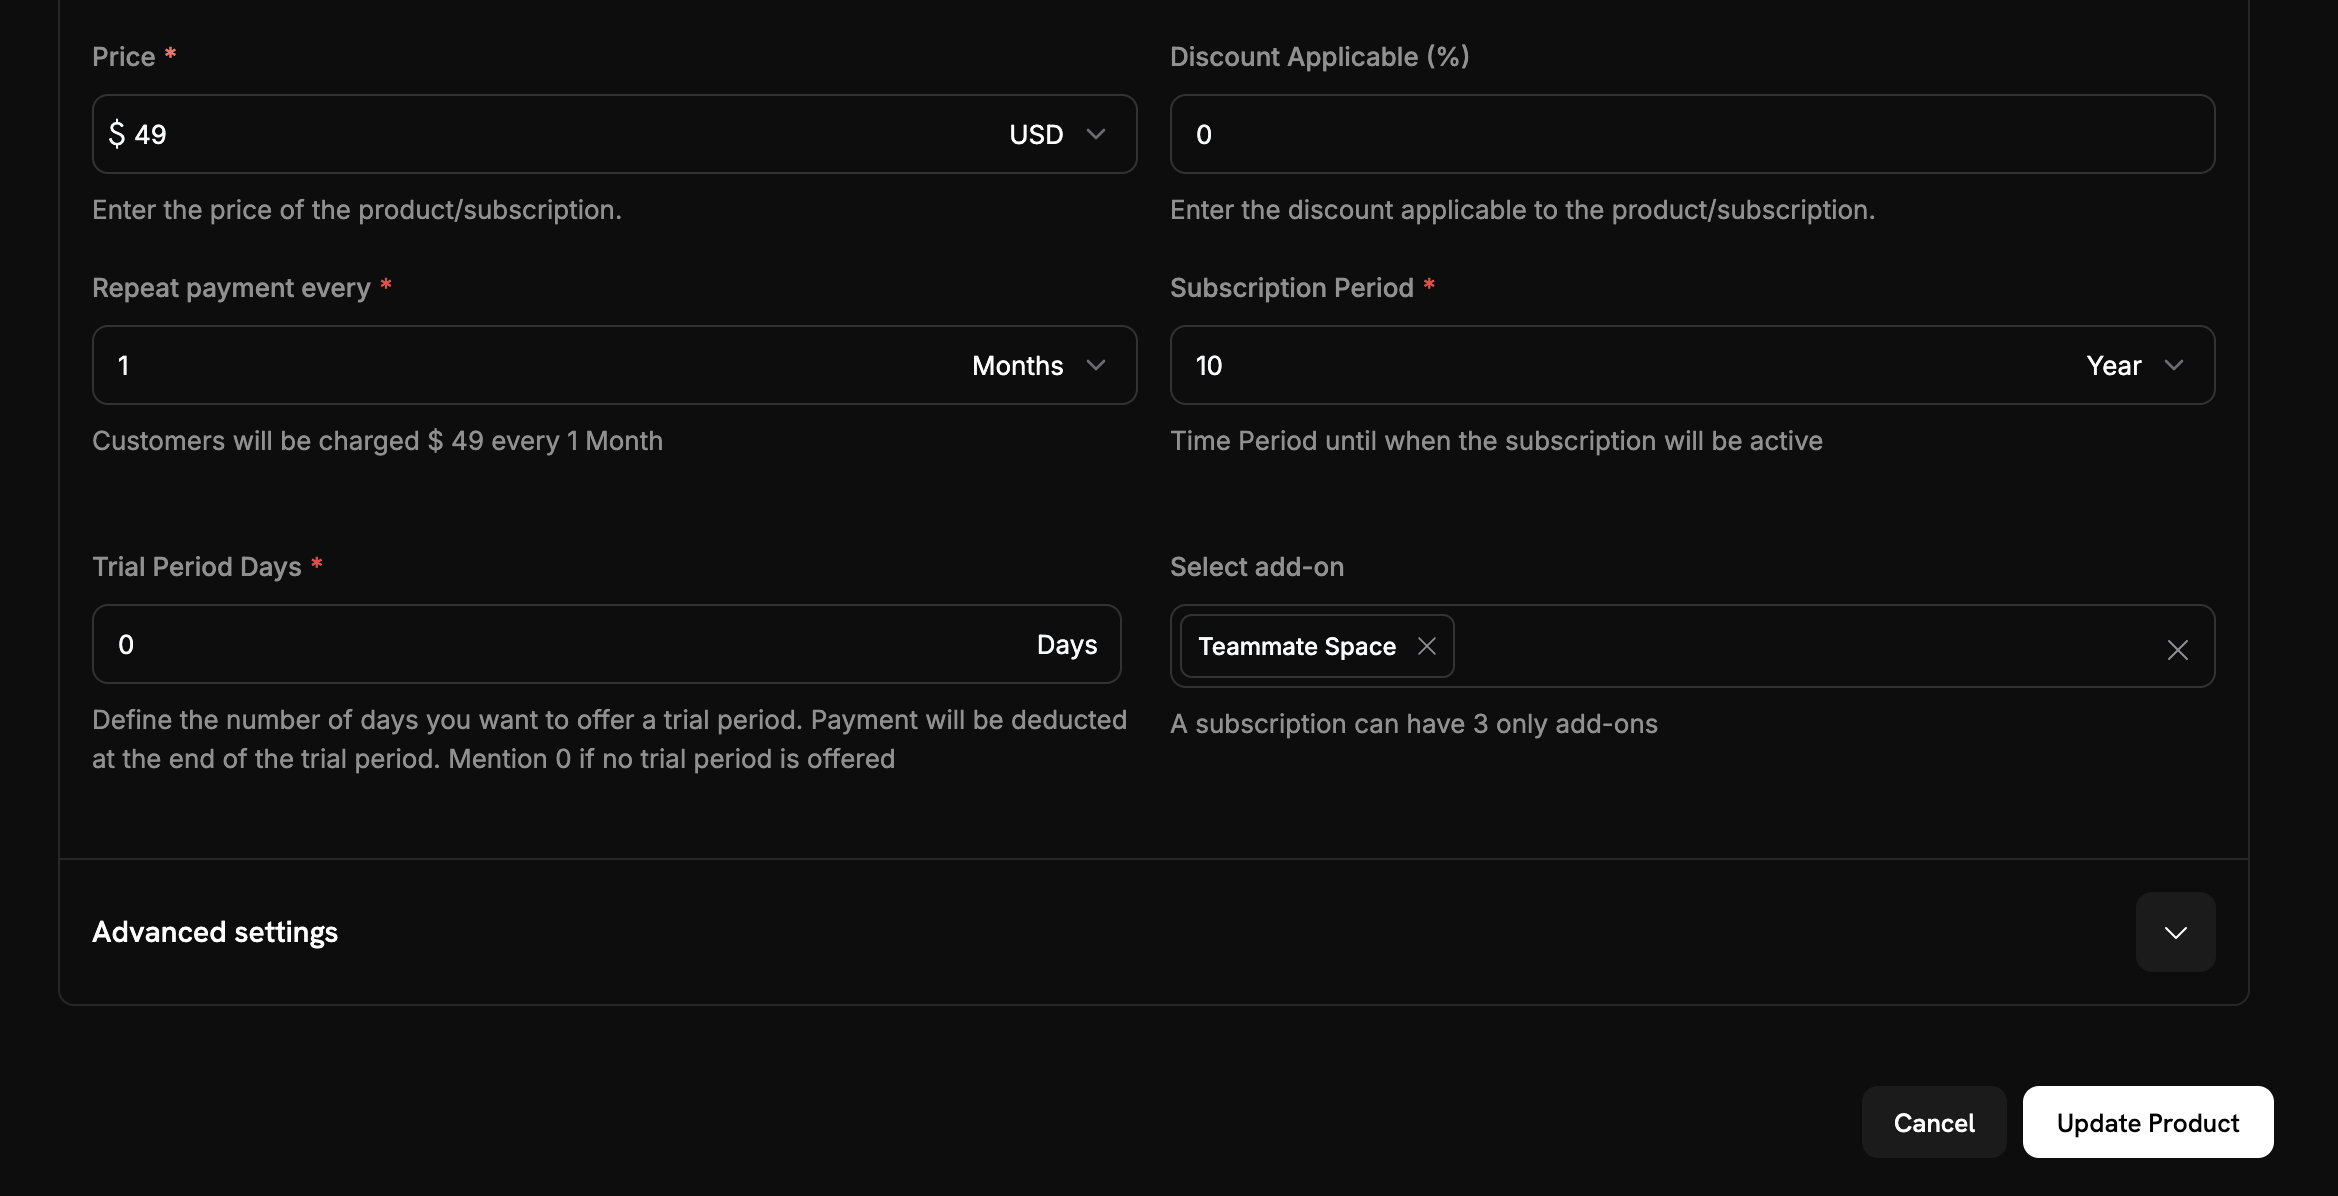
이제 고객이 체크아웃 중에 추가 좌석을 구매할 수 있도록 기본 구독과 좌석 추가 기능을 연결해야 합니다.

<Steps>
  <Step title="Attach the seat add-on">
    <Frame>
      <img src="https://mintcdn.com/dodopayments/ajOhO6Du1yNsg0hy/images/cookbooks/seat-based/seat-based-addons.png?fit=max&auto=format&n=ajOhO6Du1yNsg0hy&q=85&s=ea4ce0d437201c92590eea6c31a14e80" alt="구독에 추가 기능 연결" style={{ maxHeight: '500px', width: 'auto' }} width="2338" height="1196" data-path="images/cookbooks/seat-based/seat-based-addons.png" />
    </Frame>

    1. **추가 기능** 섹션으로 스크롤하세요.
    2. **추가 기능 추가**를 클릭하세요.
    3. 드롭다운에서 좌석 추가 기능을 선택하세요.
    4. 구독 구성에 추가 기능이 표시되는지 확인하세요.
  </Step>

  <Step title="Save subscription changes">
    1. 구독 설정을 전체적으로 검토하세요:
       * 기본 요금제: 5석에 \$49/월
       * 추가 기능: 추가 좌석당 \$2/월
       * 무료 체험: 14일
    2. **Save Changes**를 클릭하세요.

    <Check>
      **좌석 기반 가격 책정이 설정되었습니다!** 고객은 이제 기본 요금제를 구매하고 필요에 따라 추가 좌석을 더할 수 있습니다.
    </Check>
  </Step>
</Steps>

## 4단계: 사용자 지정 추가 기능 수량으로 결제 링크 생성하기

이제 사용자 지정 추가 기능 수량으로 결제 링크를 생성하는 Express.js 애플리케이션을 만들어 보겠습니다. 여기서 좌석 기반 가격 책정의 진정한 힘이 발휘됩니다 - 추가 좌석 수에 따라 동적으로 체크아웃 세션을 생성할 수 있습니다.

<Steps>
  <Step title="Set up your project">
    새로운 Node.js 프로젝트를 만들고 필요한 종속성을 설치하세요:

    ```bash theme={null}
    mkdir seat-based-pricing
    cd seat-based-pricing
    npm init -y
    npm install dodopayments express dotenv
    npm install -D @types/node @types/express typescript ts-node
    ```

    `tsconfig.json` 파일을 생성하세요:

    ```json theme={null}
    {
      "compilerOptions": {
        "target": "ES2020",
        "module": "commonjs",
        "outDir": "./dist",
        "rootDir": "./src",
        "strict": true,
        "esModuleInterop": true,
        "skipLibCheck": true,
        "forceConsistentCasingInFileNames": true
      }
    }
    ```
  </Step>

  <Step title="Create your environment file">
    Dodo Payments API 키를 저장할 `.env` 파일을 생성하세요:

    ```bash theme={null}
    DODO_PAYMENTS_API_KEY=your_actual_dodo_api_key_here
    ```

    <Warning>
      API 키를 절대 버전 관리에 커밋하지 마세요. `.env`를 `.gitignore` 파일에 추가하세요.
    </Warning>
  </Step>

  <Step title="Implement the checkout session creation">
    다음 코드를 포함한 `src/server.ts` 파일을 생성하세요:

    <CodeGroup>
      ```typescript server.ts expandable theme={null}
      // Add this new endpoint for dynamic seat quantities
      import 'dotenv/config';
      import DodoPayments from 'dodopayments';
      import express, { Request, Response } from 'express';

      const app = express();

      // Initialize the Dodo Payments client
      const client = new DodoPayments({
        bearerToken: process.env.DODO_PAYMENTS_API_KEY,
        environment: 'test_mode'
      });

      async function createCheckoutSession(seatCount: number) {
        try {
          const session = await client.checkoutSessions.create({
            // Products to sell - use IDs from your Dodo Payments dashboard
            product_cart: [
              {
                product_id: 'pdt_7Rl9OWT2Mz4wwUTKz74iZ', // Replace with your actual product ID
                quantity: 1,
                addons: [
                  {
                    addon_id: 'adn_eKQbNakKrivDpaxmI8wKI', // Replace with your actual addon ID
                    quantity: seatCount
                  }
                ]
              }
            ],
            
            // Pre-fill customer information to reduce friction
            customer: {
              email: 'steve@example.com',
              name: 'Steve Irwin',
            },
            // Where to redirect after successful payment
            return_url: 'https://example.com/checkout/success',
          });

          // Redirect your customer to this URL to complete payment
          console.log('Checkout URL:', session.checkout_url);
          console.log('Session ID:', session.session_id);
          
          return session;
          
        } catch (error) {
          console.error('Failed to create checkout session:', error);
          throw error;
        }
      }

      // Example usage in an Express.js route
      app.post('/create-checkout/:seatCount', async (req: Request, res: Response) => {
        try {
          const seatCount = parseInt(req.params.seatCount);
          const session = await createCheckoutSession(seatCount);
          res.json({ checkout_url: session.checkout_url });
        } catch (error) {
          res.status(500).json({ error: 'Failed to create checkout session' });
        }
      });

      // Add this line after your other middleware
      app.use(express.static('public'));

      // Add this route to serve the demo page
      app.get('/', (req, res) => {
        res.sendFile(__dirname + '/../public/index.html');
      });

      app.listen(3000, () => {
        console.log('Server is running on port 3000');
      });
      ```
    </CodeGroup>
  </Step>

  <Step title="Add a simple web interface">
    쉬운 테스트를 위해 `public/index.html` 파일을 생성하세요:

    <CodeGroup>
      ```html index.html expandable theme={null}
      <!DOCTYPE html>
      <html>
      <head>
          <title>Seat-Based Pricing Demo</title>
          <style>
              body { font-family: Arial, sans-serif; max-width: 600px; margin: 50px auto; padding: 20px; }
              .form-group { margin: 20px 0; }
              label { display: block; margin-bottom: 5px; font-weight: bold; }
              input { width: 100%; padding: 10px; border: 1px solid #ddd; border-radius: 4px; }
              button { background: #007bff; color: white; padding: 10px 20px; border: none; border-radius: 4px; cursor: pointer; }
              button:hover { background: #0056b3; }
              .result { margin-top: 20px; padding: 15px; background: #f8f9fa; border-radius: 4px; }
          </style>
      </head>
      <body>
          <h1>Seat-Based Pricing Demo</h1>
          <p>Generate checkout links with custom seat quantities:</p>
          
          <div class="form-group">
              <label for="seatCount">Number of Additional Seats:</label>
              <input type="number" id="seatCount" value="3" min="0" max="50">
          </div>
          
          <button onclick="createCheckout()">Generate Checkout Link</button>
          
          <div id="result" class="result" style="display: none;">
              <h3>Checkout Link Generated!</h3>
              <p><strong>Seat Count:</strong> <span id="seatCountDisplay"></span></p>
              <p><strong>Total Cost:</strong> $<span id="totalCost"></span>/month</p>
              <p><strong>Checkout URL:</strong></p>
              <a id="checkoutUrl" href="#" target="_blank">Click here to checkout</a>
          </div>

          <script>
              async function createCheckout() {
                  const seatCount = document.getElementById('seatCount').value;
                  
                  try {
                      const response = await fetch(`/create-checkout/${seatCount}`, {
                          method: 'POST'
                      });
                      
                      const data = await response.json();
                      
                      if (response.ok) {
                          document.getElementById('seatCountDisplay').textContent = seatCount;
                          document.getElementById('totalCost').textContent = data.total_cost;
                          document.getElementById('checkoutUrl').href = data.checkout_url;
                          document.getElementById('result').style.display = 'block';
                      } else {
                          alert('Error: ' + data.error);
                      }
                  } catch (error) {
                      alert('Error creating checkout session');
                  }
              }
          </script>
      </body>
      </html>
      ```
    </CodeGroup>

    <Check>
      **웹 인터페이스가 생성되었습니다!** 이제 다양한 좌석 수를 테스트할 수 있는 간단한 UI가 생겼습니다.
    </Check>
  </Step>

  <Step title="Serve static files">
    HTML 파일을 제공하기 위해 `src/server.ts`에 다음을 추가하세요:

    ```typescript theme={null}
    // Add this line after your other middleware
    app.use(express.static('public'));

    // Add this route to serve the demo page
    app.get('/', (req, res) => {
      res.sendFile(__dirname + '/../public/index.html');
    });
    ```

    <Check>
      **정적 파일이 구성되었습니다!** 데모 인터페이스를 보려면 `http://localhost:3000`로 이동하세요.
    </Check>
  </Step>
</Steps>

## 5단계: 구현 테스트하기

좌석 기반 가격 책정 구현이 제대로 작동하는지 테스트해 보겠습니다.

<Steps>
  <Step title="Start your server">
    1. `.env` 파일에 올바른 API 키가 있는지 확인하세요.
    2. 코드의 상품 및 추가 기능 ID를 Dodo Payments 대시보드의 실제 값으로 업데이트하세요.
    3. 서버를 시작하세요:

    ```bash theme={null}
    npm run dev
    ```

    <Check>
      서버가 성공적으로 시작되며 "Server running on `http://localhost:3000`"이 표시되어야 합니다.
    </Check>
  </Step>

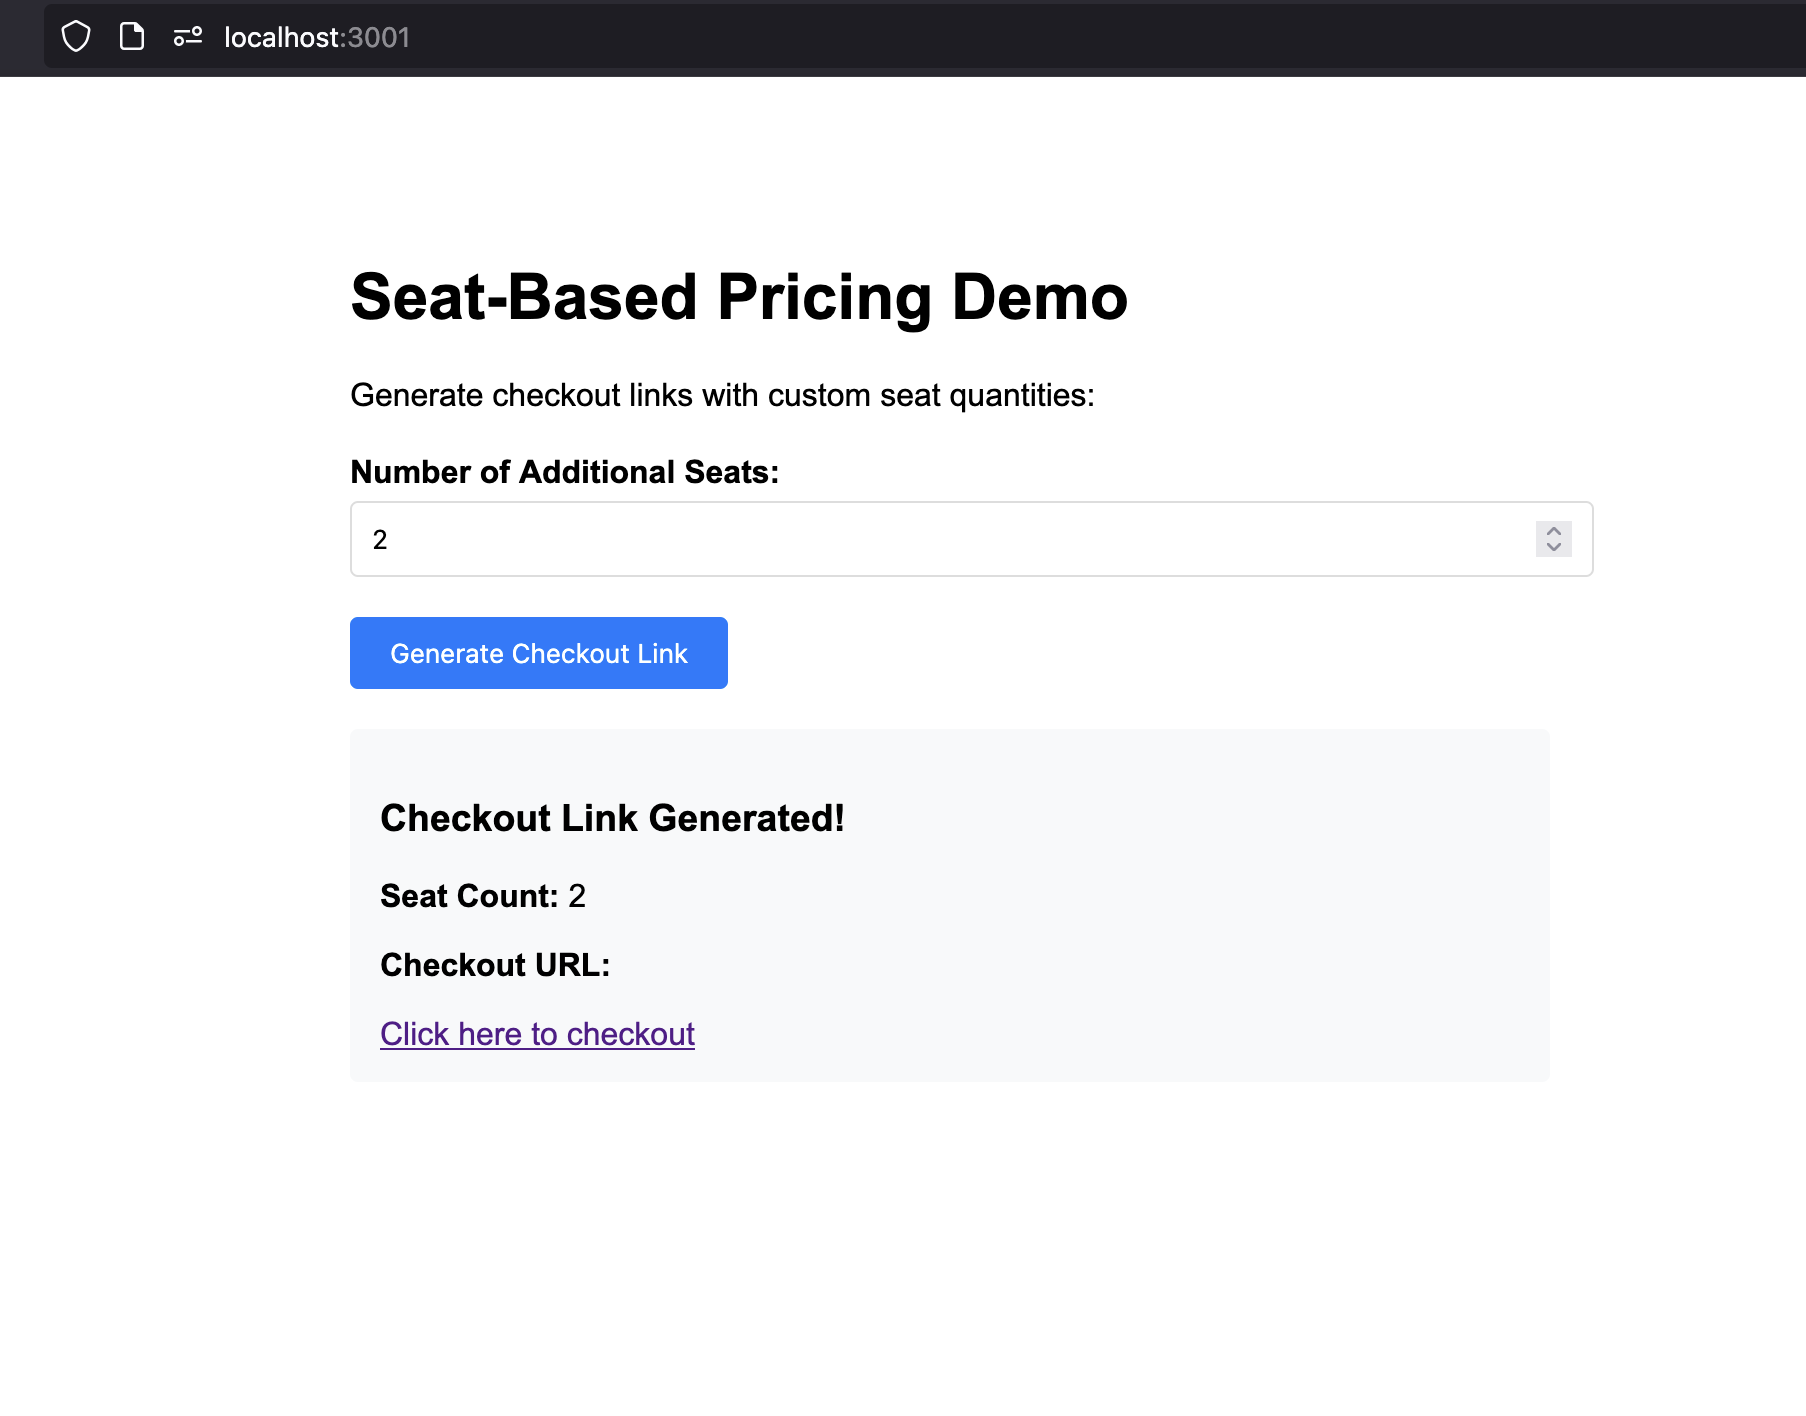
  <Step title="Test the web interface">
    <Frame>
      <img src="https://mintcdn.com/dodopayments/ajOhO6Du1yNsg0hy/images/cookbooks/seat-based/seat-based-billing-ui.png?fit=max&auto=format&n=ajOhO6Du1yNsg0hy&q=85&s=37d166d8e76b0bfbb4959bc9a3eff1f8" alt="기본 구독 제품 생성" style={{ maxHeight: '500px', width: 'auto' }} width="1806" height="1416" data-path="images/cookbooks/seat-based/seat-based-billing-ui.png" />
    </Frame>

    1. 브라우저를 열고 `http://localhost:3000`로 이동하세요.
    2. 좌석 기반 가격 데모 인터페이스가 표시되는지 확인하세요.
    3. 다양한 좌석 수(0, 3, 10 등)를 시도하세요.
    4. 각 수량에 대해 "Generate Checkout Link"를 클릭하세요.
    5. 체크아웃 URL이 올바르게 생성되었는지 확인하세요.
  </Step>

  <Step title="Test a checkout session">
    1. 추가 좌석 3개로 체크아웃 링크를 생성하세요.
    2. 체크아웃 URL을 클릭하여 Dodo Payments 체크아웃을 엽니다.
    3. 체크아웃에 다음 내용이 표시되는지 확인하세요:
       * 기본 요금제: \$49/월
       * 추가 좌석: 3 × $2 = $6/월
    4. 테스트 구매를 완료하세요.

    <Check>
      체크아웃은 올바른 가격 내역을 표시하고 구매를 완료할 수 있어야 합니다.
    </Check>
  </Step>

  <Step title="Listen for webhooks and update your DB">
    구독 및 좌석 변경 사항과 데이터베이스를 동기화하려면 Dodo Payments의 웹훅 이벤트를 수신해야 합니다. 웹훅은 고객이 체크아웃을 완료하거나 구독을 업데이트하거나 좌석 수를 변경할 때 백엔드에 알립니다.

    웹훅 엔드포인트를 설정하고 이벤트를 처리하는 방법에 대한 단계별 지침은 공식 Dodo Payments 웹훅 가이드를 참조하세요:

    <Card title="Dodo Payments Webhooks Documentation" icon="bell" href="/developer-resources/webhooks">
      구독 및 좌석 관리를 위해 웹훅 이벤트를 안전하게 수신하고 처리하는 방법을 알아보세요.
    </Card>
  </Step>
</Steps>

## 문제 해결

일반적인 문제와 그 해결 방법:

<AccordionGroup>
  <Accordion title="Checkout creation failing">
    **가능한 원인:**

    * 제품 ID 또는 추가 기능 ID가 유효하지 않음
    * API 키에 권한이 부족함
    * 추가 기능이 구독에 제대로 연결되지 않음
    * 네트워크 연결 문제

    **해결 방법:**

    1. Dodo Payments 대시보드에 제품 및 추가 기능 ID가 존재하는지 확인하세요.
    2. 추가 기능이 구독에 제대로 연결되었는지 확인하세요.
    3. API 키에 체크아웃 세션 생성 권한이 있는지 확인하세요.
    4. 간단한 GET 요청으로 API 연결을 테스트하세요.
  </Accordion>
</AccordionGroup>

## 축하합니다! 좌석 기반 가격 책정을 구현했습니다.

Dodo Payments로 좌석 기반 가격 책정 시스템을 성공적으로 만들었습니다! 다음을 달성했습니다:

<CardGroup cols={2}>
  <Card title="Base Subscription">
    5석이 포함된 구독 상품을 월 \$49에 생성했습니다.
  </Card>

  <Card title="Seat Add-ons">
    추가 좌석당 \$2로 추가 기능을 구성했습니다.
  </Card>

  <Card title="Checkout">
    맞춤 좌석 수로 체크아웃 세션을 생성하는 API를 구축했습니다.
  </Card>

  <Card title="Web Interface">
    다양한 좌석 수를 테스트할 수 있는 간단한 웹 인터페이스를 만들었습니다.
  </Card>
</CardGroup>

<Info>
  이 예시는 좌석 기반 가격 책정의 최소 구현만을 보여줍니다. 실제 운영에서는 철저한 오류 처리, 인증, 데이터 검증, 보안 조치를 추가하고 애플리케이션 요구사항에 맞게 로직을 조정해야 합니다.
</Info>