> ## Documentation Index
> Fetch the complete documentation index at: https://docs.dodopayments.com/llms.txt
> Use this file to discover all available pages before exploring further.
# 수동 라이선스 키 이행 통합 가이드
> 제품을 판매하고 필요에 따라 자체 라이선스 키를 제공할 수 있는 시스템을 구축하십시오: 제품과 권한을 생성하고, 대기 중인 그랜트를 감지하고, 고객에게 키를 제공합니다.
이 가이드는 **수동 라이선스 키 이행** 시스템을 처음부터 끝까지 구축하는 방법을 안내합니다. Dodo Payments가 결제 시 자동으로 키를 생성하는 대신, 각 구매는 `pending` 그랜트를 생성하고 *귀하*가 자체 시스템, 타사 공급업체 또는 제한된 코드 풀에서 키 값을 제공할 때까지 기다립니다.
완료 시:
* LICENSE 키 권한이 `manual` 이행으로 설정된 제품.
* 고객이 키를 기다리고 있을 때 이를 감지하는 웹훅 리스너.
* 키를 전달하고 자동으로 고객에게 알리는 이행 호출.
LICENSE 키 수명 주기 전체 및 `fulfillment_mode` 설정.
## 작동 방식
수동 이행은 **발급** 단계만 변경합니다. 키가 전달된 후 활성화, 검증, 비활성화, 만료 및 취소는 자동 생성된 키와 동일하게 작동합니다.
## 전제 조건
이 가이드를 따르려면 다음이 필요합니다:
* Dodo Payments 판매자 계정.
* 대시보드에서의 API 키 (`DODO_PAYMENTS_API_KEY`) 및 웹훅 비밀 키. [API 키 생성 가이드](/api-reference/introduction#api-key-generation)를 참조하세요.
* 웹훅을 수신할 수 있는 백엔드 엔드포인트.
`https://test.dodopayments.com` 및 테스트 모드 자격 증명을 사용하십시오. 라이브 키로 전환할 때는 `https://live.dodopayments.com`을 사용하세요.
## 1단계 — 수동 모드에서 라이선스 키 권한 생성
**권한**은 전달하는 항목에 대한 재사용 가능한 정의입니다. 라이선스 키 권한을 생성하고 이를 `fulfillment_mode`으로 설정하십시오.
대시보드에서 **권한**으로 이동하여 \*\*+\*\*를 클릭하여 새 권한을 생성합니다.
통합으로 **라이선스 키**를 선택하고 **이름**을 지정하십시오. 양식에는 다음 필드가 나타납니다:
* **이행 모드** — 기본적으로 `Automatic`. 이것이 수동 이행을 가능하게 하는 설정이며 다음 단계에서 변경합니다.
* **라이선스 길이** — 발행된 각 키가 유효한 기간 또는 **만료 없음**.
* **활성화 제한** — 키당 최대 활성화 수 또는 **무제한**.
* **활성화 메시지** — 사용자가 키를 활성화할 때 표시되는 선택적 메시지.
드롭다운에서 **이행 모드**를 열고 자동에서 수동으로 변경합니다. 이 설정이 이 전체 가이드를 주도합니다. 이 설정이 없으면 키가 자동으로 생성되고 이메일로 전송되며 대기 중인 그랜트가 생성되지 않습니다. 수동을 선택하면 각 구매가 귀하가 이행할 수 있는 `pending` 그랜트를 생성합니다. **권한 생성**을 클릭하여 저장합니다.
`integration_config.fulfillment_mode`을 `manual`로 설정하여 권한을 생성합니다.
`fulfillment_mode`은 기본적으로 `auto`입니다. 생략하거나 기존 권한을 변경하지 않으면 자동 동작이 유지됩니다. 명시적으로 `manual`로 설정된 권한만 대기 중인 그랜트를 생성합니다.
## 2단계 — 제품에 권한 연결
판매하려는 제품을 열고 **고급 설정 → 권한 및 크레딧**을 확장하여 1단계에서 수동으로 설정한 **라이선스 키 권한**을 선택합니다. 단일 제품은 동일한 구매 시 다른 권한과 함께 이 라이선스 키를 제공할 수 있습니다.
이행 모드는 **권한**의 속성이지 제품의 속성이 아닙니다. 1단계에서 수동으로 설정했기 때문에 이 권한이 첨부된 모든 제품은 구매 시 `pending` 라이선스 키 그랜트를 생성합니다. 여기서 추가로 구성할 것은 없습니다.
아직 제품이 없는 경우 먼저 하나를 만드십시오 (일회성 또는 구독). '[일회성 결제 통합 가이드](/developer-resources/integration-guide)'를 참조하여 결제를 통해 제품을 판매하세요.
## 3단계 — 대기 중인 그랜트 감지
고객이 제품을 구매하면 Dodo Payments는 `pending` 상태의 그랜트를 생성하고 **키가 없는** `entitlement_grant.created` 웹훅을 실행합니다. 이는 고객이 키를 기다리고 있다는 신호입니다.
### 웹훅을 수신 대기
웹훅 엔드포인트를 설정하고(대시보드의 개발자 → 웹훅) 대기 중인 라이선스 키 그랜트를 처리하십시오. 구현은 [표준 웹훅](https://standardwebhooks.com/) 사양을 따릅니다.
그랜트 페이로드는 `integration_type: "license_key"`을 전달하므로 추가 조회 없이 라이선스 키 그랜트를 인식할 수 있습니다. 전체 페이로드는 [권한 그랜트 웹훅 참조](/developer-resources/webhooks/intents/entitlement-grant)를 참조하십시오.
### 또는 리스트 그랜트 API를 폴링
웹훅에 의존하지 않고자 한다면, 권한에 대해 그랜트를 나열하고 `integration_type` 및 `status`로 필터링하십시오:
## 4단계 — 키 전달
자체 시스템에서 키 값을 확보한 후 [라이선스 키 그랜트 이행](/api-reference/entitlements/fulfill-license-key) 엔드포인트에 제출하십시오. 이는 귀하의 비밀 API 키(편집자 권한)를 요구합니다; 이는 **공용 라이선스 엔드포인트의 하나가 아닙니다**.
### 요청 필드
고객에게 전달할 라이선스 키 문자열. 공백은 제거됩니다; 비어 있거나 공백만 있는 값은 거부됩니다.
키별 활성화 제한. 누락 시 권한 구성을 기본값으로 합니다.
키별 만료(ISO 8601). 생략 시 권한 구성의 기간을 기본값으로 합니다. 구독 발행 그랜트의 경우 유효성은 구독과 무관하게 유지됩니다.
성공 시 그랜트는 `delivered`로 이동하고, 고객에게 키가 자동으로 전송되며(자동 이행 시 받을 이메일과 동일), `entitlement_grant.delivered`가 실행됩니다.
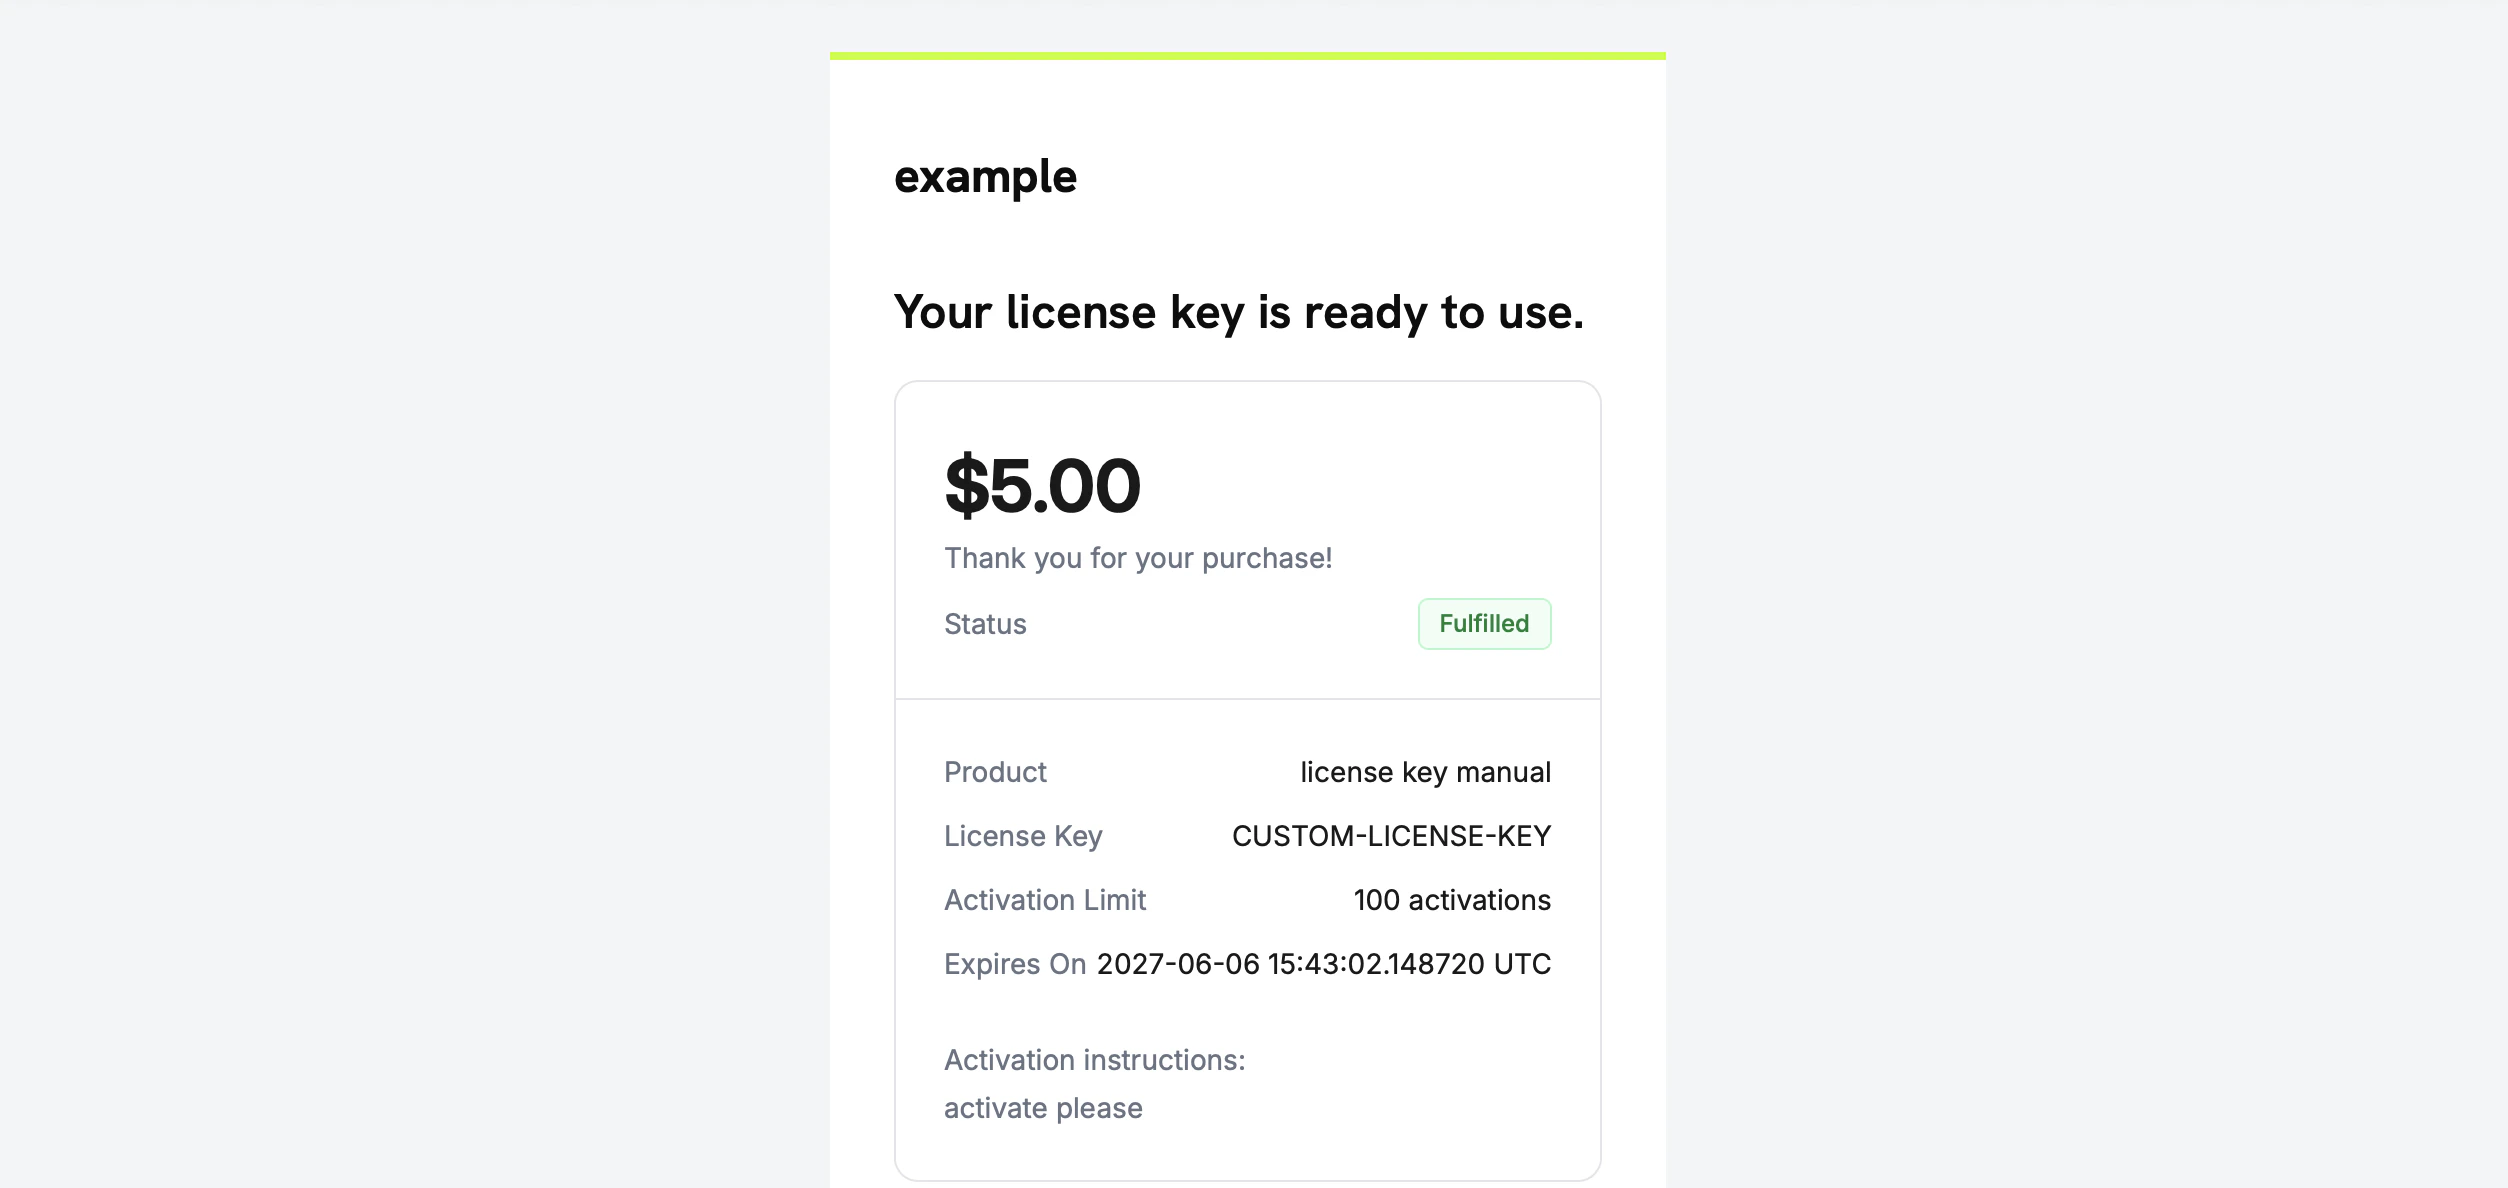
고객은 라이선스 키, 제품, 활성화 제한, 만료 및 활성화 지침을 포함한 이메일을 받습니다:
직접 키를 이메일로 보낼 필요는 없습니다 — 이행이 완료되면 자동으로 전달됩니다.
## 5단계 — 오류 및 재시도 처리
엔드포인트는 무엇이든 전달하기 전에 그랜트를 검증합니다. 다음 응답을 처리하십시오:
| 상태 | 의미 | 조치 |
| ----- | -------------------------------------------------------- | ----------------------------------------- |
| `200` | 키가 전달되어 그랜트가 이제 `delivered`. | 완료. |
| `400` | 라이선스 키 그랜트가 아니거나 키가 비어 있거나 공백임. | 요청 수정; 있는 그대로 다시 시도하지 마십시오. |
| `404` | 귀하의 비즈니스에 해당 ID의 그랜트가 없음. | `grant_id` 확인. |
| `409` | 이행을 기다리는 그랜트 아님(이미 전달되었거나 이미 키가 있음), **또는** 키 값이 이미 존재함. | 이미 전달된 경우 성공으로 처리. 중복 키일 경우 다른 키를 제공하십시오. |
| `422` | 요청 본문 검증 실패(예: `activations_limit < 1`). | 필드를 수정하고 다시 시도. |
이행은 일시적인 오류(타임아웃, `5xx`)에서 안전하게 재시도할 수 있습니다. 각 그랜트는 한번만 이행할 수 있으며, 성공하지만 인식되지 않은 호출 후 재시도는 두 번째 키를 발행하거나 중복 이메일을 보내기보다는 `409`를 반환합니다. 그랜트 `id`을 귀하의 아이템포시 키로 사용하십시오.
## 흐름 확인
1. 테스트 모드에서 제품을 구매하십시오(관련 [체크아웃 가이드](/developer-resources/integration-guide) 참조).
2. 웹훅이 `entitlement_grant.created` 및 `status: "pending"` 및 `integration_type: "license_key"`를 수신했는지 확인하거나, 해당 필터로 리스트 그랜트 응답에 그랜트가 나타나는지 확인합니다.
3. 테스트 키로 이행 엔드포인트를 호출하십시오.
4. 응답이 `status: "delivered"`을 표시하며 인구가 많은 `license_key`, 고객이 키 이메일을 받았고, `entitlement_grant.delivered`가 실행되었는지 확인하십시오.
전달된 후, 고객은 공용 라이선스 엔드포인트에 대해 [활성화 및 검증](/features/license-keys#activation-validation-deactivation)을 자동 생성된 키와 동일하게 할 수 있습니다.
## 관련 API 참조
`delivered`으로 그랜트를 이동하고 키 값을 전달합니다.
The license key string to deliver to the customer. Whitespace is trimmed; an empty or whitespace-only value is rejected.
Per-key activation limit. Falls back to the entitlement config when omitted.
Per-key expiry (ISO 8601). Falls back to the entitlement config's duration when omitted. For subscription-issued grants, validity remains tied to the subscription regardless.
On success the grant moves to `delivered`, the customer is sent the key automatically (the same email they'd receive under auto fulfillment), and `entitlement_grant.delivered` fires.
The customer receives an email with the license key, the product, activation limit, expiry, and your activation instructions:
 You do not need to email the key yourself — delivery happens automatically when the grant is fulfilled.
## Step 5 — Handle Errors and Retries
The endpoint validates the grant before delivering anything. Handle these responses:
| Status | Meaning | What to do |
| ------ | ------------------------------------------------------------------------------------------------------------- | ----------------------------------------------------------------------------------- |
| `200` | Key delivered, grant is now `delivered`. | Done. |
| `400` | Not a license-key grant, or the key is empty/whitespace. | Fix the request; do not retry as-is. |
| `404` | No grant with that ID for your business. | Verify the `grant_id`. |
| `409` | Grant not awaiting fulfillment (already delivered or already has a key), **or** the key value already exists. | If already delivered, treat as success. If a duplicate key, supply a different key. |
| `422` | Request body failed validation (e.g. `activations_limit < 1`). | Correct the field and retry. |
Fulfillment is safe to retry on transient errors (timeouts, `5xx`). Each grant can be fulfilled only once, so a retry after a successful-but-unacknowledged call returns `409` rather than issuing a second key or sending a duplicate email. Use the grant `id` as your idempotency key.
## Verify the Flow
1. Buy the product in test mode (see the [checkout guides](/developer-resources/integration-guide)).
2. Confirm your webhook received `entitlement_grant.created` with `status: "pending"` and `integration_type: "license_key"`, or that the grant appears in the List Grants response with those filters.
3. Call the fulfill endpoint with a test key.
4. Confirm the response shows `status: "delivered"` with a populated `license_key`, the customer receives the key email, and `entitlement_grant.delivered` fires.
Once delivered, the customer can [activate and validate](/features/license-keys#activation-validation-deactivation) the key against the public license endpoints exactly like an auto-generated key.
## Related API Reference
Create the License Key entitlement with `fulfillment_mode: manual`.
Filter by `integration_type` and `status` to find pending grants.
Deliver the key value and transition the grant to delivered.
The `entitlement_grant.*` events that signal pending and delivered grants.
You do not need to email the key yourself — delivery happens automatically when the grant is fulfilled.
## Step 5 — Handle Errors and Retries
The endpoint validates the grant before delivering anything. Handle these responses:
| Status | Meaning | What to do |
| ------ | ------------------------------------------------------------------------------------------------------------- | ----------------------------------------------------------------------------------- |
| `200` | Key delivered, grant is now `delivered`. | Done. |
| `400` | Not a license-key grant, or the key is empty/whitespace. | Fix the request; do not retry as-is. |
| `404` | No grant with that ID for your business. | Verify the `grant_id`. |
| `409` | Grant not awaiting fulfillment (already delivered or already has a key), **or** the key value already exists. | If already delivered, treat as success. If a duplicate key, supply a different key. |
| `422` | Request body failed validation (e.g. `activations_limit < 1`). | Correct the field and retry. |
Fulfillment is safe to retry on transient errors (timeouts, `5xx`). Each grant can be fulfilled only once, so a retry after a successful-but-unacknowledged call returns `409` rather than issuing a second key or sending a duplicate email. Use the grant `id` as your idempotency key.
## Verify the Flow
1. Buy the product in test mode (see the [checkout guides](/developer-resources/integration-guide)).
2. Confirm your webhook received `entitlement_grant.created` with `status: "pending"` and `integration_type: "license_key"`, or that the grant appears in the List Grants response with those filters.
3. Call the fulfill endpoint with a test key.
4. Confirm the response shows `status: "delivered"` with a populated `license_key`, the customer receives the key email, and `entitlement_grant.delivered` fires.
Once delivered, the customer can [activate and validate](/features/license-keys#activation-validation-deactivation) the key against the public license endpoints exactly like an auto-generated key.
## Related API Reference
Create the License Key entitlement with `fulfillment_mode: manual`.
Filter by `integration_type` and `status` to find pending grants.
Deliver the key value and transition the grant to delivered.
The `entitlement_grant.*` events that signal pending and delivered grants.