> ## Documentation Index
> Fetch the complete documentation index at: https://docs.dodopayments.com/llms.txt
> Use this file to discover all available pages before exploring further.
# 使用量ベースの請求を伴うAI画像生成器の構築
> PixelGen AIを構築しながら、使用量ベースの請求を伴うAI画像生成サービスを作成します。
このチュートリアルでは、**PixelGen AI**を構築します。これは、使用量ベースの請求を示すサンプルのAI画像生成サービスです。請求メーター、製品設定、画像を生成し、リアルタイムで使用量を追跡するサンプルアプリケーションコードをすべてゼロから作成します。
このチュートリアルでは、ターミナルベースのアプリケーション用のサンプル実装コードを紹介します。React、Vue、Angular などの任意のフレームワーク向けにこのコードを変更し、アプリケーションの要件に応じてユーザー入力方法をカスタマイズできます。
このチュートリアルの終わりまでに、次の機能を持つ動作するサンプルサービスが完成します:
* OpenAIのDALL-E APIを使用して画像を生成する
* 請求のためにすべての画像生成を追跡する
* 使用量に基づいて自動的に顧客に請求する
* 異なる品質レベル(標準とHD)を処理する
## 構築するもの
まず、PixelGen AIサービスを理解しましょう:
* **サービス**: OpenAIのDALL-E APIを使用したAI画像生成
* **価格モデル**: 画像ごとに支払い(\$0.05/画像)
* **無料枠**: 顧客ごとに月10枚の無料画像
* **品質オプション**: 標準およびHD画像(簡単のため同じ価格)
開始する前に、以下を用意していることを確認してください:
* Dodo Payments アカウント
* OpenAI の API へのアクセス
* TypeScript/Node.js の基本的な理解
## ステップ1: 使用量メーターを作成する
Dodo Paymentsダッシュボードで、サービスが生成するすべての画像を追跡するメーターを作成します。これは、請求可能なイベントを追跡する「カウンター」と考えてください。
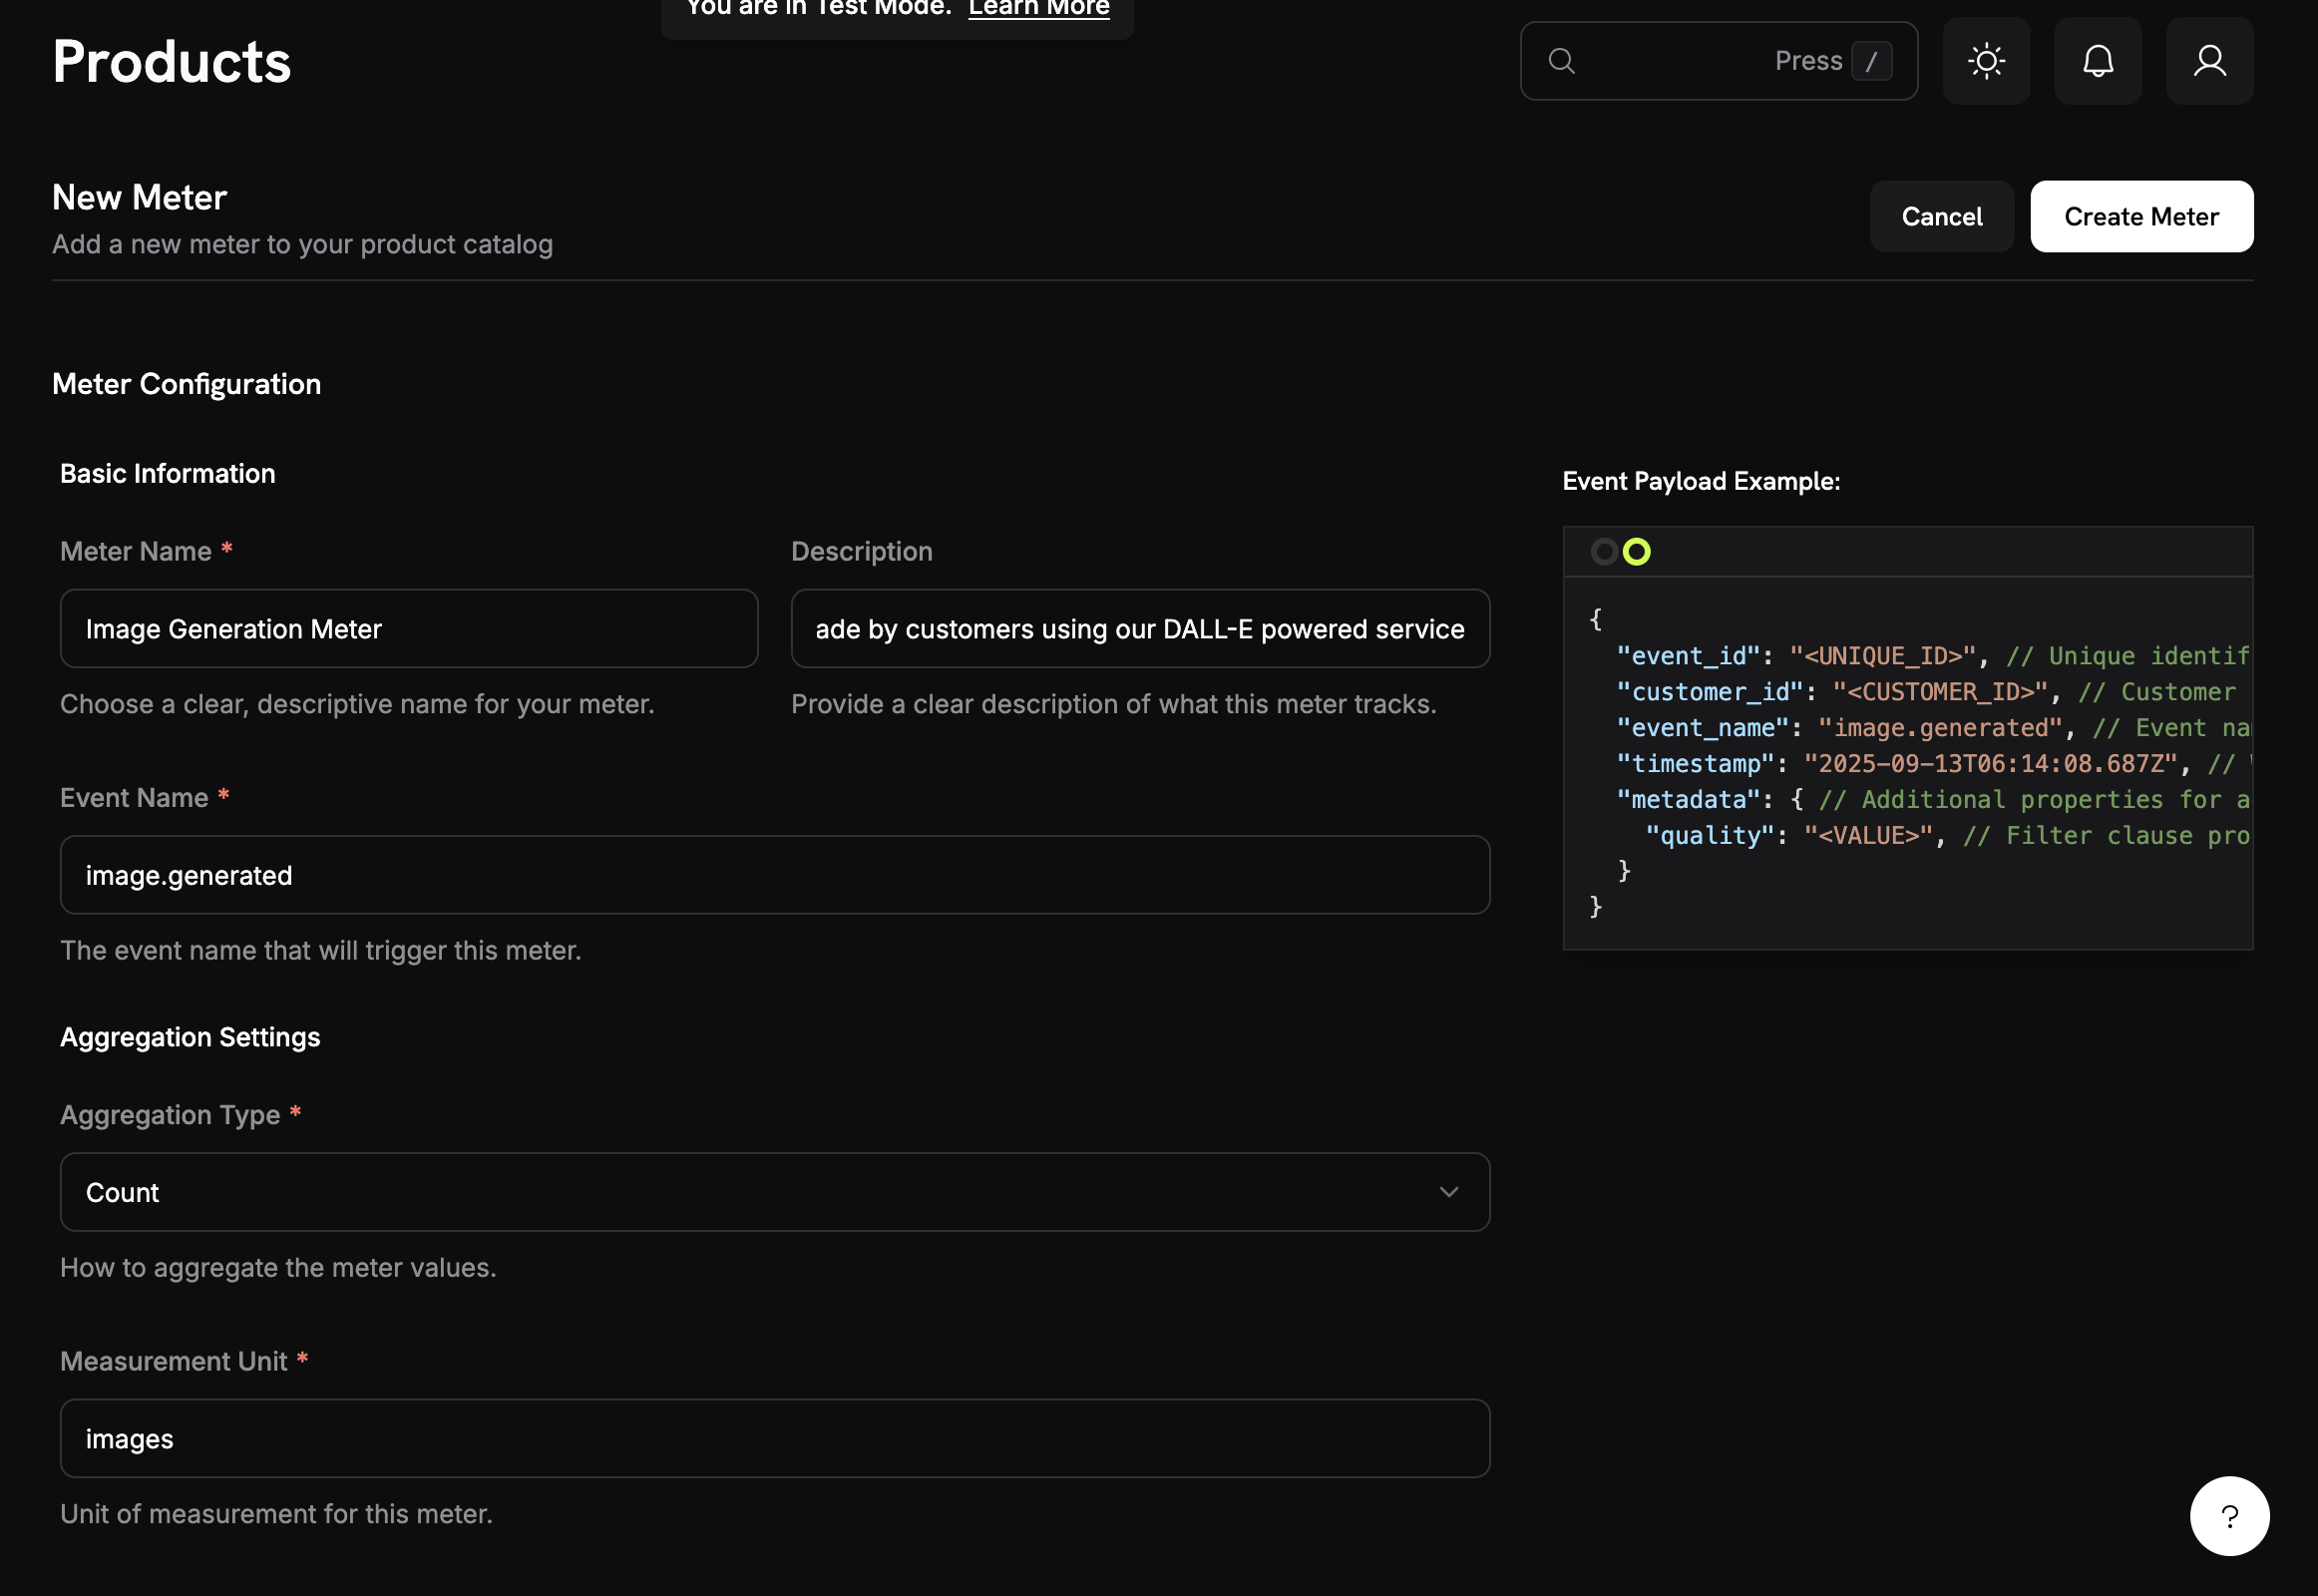 **構築するもの**: "Image Generation Meter" というメーターを作成し、サービスを使って画像を生成するたびにカウントします。
1. Dodo Payments ダッシュボードにログイン
2. 左サイドバーで **Meters** をクリック
3. **Create Meter** ボタンをクリック
画像生成トラッキングを設定するフォームが表示されます。
これから PixelGen AI サービスの具体的な詳細を入力します:
**メーター名**: 次を正確にコピーして貼り付けてください → `Image Generation Meter`
**説明**: 次をコピー → `Tracks each AI image generation request made by customers using our DALL-E powered service`
**イベント名**: 重要です。正確にコピー → `image.generated`
イベント名 `image.generated` は、後でアプリケーションコードから送信する文字列と完全に一致させる必要があります。イベント名は大文字と小文字が区別されます!
集計 (メーターがイベントをカウントする方法) を設定します:
**集計タイプ**: ドロップダウンから**カウント**を選択します
**測定単位**: 次を入力してください → `images`
「Count」を使用しているのは、生成した画像ごとに課金したいからです。サイズや生成時間ではなく、1 枚の画像 = 1 課金単位です。
**構築するもの**: "Image Generation Meter" というメーターを作成し、サービスを使って画像を生成するたびにカウントします。
1. Dodo Payments ダッシュボードにログイン
2. 左サイドバーで **Meters** をクリック
3. **Create Meter** ボタンをクリック
画像生成トラッキングを設定するフォームが表示されます。
これから PixelGen AI サービスの具体的な詳細を入力します:
**メーター名**: 次を正確にコピーして貼り付けてください → `Image Generation Meter`
**説明**: 次をコピー → `Tracks each AI image generation request made by customers using our DALL-E powered service`
**イベント名**: 重要です。正確にコピー → `image.generated`
イベント名 `image.generated` は、後でアプリケーションコードから送信する文字列と完全に一致させる必要があります。イベント名は大文字と小文字が区別されます!
集計 (メーターがイベントをカウントする方法) を設定します:
**集計タイプ**: ドロップダウンから**カウント**を選択します
**測定単位**: 次を入力してください → `images`
「Count」を使用しているのは、生成した画像ごとに課金したいからです。サイズや生成時間ではなく、1 枚の画像 = 1 課金単位です。
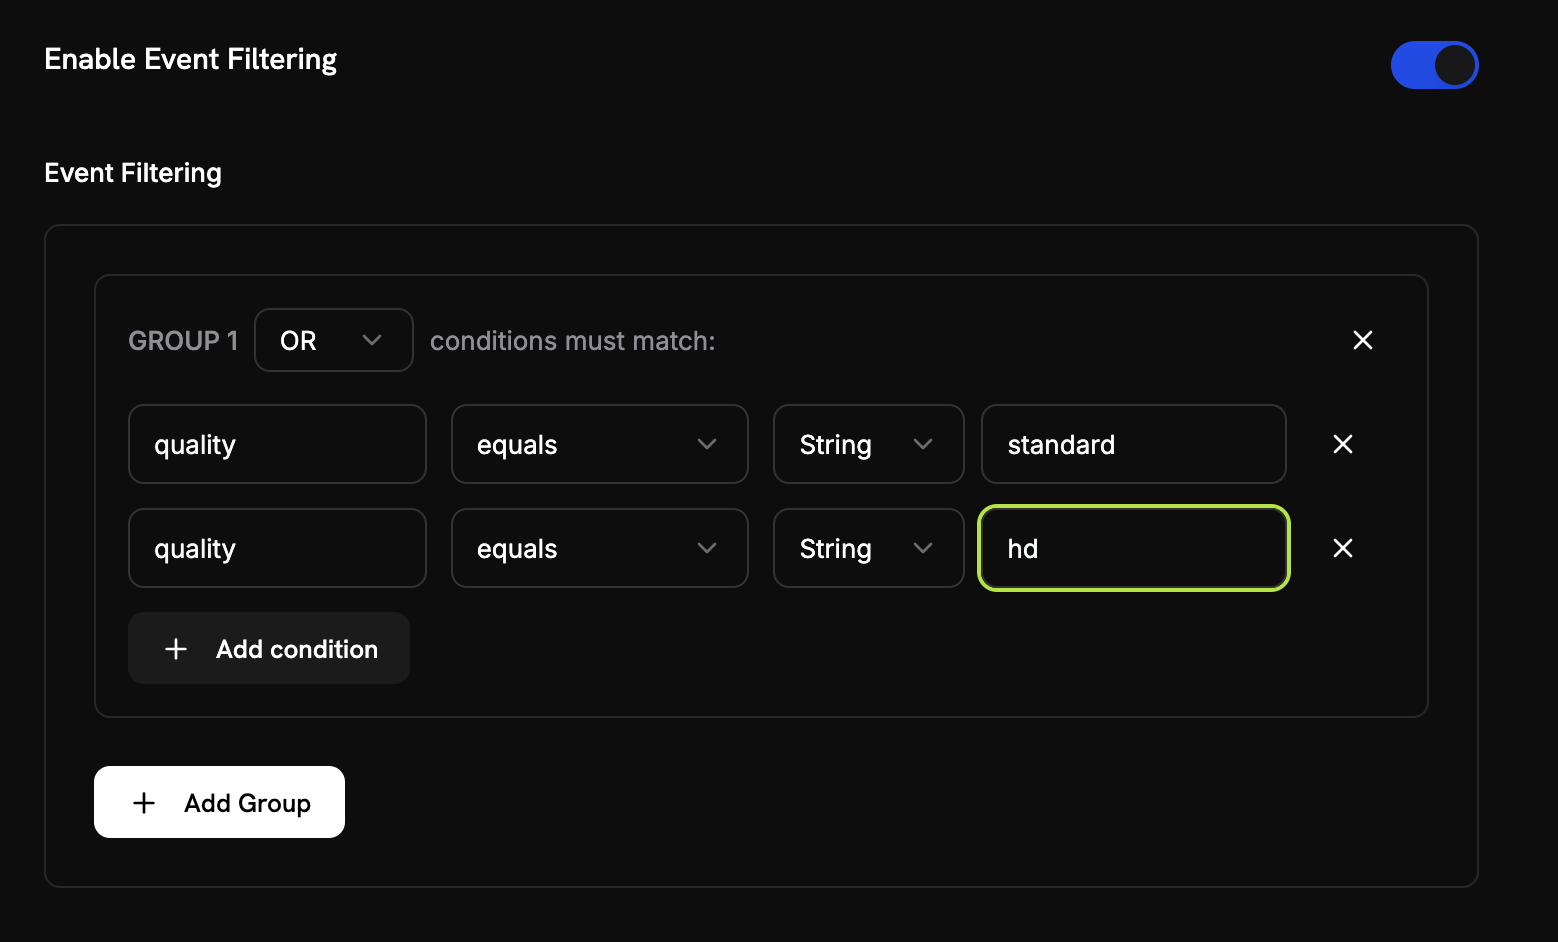 正当な画像のみをカウントするようにしたい(テスト実行や失敗を除外):
1. **イベントフィルタリングを有効にする**: これを**オン**に切り替え
2. **フィルターロジック**: **OR** を選択(これは「これらの条件のいずれかが真であればカウントする」という意味です)
3. **最初の条件を追加**:
* プロパティキー: `quality`
* 比較演算子: `equals`
* 値: `standard`
4. \*\*「条件を追加」\*\*をクリックして2つ目の条件を追加:
* プロパティキー: `quality`
* 比較演算子: `equals`
* 値: `hd`
この設定により、クオリティが「standard」または「hd」のイベントだけをカウントし、テストイベントや不正なリクエストを除外できます。
1. 上記の値とすべて一致していることを再確認します
2. **Create Meter** をクリック
**メーターが作成されました!** 「Image Generation Meter」が画像生成のカウントを開始する準備が整いました。次にこれを請求製品に接続します。
## ステップ2: 請求製品を作成する
次に、価格を定義する製品を作成する必要があります(画像ごとに\$0.05、10枚の無料画像付き)。これにより、メーターが実際の請求に接続されます。
**構築するもの**: "PixelGen AI - Image Generation" という製品を作成し、月に最初の 10 枚は無料で、それ以降は画像 1 枚あたり \$0.05 を請求するように設定します。
1. Dodo Payments ダッシュボードの左サイドバーで **Products** をクリック
2. **Create Product** をクリック
3. 製品タイプとして **Usage-Based** を選択
これは、Dodo Payments に課金が固定サブスクリプションではなくメーターの使用量に基づくことを伝えます。
PixelGen AI サービスのために次の値を正確に入力してください:
**製品名**: 次をコピー → `PixelGen AI - Image Generation`
**説明**: 次をコピー → `AI-powered image generation service with pay-per-use billing`
**製品画像**: 明確で関連性のある画像をアップロードします。
これらは顧客の請求書に表示されるため、明確でプロフェッショナルな表現にしてください。
正当な画像のみをカウントするようにしたい(テスト実行や失敗を除外):
1. **イベントフィルタリングを有効にする**: これを**オン**に切り替え
2. **フィルターロジック**: **OR** を選択(これは「これらの条件のいずれかが真であればカウントする」という意味です)
3. **最初の条件を追加**:
* プロパティキー: `quality`
* 比較演算子: `equals`
* 値: `standard`
4. \*\*「条件を追加」\*\*をクリックして2つ目の条件を追加:
* プロパティキー: `quality`
* 比較演算子: `equals`
* 値: `hd`
この設定により、クオリティが「standard」または「hd」のイベントだけをカウントし、テストイベントや不正なリクエストを除外できます。
1. 上記の値とすべて一致していることを再確認します
2. **Create Meter** をクリック
**メーターが作成されました!** 「Image Generation Meter」が画像生成のカウントを開始する準備が整いました。次にこれを請求製品に接続します。
## ステップ2: 請求製品を作成する
次に、価格を定義する製品を作成する必要があります(画像ごとに\$0.05、10枚の無料画像付き)。これにより、メーターが実際の請求に接続されます。
**構築するもの**: "PixelGen AI - Image Generation" という製品を作成し、月に最初の 10 枚は無料で、それ以降は画像 1 枚あたり \$0.05 を請求するように設定します。
1. Dodo Payments ダッシュボードの左サイドバーで **Products** をクリック
2. **Create Product** をクリック
3. 製品タイプとして **Usage-Based** を選択
これは、Dodo Payments に課金が固定サブスクリプションではなくメーターの使用量に基づくことを伝えます。
PixelGen AI サービスのために次の値を正確に入力してください:
**製品名**: 次をコピー → `PixelGen AI - Image Generation`
**説明**: 次をコピー → `AI-powered image generation service with pay-per-use billing`
**製品画像**: 明確で関連性のある画像をアップロードします。
これらは顧客の請求書に表示されるため、明確でプロフェッショナルな表現にしてください。
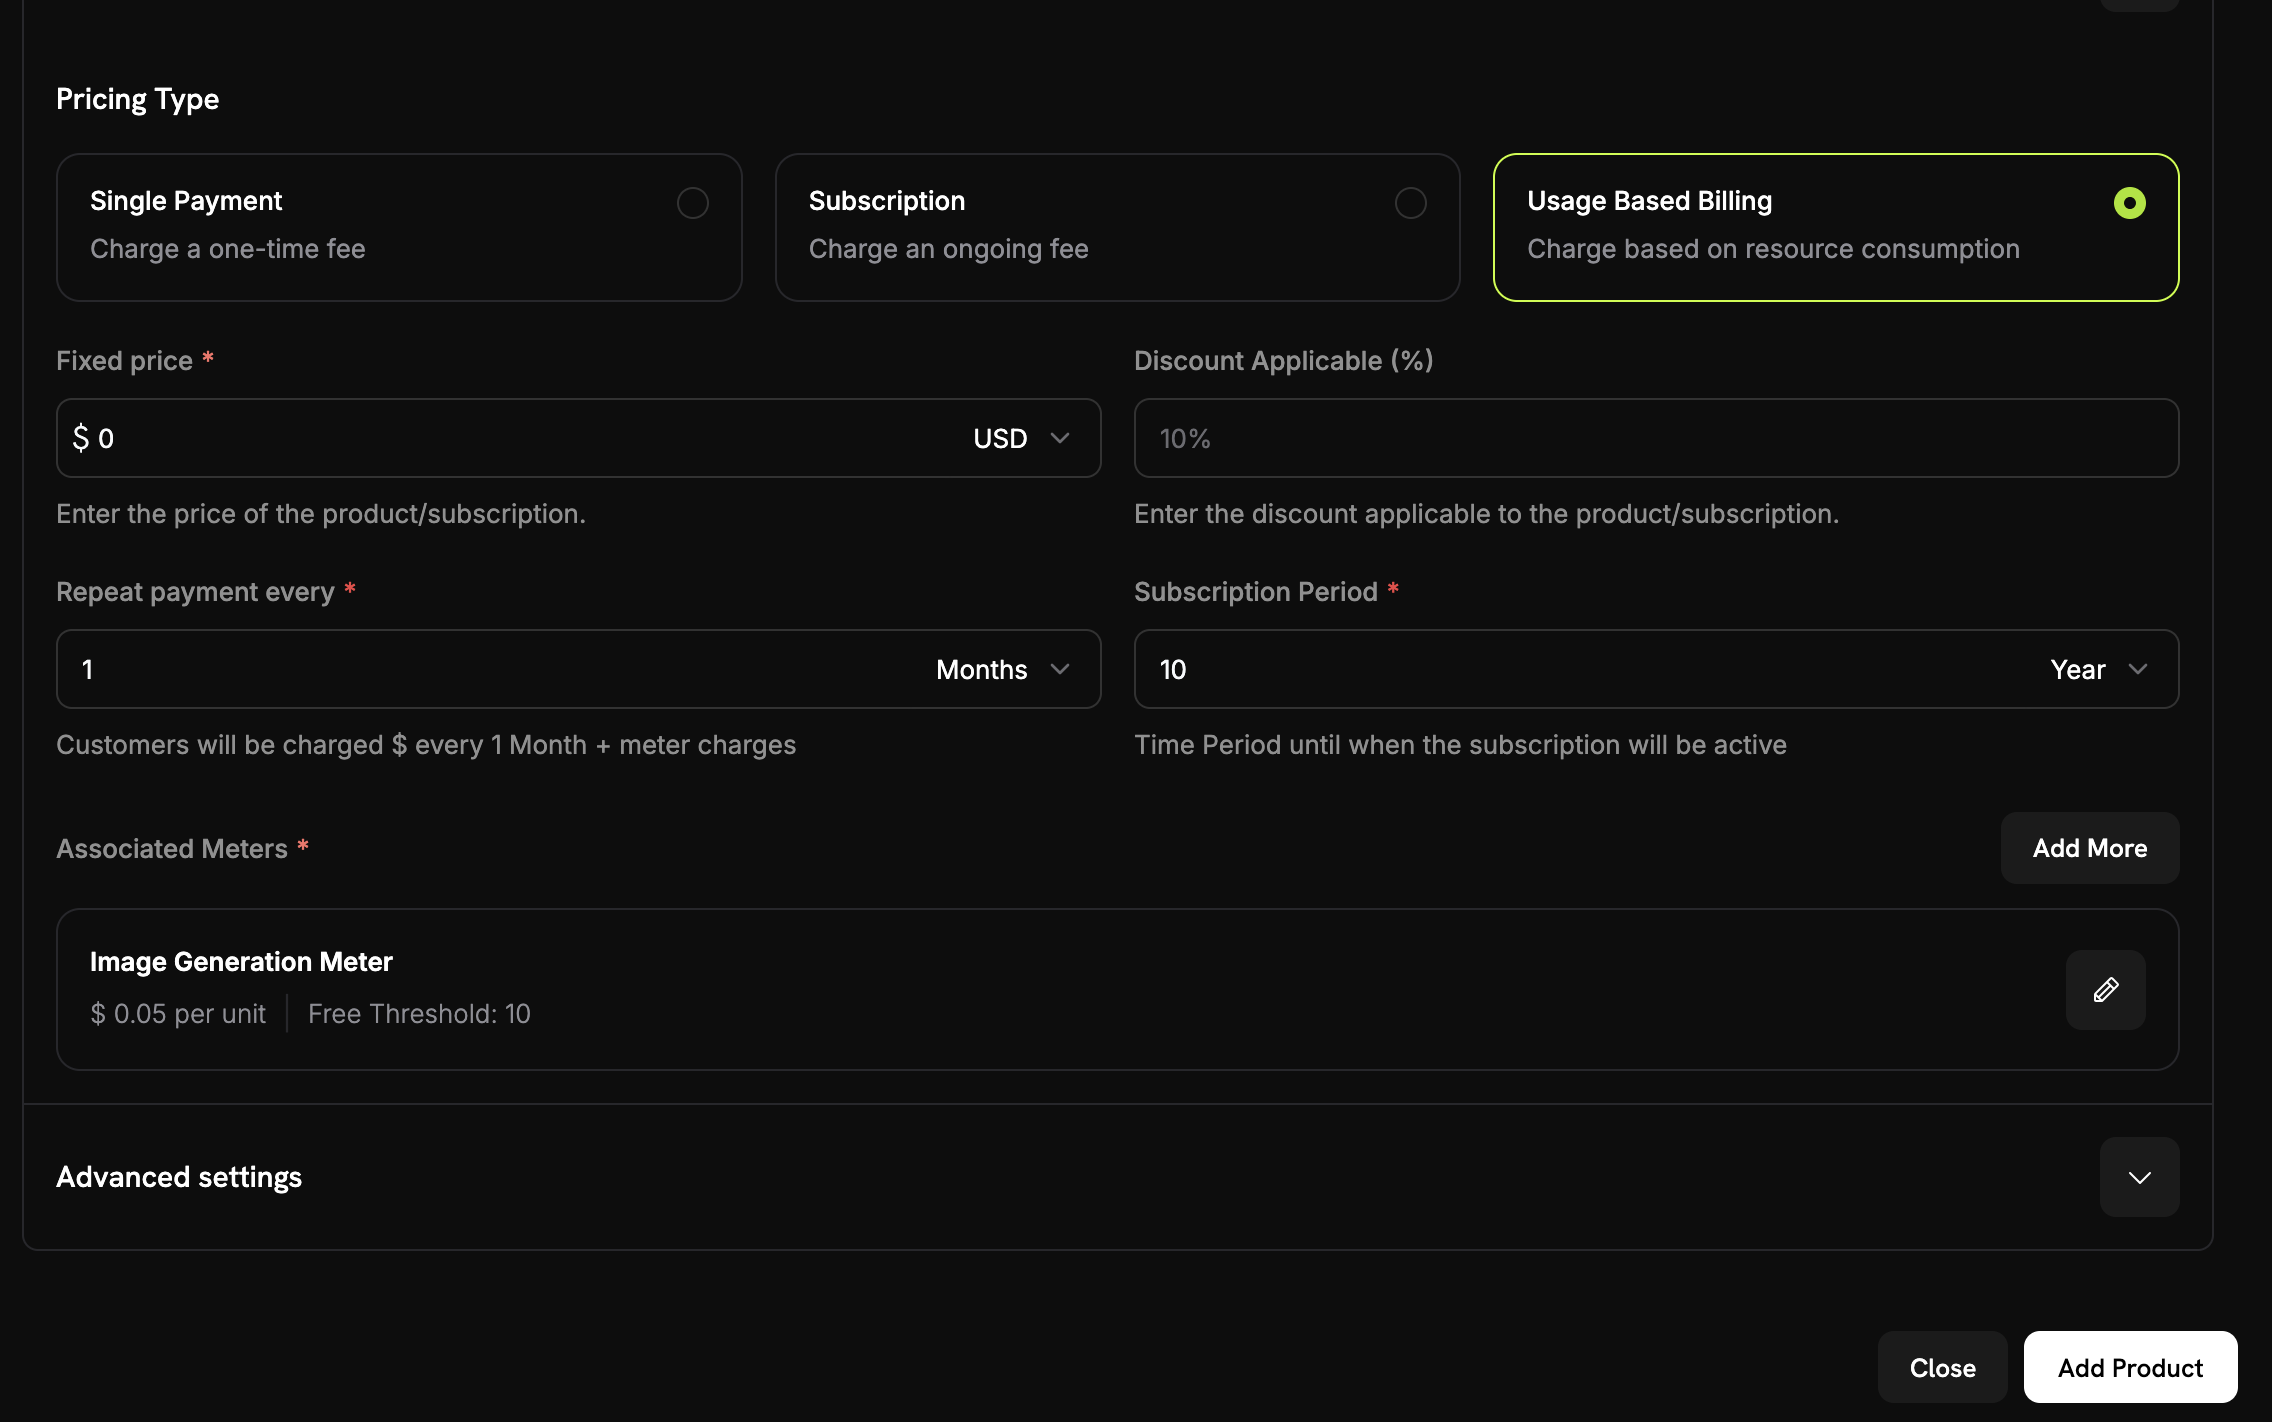 メーターを接続する前に、製品の価格タイプとして**使用量ベースの請求**を選択していることを確認してください。
さらに、**固定価格**を `0` に設定して、顧客が基本料金なしで使用量に応じてのみ請求されるようにしてください。
次に、先ほど作成したメーターをリンクします:
1. **関連メーター**セクションまでスクロールします
2. **メーターを追加**をクリックします
3. ドロップダウンから\*\*「画像生成メーター」\*\*(先ほど作成したもの)を選択します
4. 製品設定に表示されることを確認します
メーターはこの製品に正常に接続されました。
ここでビジネスモデルを定義します:
メーターを接続する前に、製品の価格タイプとして**使用量ベースの請求**を選択していることを確認してください。
さらに、**固定価格**を `0` に設定して、顧客が基本料金なしで使用量に応じてのみ請求されるようにしてください。
次に、先ほど作成したメーターをリンクします:
1. **関連メーター**セクションまでスクロールします
2. **メーターを追加**をクリックします
3. ドロップダウンから\*\*「画像生成メーター」\*\*(先ほど作成したもの)を選択します
4. 製品設定に表示されることを確認します
メーターはこの製品に正常に接続されました。
ここでビジネスモデルを定義します:
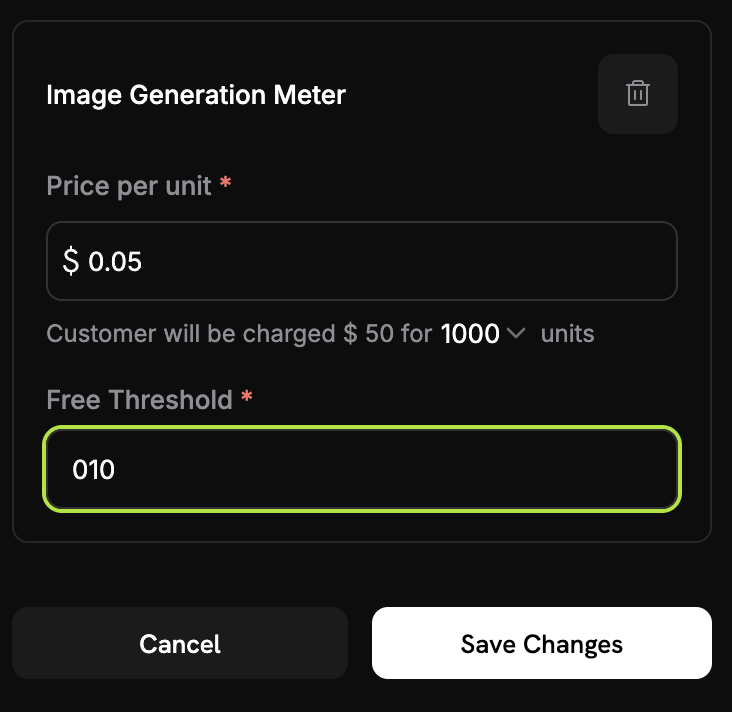 **単価 (Price Per Unit)**: 次を入力 → `0.05`(これは画像 1 枚あたり \$0.05)
**無料枠 (Free Threshold)**: 次を入力 → `10`(顧客は月に 10 枚の画像を無料で利用できます)
**請求の仕組み**: 顧客が月に 25 枚の画像を生成すると、無料枠の 10 枚を除いた 15 枚に対して請求されます。15 × $0.05 = $0.75
1. 以下の設定をすべて確認:
* 名前: PixelGen AI - Image Generation
* メーター: Image Generation Meter
* 価格: 画像 1 枚あたり \$0.05
* 無料枠: 10 枚
2. **Save Changes** をクリック
**製品が作成されました!** 課金設定は完了しました。顧客は画像生成の使用量に基づいて自動的に請求されます。
## ステップ3: テスト購入を行う
使用量イベントを取り込む前に、テスト購入を行う必要があります。
1. Dodo Payments ダッシュボードで **Products** に移動
2. 「PixelGen AI - Image Generation」製品を探す
3. 製品の横にある **Share** ボタンをクリック
4. 表示された支払いリンクをコピーする
支払いリンクは次のような形式になります: `https://test.checkout.dodopayments.com/buy/pdt_IgPWlRsfpbPd5jQKezzW1?quantity=1`
1. 支払いリンクを新しいブラウザタブで開く
2. テスト用の支払い情報を入力し、購入を完了する。
支払いが成功すると、アプリケーションコードで使用する顧客 ID が取得できます。
1. Dodo Payments ダッシュボードに戻る
2. サイドバーの **Sales → Customers** に移動
3. 作成したばかりの顧客(テストメール使用)を見つける
4. 顧客 ID をコピーする - それは `cus_abc123def456` のように見えるでしょう
この顧客 ID を保存してください — サンプルアプリケーションコードにハードコードして、イベントが正しく追跡されることを確認します。
## ステップ4: サンプルアプリケーションを構築する
請求設定が完了し、テスト顧客が作成されました。画像を生成し、請求のために自動的に使用量を追跡するサンプルPixelGen AIアプリケーションを構築しましょう。
新しいディレクトリを作成し、プロジェクトを初期化します:
```bash theme={null}
mkdir pixelgen-ai
cd pixelgen-ai
npm init -y
```
必要なパッケージをインストール:
```bash theme={null}
npm install openai dotenv
npm install -D typescript @types/node ts-node
```
`index.ts` というファイルを作成し、以下の完全なアプリケーションコードをコピーしてください:
こちらが請求を統合した完全なPixelGen AIアプリケーションです:
```typescript index.ts expandable theme={null}
import 'dotenv/config';
import OpenAI from 'openai';
import * as readline from 'readline';
import { randomUUID } from 'crypto';
// Initialize OpenAI client
const openai = new OpenAI({
apiKey: process.env.OPENAI_API_KEY,
});
// Dodo Payments configuration
const DODO_PAYMENTS_CONFIG = {
apiKey: process.env.DODO_PAYMENTS_API_KEY,
baseUrl: 'https://test.dodopayments.com',
customerId: 'cus_FX5FAB43aShGyiHJGIqjB', // Replace with your actual customer ID from Step 3
};
// DALL-E 3 pricing (as of 2024-2025)
const PRICING = {
'standard': 0.040, // $0.040 per image (1024×1024)
'hd': 0.080, // $0.080 per image (1024×1024, HD quality)
};
interface ImageGenerationOptions {
prompt: string;
model?: 'dall-e-3' | 'dall-e-2';
quality?: 'standard' | 'hd';
size?: '1024x1024' | '1792x1024' | '1024x1792';
style?: 'vivid' | 'natural';
}
interface UsageEvent {
event_id: string;
customer_id: string;
event_name: string;
timestamp: string;
metadata: {
quality: string;
};
}
/**
* Send usage event to Dodo Payments for billing tracking
*/
async function sendUsageEvent(event: UsageEvent): Promise {
try {
console.log('Sending usage event to Dodo Payments...');
console.log(`URL: ${DODO_PAYMENTS_CONFIG.baseUrl}/events/ingest`);
console.log(`API Key present: ${!!DODO_PAYMENTS_CONFIG.apiKey}`);
console.log(`API Key length: ${DODO_PAYMENTS_CONFIG.apiKey?.length || 0}`);
console.log(`Customer ID: ${DODO_PAYMENTS_CONFIG.customerId}`);
const requestBody = {
events: [event]
};
console.log('Request body:', JSON.stringify(requestBody, null, 2));
const headers = {
'Authorization': `Bearer ${DODO_PAYMENTS_CONFIG.apiKey}`,
'Content-Type': 'application/json',
}
console.log('Headers:', headers);
const response = await fetch(`${DODO_PAYMENTS_CONFIG.baseUrl}/events/ingest`, {
method: 'POST',
headers: headers,
body: JSON.stringify(requestBody),
});
console.log(`Response status: ${response.status}`);
console.log(`Response headers:`, Object.fromEntries(response.headers.entries()));
if (!response.ok) {
const errorData = await response.text();
console.log(`Error response body: ${errorData}`);
throw new Error(`HTTP ${response.status}: ${errorData}`);
}
const result = await response.json();
console.log('Usage event sent successfully');
console.log(` • Event ID: ${event.event_id}`);
console.log(` • Customer: ${event.customer_id}`);
console.log(` • Quality: ${event.metadata.quality}`);
} catch (error) {
console.error('Failed to send usage event:', error);
// In production, you might want to queue failed events for retry
throw error;
}
}
async function generateImage(options: ImageGenerationOptions) {
const startTime = Date.now();
const eventId = randomUUID();
try {
console.log('Generating image...');
console.log(`Prompt: "${options.prompt}"`);
console.log(`Quality: ${options.quality || 'standard'}`);
console.log(`Size: ${options.size || '1024x1024'}`);
const response = await openai.images.generate({
model: options.model || 'dall-e-3',
prompt: options.prompt,
n: 1,
size: options.size || '1024x1024',
quality: options.quality || 'standard',
style: options.style || 'vivid',
});
const endTime = Date.now();
const duration = (endTime - startTime) / 1000;
const cost = PRICING[options.quality || 'standard'];
// Create usage event for Dodo Payments
const usageEvent: UsageEvent = {
event_id: eventId,
customer_id: DODO_PAYMENTS_CONFIG.customerId!,
event_name: 'image.generated',
timestamp: new Date().toISOString(),
metadata: {
quality: options.quality || 'standard',
}
};
// Send usage event to Dodo Payments for billing
await sendUsageEvent(usageEvent);
console.log('\nImage generated successfully!');
console.log(`Generation Stats:`);
console.log(` • Duration: ${duration.toFixed(2)} seconds`);
console.log(` • Quality: ${options.quality || 'standard'}`);
console.log(` • Cost: $${cost.toFixed(3)}`);
console.log(` • Image URL: ${response.data?.[0]?.url}`);
if (response.data?.[0]?.revised_prompt) {
console.log(` • Revised prompt: "${response.data[0].revised_prompt}"`);
}
return {
imageUrl: response.data?.[0].url,
revisedPrompt: response.data?.[0].revised_prompt,
cost: cost,
duration: duration,
eventId: eventId,
};
} catch (error) {
console.error('Error generating image:', error);
// Send failure event for monitoring (optional)
try {
const failureEvent: UsageEvent = {
event_id: eventId,
customer_id: DODO_PAYMENTS_CONFIG.customerId!,
event_name: 'image.generation.failed',
timestamp: new Date().toISOString(),
metadata: {
quality: options.quality || 'standard',
}
};
// Note: You might want to create a separate meter for failed attempts
// await sendUsageEvent(failureEvent);
} catch (eventError) {
console.error('Failed to send failure event:', eventError);
}
throw error;
}
}
async function getUserInput(): Promise {
const rl = readline.createInterface({
input: process.stdin,
output: process.stdout
});
return new Promise((resolve) => {
rl.question('Enter your image prompt: ', (answer) => {
rl.close();
resolve(answer);
});
});
}
async function main() {
console.log('PixelGen AI - Image Generator with Usage Billing\n');
// Validate environment variables
const requiredEnvVars = [
'OPENAI_API_KEY',
'DODO_PAYMENTS_API_KEY'
];
for (const envVar of requiredEnvVars) {
if (!process.env[envVar]) {
console.error(`Error: ${envVar} environment variable is not set.`);
console.log('Please set all required environment variables:');
console.log('export OPENAI_API_KEY="your-openai-key"');
console.log('export DODO_PAYMENTS_API_KEY="your-dodo-api-key"');
console.log('Note: Customer ID is hardcoded in the application');
process.exit(1);
}
}
try {
const prompt = await getUserInput();
if (!prompt.trim()) {
console.log('No prompt provided. Exiting...');
return;
}
const result = await generateImage({
prompt: prompt.trim(),
quality: 'standard', // Change to 'hd' for higher quality (costs more)
size: '1024x1024',
style: 'vivid'
});
console.log('\nProcess completed successfully!');
console.log(`Billing Information:`);
console.log(` • Total cost: $${result.cost.toFixed(3)}`);
console.log(` • Event ID: ${result.eventId}`);
console.log(` • Billing will be processed automatically via Dodo Payments`);
} catch (error) {
console.error('Application error:', error);
process.exit(1);
}
}
// Run the application
if (require.main === module) {
main().catch(console.error);
}
```
```bash .env theme={null}
# Create .env file with your API keys
OPENAI_API_KEY=your_openai_api_key_here
DODO_PAYMENTS_API_KEY=your_DODO_PAYMENTS_payments_api_key_here
# Note: Customer ID is hardcoded in the application code
```
```typescript package.json theme={null}
{
"name": "pixelgen-ai",
"version": "1.0.0",
"description": "AI Image Generation with Usage-Based Billing",
"main": "index.js",
"scripts": {
"start": "ts-node index.ts",
"build": "tsc",
"dev": "ts-node --watch index.ts"
},
"dependencies": {
"openai": "^4.0.0",
"dotenv": "^16.0.0"
},
"devDependencies": {
"@types/node": "^20.0.0",
"typescript": "^5.0.0",
"ts-node": "^10.0.0"
}
}
```
## ステップ5: サンプルアプリケーションをテストする
サンプルPixelGen AIサービスをテストし、請求が機能するか確認する時間です!すべてがエンドツーエンドで動作することを確認しましょう。
**テストする内容**: 画像を生成し、イベントが Dodo Payments に届いていることを確認し、請求計算が正しいことを確かめます。
まず、すべての設定が完了していることを確認してください:
1. `.env` ファイルを `pixelgen-ai` ディレクトリに作成
2. 実際の API キーを追加:
```bash theme={null}
OPENAI_API_KEY=sk-your-actual-openai-key
DODO_PAYMENTS_API_KEY=your-actual-dodo-api-key
# Customer ID is hardcoded in the application
```
3. 依存関係をインストールし、アプリを実行します:
```bash theme={null}
npm install
npm start
```
実際の API キーを使用し、ステップ3で取得した実際の顧客 ID でコード内のハードコードされた顧客 ID を更新してください!
アプリを起動すると、次のように表示されます:
```
PixelGen AI - Image Generator with Usage Billing
Enter your image prompt:
```
このプロンプトを試してください: **"かわいいロボットが風景を描いている"**
次のような出力が表示されるはずです:
```
Generating image...
Prompt: "A cute robot painting a landscape"
Quality: standard
Size: 1024x1024
Sending usage event to Dodo Payments...
Usage event sent successfully
• Event ID: 550e8400-e29b-41d4-a716-446655440000
• Customer: cus_atXa1lklCRRzMicTqfiw2
• Quality: standard
Image generated successfully!
Generation Stats:
• Duration: 8.45 seconds
• Quality: standard
• Cost: $0.040
• Image URL: https://oaidalleapi...
```
「Usage event sent successfully」が表示されたら、課金統合は正常に動作しています!
さらに 2〜3 枚の画像を生成して複数のイベントをテストしましょう。以下のプロンプトを試してください:
1. **"紫の雲のある山の上の夕日"**
2. **"ビクトリア朝のキッチンにあるスチームパンクのコーヒーマシン"**
3. **"図書館で本を読んでいる友好的なドラゴン"**
実行するたびに「Usage event sent successfully」のメッセージを確認してください。
続いて、イベントが届いているか確認します:
1. Dodo Paymentsダッシュボードを開きます
2. *使用量請求* → \***メーター** → **画像生成メーター**に移動します
3. **イベント**タブをクリックします
4. 画像生成イベントがリストされているのを確認します
**確認すべき点**:
* イベント名: `image.generated`
* 顧客 ID: テスト顧客の ID
生成した画像ごとに 1 件のイベントが表示されるはずです!
利用状況のカウントが正しく行われているか確認しましょう:
**単価 (Price Per Unit)**: 次を入力 → `0.05`(これは画像 1 枚あたり \$0.05)
**無料枠 (Free Threshold)**: 次を入力 → `10`(顧客は月に 10 枚の画像を無料で利用できます)
**請求の仕組み**: 顧客が月に 25 枚の画像を生成すると、無料枠の 10 枚を除いた 15 枚に対して請求されます。15 × $0.05 = $0.75
1. 以下の設定をすべて確認:
* 名前: PixelGen AI - Image Generation
* メーター: Image Generation Meter
* 価格: 画像 1 枚あたり \$0.05
* 無料枠: 10 枚
2. **Save Changes** をクリック
**製品が作成されました!** 課金設定は完了しました。顧客は画像生成の使用量に基づいて自動的に請求されます。
## ステップ3: テスト購入を行う
使用量イベントを取り込む前に、テスト購入を行う必要があります。
1. Dodo Payments ダッシュボードで **Products** に移動
2. 「PixelGen AI - Image Generation」製品を探す
3. 製品の横にある **Share** ボタンをクリック
4. 表示された支払いリンクをコピーする
支払いリンクは次のような形式になります: `https://test.checkout.dodopayments.com/buy/pdt_IgPWlRsfpbPd5jQKezzW1?quantity=1`
1. 支払いリンクを新しいブラウザタブで開く
2. テスト用の支払い情報を入力し、購入を完了する。
支払いが成功すると、アプリケーションコードで使用する顧客 ID が取得できます。
1. Dodo Payments ダッシュボードに戻る
2. サイドバーの **Sales → Customers** に移動
3. 作成したばかりの顧客(テストメール使用)を見つける
4. 顧客 ID をコピーする - それは `cus_abc123def456` のように見えるでしょう
この顧客 ID を保存してください — サンプルアプリケーションコードにハードコードして、イベントが正しく追跡されることを確認します。
## ステップ4: サンプルアプリケーションを構築する
請求設定が完了し、テスト顧客が作成されました。画像を生成し、請求のために自動的に使用量を追跡するサンプルPixelGen AIアプリケーションを構築しましょう。
新しいディレクトリを作成し、プロジェクトを初期化します:
```bash theme={null}
mkdir pixelgen-ai
cd pixelgen-ai
npm init -y
```
必要なパッケージをインストール:
```bash theme={null}
npm install openai dotenv
npm install -D typescript @types/node ts-node
```
`index.ts` というファイルを作成し、以下の完全なアプリケーションコードをコピーしてください:
こちらが請求を統合した完全なPixelGen AIアプリケーションです:
```typescript index.ts expandable theme={null}
import 'dotenv/config';
import OpenAI from 'openai';
import * as readline from 'readline';
import { randomUUID } from 'crypto';
// Initialize OpenAI client
const openai = new OpenAI({
apiKey: process.env.OPENAI_API_KEY,
});
// Dodo Payments configuration
const DODO_PAYMENTS_CONFIG = {
apiKey: process.env.DODO_PAYMENTS_API_KEY,
baseUrl: 'https://test.dodopayments.com',
customerId: 'cus_FX5FAB43aShGyiHJGIqjB', // Replace with your actual customer ID from Step 3
};
// DALL-E 3 pricing (as of 2024-2025)
const PRICING = {
'standard': 0.040, // $0.040 per image (1024×1024)
'hd': 0.080, // $0.080 per image (1024×1024, HD quality)
};
interface ImageGenerationOptions {
prompt: string;
model?: 'dall-e-3' | 'dall-e-2';
quality?: 'standard' | 'hd';
size?: '1024x1024' | '1792x1024' | '1024x1792';
style?: 'vivid' | 'natural';
}
interface UsageEvent {
event_id: string;
customer_id: string;
event_name: string;
timestamp: string;
metadata: {
quality: string;
};
}
/**
* Send usage event to Dodo Payments for billing tracking
*/
async function sendUsageEvent(event: UsageEvent): Promise {
try {
console.log('Sending usage event to Dodo Payments...');
console.log(`URL: ${DODO_PAYMENTS_CONFIG.baseUrl}/events/ingest`);
console.log(`API Key present: ${!!DODO_PAYMENTS_CONFIG.apiKey}`);
console.log(`API Key length: ${DODO_PAYMENTS_CONFIG.apiKey?.length || 0}`);
console.log(`Customer ID: ${DODO_PAYMENTS_CONFIG.customerId}`);
const requestBody = {
events: [event]
};
console.log('Request body:', JSON.stringify(requestBody, null, 2));
const headers = {
'Authorization': `Bearer ${DODO_PAYMENTS_CONFIG.apiKey}`,
'Content-Type': 'application/json',
}
console.log('Headers:', headers);
const response = await fetch(`${DODO_PAYMENTS_CONFIG.baseUrl}/events/ingest`, {
method: 'POST',
headers: headers,
body: JSON.stringify(requestBody),
});
console.log(`Response status: ${response.status}`);
console.log(`Response headers:`, Object.fromEntries(response.headers.entries()));
if (!response.ok) {
const errorData = await response.text();
console.log(`Error response body: ${errorData}`);
throw new Error(`HTTP ${response.status}: ${errorData}`);
}
const result = await response.json();
console.log('Usage event sent successfully');
console.log(` • Event ID: ${event.event_id}`);
console.log(` • Customer: ${event.customer_id}`);
console.log(` • Quality: ${event.metadata.quality}`);
} catch (error) {
console.error('Failed to send usage event:', error);
// In production, you might want to queue failed events for retry
throw error;
}
}
async function generateImage(options: ImageGenerationOptions) {
const startTime = Date.now();
const eventId = randomUUID();
try {
console.log('Generating image...');
console.log(`Prompt: "${options.prompt}"`);
console.log(`Quality: ${options.quality || 'standard'}`);
console.log(`Size: ${options.size || '1024x1024'}`);
const response = await openai.images.generate({
model: options.model || 'dall-e-3',
prompt: options.prompt,
n: 1,
size: options.size || '1024x1024',
quality: options.quality || 'standard',
style: options.style || 'vivid',
});
const endTime = Date.now();
const duration = (endTime - startTime) / 1000;
const cost = PRICING[options.quality || 'standard'];
// Create usage event for Dodo Payments
const usageEvent: UsageEvent = {
event_id: eventId,
customer_id: DODO_PAYMENTS_CONFIG.customerId!,
event_name: 'image.generated',
timestamp: new Date().toISOString(),
metadata: {
quality: options.quality || 'standard',
}
};
// Send usage event to Dodo Payments for billing
await sendUsageEvent(usageEvent);
console.log('\nImage generated successfully!');
console.log(`Generation Stats:`);
console.log(` • Duration: ${duration.toFixed(2)} seconds`);
console.log(` • Quality: ${options.quality || 'standard'}`);
console.log(` • Cost: $${cost.toFixed(3)}`);
console.log(` • Image URL: ${response.data?.[0]?.url}`);
if (response.data?.[0]?.revised_prompt) {
console.log(` • Revised prompt: "${response.data[0].revised_prompt}"`);
}
return {
imageUrl: response.data?.[0].url,
revisedPrompt: response.data?.[0].revised_prompt,
cost: cost,
duration: duration,
eventId: eventId,
};
} catch (error) {
console.error('Error generating image:', error);
// Send failure event for monitoring (optional)
try {
const failureEvent: UsageEvent = {
event_id: eventId,
customer_id: DODO_PAYMENTS_CONFIG.customerId!,
event_name: 'image.generation.failed',
timestamp: new Date().toISOString(),
metadata: {
quality: options.quality || 'standard',
}
};
// Note: You might want to create a separate meter for failed attempts
// await sendUsageEvent(failureEvent);
} catch (eventError) {
console.error('Failed to send failure event:', eventError);
}
throw error;
}
}
async function getUserInput(): Promise {
const rl = readline.createInterface({
input: process.stdin,
output: process.stdout
});
return new Promise((resolve) => {
rl.question('Enter your image prompt: ', (answer) => {
rl.close();
resolve(answer);
});
});
}
async function main() {
console.log('PixelGen AI - Image Generator with Usage Billing\n');
// Validate environment variables
const requiredEnvVars = [
'OPENAI_API_KEY',
'DODO_PAYMENTS_API_KEY'
];
for (const envVar of requiredEnvVars) {
if (!process.env[envVar]) {
console.error(`Error: ${envVar} environment variable is not set.`);
console.log('Please set all required environment variables:');
console.log('export OPENAI_API_KEY="your-openai-key"');
console.log('export DODO_PAYMENTS_API_KEY="your-dodo-api-key"');
console.log('Note: Customer ID is hardcoded in the application');
process.exit(1);
}
}
try {
const prompt = await getUserInput();
if (!prompt.trim()) {
console.log('No prompt provided. Exiting...');
return;
}
const result = await generateImage({
prompt: prompt.trim(),
quality: 'standard', // Change to 'hd' for higher quality (costs more)
size: '1024x1024',
style: 'vivid'
});
console.log('\nProcess completed successfully!');
console.log(`Billing Information:`);
console.log(` • Total cost: $${result.cost.toFixed(3)}`);
console.log(` • Event ID: ${result.eventId}`);
console.log(` • Billing will be processed automatically via Dodo Payments`);
} catch (error) {
console.error('Application error:', error);
process.exit(1);
}
}
// Run the application
if (require.main === module) {
main().catch(console.error);
}
```
```bash .env theme={null}
# Create .env file with your API keys
OPENAI_API_KEY=your_openai_api_key_here
DODO_PAYMENTS_API_KEY=your_DODO_PAYMENTS_payments_api_key_here
# Note: Customer ID is hardcoded in the application code
```
```typescript package.json theme={null}
{
"name": "pixelgen-ai",
"version": "1.0.0",
"description": "AI Image Generation with Usage-Based Billing",
"main": "index.js",
"scripts": {
"start": "ts-node index.ts",
"build": "tsc",
"dev": "ts-node --watch index.ts"
},
"dependencies": {
"openai": "^4.0.0",
"dotenv": "^16.0.0"
},
"devDependencies": {
"@types/node": "^20.0.0",
"typescript": "^5.0.0",
"ts-node": "^10.0.0"
}
}
```
## ステップ5: サンプルアプリケーションをテストする
サンプルPixelGen AIサービスをテストし、請求が機能するか確認する時間です!すべてがエンドツーエンドで動作することを確認しましょう。
**テストする内容**: 画像を生成し、イベントが Dodo Payments に届いていることを確認し、請求計算が正しいことを確かめます。
まず、すべての設定が完了していることを確認してください:
1. `.env` ファイルを `pixelgen-ai` ディレクトリに作成
2. 実際の API キーを追加:
```bash theme={null}
OPENAI_API_KEY=sk-your-actual-openai-key
DODO_PAYMENTS_API_KEY=your-actual-dodo-api-key
# Customer ID is hardcoded in the application
```
3. 依存関係をインストールし、アプリを実行します:
```bash theme={null}
npm install
npm start
```
実際の API キーを使用し、ステップ3で取得した実際の顧客 ID でコード内のハードコードされた顧客 ID を更新してください!
アプリを起動すると、次のように表示されます:
```
PixelGen AI - Image Generator with Usage Billing
Enter your image prompt:
```
このプロンプトを試してください: **"かわいいロボットが風景を描いている"**
次のような出力が表示されるはずです:
```
Generating image...
Prompt: "A cute robot painting a landscape"
Quality: standard
Size: 1024x1024
Sending usage event to Dodo Payments...
Usage event sent successfully
• Event ID: 550e8400-e29b-41d4-a716-446655440000
• Customer: cus_atXa1lklCRRzMicTqfiw2
• Quality: standard
Image generated successfully!
Generation Stats:
• Duration: 8.45 seconds
• Quality: standard
• Cost: $0.040
• Image URL: https://oaidalleapi...
```
「Usage event sent successfully」が表示されたら、課金統合は正常に動作しています!
さらに 2〜3 枚の画像を生成して複数のイベントをテストしましょう。以下のプロンプトを試してください:
1. **"紫の雲のある山の上の夕日"**
2. **"ビクトリア朝のキッチンにあるスチームパンクのコーヒーマシン"**
3. **"図書館で本を読んでいる友好的なドラゴン"**
実行するたびに「Usage event sent successfully」のメッセージを確認してください。
続いて、イベントが届いているか確認します:
1. Dodo Paymentsダッシュボードを開きます
2. *使用量請求* → \***メーター** → **画像生成メーター**に移動します
3. **イベント**タブをクリックします
4. 画像生成イベントがリストされているのを確認します
**確認すべき点**:
* イベント名: `image.generated`
* 顧客 ID: テスト顧客の ID
生成した画像ごとに 1 件のイベントが表示されるはずです!
利用状況のカウントが正しく行われているか確認しましょう:
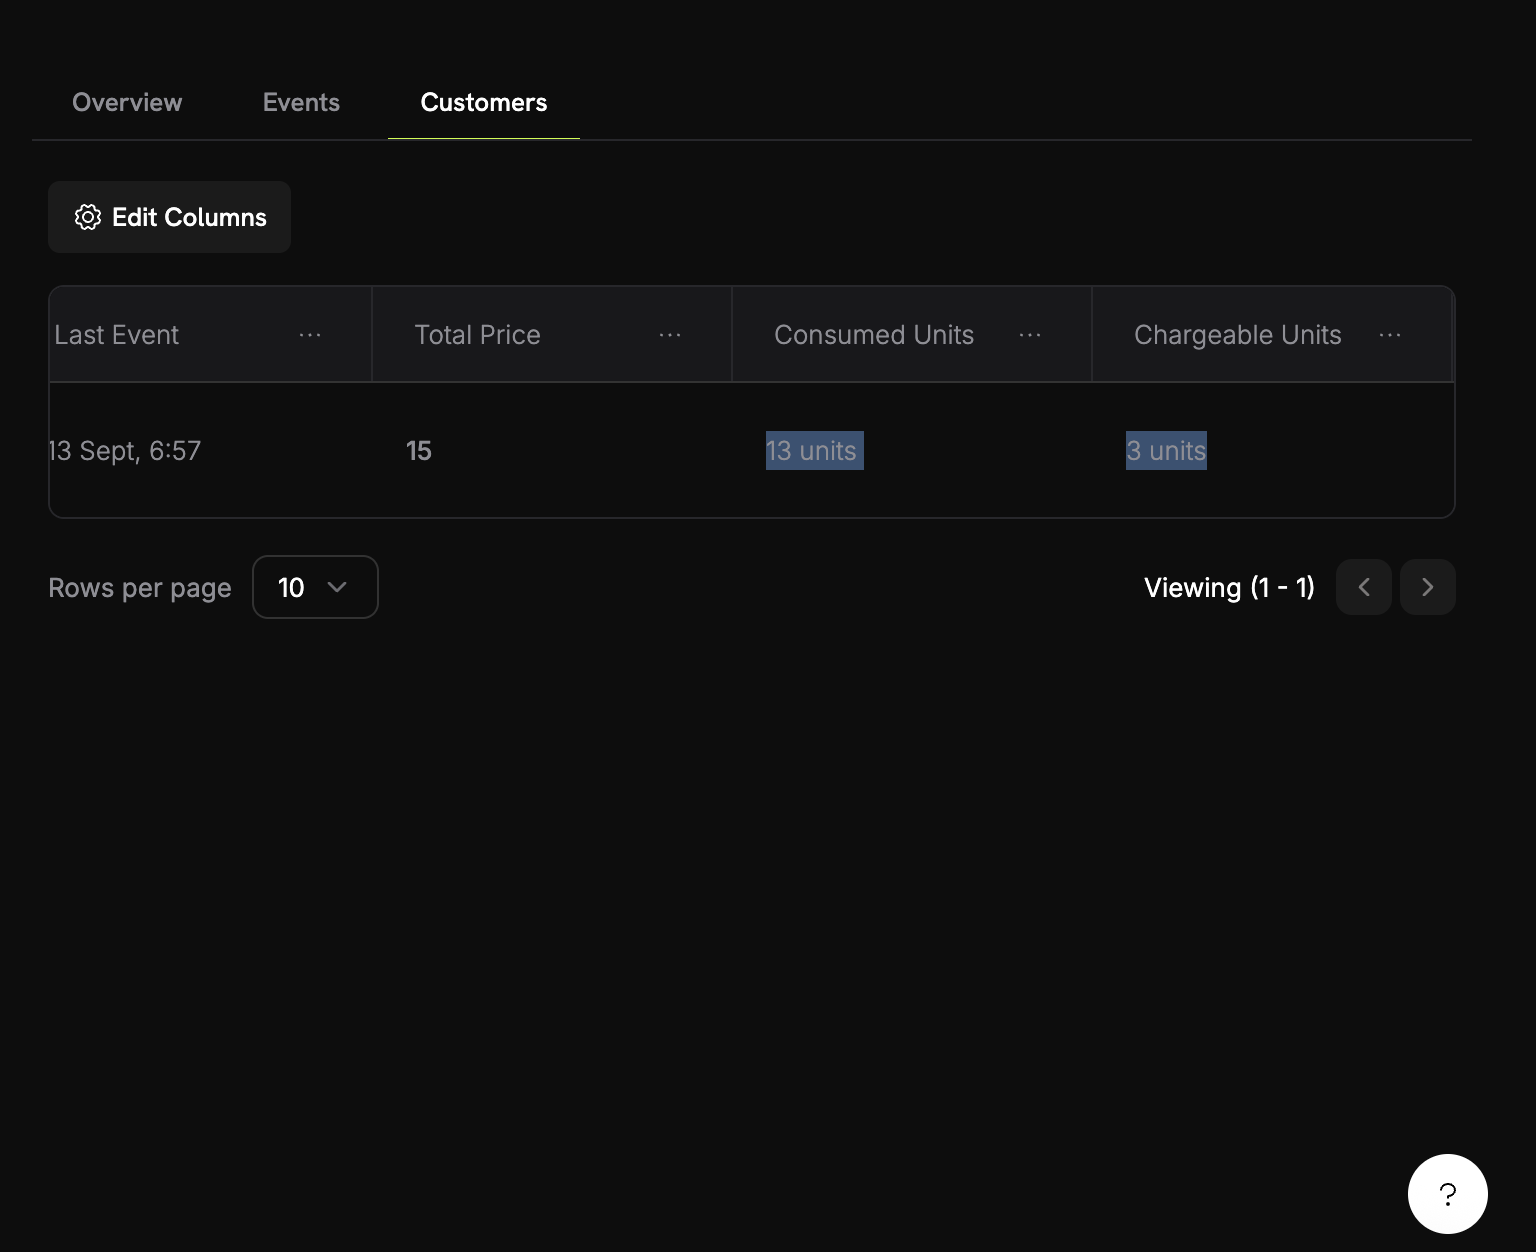 1. メーターで、**顧客**タブに移動します
2. テスト顧客を見つけます
3. 「消費単位」列を確認します
無料枠を超えて請求がどのようになるか確認しましょう:
1. さらに8枚の画像を生成します(合計12枚に到達)
2. メーターダッシュボードを再度確認します
3. 次のように表示されるはずです:
* 消費単位: 12
* 請求単位: 2(12 - 10の無料)
* 請求額: \$0.10
**成功!** 使用量ベースの課金は正常に動作しています。顧客は実際の画像生成の使用量に基づいて自動的に請求されます。
## トラブルシューティング
一般的な問題とその解決策:
**考えられる原因:**
* イベント名がメーター設定と完全に一致していない
* 顧客 ID がアカウントに存在しない
* API キーが無効または期限切れ
* ネットワーク接続の問題
**解決策:**
1. イベント名がメーター設定と完全に一致しているか確認する(大文字小文字を区別します)
2. 顧客 ID が Dodo Payments に存在することを確認する
3. シンプルな API 呼び出しで API キーをテストする
4. ネットワーク接続とファイアウォールの設定を確認する
## おめでとうございます! PixelGen AIを構築しました
使用量ベースの請求を伴うAI画像生成のスニペットを成功裏に作成しました!達成したことは次のとおりです:
「Image Generation Meter」を作成し、すべての画像生成イベントを追跡できるようにしました
1 画像あたり \$0.05、月に 10 枚無料の価格設定を構成しました
OpenAI の DALL-E を使用して画像を生成する動作する TypeScript アプリを構築しました
リアルタイムのイベントトラッキングを統合し、顧客に自動で請求されるようにしました
1. メーターで、**顧客**タブに移動します
2. テスト顧客を見つけます
3. 「消費単位」列を確認します
無料枠を超えて請求がどのようになるか確認しましょう:
1. さらに8枚の画像を生成します(合計12枚に到達)
2. メーターダッシュボードを再度確認します
3. 次のように表示されるはずです:
* 消費単位: 12
* 請求単位: 2(12 - 10の無料)
* 請求額: \$0.10
**成功!** 使用量ベースの課金は正常に動作しています。顧客は実際の画像生成の使用量に基づいて自動的に請求されます。
## トラブルシューティング
一般的な問題とその解決策:
**考えられる原因:**
* イベント名がメーター設定と完全に一致していない
* 顧客 ID がアカウントに存在しない
* API キーが無効または期限切れ
* ネットワーク接続の問題
**解決策:**
1. イベント名がメーター設定と完全に一致しているか確認する(大文字小文字を区別します)
2. 顧客 ID が Dodo Payments に存在することを確認する
3. シンプルな API 呼び出しで API キーをテストする
4. ネットワーク接続とファイアウォールの設定を確認する
## おめでとうございます! PixelGen AIを構築しました
使用量ベースの請求を伴うAI画像生成のスニペットを成功裏に作成しました!達成したことは次のとおりです:
「Image Generation Meter」を作成し、すべての画像生成イベントを追跡できるようにしました
1 画像あたり \$0.05、月に 10 枚無料の価格設定を構成しました
OpenAI の DALL-E を使用して画像を生成する動作する TypeScript アプリを構築しました
リアルタイムのイベントトラッキングを統合し、顧客に自動で請求されるようにしました