> ## Documentation Index
> Fetch the complete documentation index at: https://docs.dodopayments.com/llms.txt
> Use this file to discover all available pages before exploring further.
# 手動ライセンスキー発行統合ガイド
> 製品を販売し、必要に応じて独自のライセンスキーを供給するエンドツーエンドのシステムを構築します: 製品と権利を作成し、保留中の付与を検出し、顧客にキーを配信します。
このガイドでは、**手動ライセンスキー発行**システムをエンドツーエンドで構築する方法を説明します。Dodo Payments が支払い時に自動生成する代わりに、各購入が `pending` の付与を作成し、*あなた* が独自のシステム、サードパーティのベンダー、または限られたコードのプールからキーを提供するのを待ちます。
完了することで、次のことが可能になります:
* ライセンスキー権利が `manual` 発行に設定された製品。
* 顧客がキーを待っているときに検出する Webhook リスナー。
* キーを配信し、顧客に自動的に通知する発行コール。
完全なライセンスキーライフサイクルと `fulfillment_mode` 設定。
キーを配信するために呼び出すエンドポイントの API リファレンス。
## 仕組み
```mermaid theme={null}
sequenceDiagram
participant C as Customer
participant D as Dodo Payments
participant M as Your Backend
C->>D: Purchase (manual-mode License Key product)
D->>D: Create grant (status: pending, no key)
D->>M: entitlement_grant.created (integration_type: license_key, status: pending)
M->>M: Obtain key from own system / vendor
M->>D: POST /grants/{grant_id}/license-key { key }
D->>C: Deliver license key to customer
D->>M: entitlement_grant.delivered
```
手動発行では、**発行**ステップだけが変更されます。配信された後は、アクティベーション、検証、無効化、有効期限、取り消しは自動生成されたキーと同じように動作します。
## 前提条件
このガイドを進めるには次のものが必要です:
* Dodo Payments マーチャントアカウント。
* ダッシュボードの API キー (`DODO_PAYMENTS_API_KEY`) と Webhook シークレットキー。API キー生成ガイドを参照: [API key generation guide](/api-reference/introduction#api-key-generation)。
* Webhook を受信できるバックエンドエンドポイント。
`https://test.dodopayments.com` とテストモードの資格情報を使用して構築します。製品に移行するときは `https://live.dodopayments.com` とライブキーに切り替えてください。
## ステップ 1 — 手動モードでライセンスキー権利を作成
権利とは、提供するものの再利用可能な定義です。ライセンスキー権利を作成し、その `fulfillment_mode` を `manual` に設定します。
ダッシュボードの**権利**に移動し、**+** をクリックして新しい権利を作成します。
**ライセンスキー**を統合として選択し、**名前**を付けます。フォームは次のフィールドを公開しています:
* **Fulfillment Mode** — デフォルトでは `Automatic`。これは手動発行を有効にする設定です。次のステップで変更します。
* **License Length** — 各発行されたキーが有効である期間、または **No expiration**。
* **Activations Limit** — 各キーの最大アクティベーション数、または **Unlimited**。
* **Activation Message** — キーを有効化するときに表示される、顧客向けのオプションメッセージ。
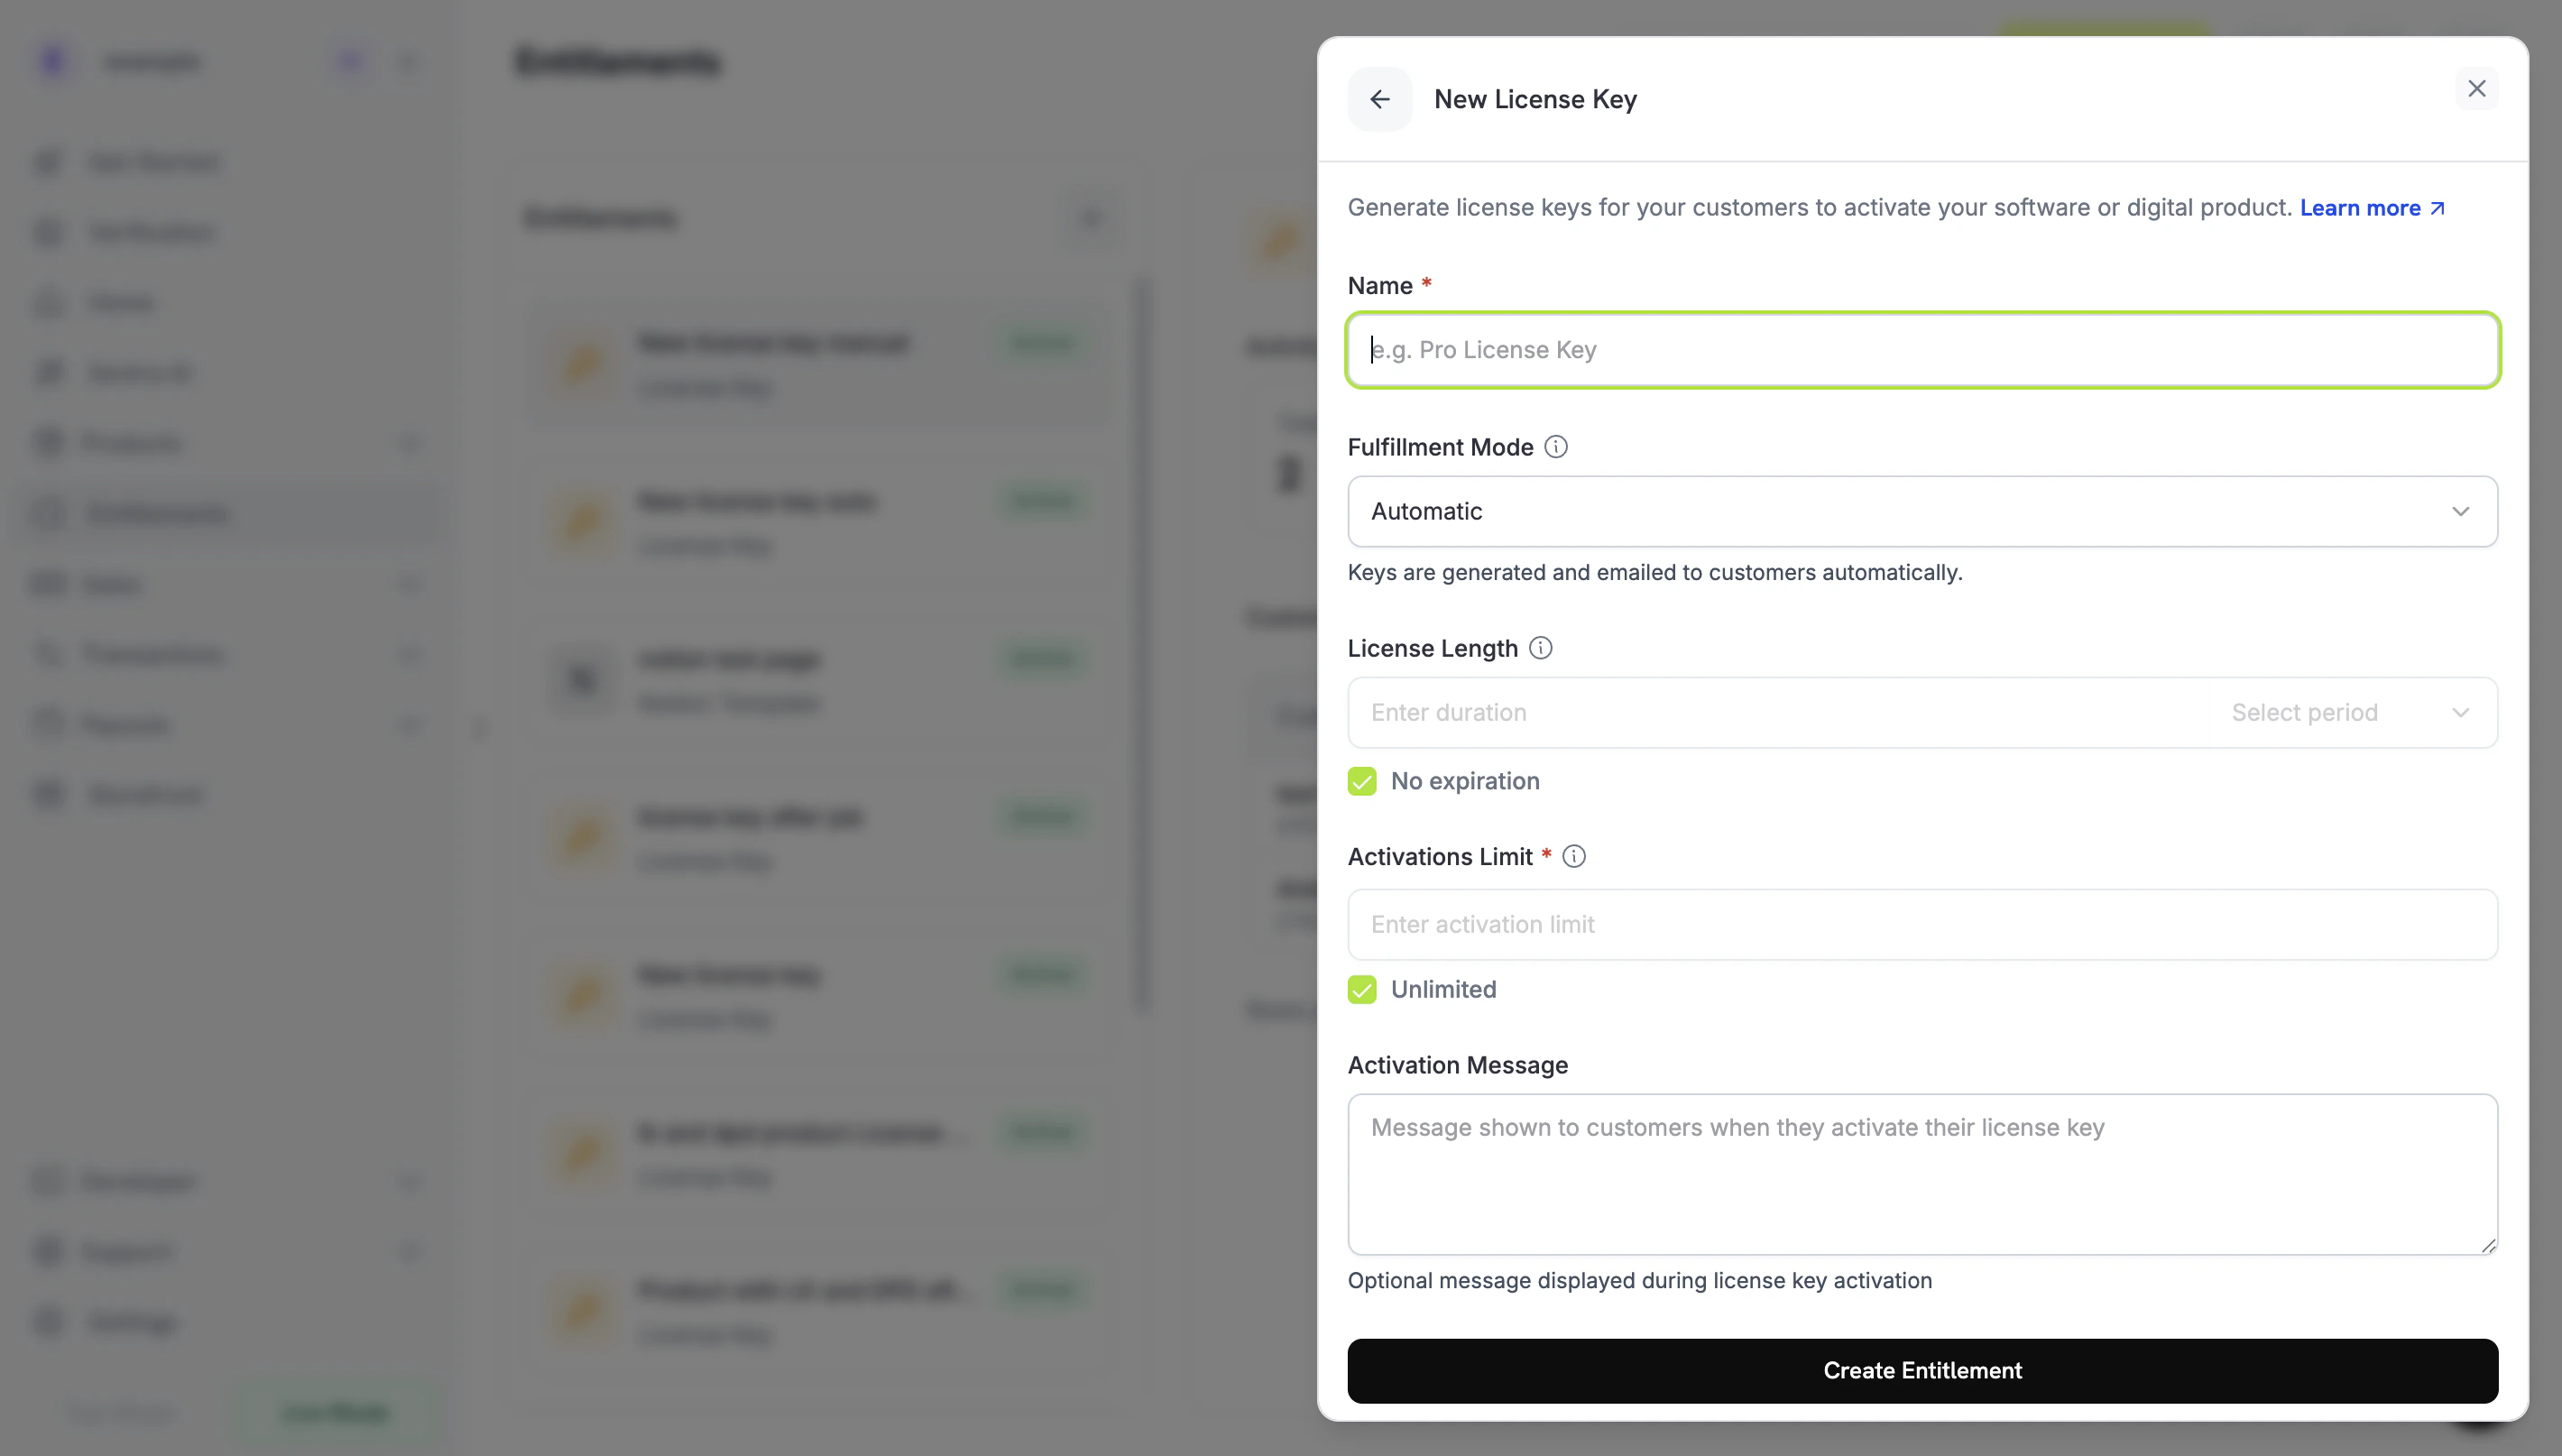 **Fulfillment Mode** ドロップダウンを開き、**自動**から**手動**に変更します。これは、このガイド全体を駆動する設定です — これがないと、キーは自動的に生成されメールされ、保留中の付与は作成されません。**手動**を選択すると、各購入であなたが発行するための `pending` 付与が作成されます。**Create Entitlement** をクリックして保存します。
権利を `integration_config.fulfillment_mode` を `manual` に設定して作成します。
```typescript Node.js theme={null} theme={null}
import DodoPayments from 'dodopayments';
const client = new DodoPayments({
bearerToken: process.env.DODO_PAYMENTS_API_KEY,
environment: 'test_mode', // defaults to 'live_mode'
});
const entitlement = await client.entitlements.create({
name: 'Pro License (Manual)',
integration_type: 'license_key',
integration_config: {
fulfillment_mode: 'manual',
activations_limit: 5,
duration_count: 1,
duration_interval: 'Year',
},
});
console.log(entitlement.id); // ent_...
```
```python Python theme={null} theme={null}
import os
from dodopayments import DodoPayments
client = DodoPayments(
bearer_token=os.environ.get("DODO_PAYMENTS_API_KEY"),
environment="test_mode", # defaults to "live_mode"
)
entitlement = client.entitlements.create(
name="Pro License (Manual)",
integration_type="license_key",
integration_config={
"fulfillment_mode": "manual",
"activations_limit": 5,
"duration_count": 1,
"duration_interval": "Year",
},
)
print(entitlement.id)
```
```bash cURL theme={null} theme={null}
curl -X POST https://test.dodopayments.com/entitlements \
-H "Authorization: Bearer $DODO_PAYMENTS_API_KEY" \
-H "Content-Type: application/json" \
-d '{
"name": "Pro License (Manual)",
"integration_type": "license_key",
"integration_config": {
"fulfillment_mode": "manual",
"activations_limit": 5,
"duration_count": 1,
"duration_interval": "Year"
}
}'
```
`fulfillment_mode` はデフォルトで `auto` です。それを省略するか、既存の権利を変更しないままでいると、自動動作が維持されます。明示的に `manual` に設定された権利のみが保留中の付与を作成します。
## ステップ 2 — 権利を製品に添付
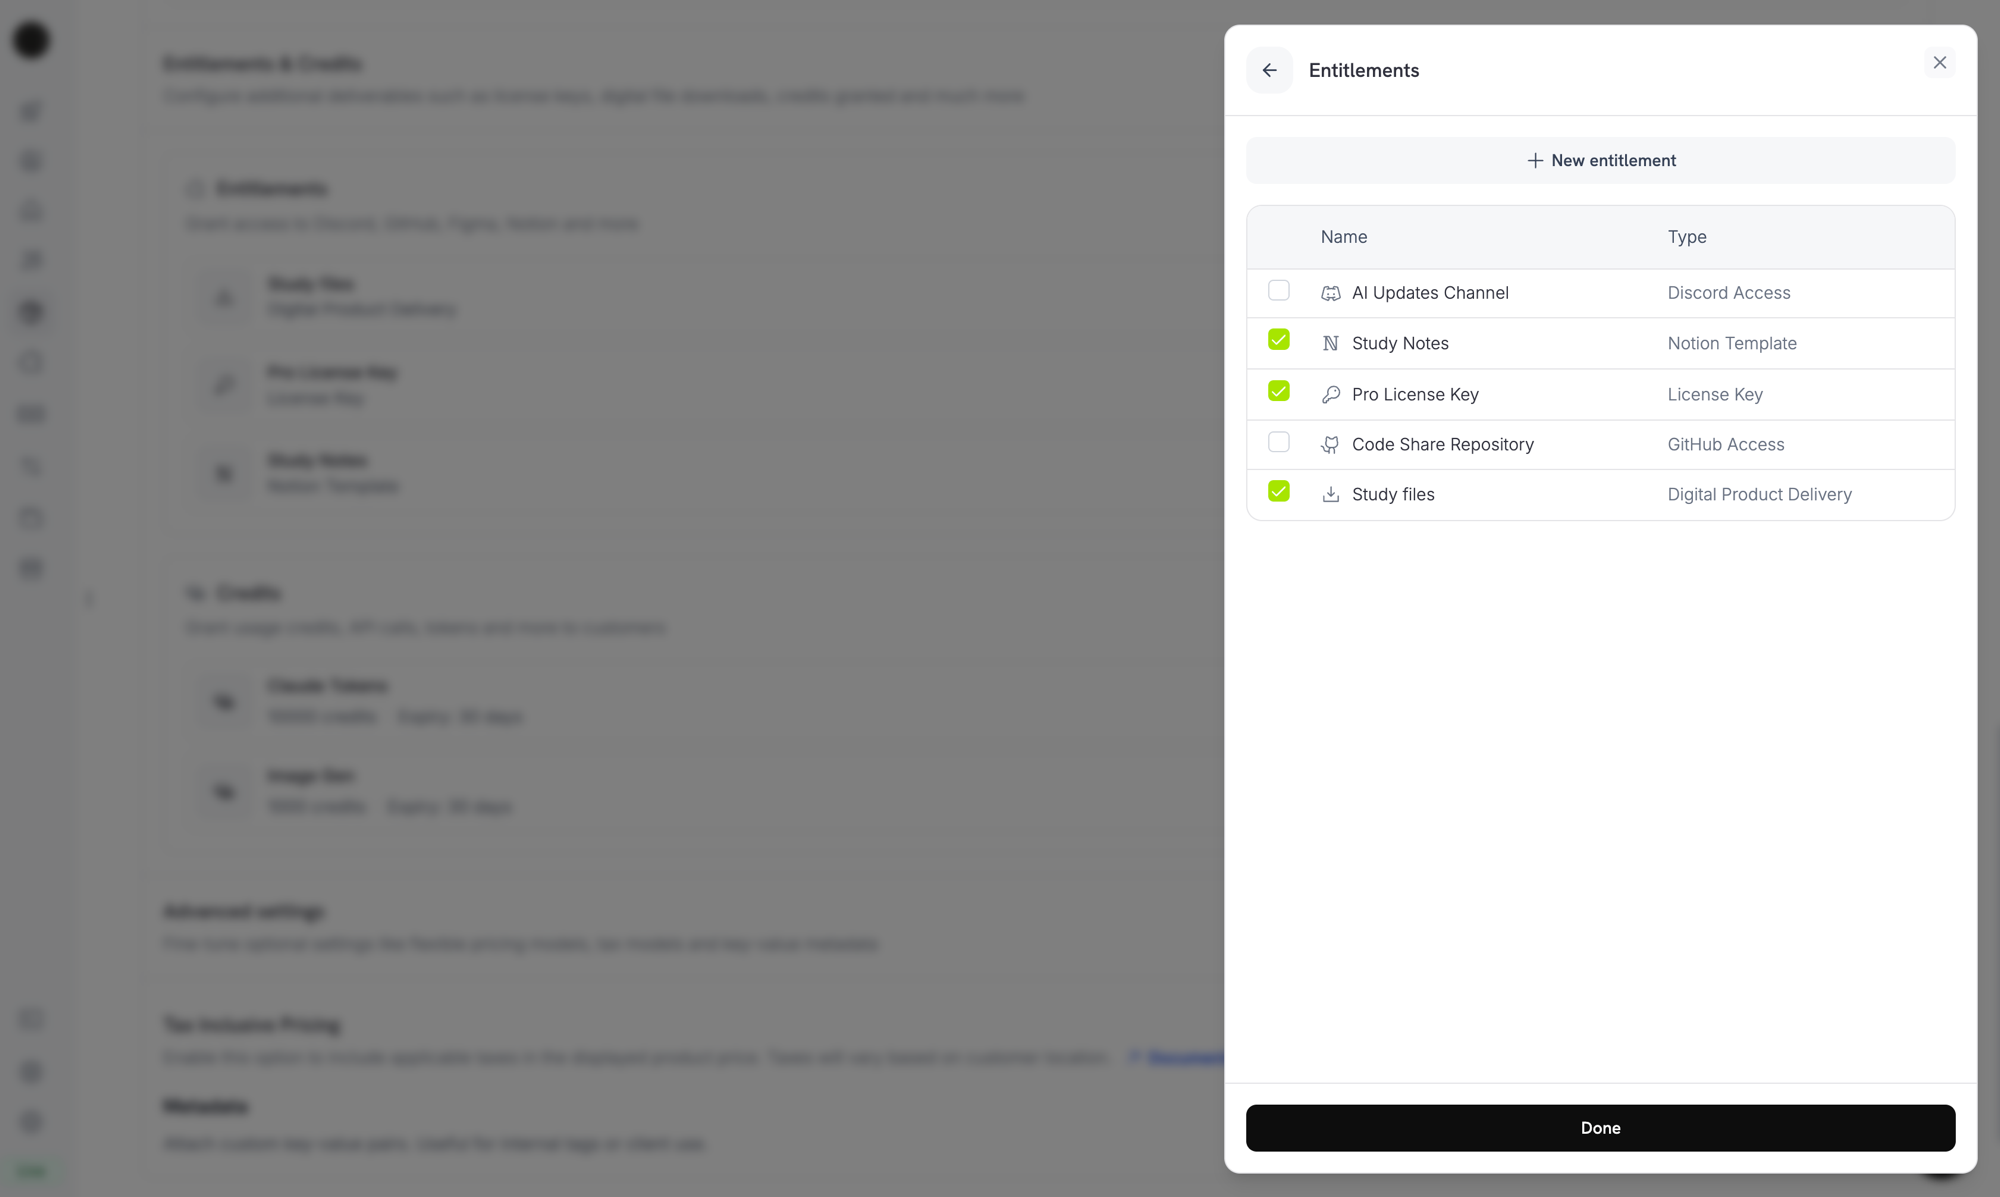
販売したい製品を開き、**詳細設定 → 権利 & クレジット**を展開し、ステップ 1 で手動に設定した**ライセンスキー権利**を選択します。単一の製品で、このライセンスキーを他の権利と同じ購入に一緒に提供することができます。
**Fulfillment Mode** ドロップダウンを開き、**自動**から**手動**に変更します。これは、このガイド全体を駆動する設定です — これがないと、キーは自動的に生成されメールされ、保留中の付与は作成されません。**手動**を選択すると、各購入であなたが発行するための `pending` 付与が作成されます。**Create Entitlement** をクリックして保存します。
権利を `integration_config.fulfillment_mode` を `manual` に設定して作成します。
```typescript Node.js theme={null} theme={null}
import DodoPayments from 'dodopayments';
const client = new DodoPayments({
bearerToken: process.env.DODO_PAYMENTS_API_KEY,
environment: 'test_mode', // defaults to 'live_mode'
});
const entitlement = await client.entitlements.create({
name: 'Pro License (Manual)',
integration_type: 'license_key',
integration_config: {
fulfillment_mode: 'manual',
activations_limit: 5,
duration_count: 1,
duration_interval: 'Year',
},
});
console.log(entitlement.id); // ent_...
```
```python Python theme={null} theme={null}
import os
from dodopayments import DodoPayments
client = DodoPayments(
bearer_token=os.environ.get("DODO_PAYMENTS_API_KEY"),
environment="test_mode", # defaults to "live_mode"
)
entitlement = client.entitlements.create(
name="Pro License (Manual)",
integration_type="license_key",
integration_config={
"fulfillment_mode": "manual",
"activations_limit": 5,
"duration_count": 1,
"duration_interval": "Year",
},
)
print(entitlement.id)
```
```bash cURL theme={null} theme={null}
curl -X POST https://test.dodopayments.com/entitlements \
-H "Authorization: Bearer $DODO_PAYMENTS_API_KEY" \
-H "Content-Type: application/json" \
-d '{
"name": "Pro License (Manual)",
"integration_type": "license_key",
"integration_config": {
"fulfillment_mode": "manual",
"activations_limit": 5,
"duration_count": 1,
"duration_interval": "Year"
}
}'
```
`fulfillment_mode` はデフォルトで `auto` です。それを省略するか、既存の権利を変更しないままでいると、自動動作が維持されます。明示的に `manual` に設定された権利のみが保留中の付与を作成します。
## ステップ 2 — 権利を製品に添付
販売したい製品を開き、**詳細設定 → 権利 & クレジット**を展開し、ステップ 1 で手動に設定した**ライセンスキー権利**を選択します。単一の製品で、このライセンスキーを他の権利と同じ購入に一緒に提供することができます。
 発行モードは**権利**のプロパティであり、製品のプロパティではありません。ステップ 1 で手動に設定したので、この権利が添付されたすべての製品は購買時に `pending` ライセンスキーの付与を作成します—ここでは何も追加で設定する必要はありません。
まだ製品を持っていない場合は、最初に製品(ワンタイムまたはサブスクリプション)を作成します。[ワンタイムペイメント統合ガイド](/developer-resources/integration-guide) を参照して、チェックアウトを通じて製品を販売します。
## ステップ 3 — 保留中の付与を検出
顧客が製品を購入すると、Dodo Payments は `pending` 状態で**キーが添付されていない**付与を作成し、`entitlement_grant.created` Webhook を発火します。これが顧客がキーを待っていることを示す合図です。
### Webhook を監視する
Webhook エンドポイントをセットアップし (ダッシュボードの Developer → Webhooks)、保留中のライセンスキー付与にアクションを起こします。実装は [Standard Webhooks](https://standardwebhooks.com/) の仕様に従います。
```typescript theme={null} theme={null}
import { Webhook } from 'standardwebhooks';
const webhook = new Webhook(process.env.DODO_WEBHOOK_KEY!);
export async function POST(request: Request) {
const rawBody = await request.text();
const headers = {
'webhook-id': request.headers.get('webhook-id') || '',
'webhook-signature': request.headers.get('webhook-signature') || '',
'webhook-timestamp': request.headers.get('webhook-timestamp') || '',
};
await webhook.verify(rawBody, headers);
const event = JSON.parse(rawBody);
// A customer bought a manual-mode license key and is waiting for it.
if (
event.type === 'entitlement_grant.created' &&
event.data.integration_type === 'license_key' &&
event.data.status === 'pending'
) {
await queueLicenseKeyFulfillment({
grantId: event.data.id,
customerId: event.data.customer_id,
});
}
return new Response('ok');
}
```
付与ペイロードは `integration_type: "license_key"` を運ぶので、余分なルックアップなしでライセンスキー付与を認識できます。完全なペイロードについては [Entitlement Grant webhook reference](/developer-resources/webhooks/intents/entitlement-grant) を参照してください。
### または List Grants API をポーリングする
Webhook に頼りたくない場合は、権利のために付与をリストし、`integration_type` と `status` でフィルタリングします:
```typescript Node.js theme={null} theme={null}
const pending = await client.entitlements.grants.list('ent_license_key_id', {
integration_type: 'license_key',
status: 'pending',
});
for (const grant of pending.items) {
console.log(`Grant ${grant.id} for customer ${grant.customer_id} needs a key`);
}
```
```bash cURL theme={null} theme={null}
curl -G https://test.dodopayments.com/entitlements/ent_license_key_id/grants \
-H "Authorization: Bearer $DODO_PAYMENTS_API_KEY" \
--data-urlencode "integration_type=license_key" \
--data-urlencode "status=pending"
```
## ステップ 4 — キーを配信
独自のシステムからキーの値を取得し、[Fulfill License Key Grant](/api-reference/entitlements/fulfill-license-key) エンドポイントに送信します。これには秘密の API キー (編集者権限) が必要です。これは公開ライセンスエンドポイントのひとつでは**ありません**。
```typescript Node.js theme={null} theme={null}
async function fulfill(grantId: string, key: string) {
const res = await fetch(
`https://test.dodopayments.com/grants/${grantId}/license-key`,
{
method: 'POST',
headers: {
'Content-Type': 'application/json',
Authorization: `Bearer ${process.env.DODO_PAYMENTS_API_KEY}`,
},
body: JSON.stringify({
key,
// Optional — fall back to the entitlement config when omitted
activations_limit: 5,
expires_at: '2027-05-01T00:00:00Z',
}),
},
);
if (!res.ok) {
// See the status code table below for handling
throw new Error(`Fulfillment failed: ${res.status}`);
}
return res.json(); // updated grant, now status: "delivered"
}
```
```bash cURL theme={null} theme={null}
curl -X POST https://test.dodopayments.com/grants/grant_8VbC6JDZ/license-key \
-H "Authorization: Bearer $DODO_PAYMENTS_API_KEY" \
-H "Content-Type: application/json" \
-d '{
"key": "PRO-AAAA-BBBB-CCCC-DDDD",
"activations_limit": 5,
"expires_at": "2027-05-01T00:00:00Z"
}'
```
### リクエストフィールド
顧客に配信するためのライセンスキー文字列。空白がトリムされます。空または空白のみの値は拒否されます。
キーごとのアクティベーション制限。省略時は権利の設定にフォールバックします。
キーごとの有効期限 (ISO 8601)。省略時は権利設定の期間にフォールバックします。サブスクリプション発行の付与の場合、有効性はサブスクリプションに関係なくつながれたままです。
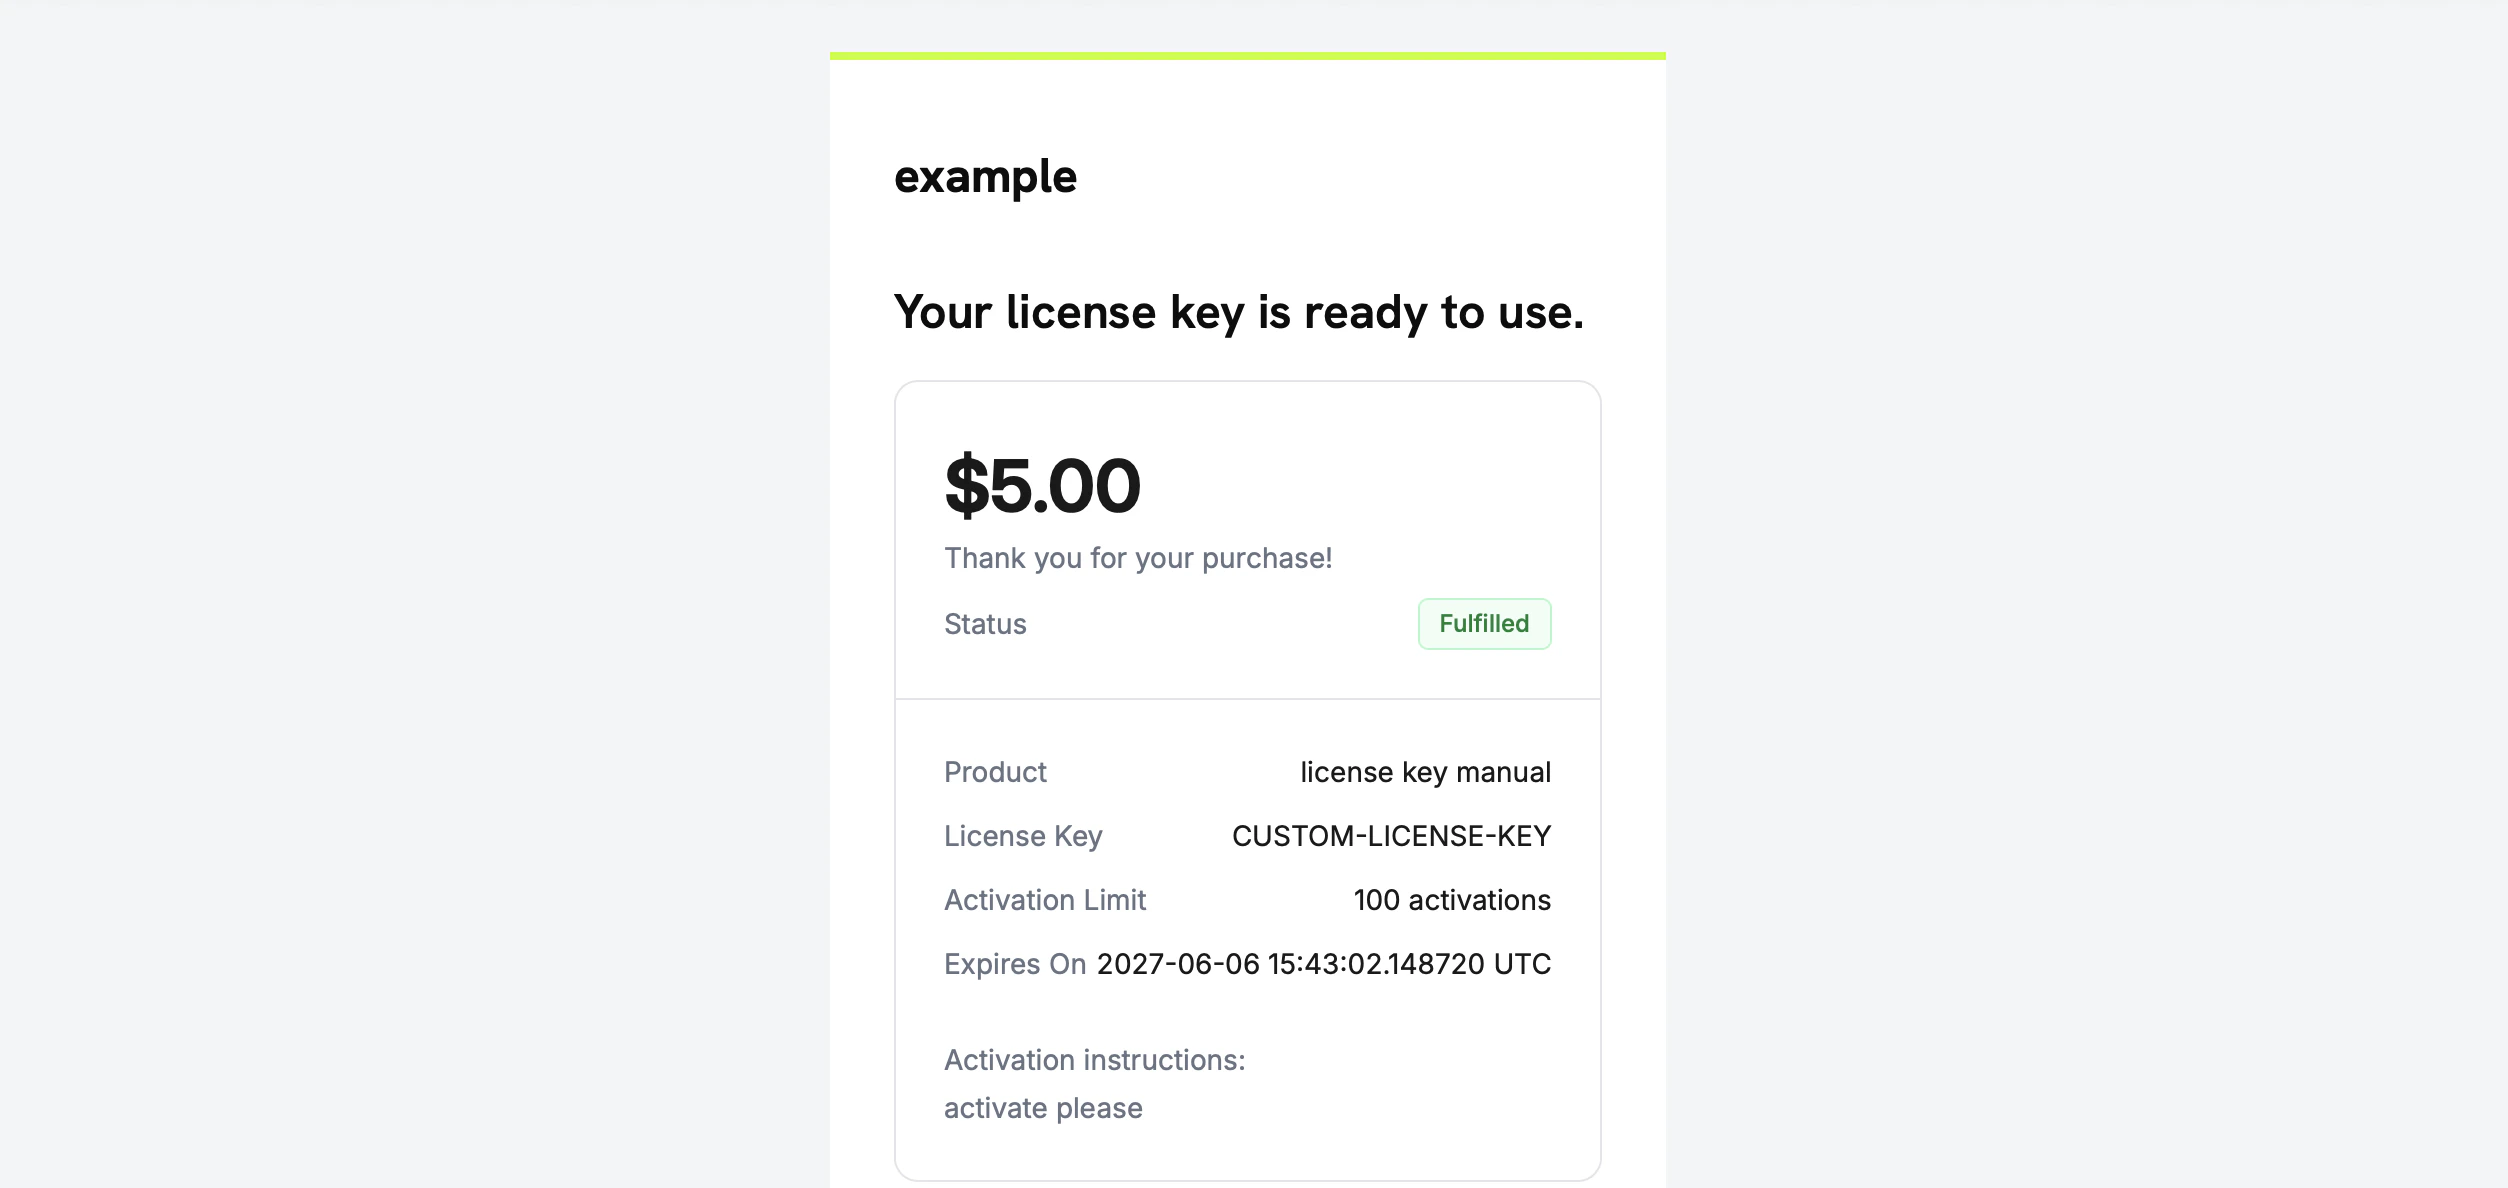
成功すれば付与が `delivered` に移行し、顧客に自動的にキーが送信されます(自動発行の下で受け取るのと同じメール)、`entitlement_grant.delivered` が発火します。
顧客はライセンスキー、製品、アクティベーション制限、有効期限、あなたのアクティベーション指示が含まれるメールを受け取ります:
発行モードは**権利**のプロパティであり、製品のプロパティではありません。ステップ 1 で手動に設定したので、この権利が添付されたすべての製品は購買時に `pending` ライセンスキーの付与を作成します—ここでは何も追加で設定する必要はありません。
まだ製品を持っていない場合は、最初に製品(ワンタイムまたはサブスクリプション)を作成します。[ワンタイムペイメント統合ガイド](/developer-resources/integration-guide) を参照して、チェックアウトを通じて製品を販売します。
## ステップ 3 — 保留中の付与を検出
顧客が製品を購入すると、Dodo Payments は `pending` 状態で**キーが添付されていない**付与を作成し、`entitlement_grant.created` Webhook を発火します。これが顧客がキーを待っていることを示す合図です。
### Webhook を監視する
Webhook エンドポイントをセットアップし (ダッシュボードの Developer → Webhooks)、保留中のライセンスキー付与にアクションを起こします。実装は [Standard Webhooks](https://standardwebhooks.com/) の仕様に従います。
```typescript theme={null} theme={null}
import { Webhook } from 'standardwebhooks';
const webhook = new Webhook(process.env.DODO_WEBHOOK_KEY!);
export async function POST(request: Request) {
const rawBody = await request.text();
const headers = {
'webhook-id': request.headers.get('webhook-id') || '',
'webhook-signature': request.headers.get('webhook-signature') || '',
'webhook-timestamp': request.headers.get('webhook-timestamp') || '',
};
await webhook.verify(rawBody, headers);
const event = JSON.parse(rawBody);
// A customer bought a manual-mode license key and is waiting for it.
if (
event.type === 'entitlement_grant.created' &&
event.data.integration_type === 'license_key' &&
event.data.status === 'pending'
) {
await queueLicenseKeyFulfillment({
grantId: event.data.id,
customerId: event.data.customer_id,
});
}
return new Response('ok');
}
```
付与ペイロードは `integration_type: "license_key"` を運ぶので、余分なルックアップなしでライセンスキー付与を認識できます。完全なペイロードについては [Entitlement Grant webhook reference](/developer-resources/webhooks/intents/entitlement-grant) を参照してください。
### または List Grants API をポーリングする
Webhook に頼りたくない場合は、権利のために付与をリストし、`integration_type` と `status` でフィルタリングします:
```typescript Node.js theme={null} theme={null}
const pending = await client.entitlements.grants.list('ent_license_key_id', {
integration_type: 'license_key',
status: 'pending',
});
for (const grant of pending.items) {
console.log(`Grant ${grant.id} for customer ${grant.customer_id} needs a key`);
}
```
```bash cURL theme={null} theme={null}
curl -G https://test.dodopayments.com/entitlements/ent_license_key_id/grants \
-H "Authorization: Bearer $DODO_PAYMENTS_API_KEY" \
--data-urlencode "integration_type=license_key" \
--data-urlencode "status=pending"
```
## ステップ 4 — キーを配信
独自のシステムからキーの値を取得し、[Fulfill License Key Grant](/api-reference/entitlements/fulfill-license-key) エンドポイントに送信します。これには秘密の API キー (編集者権限) が必要です。これは公開ライセンスエンドポイントのひとつでは**ありません**。
```typescript Node.js theme={null} theme={null}
async function fulfill(grantId: string, key: string) {
const res = await fetch(
`https://test.dodopayments.com/grants/${grantId}/license-key`,
{
method: 'POST',
headers: {
'Content-Type': 'application/json',
Authorization: `Bearer ${process.env.DODO_PAYMENTS_API_KEY}`,
},
body: JSON.stringify({
key,
// Optional — fall back to the entitlement config when omitted
activations_limit: 5,
expires_at: '2027-05-01T00:00:00Z',
}),
},
);
if (!res.ok) {
// See the status code table below for handling
throw new Error(`Fulfillment failed: ${res.status}`);
}
return res.json(); // updated grant, now status: "delivered"
}
```
```bash cURL theme={null} theme={null}
curl -X POST https://test.dodopayments.com/grants/grant_8VbC6JDZ/license-key \
-H "Authorization: Bearer $DODO_PAYMENTS_API_KEY" \
-H "Content-Type: application/json" \
-d '{
"key": "PRO-AAAA-BBBB-CCCC-DDDD",
"activations_limit": 5,
"expires_at": "2027-05-01T00:00:00Z"
}'
```
### リクエストフィールド
顧客に配信するためのライセンスキー文字列。空白がトリムされます。空または空白のみの値は拒否されます。
キーごとのアクティベーション制限。省略時は権利の設定にフォールバックします。
キーごとの有効期限 (ISO 8601)。省略時は権利設定の期間にフォールバックします。サブスクリプション発行の付与の場合、有効性はサブスクリプションに関係なくつながれたままです。
成功すれば付与が `delivered` に移行し、顧客に自動的にキーが送信されます(自動発行の下で受け取るのと同じメール)、`entitlement_grant.delivered` が発火します。
顧客はライセンスキー、製品、アクティベーション制限、有効期限、あなたのアクティベーション指示が含まれるメールを受け取ります:
 キーを自分でメール送信する必要はありません—付与が完了すると自動的に配信されます。
## ステップ 5 — エラーと再試行の処理
エンドポイントは何も配信する前に付与を検証します。次の応答を処理します:
| ステータス | 意味 | すべきこと |
| ----- | ------------------------------------------------------ | -------------------------------------------------- |
| `200` | キーが配信され、付与は現在 `delivered` です。 | 完了。 |
| `400` | ライセンスキーの付与ではない、またはキーが空/空白。 | リクエストを修正し、そのまま再試行しないでください。 |
| `404` | ビジネスにその ID の付与は存在しません。 | `grant_id` を確認します。 |
| `409` | 付与は発行待ちでない(すでに配信されているか、すでにキーがある)、**または** キー値がすでに存在します。 | すでに配信されている場合は、成功として処理します。重複したキーの場合は、別のキーを提供してください。 |
| `422` | リクエスト本文のバリデーションに失敗した(例: `activations_limit < 1`)。 | フィールドを修正して再試行してください。 |
一時的なエラー(タイムアウト、`5xx`)については発行を安全に再試行できます。各付与は一度だけ満たすことができるため、成功したが確認されなかった後の再試行は、二つ目のキーを発行したり重複したメールを送信する代わりに `409` を返します。付与 `id` を冪等性キーとして使用してください。
## フローを確認
1. テストモードで製品を購入 (チェックアウトガイドを参照: [checkout guides](/developer-resources/integration-guide))。
2. Webhook で `entitlement_grant.created` が `status: "pending"` と `integration_type: "license_key"` を受信していることを確認、または付与がこれらのフィルタで List Grants の応答に表示されることを確認します。
3. テストキーで発行エンドポイントを呼び出します。
4. 応答が `status: "delivered"` を示し、`license_key` が入力され、顧客がキーのメールを受け取り、`entitlement_grant.delivered` が発火することを確認します。
配信後、顧客は [アクティベーションと検証](/features/license-keys#activation-validation-deactivation) を公開ライセンスエンドポイントに対して自動生成されたキーのように行うことができます。
## 関連 API リファレンス
`fulfillment_mode: manual` でライセンスキーの権利を作成します。
`integration_type` と `status` でフィルターして保留中の付与を見つけます。
キーの値を配信し、付与を配信済みへと移行します。
保留中と配信済みの付与を示す `entitlement_grant.*` イベント。
Create the License Key entitlement with `fulfillment_mode: manual`.
Filter by `integration_type` and `status` to find pending grants.
Deliver the key value and transition the grant to delivered.
The `entitlement_grant.*` events that signal pending and delivered grants.
キーを自分でメール送信する必要はありません—付与が完了すると自動的に配信されます。
## ステップ 5 — エラーと再試行の処理
エンドポイントは何も配信する前に付与を検証します。次の応答を処理します:
| ステータス | 意味 | すべきこと |
| ----- | ------------------------------------------------------ | -------------------------------------------------- |
| `200` | キーが配信され、付与は現在 `delivered` です。 | 完了。 |
| `400` | ライセンスキーの付与ではない、またはキーが空/空白。 | リクエストを修正し、そのまま再試行しないでください。 |
| `404` | ビジネスにその ID の付与は存在しません。 | `grant_id` を確認します。 |
| `409` | 付与は発行待ちでない(すでに配信されているか、すでにキーがある)、**または** キー値がすでに存在します。 | すでに配信されている場合は、成功として処理します。重複したキーの場合は、別のキーを提供してください。 |
| `422` | リクエスト本文のバリデーションに失敗した(例: `activations_limit < 1`)。 | フィールドを修正して再試行してください。 |
一時的なエラー(タイムアウト、`5xx`)については発行を安全に再試行できます。各付与は一度だけ満たすことができるため、成功したが確認されなかった後の再試行は、二つ目のキーを発行したり重複したメールを送信する代わりに `409` を返します。付与 `id` を冪等性キーとして使用してください。
## フローを確認
1. テストモードで製品を購入 (チェックアウトガイドを参照: [checkout guides](/developer-resources/integration-guide))。
2. Webhook で `entitlement_grant.created` が `status: "pending"` と `integration_type: "license_key"` を受信していることを確認、または付与がこれらのフィルタで List Grants の応答に表示されることを確認します。
3. テストキーで発行エンドポイントを呼び出します。
4. 応答が `status: "delivered"` を示し、`license_key` が入力され、顧客がキーのメールを受け取り、`entitlement_grant.delivered` が発火することを確認します。
配信後、顧客は [アクティベーションと検証](/features/license-keys#activation-validation-deactivation) を公開ライセンスエンドポイントに対して自動生成されたキーのように行うことができます。
## 関連 API リファレンス
`fulfillment_mode: manual` でライセンスキーの権利を作成します。
`integration_type` と `status` でフィルターして保留中の付与を見つけます。
キーの値を配信し、付与を配信済みへと移行します。
保留中と配信済みの付与を示す `entitlement_grant.*` イベント。
Create the License Key entitlement with `fulfillment_mode: manual`.
Filter by `integration_type` and `status` to find pending grants.
Deliver the key value and transition the grant to delivered.
The `entitlement_grant.*` events that signal pending and delivered grants.