> ## Documentation Index
> Fetch the complete documentation index at: https://docs.dodopayments.com/llms.txt
> Use this file to discover all available pages before exploring further.

# Costruisci un'app di chat AI con AI SDK e LLM Blueprint

> Segui mentre costruiamo un'app di chat AI con tracciamento automatico dei token e fatturazione basata sull'uso

<Tip>
  <strong>Lascia che Sentra scriva il codice della tua integrazione per te.</strong><br />
  Usa il nostro assistente AI in VS Code, Cursor o Windsurf per generare codice SDK/API, codice di integrazione LLM Blueprint, webhook e altro ancora, descrivendo semplicemente ciò che desideri.

  <a href="https://dodopayments.com/sentra" target="_blank" rel="noopener noreferrer">
    Prova Sentra: integrazione alimentata da AI →
  </a>
</Tip>

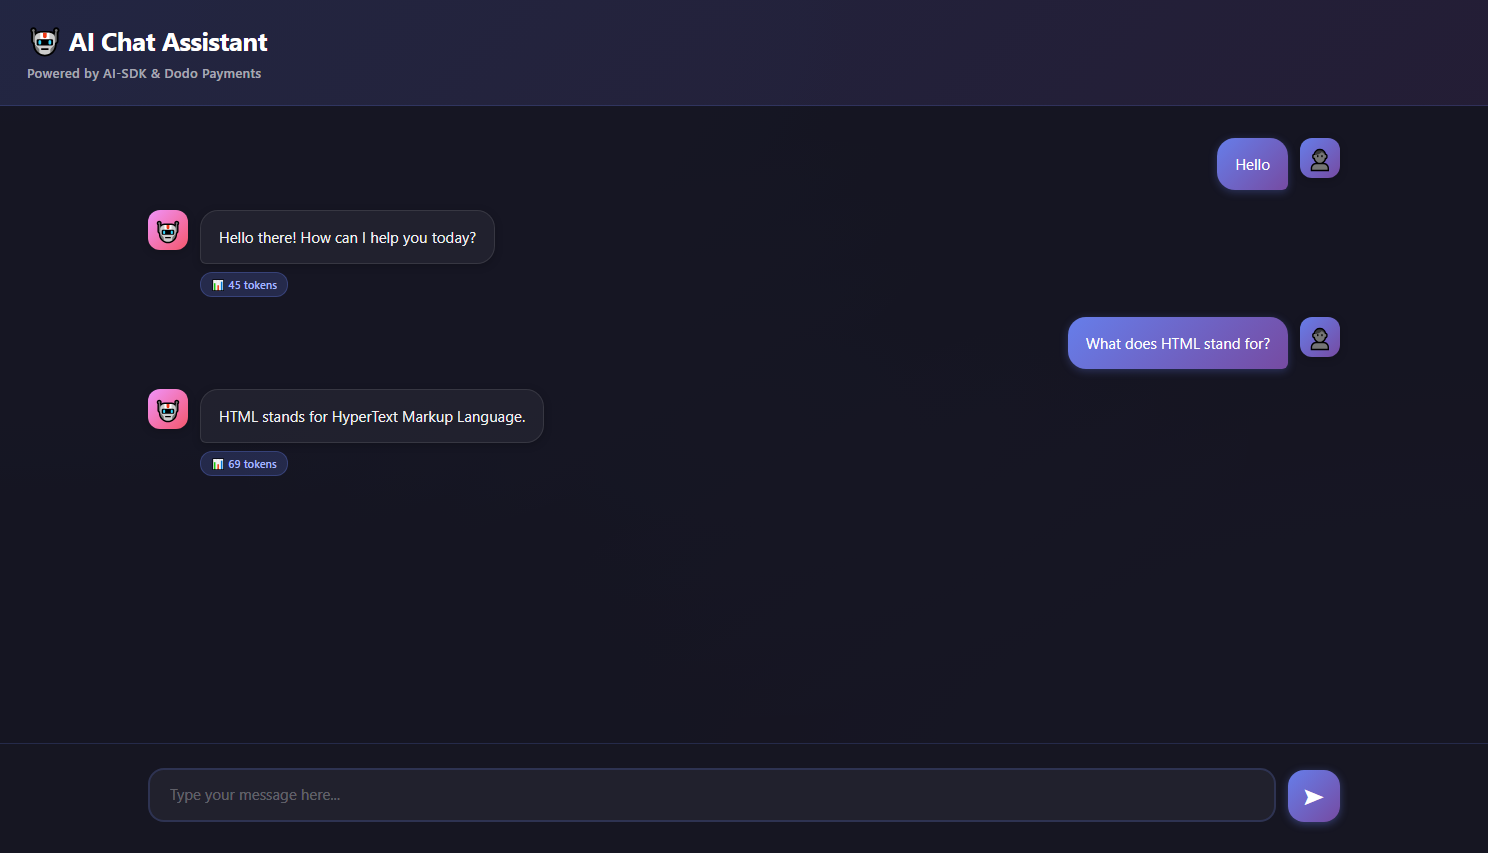
In questo tutorial, costruirai un **applicazione di chat AI** con fatturazione automatica basata sull'uso. Creeremo tutto da zero: il contatore di fatturazione, la configurazione del prodotto e il codice dell'applicazione che alimenta le conversazioni e tiene traccia dell'uso dei token in tempo reale.

<Note>
  Questo tutorial fornisce un'applicazione completa funzionante sia con backend che frontend. L'app di chat utilizza l'AI Gemini di Google e monitora automaticamente l'utilizzo dei token senza bisogno di conteggi manuali.
</Note>

Entro la fine di questo tutorial, avrai un'app di chat funzionante che:

* Alimenta conversazioni AI utilizzando Google Gemini (AI SDK)
* Tiene automaticamente traccia dell'uso dei token (senza codice manuale)
* Addebita ai clienti in base al consumo effettivo di token
* Include un'interfaccia di chat bellissima

<Frame>
  <img src="https://mintcdn.com/dodopayments/oig3NPG69DDpua_S/images/cookbooks/ai-chat-app/ai-chat-demo.png?fit=max&auto=format&n=oig3NPG69DDpua_S&q=85&s=9d9932fb528b64632cfbedaad98c09f3" alt="Demo Chat AI" style={{ maxHeight: '500px', width: 'auto' }} width="1488" height="853" data-path="images/cookbooks/ai-chat-app/ai-chat-demo.png" />
</Frame>

## Cosa Stiamo Costruendo

Iniziamo comprendendo il nostro servizio di chat AI:

* **Servizio**: chat potenziata da AI utilizzando Google Gemini (AI SDK)
* **Modello di Prezzo**: Pagamento per token (\$0.01 per 1.000 token)
* **Livello Gratuito**: 10.000 token gratuiti per cliente al mese
* **Caratteristiche**: Cronologia delle conversazioni, tracciamento automatico dei token

<Info>
  Prima di iniziare, assicurati di avere:

  * Un account Dodo Payments
  * Una chiave API Google AI ([Recupèrala da aistudio](https://aistudio.google.com/api-keys))
  * Node.js v16+ installato
</Info>

***

## Passo 1: Crea il Tuo Contatore di Utilizzo

Inizieremo creando un contatore nel tuo dashboard Dodo Payments che terrà traccia dell'uso dei token AI.

<Tip>
  **Cosa stiamo costruendo**: Un contatore chiamato “AI Token Usage Meter” che somma tutti i token consumati nelle conversazioni di chat.
</Tip>

<Steps>
  <Step title="Open the Meters section">
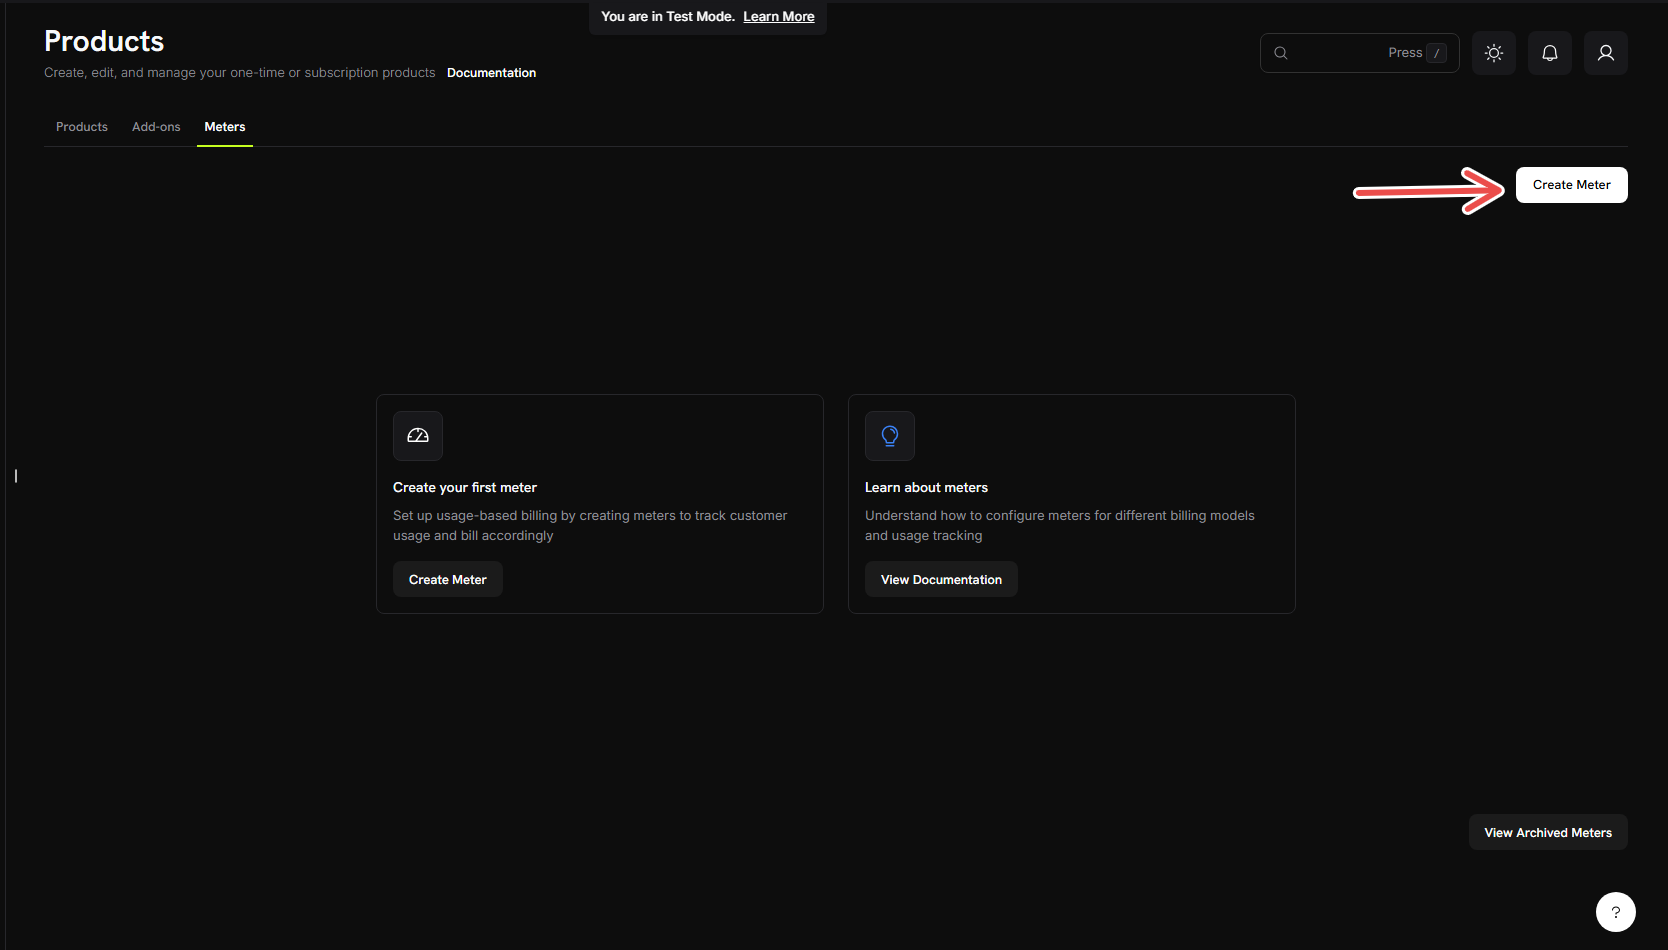
    1. Accedi alla dashboard di Dodo Payments
    2. Clicca su Prodotti nella barra laterale sinistra
    3. Clicca su **Meters**
    4. Clicca sul pulsante **Crea Meter**

    <Frame>
      <img src="https://mintcdn.com/dodopayments/oig3NPG69DDpua_S/images/cookbooks/ai-chat-app/create-meter.png?fit=max&auto=format&n=oig3NPG69DDpua_S&q=85&s=e5aa342d55a4a9c7323cf68015f737e4" alt="Crea Contatore" style={{ maxHeight: '500px', width: 'auto' }} width="1668" height="950" data-path="images/cookbooks/ai-chat-app/create-meter.png" />
    </Frame>

    Dovresti vedere un modulo in cui configureremo il monitoraggio dei token.
  </Step>

  <Step title="Fill in the basic meter information">
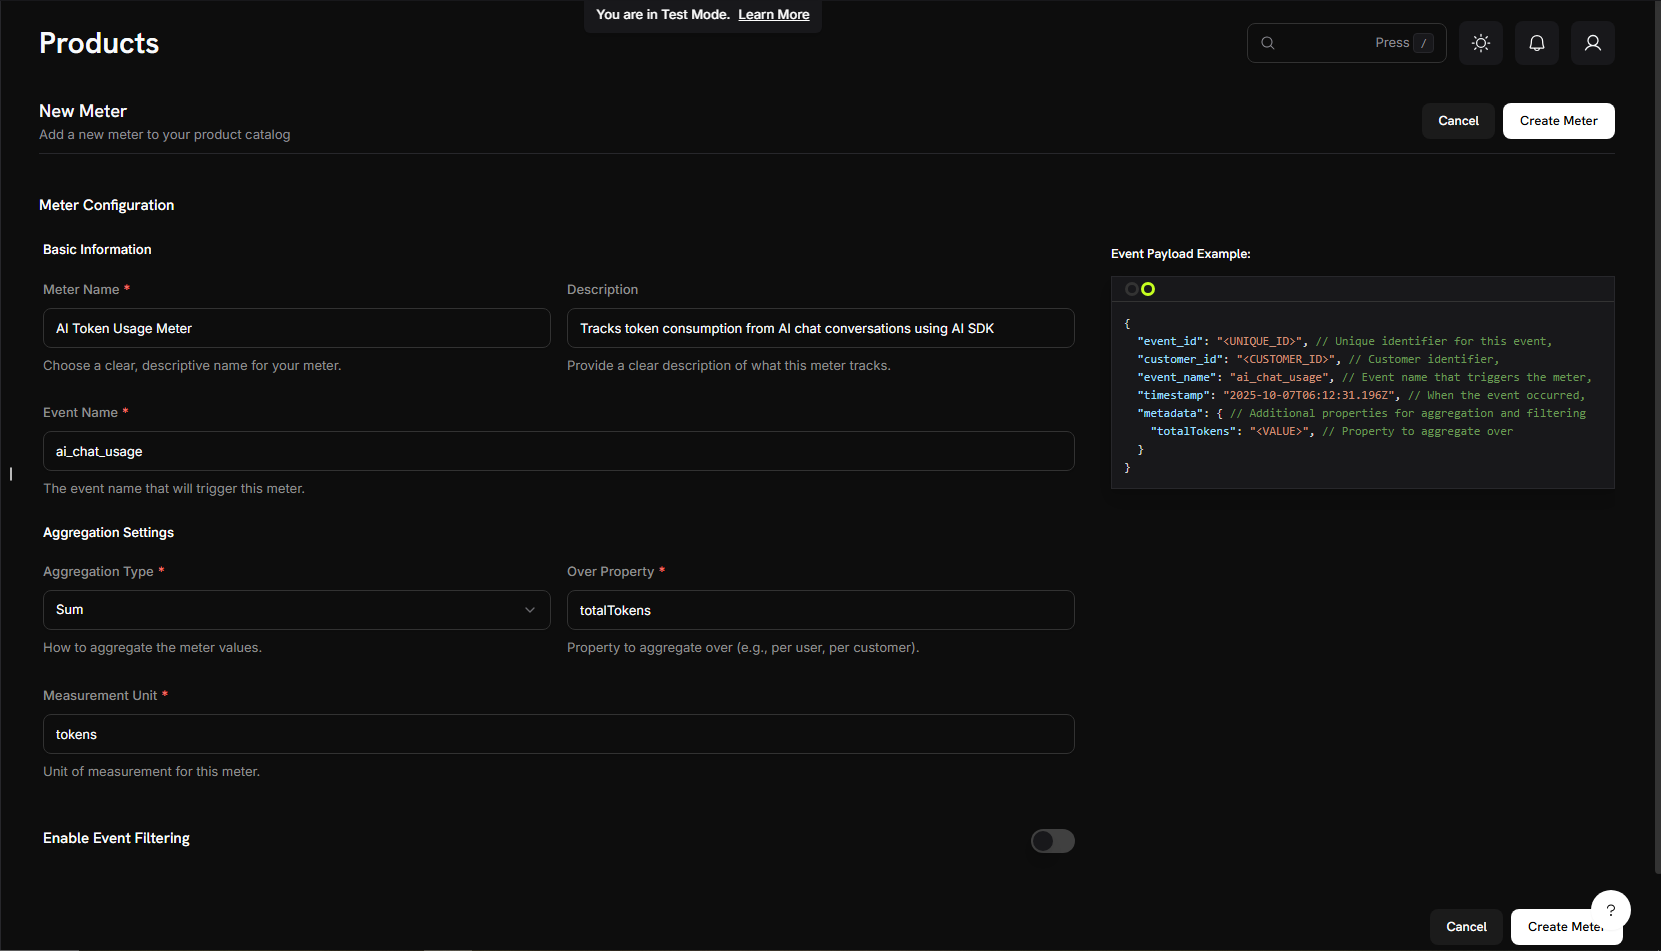
    Ora inseriremo i dettagli specifici per il nostro servizio di chat AI:

    **Nome del Meter** → `AI Token Usage Meter`

    **Descrizione** → `Tracks token consumption from AI chat conversations using AI SDK`

    **Nome Evento** → `ai_chat_usage`

    <Warning>
      Il nome evento `ai_chat_usage` deve corrispondere esattamente a quello che invieremo dal codice dell'applicazione in seguito. I nomi degli eventi sono sensibili alle maiuscole!
    </Warning>
  </Step>

  <Step title="Configure how we count tokens">
    Configura l'aggregazione (il modo in cui il meter conteggia i nostri eventi):

    **Tipo di Aggregazione**: Seleziona **Somma** dal menu a discesa

    **Aggrega su**: Tipo → `totalTokens`

    **Unità di Misura**: Tipo → `tokens`

    <Info>
      Stiamo usando “Somma” perché vogliamo aggiungere tutti i token consumati in più messaggi di chat. L’SDK invia automaticamente `totalTokens` in ogni evento.
    </Info>
  </Step>

  <Step title="Create your meter">
    1. Ricontrolla che tutte le impostazioni corrispondano ai valori indicati sopra
    2. Clicca su **Crea Meter**

    <Frame>
      <img src="https://mintcdn.com/dodopayments/4L3_sb2jJa5trJWD/images/cookbooks/ai-chat-app/meter-configuration.png?fit=max&auto=format&n=4L3_sb2jJa5trJWD&q=85&s=c5b4f56326b6825847c9fc7666056102" alt="Configurazione Contatore" style={{ maxHeight: '500px', width: 'auto' }} width="1661" height="951" data-path="images/cookbooks/ai-chat-app/meter-configuration.png" />
    </Frame>

    <Check>
      **Meter creato!** Il tuo “AI Token Usage Meter” è ora pronto a iniziare a contare i token. Successivamente lo collegheremo a un prodotto di fatturazione.
    </Check>
  </Step>
</Steps>

## Passo 2: Ottieni le Tue Chiavi API

Prima di costruire l'app, raccogliamo le chiavi API di cui avremo bisogno.

<Steps>
  <Step title="Get Dodo Payments API Key">
    1. Nel tuo cruscotto Dodo Payments, vai su **Developers** → **API Keys**
    2. Clicca su **Create API Key**
    3. Copia la chiave API - sarà simile a `test_abc123...`

    <Note>
      Salva questa chiave API - la aggiungeremo al file `.env` più avanti.
    </Note>
  </Step>

  <Step title="Get Google AI API Key">
    1. Visita [aistudio.google.com](https://aistudio.google.com/api-keys)
    2. Clicca su **Get API Key**
    3. Crea una nuova chiave API o usa una esistente
    4. Copia la chiave

    <Note>
      Tieni al sicuro questa chiave - la aggiungeremo anche al file `.env`.
    </Note>
  </Step>
</Steps>

***

## Passo 3: Crea il Tuo Prodotto di Fatturazione

Ora dobbiamo creare un prodotto che definisca il nostro prezzo (\$0.01 per 1.000 token con 10.000 token gratuiti). Questo collega il nostro contatore alla fatturazione effettiva.

<Tip>
  **Cosa stiamo costruendo**: Un prodotto chiamato “AI Chat Service” che fattura in base al consumo dei token con una generosa soglia gratuita.
</Tip>

<Steps>
  <Step title="Navigate to Products">
    1. Nella dashboard di Dodo Payments, clicca su **Products** nella barra laterale sinistra
    2. Clicca su **Create Product**
    3. Seleziona **Usage-Based** come tipo di prodotto

    Questo indica a Dodo Payments che la fatturazione sarà basata sull'utilizzo del meter, non su un abbonamento fisso.
  </Step>

  <Step title="Enter product details">
    Compila i dettagli richiesti:

    **Nome Prodotto**: → `AI Chat Service`

    **Descrizione**: → `AI-powered chat service with automatic token-based billing`

    **Immagine del Prodotto**: Carica un'immagine pertinente

    <Info>
      Questi compariranno sulle fatture dei clienti, quindi assicurati che siano chiari e professionali.
    </Info>
  </Step>

  <Step title="Connect your meter">
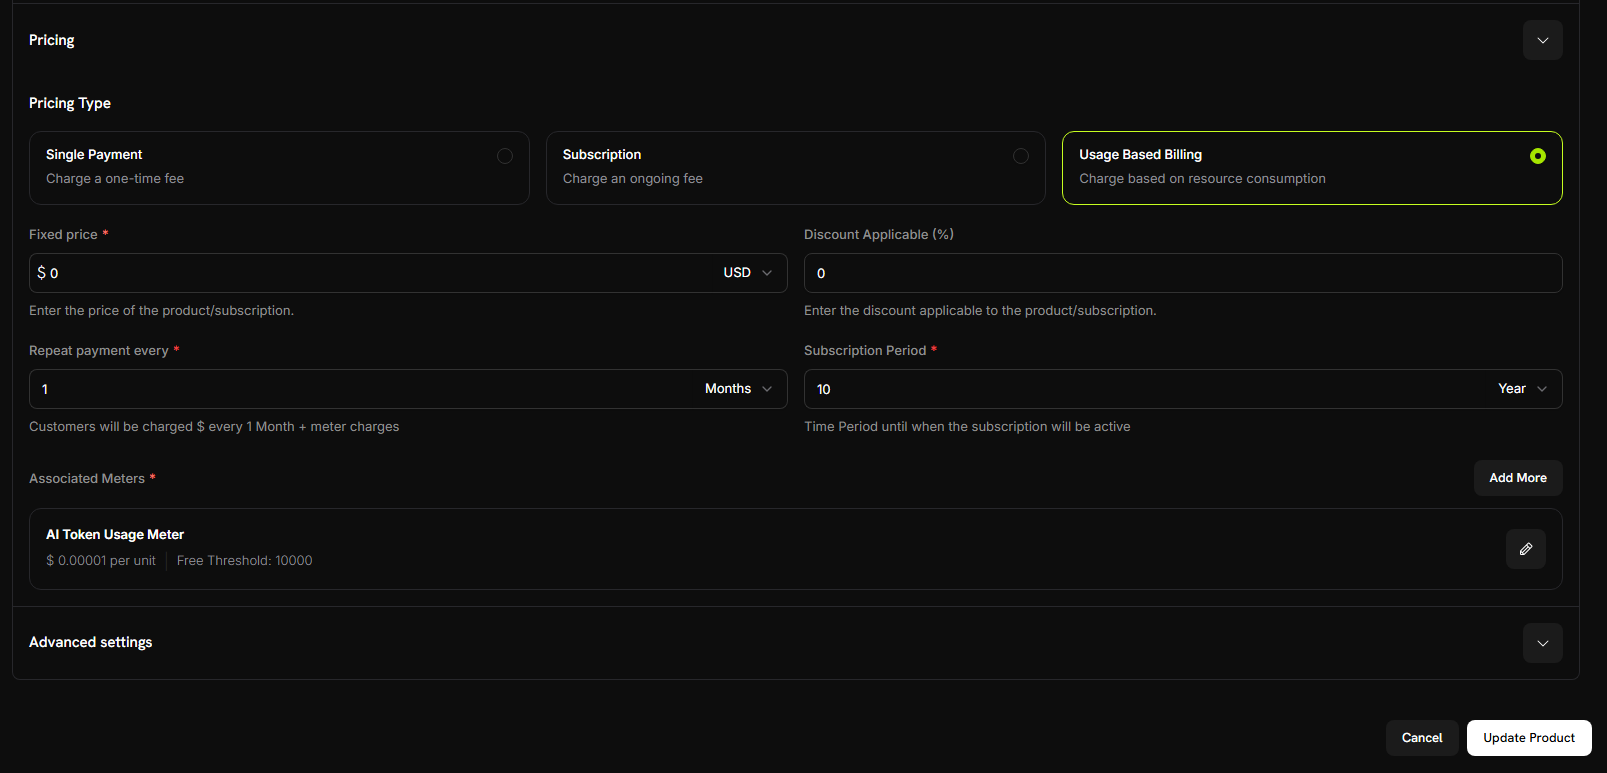
    Prima di connettere il meter, assicurati di aver selezionato **Usage Based Billing** come tipo di prezzo per il tuo prodotto.

    Inoltre, imposta il **Prezzo Fisso** a `0` per garantire che i clienti vengano fatturati solo in base al loro utilizzo, senza alcuna tariffa base.

    Ora, collega il contatore che hai appena creato:

    1. Scorri verso il basso fino alla sezione **Contatore Associato**
    2. Clicca su **Aggiungi Contatori**
    3. Dal menu a discesa, seleziona **"Contatore di Utilizzo Token AI"** (quello che hai creato in precedenza)
    4. Conferma che appaia nella configurazione del tuo prodotto

    <Check>
      Il tuo meter è ora connesso con successo a questo prodotto.
    </Check>
  </Step>

  <Step title="Set your pricing">
    Qui definiamo il nostro modello di business:

    **Prezzo per unità**: Inserisci → `0.00001` (questo corrisponde a $0.01 per 1.000 token o $0.00001 per token)

    **Soglia gratuita**: Inserisci → `10000` (i clienti ottengono 10.000 token gratuiti al mese)

    <Frame>
      <img src="https://mintcdn.com/dodopayments/4L3_sb2jJa5trJWD/images/cookbooks/ai-chat-app/product-pricing.png?fit=max&auto=format&n=4L3_sb2jJa5trJWD&q=85&s=e92dcb98316e970c1b921e0572f10b43" alt="Prezzo del Prodotto" style={{ maxHeight: '500px', width: 'auto' }} width="1607" height="773" data-path="images/cookbooks/ai-chat-app/product-pricing.png" />
    </Frame>

    <Tip>
      **Come funziona la fatturazione**: Se un cliente usa 25.000 token in un mese, verrà fatturato per 15.000 token (25.000 - 10.000 gratuiti) = 15.000 × $0.00001 = $0.15
    </Tip>
  </Step>

  <Step title="Save your product">
    1. Rivedi tutte le impostazioni:
       * Nome: AI Chat Service
       * Meter: AI Token Usage Meter
       * Prezzo: \$0.01 per 1.000 token
       * Tier gratuito: 10.000 token
    2. Clicca su **Save Changes**

    <Check>
      **Prodotto creato!** La tua fatturazione è ora configurata. I clienti verranno addebitati automaticamente in base al loro consumo di token.
    </Check>
  </Step>
</Steps>

## Passo 4: Effettua un Acquisto di Prova

Prima di iniziare a costruire l'app, creiamo un cliente di prova effettuando un acquisto.

<Steps>
  <Step title="Get your payment link">
    1. Nella dashboard di Dodo Payments, vai su **Products**
    2. Trova il tuo prodotto “AI Chat Service”
    3. Clicca sul pulsante **Share** accanto al prodotto
    4. Copia il link di pagamento che appare
  </Step>

  <Step title="Complete a test purchase">
    1. Apri il link di pagamento in una nuova scheda del browser
    2. Inserisci dettagli di pagamento di test e completa l'acquisto

    <Check>
      Dopo il pagamento riuscito, avrai un ID cliente che useremo nel codice dell'applicazione.
    </Check>
  </Step>

  <Step title="Find your customer ID">
    1. Torna alla dashboard di Dodo Payments
    2. Vai su **Sales** -> **Customers** nella barra laterale sinistra
    3. Trova il cliente appena creato (con l'email di test)
    4. Copia l’ID cliente - sarà simile a `cus_123`

    <Note>
      Salva questo ID cliente - lo useremo per testare la nostra applicazione di chat.
    </Note>
  </Step>
</Steps>

## Passo 5: Costruisci l'Applicazione di Chat

Ora abbiamo completato la configurazione della fatturazione e creato un cliente di prova. Costruiamo l'applicazione di chat AI con tracciamento automatico dei token.

<Steps>
  <Step title="Set up your project">
    Crea una nuova directory e inizializza il progetto:

    ```bash theme={null}
    mkdir ai-chat-app
    cd ai-chat-app
    npm init -y
    ```
  </Step>

  <Step title="Install dependencies">
    Installa i pacchetti necessari:

    ```bash theme={null}
    npm install express ai @ai-sdk/google @dodopayments/ingestion-blueprints dotenv
    npm install --save-dev typescript @types/express @types/node tsx
    ```
  </Step>

  <Step title="Configure TypeScript">
    Crea `tsconfig.json`:

    ```json tsconfig.json theme={null}
    {
      "compilerOptions": {
        "target": "ES2020",
        "module": "ESNext",
        "moduleResolution": "node",
        "esModuleInterop": true,
        "strict": true,
        "skipLibCheck": true,
        "outDir": "./dist",
        "rootDir": "./src"
      },
      "include": ["src/**/*"],
      "exclude": ["node_modules"]
    }
    ```

    Aggiorna `package.json` per aggiungere il tipo di modulo e gli script:

    ```json package.json theme={null}
    {
      "type": "module",
      "scripts": {
        "dev": "tsx src/server.ts",
        "build": "tsc",
        "start": "node dist/server.js"
      }
    }
    ```
  </Step>

  <Step title="Create project structure">
    Crea le cartelle e i file:

    ```bash theme={null}
    mkdir src public
    ```
  </Step>

  <Step title="Set up environment variables">
    Crea un file `.env` nella radice del progetto:

    ```bash .env theme={null}
    DODO_PAYMENTS_API_KEY=your_dodo_api_key_here
    DODO_ENVIRONMENT=test_mode
    GOOGLE_GENERATIVE_AI_API_KEY=your_google_api_key_here
    PORT=3000
    ```

    Sostituisci i valori segnaposto con le tue API key effettive del Passo 2.
  </Step>

  <Step title="Create the backend server">
    Crea `src/server.ts` e copia questo codice completo del server:
  </Step>
</Steps>

Ecco il server di chat AI completo con fatturazione integrata:

<CodeGroup>
  ```typescript src/server.ts expandable theme={null}
  import express, { Request, Response } from 'express';
  import { generateText } from 'ai';
  import { google } from '@ai-sdk/google';
  import { createLLMTracker } from '@dodopayments/ingestion-blueprints';
  import 'dotenv/config';

  const app = express();
  app.use(express.json());
  app.use(express.static('public'));

  // Replace with your test customer ID
  const CUSTOMER_ID = 'cus_123';

  // Create tracker once with your meter event name
  const llmTracker = createLLMTracker({
    apiKey: process.env.DODO_PAYMENTS_API_KEY!,
    environment: process.env.DODO_ENVIRONMENT as 'test_mode' | 'live_mode',
    eventName: 'ai_chat_usage', // Must match your meter configuration
  });

  // Chat endpoint with conversation support
  app.post('/chat', async (req: Request, res: Response) => {
    try {
      const { messages } = req.body;

      if (!messages || !Array.isArray(messages)) {
        return res.status(400).json({ 
          error: 'Missing required field: messages (array)' 
        });
      }

      // Wrap AI SDK with automatic token tracking
      const trackedClient = llmTracker.wrap({
        client: { generateText },
        customerId: CUSTOMER_ID
      });

      // Generate AI response - tokens are automatically tracked!
      const response = await trackedClient.generateText({
        model: google('gemini-2.5-flash'),
        messages: messages
      });

      res.json({
        message: response.text,
        usage: {
          totalTokens: response.usage.totalTokens
        }
      });

    } catch (error: any) {
      console.error('Chat error:', error);
      res.status(500).json({ 
        error: 'Failed to process chat',
        details: error.message 
      });
    }
  });

  const PORT = process.env.PORT || 3000;
  app.listen(PORT, () => {
    console.log(`🚀 Server running at http://localhost:${PORT}`);
    console.log(`📊 Tracking event: ai_chat_usage`);
    console.log(`👤 Customer ID: ${CUSTOMER_ID}`);
    console.log(`🔧 Environment: ${process.env.DODO_ENVIRONMENT}`);
  });
  ```

  ```bash .env theme={null}
  # Add your API keys here
  DODO_PAYMENTS_API_KEY=your_dodo_api_key_here
  DODO_ENVIRONMENT=test_mode
  GOOGLE_GENERATIVE_AI_API_KEY=your_google_api_key_here
  PORT=3000
  ```

  ```json package.json expandable theme={null}
  {
    "name": "ai-chat-app",
    "version": "1.0.0",
    "type": "module",
    "scripts": {
      "dev": "tsx src/server.ts",
      "build": "tsc",
      "start": "node dist/server.js"
    },
    "dependencies": {
      "express": "^4.18.2",
      "ai": "^3.0.0",
      "@ai-sdk/google": "^0.0.15",
      "@dodopayments/ingestion-blueprints": "latest",
      "dotenv": "^16.0.3"
    },
    "devDependencies": {
      "typescript": "^5.0.0",
      "@types/express": "^4.17.17",
      "@types/node": "^20.0.0",
      "tsx": "^3.12.7"
    }
  }
  ```
</CodeGroup>

***

## Passo 6: Aggiungi l'Interfaccia di Chat

Ora aggiungiamo una splendida interfaccia chat con cronologia completa delle conversazioni! Crea `public/index.html`:

```html public/index.html expandable theme={null}
<!DOCTYPE html>
<html lang="en">
  <head>
    <meta charset="UTF-8" />
    <meta name="viewport" content="width=device-width, initial-scale=1.0" />
    <title>AI Chat with Usage Billing</title>
    <style>
      * {
        margin: 0;
        padding: 0;
        box-sizing: border-box;
      }

      body {
        font-family: "Inter", -apple-system, BlinkMacSystemFont, "Segoe UI",
          Roboto, sans-serif;
        background: #0f0f1e;
        background-image: radial-gradient(
            at 0% 0%,
            rgba(102, 126, 234, 0.15) 0px,
            transparent 50%
          ),
          radial-gradient(
            at 100% 100%,
            rgba(118, 75, 162, 0.15) 0px,
            transparent 50%
          ),
          radial-gradient(
            at 50% 50%,
            rgba(102, 126, 234, 0.05) 0px,
            transparent 50%
          );
        height: 100vh;
        display: flex;
        justify-content: center;
        align-items: center;
        padding: 0;
        position: relative;
        overflow: hidden;
        margin: 0;
      }

      .chat-container {
        background: rgba(22, 22, 35, 0.95);
        border: 1px solid rgba(102, 126, 234, 0.2);
        border-radius: 0;
        box-shadow: 0 10px 40px rgba(0, 0, 0, 0.5);
        width: 100%;
        max-width: 100%;
        height: 100vh;
        display: flex;
        flex-direction: column;
        overflow: hidden;
        position: relative;
        z-index: 1;
      }

      .chat-header {
        background: linear-gradient(
          135deg,
          rgba(102, 126, 234, 0.15) 0%,
          rgba(118, 75, 162, 0.15) 100%
        );
        border-bottom: 1px solid rgba(102, 126, 234, 0.2);
        color: white;
        padding: 24px 28px;
        position: relative;
        overflow: hidden;
      }

      .chat-header h1 {
        font-size: 26px;
        margin-bottom: 6px;
        font-weight: 700;
        letter-spacing: -0.5px;
        color: #fff;
      }

      .chat-header p {
        font-size: 13px;
        opacity: 0.6;
        font-weight: 500;
        letter-spacing: 0.3px;
      }

      .chat-messages {
        flex: 1;
        overflow-y: auto;
        padding: 32px 10%;
        background: transparent;
        will-change: scroll-position;
        scroll-behavior: smooth;
      }

      .chat-messages::-webkit-scrollbar {
        width: 6px;
      }

      .chat-messages::-webkit-scrollbar-track {
        background: rgba(255, 255, 255, 0.05);
      }

      .chat-messages::-webkit-scrollbar-thumb {
        background: rgba(102, 126, 234, 0.3);
        border-radius: 3px;
      }

      .chat-messages::-webkit-scrollbar-thumb:hover {
        background: rgba(102, 126, 234, 0.5);
      }

      .message {
        margin-bottom: 20px;
        display: flex;
        gap: 12px;
        animation: slideIn 0.2s ease-out;
      }

      @keyframes slideIn {
        from {
          opacity: 0;
          transform: translateY(10px);
        }

        to {
          opacity: 1;
          transform: translateY(0);
        }
      }

      .message.user {
        flex-direction: row-reverse;
      }

      .message-avatar {
        width: 40px;
        height: 40px;
        border-radius: 12px;
        display: flex;
        align-items: center;
        justify-content: center;
        font-size: 20px;
        flex-shrink: 0;
        box-shadow: 0 2px 8px rgba(0, 0, 0, 0.2);
      }

      .message.user .message-avatar {
        background: linear-gradient(135deg, #667eea 0%, #764ba2 100%);
      }

      .message.assistant .message-avatar {
        background: linear-gradient(135deg, #f093fb 0%, #f5576c 100%);
      }

      .message-content {
        max-width: 65%;
      }

      .message-bubble {
        padding: 14px 18px;
        border-radius: 18px;
        line-height: 1.6;
        word-wrap: break-word;
        font-size: 15px;
        position: relative;
      }

      .message.user .message-bubble {
        background: linear-gradient(135deg, #667eea 0%, #764ba2 100%);
        color: white;
        border-bottom-right-radius: 6px;
        box-shadow: 0 2px 8px rgba(102, 126, 234, 0.3);
      }

      .message.assistant .message-bubble {
        background: rgba(255, 255, 255, 0.05);
        color: rgba(255, 255, 255, 0.95);
        border: 1px solid rgba(255, 255, 255, 0.1);
        border-bottom-left-radius: 6px;
        box-shadow: 0 2px 8px rgba(0, 0, 0, 0.2);
      }

      .message-meta {
        display: flex;
        gap: 10px;
        margin-top: 8px;
        font-size: 11px;
        color: rgba(255, 255, 255, 0.4);
        font-weight: 500;
      }

      .message.user .message-meta {
        justify-content: flex-end;
      }

      .token-badge {
        background: rgba(102, 126, 234, 0.2);
        color: #a8b9ff;
        padding: 4px 10px;
        border-radius: 12px;
        font-weight: 600;
        border: 1px solid rgba(102, 126, 234, 0.3);
      }

      .chat-input-area {
        padding: 24px 10% 32px;
        background: rgba(22, 22, 35, 0.95);
        border-top: 1px solid rgba(102, 126, 234, 0.2);
      }

      .input-wrapper {
        display: flex;
        gap: 12px;
        align-items: flex-end;
      }

      #messageInput {
        flex: 1;
        background: rgba(255, 255, 255, 0.05);
        border: 2px solid rgba(102, 126, 234, 0.2);
        border-radius: 16px;
        padding: 14px 20px;
        font-size: 15px;
        font-family: inherit;
        resize: none;
        max-height: 120px;
        transition: border-color 0.2s ease, background 0.2s ease;
        color: white;
        will-change: border-color;
        overflow: hidden;
        scrollbar-width: none;
        /* Firefox */
      }

      #messageInput::-webkit-scrollbar {
        display: none;
      }

      #messageInput::placeholder {
        color: rgba(255, 255, 255, 0.3);
      }

      #messageInput:focus {
        outline: none;
        border-color: #667eea;
        background: rgba(255, 255, 255, 0.08);
      }

      #sendBtn {
        background: linear-gradient(135deg, #667eea 0%, #764ba2 100%);
        color: white;
        border: none;
        width: 52px;
        height: 52px;
        border-radius: 16px;
        cursor: pointer;
        display: flex;
        align-items: center;
        justify-content: center;
        font-size: 22px;
        transition: transform 0.1s ease, box-shadow 0.1s ease;
        flex-shrink: 0;
        box-shadow: 0 2px 8px rgba(102, 126, 234, 0.4);
        position: relative;
      }

      #sendBtn:hover:not(:disabled) {
        transform: translateY(-1px);
        box-shadow: 0 4px 12px rgba(102, 126, 234, 0.5);
      }

      #sendBtn:active:not(:disabled) {
        transform: translateY(0);
      }

      #sendBtn:disabled {
        opacity: 0.4;
        cursor: not-allowed;
        box-shadow: none;
      }

      .typing-indicator {
        display: none;
        padding: 14px 18px;
        background: rgba(255, 255, 255, 0.05);
        border: 1px solid rgba(255, 255, 255, 0.1);
        border-radius: 18px;
        border-bottom-left-radius: 6px;
        box-shadow: 0 2px 8px rgba(0, 0, 0, 0.2);
        width: fit-content;
      }

      .typing-indicator.show {
        display: block;
      }

      .typing-dots {
        display: flex;
        gap: 6px;
      }

      .typing-dots span {
        width: 10px;
        height: 10px;
        border-radius: 50%;
        background: #667eea;
        animation: typing 1.4s infinite ease-in-out;
        will-change: transform, opacity;
      }

      .typing-dots span:nth-child(2) {
        animation-delay: 0.2s;
      }

      .typing-dots span:nth-child(3) {
        animation-delay: 0.4s;
      }

      @keyframes typing {
        0%,
        60%,
        100% {
          transform: translateY(0) scale(1);
          opacity: 0.6;
        }

        30% {
          transform: translateY(-12px) scale(1.1);
          opacity: 1;
        }
      }

      .error-message {
        background: rgba(239, 68, 68, 0.15);
        color: #fca5a5;
        padding: 14px 18px;
        border-radius: 12px;
        margin-bottom: 12px;
        display: none;
        border: 1px solid rgba(239, 68, 68, 0.3);
        font-size: 14px;
        font-weight: 500;
      }

      .error-message.show {
        display: block;
        animation: slideIn 0.3s ease;
      }

      .empty-state {
        text-align: center;
        padding: 80px 20px;
        color: rgba(255, 255, 255, 0.5);
      }

      .empty-state-icon {
        font-size: 72px;
        margin-bottom: 20px;
        animation: float 3s ease-in-out infinite;
      }

      @keyframes float {
        0%,
        100% {
          transform: translateY(0px);
        }

        50% {
          transform: translateY(-10px);
        }
      }

      .empty-state h2 {
        font-size: 24px;
        margin-bottom: 10px;
        color: rgba(255, 255, 255, 0.9);
        font-weight: 700;
        letter-spacing: -0.5px;
      }

      .empty-state p {
        font-size: 15px;
        color: rgba(255, 255, 255, 0.4);
        font-weight: 500;
      }
    </style>
  </head>

  <body>
    <div class="chat-container">
      <div class="chat-header">
        <h1>🤖 AI Chat Assistant</h1>
        <p>Powered by AI-SDK & Dodo Payments</p>
      </div>

      <div class="chat-messages" id="chatMessages">
        <div class="empty-state" id="emptyState">
          <div class="empty-state-icon">💬</div>
          <h2>Start a Conversation</h2>
          <p>Ask me anything! Your token usage is automatically tracked.</p>
        </div>
      </div>

      <div class="chat-input-area">
        <div class="error-message" id="errorMessage"></div>
        <div class="input-wrapper">
          <textarea
            id="messageInput"
            placeholder="Type your message here..."
            rows="1"
          ></textarea>
          <button id="sendBtn" onclick="sendMessage()">➤</button>
        </div>
      </div>
    </div>

    <script>
      let conversationHistory = [];

      const messageInput = document.getElementById("messageInput");
      let resizeTimeout;
      messageInput.addEventListener("input", function () {
        clearTimeout(resizeTimeout);
        resizeTimeout = setTimeout(() => {
          this.style.height = "auto";
          this.style.height = Math.min(this.scrollHeight, 120) + "px";
        }, 10);
      });

      // Send message on Enter (Shift+Enter for new line)
      messageInput.addEventListener("keydown", function (e) {
        if (e.key === "Enter" && !e.shiftKey) {
          e.preventDefault();
          sendMessage();
        }
      });

      async function sendMessage() {
        const input = document.getElementById("messageInput");
        const message = input.value.trim();

        if (!message) return;

        // Hide empty state
        document.getElementById("emptyState").style.display = "none";

        // Hide error
        document.getElementById("errorMessage").classList.remove("show");

        // Add user message to UI
        addMessage("user", message);

        // Add to conversation history
        conversationHistory.push({
          role: "user",
          content: message,
        });

        // Clear input
        input.value = "";
        input.style.height = "auto";

        // Show typing indicator
        showTypingIndicator();

        // Disable send button
        const sendBtn = document.getElementById("sendBtn");
        sendBtn.disabled = true;

        try {
          const response = await fetch("/chat", {
            method: "POST",
            headers: {
              "Content-Type": "application/json",
            },
            body: JSON.stringify({
              messages: conversationHistory,
            }),
          });

          const data = await response.json();

          if (!response.ok) {
            throw new Error(data.error || "Failed to get response");
          }

          // Hide typing indicator
          hideTypingIndicator();

          // Add assistant response to UI
          addMessage("assistant", data.message, data.usage);

          // Add to conversation history
          conversationHistory.push({
            role: "assistant",
            content: data.message,
          });
        } catch (error) {
          hideTypingIndicator();
          showError(error.message);
          // Remove the last user message from history since it failed
          conversationHistory.pop();
        } finally {
          sendBtn.disabled = false;
        }
      }

      function addMessage(role, content, usage = null) {
        const messagesDiv = document.getElementById("chatMessages");

        const messageDiv = document.createElement("div");
        messageDiv.className = `message ${role}`;

        const avatar = role === "user" ? "👤" : "🤖";

        let metaHTML = "";
        if (usage) {
          metaHTML = `
                    <div class="message-meta">
                        <span class="token-badge">📊 ${usage.totalTokens} tokens</span>
                    </div>
                `;
        }

        messageDiv.innerHTML = `
                <div class="message-avatar">${avatar}</div>
                <div class="message-content">
                    <div class="message-bubble">${escapeHtml(content)}</div>
                    ${metaHTML}
                </div>
            `;

        messagesDiv.appendChild(messageDiv);
        requestAnimationFrame(() => {
          messagesDiv.scrollTop = messagesDiv.scrollHeight;
        });
      }

      function showTypingIndicator() {
        const messagesDiv = document.getElementById("chatMessages");

        const typingDiv = document.createElement("div");
        typingDiv.className = "message assistant";
        typingDiv.id = "typingIndicator";
        typingDiv.innerHTML = `
                <div class="message-avatar">🤖</div>
                <div class="typing-indicator show">
                    <div class="typing-dots">
                        <span></span>
                        <span></span>
                        <span></span>
                    </div>
                </div>
            `;

        messagesDiv.appendChild(typingDiv);
        requestAnimationFrame(() => {
          messagesDiv.scrollTop = messagesDiv.scrollHeight;
        });
      }

      function hideTypingIndicator() {
        const typingIndicator = document.getElementById("typingIndicator");
        if (typingIndicator) {
          typingIndicator.remove();
        }
      }

      function showError(message) {
        const errorDiv = document.getElementById("errorMessage");
        errorDiv.textContent = "❌ " + message;
        errorDiv.classList.add("show");
      }

      function escapeHtml(text) {
        const div = document.createElement("div");
        div.textContent = text;
        return div.innerHTML.replace(/\n/g, "<br>");
      }
    </script>
  </body>
</html>
```

***

## Passo 7: Testa la Tua Applicazione di Chat

È tempo di testare la nostra app di chat AI e vedere la fatturazione in azione! Assicuriamoci che tutto funzioni end-to-end.

<Tip>
  **Cosa stiamo testando**: Avvieremo alcune conversazioni con l'AI, verificheremo che gli eventi dei token raggiungano Dodo Payments e confermeremo che i calcoli di fatturazione siano corretti.
</Tip>

<Steps>
  <Step title="Start the server">
    Per prima cosa, assicurati che tutto sia configurato:

    1. Verifica che il file `.env` contenga tutte le API key del Passo 2
    2. Avvia il server di sviluppo:

    ```bash theme={null}
    npm run dev
    ```

    Dovresti vedere:

    ```
    🚀 Server running at http://localhost:3000
    📊 Tracking event: ai_chat_usage
    👤 Customer ID: {YOUR CUSTOMER_ID}
    🔧 Environment: test_mode
    ```

    <Check>
      Il server è in esecuzione! È ora di chattare.
    </Check>
  </Step>

  <Step title="Open the chat interface">
    1. Apri il browser
    2. Naviga verso `http://localhost:3000`
    3. Dovresti vedere la splendida interfaccia della chat

    <Note>
      Assicurati di aggiornare `CUSTOMER_ID` in `server.ts` con il tuo effettivo ID cliente di test del Passo 4.
    </Note>
  </Step>

  <Step title="Have your first conversation">
    Mettiamolo alla prova! Prova questi messaggi:

    1. **"Cos'è l'intelligenza artificiale?"**
    2. **"Come funziona il machine learning?"**
    3. **"Puoi spiegare le reti neurali?"**

    Guarda l'uso dei token aggiornarsi dopo ogni risposta!

    <Check>
      Se vedi l’AI rispondere e i conteggi dei token comparire, la tua app funziona!
    </Check>
  </Step>

  <Step title="Check your Dodo Payments dashboard">
    Ora verifichiamo che gli eventi vengano ricevuti:

    1. Apri il tuo dashboard Dodo Payments
    2. Vai a **Fatturazione per Utilizzo** → **Contatore di Utilizzo Token AI**
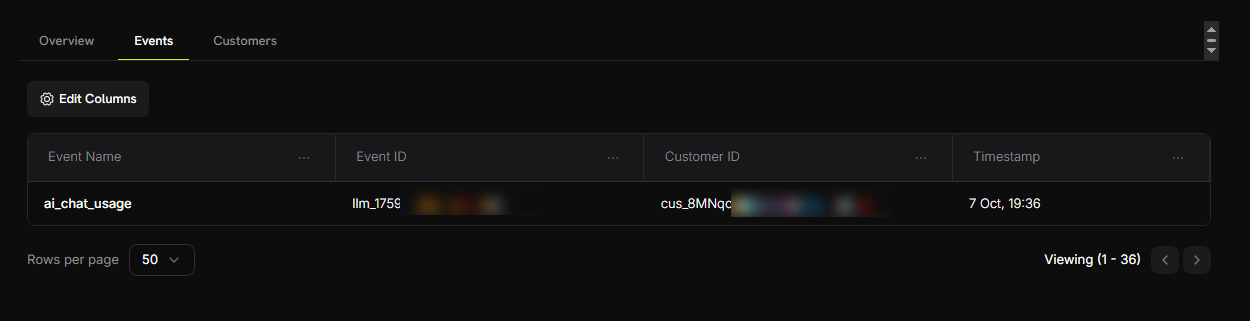
    3. Clicca sulla scheda **Eventi**
    4. Dovresti vedere elencati i tuoi eventi di chat

    **Cosa cercare:**

    * Nomi evento: `ai_chat_usage`
    * ID cliente: il tuo ID cliente di test

    <Frame>
      <img src="https://mintcdn.com/dodopayments/4L3_sb2jJa5trJWD/images/cookbooks/ai-chat-app/meter-event.png?fit=max&auto=format&n=4L3_sb2jJa5trJWD&q=85&s=041f2bd60ce174a0e67f051e206d25b0" alt="Eventi del Contatore" style={{ maxHeight: '500px', width: 'auto' }} width="1250" height="321" data-path="images/cookbooks/ai-chat-app/meter-event.png" />
    </Frame>

    <Check>
      Dovresti vedere un evento per ogni messaggio inviato!
    </Check>
  </Step>

  <Step title="Verify token counting">
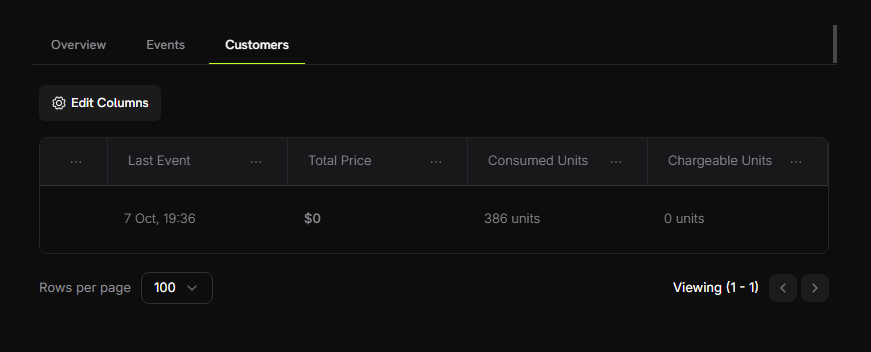
    Invia ancora qualche messaggio e verifica se l’aggregazione dei token funziona:

    1. Nel tuo contatore, vai alla scheda **Clienti**
    2. Trova il tuo cliente di prova
    3. Controlla la colonna "Unità Consummate" - dovrebbe mostrare il totale dei token utilizzati

    <Frame>
      <img src="https://mintcdn.com/dodopayments/oig3NPG69DDpua_S/images/cookbooks/ai-chat-app/aggregation.png?fit=max&auto=format&n=oig3NPG69DDpua_S&q=85&s=58fa883c91fae2d4e7d59e266ca8913b" alt="Token Cliente Contatore" style={{ maxHeight: '500px', width: 'auto' }} width="871" height="352" data-path="images/cookbooks/ai-chat-app/aggregation.png" />
    </Frame>

    <Info>
      Il meter sta sommando automaticamente tutti i valori `totalTokens`!
    </Info>
  </Step>

  <Step title="Test the free tier">
    Usiamo abbastanza token da superare la soglia gratuita:

    1. Fai diverse altre conversazioni (puntando a \~15.000+ token totali)
    2. Controlla di nuovo la tua scheda **Clienti** nel dashboard del contatore
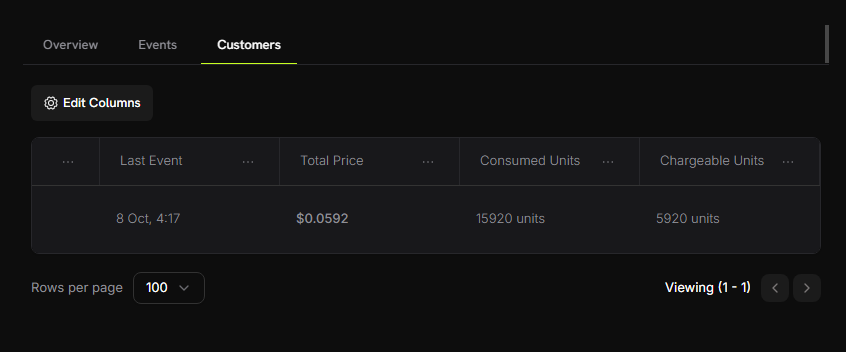
    3. Dovresti ora vedere:
       * Unità Consummate: 15.000+ token
       * Unità Addebitabili: 5.000 (10.000 token gratuiti applicati)
       * Prezzo Totale: \~\$0.05

    <Frame>
      <img src="https://mintcdn.com/dodopayments/oig3NPG69DDpua_S/images/cookbooks/ai-chat-app/free-tier-test.png?fit=max&auto=format&n=oig3NPG69DDpua_S&q=85&s=5ffc1f234acfbaaa2ab0c34805812785" alt="Test Livello Gratuito" style={{ maxHeight: '500px', width: 'auto' }} width="846" height="352" data-path="images/cookbooks/ai-chat-app/free-tier-test.png" />
    </Frame>

    <Check>
      **Successo!** La tua fatturazione basata sull'utilizzo funziona perfettamente. I clienti verranno addebitati automaticamente in base al consumo effettivo di token.
    </Check>
  </Step>
</Steps>

***

## Risoluzione dei Problemi

Problemi comuni e le loro soluzioni:

<AccordionGroup>
  <Accordion title="Events not appearing in dashboard">
    **Possibili cause:**

    * Il nome evento non corrisponde esattamente alla configurazione del meter
    * L’ID cliente non esiste nel tuo account
    * La chiave API è invalida o scaduta
    * Problemi di connettività di rete

    **Soluzioni:**

    1. Verifica che il nome evento corrisponda esattamente alla configurazione del meter (sensitive alle maiuscole: `ai_chat_usage`)
    2. Controlla che l’ID cliente esista nella dashboard di Dodo Payments
    3. Testa la chiave API con una chiamata semplice all’API
    4. Controlla i log del server per eventuali messaggi di errore
  </Accordion>

  <Accordion title="Token counts showing zero">
    **Possibili cause:**

    * Il modello non restituisce informazioni sull'utilizzo
    * Versione SDK errata

    **Soluzioni:**

    1. Testa se il modello restituisce l'uso:

    ```typescript theme={null}
    const response = await generateText({...});
    console.log('Usage:', response.usage);
    ```

    2. Aggiorna all’ultima versione di Blueprints SDK: `npm install @dodopayments/ingestion-blueprints@latest`
  </Accordion>

  <Accordion title="API key invalid error">
    **Possibili cause:**

    * Chiave API errata per l’ambiente
    * Spazi o virgolette extra nel file `.env`

    **Soluzioni:**

    * Assicurati che la chiave di test inizi con `test_`, quella live con `live_`
    * Rimuovi eventuali virgolette attorno alle chiavi nel file `.env`
    * Genera una nuova chiave se necessario
  </Accordion>
</AccordionGroup>

Hai bisogno di aiuto?

* [Comunità Discord](https://discord.gg/bYqAp4ayYh)
* [support@dodopayments.com](mailto:support@dodopayments.com)

***

## Congratulazioni! Hai Costruito un'App di Chat AI

Ora hai un'applicazione di chat AI completamente funzionale con tracciamento automatico dell'uso dei token e fatturazione potenziata da Dodo Payments. 🎉

### Scopri di Più

<CardGroup cols={2}>
  <Card title="LLM Blueprint" icon="robot" href="/developer-resources/ingestion-blueprints/llm">
    Scopri di più su LLM Ingestion Blueprint
  </Card>

  <Card title="Ingestion Blueprints SDK" icon="github" href="https://github.com/dodopayments/ingestion-blueprints">
    Dai un’occhiata al repository GitHub per altri esempi
  </Card>

  <Card title="Join Community" icon="discord" href="https://discord.gg/bYqAp4ayYh">
    Ottieni aiuto e condividi i tuoi progetti su Discord
  </Card>
</CardGroup>