> ## Documentation Index
> Fetch the complete documentation index at: https://docs.dodopayments.com/llms.txt
> Use this file to discover all available pages before exploring further.
# MailerLite
> Dodo Payments घटनाओं के आधार पर ग्राहकों को MailerLite ग्राहक सूचियों में स्वचालित रूप से जोड़ें और ईमेल स्वचालन को ट्रिगर करें।
## परिचय
जब भुगतान घटनाएँ होती हैं, तो अपने भुगतान करने वाले ग्राहकों को MailerLite ग्राहक सूचियों के साथ स्वचालित रूप से समन्वयित करें। ग्राहकों को विशिष्ट समूहों में जोड़ें, स्वचालन कार्यप्रवाह को ट्रिगर करें, और अपने ईमेल मार्केटिंग सूचियों को वास्तविक भुगतान डेटा के साथ अद्यतित रखें।
MailerLite समाचार पत्रों, अभियानों और स्वचालनों के लिए एक शक्तिशाली ईमेल मार्केटिंग प्लेटफ़ॉर्म है। यह एकीकरण आपको भुगतान गतिविधि के आधार पर ग्राहकों का प्रबंधन स्वचालित रूप से करने में मदद करता है - ऑनबोर्डिंग अनुक्रमों, ग्राहक विभाजन, और लक्षित मार्केटिंग अभियानों के लिए बिल्कुल सही।
इस एकीकरण के लिये प्रमाणीकृतिकरण के लिये आपका MailerLite API Key आवश्यक है। आप इसे अपने [MailerLite Integrations पृष्ठ](https://dashboard.mailerlite.com/integrations/api) से उत्पन्न कर सकते हैं।
## प्रारंभ करना
अपनी Dodo Payments डैशबोर्ड में, Webhooks + Add Endpoint पर नेविगेट करें और इंटीग्रेशन ड्रॉपडाउन का विस्तार करें।
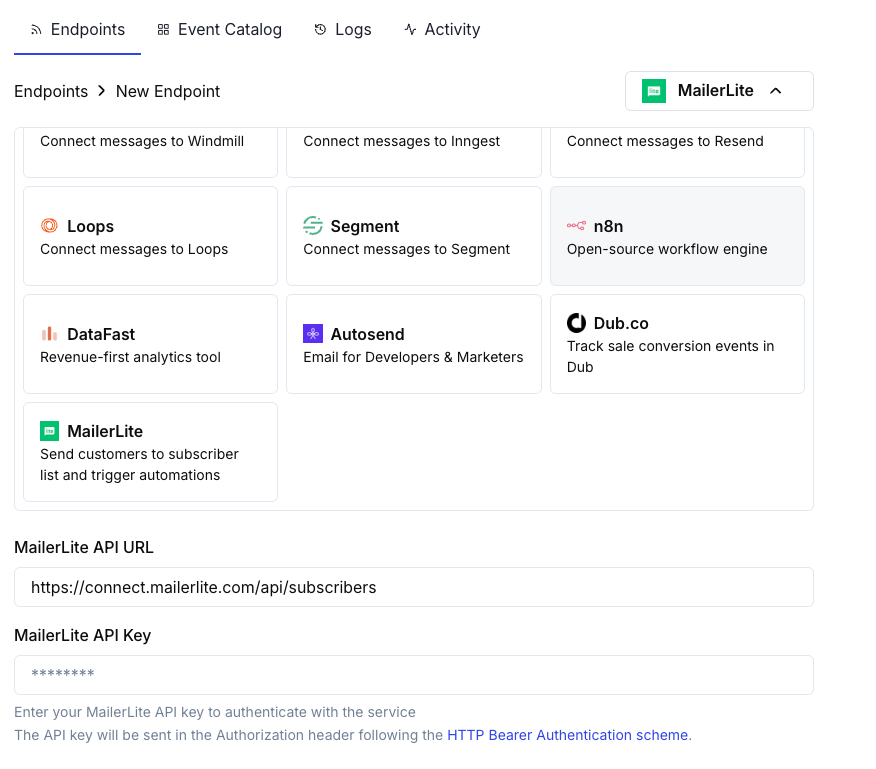 MailerLite एकीकरण कार्ड चुने।
कॉन्फ़िगरेशन में अपना MailerLite API Key दर्ज करें।
सदस्य डेटा को MailerLite की API के लिए प्रारूपित करने हेतु ट्रांसफ़ॉर्मेशन कोड संपादित करें।
नमूना पे लोड्स से परीक्षण करें और सदस्य सिंक को सक्रिय करने के लिये Create पर क्लिक करें।
भुगतान ईवेंट अब स्वतः आपके MailerLite सूचियों में ग्राहकों को सिंक करेंगे।
## रूपांतरण कोड उदाहरण
### सफल भुगतान पर ग्राहक जोड़ें
```javascript add_customer.js icon="js" expandable theme={null}
function handler(webhook) {
if (webhook.eventType === "payment.succeeded") {
const p = webhook.payload.data;
webhook.url = "https://connect.mailerlite.com/api/subscribers";
webhook.payload = {
email: p.customer.email,
fields: {
name: p.customer.name,
company: p.customer.business_name || "",
last_name: ""
},
groups: ["your-group-id-here"],
status: "active"
};
}
return webhook;
}
```
### उत्पाद के आधार पर कई समूहों में ग्राहक जोड़ें
```javascript product_segmentation.js icon="js" expandable theme={null}
function handler(webhook) {
if (webhook.eventType === "payment.succeeded") {
const p = webhook.payload.data;
// Determine groups based on product or amount
const groups = ["customers-group-id"];
// Add to premium group if high-value purchase
if (p.total_amount >= 10000) { // $100+
groups.push("premium-customers-group-id");
}
webhook.url = "https://connect.mailerlite.com/api/subscribers";
webhook.payload = {
email: p.customer.email,
fields: {
name: p.customer.name,
last_purchase_amount: (p.total_amount / 100).toFixed(2),
last_purchase_date: new Date(webhook.payload.timestamp).toISOString().split('T')[0],
payment_id: p.payment_id
},
groups: groups,
status: "active"
};
}
return webhook;
}
```
### सदस्यता सक्रियण पर नए ग्राहक को जोड़ें
```javascript subscription_subscriber.js icon="js" expandable theme={null}
function handler(webhook) {
if (webhook.eventType === "subscription.active") {
const s = webhook.payload.data;
webhook.url = "https://connect.mailerlite.com/api/subscribers";
webhook.payload = {
email: s.customer.email,
fields: {
name: s.customer.name,
subscription_plan: s.product_id,
subscription_amount: (s.recurring_pre_tax_amount / 100).toFixed(2),
billing_frequency: s.payment_frequency_interval,
subscription_start: new Date().toISOString().split('T')[0]
},
groups: ["subscribers-group-id", "active-subscriptions-group-id"],
status: "active"
};
}
return webhook;
}
```
### सदस्यता रद्द करने पर ग्राहक को अपडेट करें
```javascript subscription_cancelled.js icon="js" expandable theme={null}
function handler(webhook) {
if (webhook.eventType === "subscription.cancelled") {
const s = webhook.payload.data;
// Use PUT to update existing subscriber
webhook.url = "https://connect.mailerlite.com/api/subscribers/" + encodeURIComponent(s.customer.email);
webhook.method = "PUT";
webhook.payload = {
fields: {
subscription_status: "cancelled",
cancellation_date: new Date().toISOString().split('T')[0]
},
groups: ["churned-customers-group-id"]
};
}
return webhook;
}
```
### कस्टम फ़ील्ड के साथ ग्राहक जोड़ें
```javascript custom_fields.js icon="js" expandable theme={null}
function handler(webhook) {
if (webhook.eventType === "payment.succeeded") {
const p = webhook.payload.data;
webhook.url = "https://connect.mailerlite.com/api/subscribers";
webhook.payload = {
email: p.customer.email,
fields: {
name: p.customer.name,
company: p.customer.business_name || "",
country: p.customer.country || "",
city: p.customer.city || "",
phone: p.customer.phone || "",
// Custom fields (must be created in MailerLite first)
total_spent: (p.total_amount / 100).toFixed(2),
customer_since: new Date().toISOString().split('T')[0],
payment_method: p.payment_method || "unknown",
currency: p.currency || "USD"
},
groups: ["paying-customers-group-id"],
status: "active",
subscribed_at: new Date().toISOString().replace('T', ' ').split('.')[0]
};
}
return webhook;
}
```
### घटना के माध्यम से स्वचालन ट्रिगर करें
```javascript trigger_automation.js icon="js" expandable theme={null}
function handler(webhook) {
if (webhook.eventType === "payment.succeeded") {
const p = webhook.payload.data;
// First, ensure subscriber exists
webhook.url = "https://connect.mailerlite.com/api/subscribers";
webhook.payload = {
email: p.customer.email,
fields: {
name: p.customer.name,
// Add a trigger field that your automation watches
last_payment_trigger: new Date().toISOString(),
last_payment_amount: (p.total_amount / 100).toFixed(2)
},
status: "active"
};
// Tip: Create an automation in MailerLite that triggers
// when 'last_payment_trigger' field is updated
}
return webhook;
}
```
## सुझाव
* अपने रूपांतरणों में उनका उपयोग करने से पहले MailerLite में कस्टम फ़ील्ड बनाएं
* उत्पाद, योजना स्तर, या खरीद व्यवहार के आधार पर ग्राहकों को विभाजित करने के लिए समूहों का उपयोग करें
* MailerLite में स्वचालन कार्यप्रवाह सेट करें जो फ़ील्ड अपडेट पर ट्रिगर होते हैं
* डुप्लिकेट ग्राहक त्रुटियों से बचने के लिए अपसर्ट व्यवहार (POST to /subscribers) का उपयोग करें
* बेहतर ग्राहक अंतर्दृष्टि के लिए कस्टम फ़ील्ड में भुगतान मेटाडेटा संग्रहीत करें
* सभी भुगतानों के लिए सक्षम करने से पहले एक छोटे समूह के साथ परीक्षण करें
## कस्टम फ़ील्ड सेटअप
कस्टम फ़ील्ड का उपयोग करने से पहले, आपको उन्हें MailerLite में बनाना होगा:
1. अपने MailerLite डैशबोर्ड पर जाएँ
2. **Subscribers Fields** पर नेविगेट करें
3. **Create field** पर क्लिक करें और निम्न फ़ील्ड जोड़ें:
* `total_spent` (Number)
* `customer_since` (Date)
* `subscription_plan` (Text)
* `payment_method` (Text)
* `last_payment_amount` (Number)
## समस्या निवारण
* API Key सही और सक्रिय है, यह सत्यापित करें
* ईमेल पता मान्य (RFC 2821 अनुरूप) होना चाहिए
* सुनिश्चित करें कि समूह ID सही हैं और आपके खाते में मौजूद हैं
* ध्यान दें: अनसब्सक्राइब्ड, बाउंस्ड, या जंक सदस्य API के माध्यम से पुनः सक्रिय नहीं हो सकते
* उपयोग से पहले MailerLite में कस्टम फ़ील्ड मौजूद होने चाहिए
* फ़ील्ड नाम बिल्कुल मेल खाते हों (केस-सेंसिटिव)
* सुनिश्चित करें कि फ़ील्ड मान अपेक्षित प्रकार (text, number, date) से मेल खाते हों
* MailerLite API की रेट लिमिट प्रति मिनट 120 अनुरोध है
* यदि कई सदस्यों को संसाधित कर रहे हैं तो बैच एंडपॉइंट्स का उपयोग करें
* उच्च वॉल्यूम परिदृश्यों के लिए बैकऑफ रणनीतियाँ लागू करें
* समूह ID संख्यात्मक स्ट्रिंग्स हों, यह सत्यापित करें
* जांचें कि समूह आपके MailerLite खाते में मौजूद हैं
* ध्यान दें: समूहों के साथ PUT का उपयोग करने पर सदस्य उन समूहों से हट जाएंगे जो सूचीबद्ध नहीं हैं
## API संदर्भ
MailerLite ग्राहक API निम्नलिखित प्रमुख पैरामीटर स्वीकार करता है:
| Parameter | Type | Required | Description |
| ------------------ | ------ | -------- | ------------------------------------------------------------- |
| `email` | string | Yes | मान्य ईमेल पता (RFC 2821) |
| `fields` | object | No | फ़ील्ड नाम/मान जोड़े वाला ऑब्जेक्ट |
| `fields.name` | string | No | सदस्य का पहला नाम |
| `fields.last_name` | string | No | सदस्य का अंतिम नाम |
| `fields.company` | string | No | कंपनी का नाम |
| `fields.country` | string | No | देश |
| `fields.city` | string | No | शहर |
| `fields.phone` | string | No | फ़ोन नंबर |
| `groups` | array | No | उन समूह ID का सरणी जिनमें सदस्य को जोड़ना है |
| `status` | string | No | इनमें से एक: active, unsubscribed, unconfirmed, bounced, junk |
| `subscribed_at` | string | No | `yyyy-MM-dd HH:mm:ss` प्रारूप में तिथि |
| `ip_address` | string | No | सदस्य का IP पता |
पूर्ण API दस्तावेज़ के लिए, [MailerLite Developers](https://developers.mailerlite.com/docs/subscribers.html) पर जाएं.
MailerLite एकीकरण कार्ड चुने।
कॉन्फ़िगरेशन में अपना MailerLite API Key दर्ज करें।
सदस्य डेटा को MailerLite की API के लिए प्रारूपित करने हेतु ट्रांसफ़ॉर्मेशन कोड संपादित करें।
नमूना पे लोड्स से परीक्षण करें और सदस्य सिंक को सक्रिय करने के लिये Create पर क्लिक करें।
भुगतान ईवेंट अब स्वतः आपके MailerLite सूचियों में ग्राहकों को सिंक करेंगे।
## रूपांतरण कोड उदाहरण
### सफल भुगतान पर ग्राहक जोड़ें
```javascript add_customer.js icon="js" expandable theme={null}
function handler(webhook) {
if (webhook.eventType === "payment.succeeded") {
const p = webhook.payload.data;
webhook.url = "https://connect.mailerlite.com/api/subscribers";
webhook.payload = {
email: p.customer.email,
fields: {
name: p.customer.name,
company: p.customer.business_name || "",
last_name: ""
},
groups: ["your-group-id-here"],
status: "active"
};
}
return webhook;
}
```
### उत्पाद के आधार पर कई समूहों में ग्राहक जोड़ें
```javascript product_segmentation.js icon="js" expandable theme={null}
function handler(webhook) {
if (webhook.eventType === "payment.succeeded") {
const p = webhook.payload.data;
// Determine groups based on product or amount
const groups = ["customers-group-id"];
// Add to premium group if high-value purchase
if (p.total_amount >= 10000) { // $100+
groups.push("premium-customers-group-id");
}
webhook.url = "https://connect.mailerlite.com/api/subscribers";
webhook.payload = {
email: p.customer.email,
fields: {
name: p.customer.name,
last_purchase_amount: (p.total_amount / 100).toFixed(2),
last_purchase_date: new Date(webhook.payload.timestamp).toISOString().split('T')[0],
payment_id: p.payment_id
},
groups: groups,
status: "active"
};
}
return webhook;
}
```
### सदस्यता सक्रियण पर नए ग्राहक को जोड़ें
```javascript subscription_subscriber.js icon="js" expandable theme={null}
function handler(webhook) {
if (webhook.eventType === "subscription.active") {
const s = webhook.payload.data;
webhook.url = "https://connect.mailerlite.com/api/subscribers";
webhook.payload = {
email: s.customer.email,
fields: {
name: s.customer.name,
subscription_plan: s.product_id,
subscription_amount: (s.recurring_pre_tax_amount / 100).toFixed(2),
billing_frequency: s.payment_frequency_interval,
subscription_start: new Date().toISOString().split('T')[0]
},
groups: ["subscribers-group-id", "active-subscriptions-group-id"],
status: "active"
};
}
return webhook;
}
```
### सदस्यता रद्द करने पर ग्राहक को अपडेट करें
```javascript subscription_cancelled.js icon="js" expandable theme={null}
function handler(webhook) {
if (webhook.eventType === "subscription.cancelled") {
const s = webhook.payload.data;
// Use PUT to update existing subscriber
webhook.url = "https://connect.mailerlite.com/api/subscribers/" + encodeURIComponent(s.customer.email);
webhook.method = "PUT";
webhook.payload = {
fields: {
subscription_status: "cancelled",
cancellation_date: new Date().toISOString().split('T')[0]
},
groups: ["churned-customers-group-id"]
};
}
return webhook;
}
```
### कस्टम फ़ील्ड के साथ ग्राहक जोड़ें
```javascript custom_fields.js icon="js" expandable theme={null}
function handler(webhook) {
if (webhook.eventType === "payment.succeeded") {
const p = webhook.payload.data;
webhook.url = "https://connect.mailerlite.com/api/subscribers";
webhook.payload = {
email: p.customer.email,
fields: {
name: p.customer.name,
company: p.customer.business_name || "",
country: p.customer.country || "",
city: p.customer.city || "",
phone: p.customer.phone || "",
// Custom fields (must be created in MailerLite first)
total_spent: (p.total_amount / 100).toFixed(2),
customer_since: new Date().toISOString().split('T')[0],
payment_method: p.payment_method || "unknown",
currency: p.currency || "USD"
},
groups: ["paying-customers-group-id"],
status: "active",
subscribed_at: new Date().toISOString().replace('T', ' ').split('.')[0]
};
}
return webhook;
}
```
### घटना के माध्यम से स्वचालन ट्रिगर करें
```javascript trigger_automation.js icon="js" expandable theme={null}
function handler(webhook) {
if (webhook.eventType === "payment.succeeded") {
const p = webhook.payload.data;
// First, ensure subscriber exists
webhook.url = "https://connect.mailerlite.com/api/subscribers";
webhook.payload = {
email: p.customer.email,
fields: {
name: p.customer.name,
// Add a trigger field that your automation watches
last_payment_trigger: new Date().toISOString(),
last_payment_amount: (p.total_amount / 100).toFixed(2)
},
status: "active"
};
// Tip: Create an automation in MailerLite that triggers
// when 'last_payment_trigger' field is updated
}
return webhook;
}
```
## सुझाव
* अपने रूपांतरणों में उनका उपयोग करने से पहले MailerLite में कस्टम फ़ील्ड बनाएं
* उत्पाद, योजना स्तर, या खरीद व्यवहार के आधार पर ग्राहकों को विभाजित करने के लिए समूहों का उपयोग करें
* MailerLite में स्वचालन कार्यप्रवाह सेट करें जो फ़ील्ड अपडेट पर ट्रिगर होते हैं
* डुप्लिकेट ग्राहक त्रुटियों से बचने के लिए अपसर्ट व्यवहार (POST to /subscribers) का उपयोग करें
* बेहतर ग्राहक अंतर्दृष्टि के लिए कस्टम फ़ील्ड में भुगतान मेटाडेटा संग्रहीत करें
* सभी भुगतानों के लिए सक्षम करने से पहले एक छोटे समूह के साथ परीक्षण करें
## कस्टम फ़ील्ड सेटअप
कस्टम फ़ील्ड का उपयोग करने से पहले, आपको उन्हें MailerLite में बनाना होगा:
1. अपने MailerLite डैशबोर्ड पर जाएँ
2. **Subscribers Fields** पर नेविगेट करें
3. **Create field** पर क्लिक करें और निम्न फ़ील्ड जोड़ें:
* `total_spent` (Number)
* `customer_since` (Date)
* `subscription_plan` (Text)
* `payment_method` (Text)
* `last_payment_amount` (Number)
## समस्या निवारण
* API Key सही और सक्रिय है, यह सत्यापित करें
* ईमेल पता मान्य (RFC 2821 अनुरूप) होना चाहिए
* सुनिश्चित करें कि समूह ID सही हैं और आपके खाते में मौजूद हैं
* ध्यान दें: अनसब्सक्राइब्ड, बाउंस्ड, या जंक सदस्य API के माध्यम से पुनः सक्रिय नहीं हो सकते
* उपयोग से पहले MailerLite में कस्टम फ़ील्ड मौजूद होने चाहिए
* फ़ील्ड नाम बिल्कुल मेल खाते हों (केस-सेंसिटिव)
* सुनिश्चित करें कि फ़ील्ड मान अपेक्षित प्रकार (text, number, date) से मेल खाते हों
* MailerLite API की रेट लिमिट प्रति मिनट 120 अनुरोध है
* यदि कई सदस्यों को संसाधित कर रहे हैं तो बैच एंडपॉइंट्स का उपयोग करें
* उच्च वॉल्यूम परिदृश्यों के लिए बैकऑफ रणनीतियाँ लागू करें
* समूह ID संख्यात्मक स्ट्रिंग्स हों, यह सत्यापित करें
* जांचें कि समूह आपके MailerLite खाते में मौजूद हैं
* ध्यान दें: समूहों के साथ PUT का उपयोग करने पर सदस्य उन समूहों से हट जाएंगे जो सूचीबद्ध नहीं हैं
## API संदर्भ
MailerLite ग्राहक API निम्नलिखित प्रमुख पैरामीटर स्वीकार करता है:
| Parameter | Type | Required | Description |
| ------------------ | ------ | -------- | ------------------------------------------------------------- |
| `email` | string | Yes | मान्य ईमेल पता (RFC 2821) |
| `fields` | object | No | फ़ील्ड नाम/मान जोड़े वाला ऑब्जेक्ट |
| `fields.name` | string | No | सदस्य का पहला नाम |
| `fields.last_name` | string | No | सदस्य का अंतिम नाम |
| `fields.company` | string | No | कंपनी का नाम |
| `fields.country` | string | No | देश |
| `fields.city` | string | No | शहर |
| `fields.phone` | string | No | फ़ोन नंबर |
| `groups` | array | No | उन समूह ID का सरणी जिनमें सदस्य को जोड़ना है |
| `status` | string | No | इनमें से एक: active, unsubscribed, unconfirmed, bounced, junk |
| `subscribed_at` | string | No | `yyyy-MM-dd HH:mm:ss` प्रारूप में तिथि |
| `ip_address` | string | No | सदस्य का IP पता |
पूर्ण API दस्तावेज़ के लिए, [MailerLite Developers](https://developers.mailerlite.com/docs/subscribers.html) पर जाएं.