> ## Documentation Index
> Fetch the complete documentation index at: https://docs.dodopayments.com/llms.txt
> Use this file to discover all available pages before exploring further.
# Invoice Management
> Automatically generate and deliver professional invoices for every successful payment, with customizable branding and seamless email delivery.
 ## Overview
Dodo Payments automatically generates professional invoices for every successful transaction, eliminating manual invoice creation and ensuring consistent documentation for your business. Invoices are instantly delivered to both you and your customers via email after each payment.
Invoices are generated automatically for both one-time purchases and recurring subscription payments.
## Key Features
Invoices are created instantly after successful payment processing without manual intervention.
Add your business logo and name to maintain brand consistency across all customer touchpoints.
Invoices are automatically sent to customers and merchants immediately after generation.
Access and download invoices from a centralized dashboard view.
## Setting Up Invoice Branding
Open the Dodo Payments dashboard and go to **Settings** → **Business**.
Upload your business logo and enter your business name. These details will appear on all generated invoices.
Use a high-resolution logo (minimum 300x300px) in PNG format for the best print quality.
Click **Save** to apply your branding settings. All future invoices will automatically use these details.
Your invoice branding is now configured and will be applied to all new invoices.
## What's Included in Invoices
Every generated invoice contains comprehensive transaction details:
* **Business Information**: Your business name, logo, and contact details
* **Customer Details**: Customer name and email address
* **Invoice Number**: Unique identifier for tracking and reference
* **Transaction Date**: When the payment was processed
* **Payment Details**: Amount paid, currency, and payment method
* **Product/Service Description**: Itemized list of purchased products or subscriptions
* **Tax Information**: Applicable taxes and tax identification numbers
* **Payment Status**: Confirmation of successful payment
Invoice numbers are automatically generated and follow a sequential format for easy tracking.
## How Invoice Generation Works
When a customer completes a one-time purchase:
1. Payment is processed successfully
2. Invoice is automatically generated with transaction details
3. Invoice is emailed to both customer and merchant
4. Invoice appears in your dashboard **Invoices** section
All one-time purchase invoices include product details, pricing, and payment confirmation.
For recurring subscription payments:
1. Subscription renewal payment is processed automatically
2. Invoice is generated for the billing period
3. Invoice is emailed to customer with subscription details
4. Invoice is stored in your dashboard for records
Subscription invoices include the billing period, subscription plan details, and next renewal date.
## Managing Invoices
### Accessing Your Invoices
Navigate to the **Invoices** section in your Dodo Payments dashboard to view all generated invoices. You can:
* **View Invoice Details**: Click any invoice to see complete transaction information
* **Download PDF**: Export invoices in PDF format for your records
* **Resend to Customer**: Email the invoice again if needed
* **Filter and Search**: Find specific invoices by date, customer, or invoice number
Use the search and filter options to quickly locate invoices for accounting or customer support purposes.
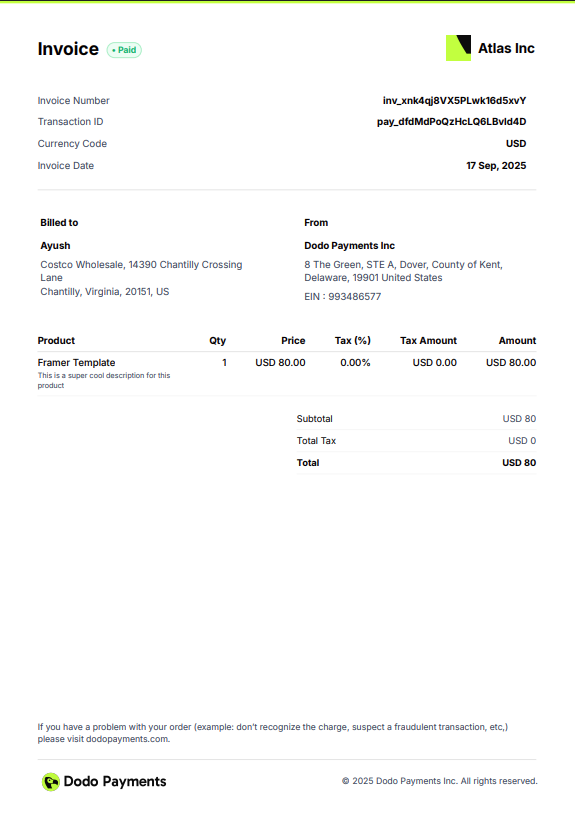
## Invoice Template Preview
Here's what your branded invoices will look like:
## Overview
Dodo Payments automatically generates professional invoices for every successful transaction, eliminating manual invoice creation and ensuring consistent documentation for your business. Invoices are instantly delivered to both you and your customers via email after each payment.
Invoices are generated automatically for both one-time purchases and recurring subscription payments.
## Key Features
Invoices are created instantly after successful payment processing without manual intervention.
Add your business logo and name to maintain brand consistency across all customer touchpoints.
Invoices are automatically sent to customers and merchants immediately after generation.
Access and download invoices from a centralized dashboard view.
## Setting Up Invoice Branding
Open the Dodo Payments dashboard and go to **Settings** → **Business**.
Upload your business logo and enter your business name. These details will appear on all generated invoices.
Use a high-resolution logo (minimum 300x300px) in PNG format for the best print quality.
Click **Save** to apply your branding settings. All future invoices will automatically use these details.
Your invoice branding is now configured and will be applied to all new invoices.
## What's Included in Invoices
Every generated invoice contains comprehensive transaction details:
* **Business Information**: Your business name, logo, and contact details
* **Customer Details**: Customer name and email address
* **Invoice Number**: Unique identifier for tracking and reference
* **Transaction Date**: When the payment was processed
* **Payment Details**: Amount paid, currency, and payment method
* **Product/Service Description**: Itemized list of purchased products or subscriptions
* **Tax Information**: Applicable taxes and tax identification numbers
* **Payment Status**: Confirmation of successful payment
Invoice numbers are automatically generated and follow a sequential format for easy tracking.
## How Invoice Generation Works
When a customer completes a one-time purchase:
1. Payment is processed successfully
2. Invoice is automatically generated with transaction details
3. Invoice is emailed to both customer and merchant
4. Invoice appears in your dashboard **Invoices** section
All one-time purchase invoices include product details, pricing, and payment confirmation.
For recurring subscription payments:
1. Subscription renewal payment is processed automatically
2. Invoice is generated for the billing period
3. Invoice is emailed to customer with subscription details
4. Invoice is stored in your dashboard for records
Subscription invoices include the billing period, subscription plan details, and next renewal date.
## Managing Invoices
### Accessing Your Invoices
Navigate to the **Invoices** section in your Dodo Payments dashboard to view all generated invoices. You can:
* **View Invoice Details**: Click any invoice to see complete transaction information
* **Download PDF**: Export invoices in PDF format for your records
* **Resend to Customer**: Email the invoice again if needed
* **Filter and Search**: Find specific invoices by date, customer, or invoice number
Use the search and filter options to quickly locate invoices for accounting or customer support purposes.
## Invoice Template Preview
Here's what your branded invoices will look like:
 ## Related Features
Learn how subscriptions work with automatic recurring invoices.
Manage multiple brands with separate invoice branding for each.
Allow customers to access their invoice history through the customer portal.
Configure tax settings to ensure invoices display correct tax information.
## Related Features
Learn how subscriptions work with automatic recurring invoices.
Manage multiple brands with separate invoice branding for each.
Allow customers to access their invoice history through the customer portal.
Configure tax settings to ensure invoices display correct tax information.