> ## Documentation Index
> Fetch the complete documentation index at: https://docs.dodopayments.com/llms.txt
> Use this file to discover all available pages before exploring further.
# Webhooks
> Receive real-time notifications when events occur in Dodo Payments. Automate workflows and keep your systems synchronized with instant event delivery.
 Webhooks provide real-time notifications when specific events occur in your Dodo Payments account. Use webhooks to automate workflows, update your database, send notifications, and keep your systems synchronized.
Our webhook implementation follows the [Standard Webhooks](https://standardwebhooks.com/) specification, ensuring compatibility with industry best practices and existing webhook libraries.
## Key Features
Receive instant notifications when events occur
HMAC SHA256 signature verification included
Built-in retry logic with exponential backoff
Subscribe only to events you need
## Getting Started
Navigate to the DodoPayments Dashboard and go to `Developer > Webhooks`.
Click on `Add Webhook` to create a new webhook endpoint.
Webhooks provide real-time notifications when specific events occur in your Dodo Payments account. Use webhooks to automate workflows, update your database, send notifications, and keep your systems synchronized.
Our webhook implementation follows the [Standard Webhooks](https://standardwebhooks.com/) specification, ensuring compatibility with industry best practices and existing webhook libraries.
## Key Features
Receive instant notifications when events occur
HMAC SHA256 signature verification included
Built-in retry logic with exponential backoff
Subscribe only to events you need
## Getting Started
Navigate to the DodoPayments Dashboard and go to `Developer > Webhooks`.
Click on `Add Webhook` to create a new webhook endpoint.
 Enter the URL where you want to receive webhook events.
Choose the specific events your webhook endpoint should listen for by selecting them from the event list.
Only selected events will trigger webhooks to your endpoint, helping you avoid unnecessary traffic and processing.
Obtain your webhook `Secret Key` from the settings page. You'll use this to verify the authenticity of received webhooks.
Keep your webhook secret key secure and never expose it in client-side code or public repositories.
If needed, you can rotate your webhook secret for enhanced security. Click the **Rotate Secret** button in your webhook settings.
Rotating the secret will **expire it** and **replace it** with a new one. The old secret will only be valid for the next 24 hours. Afterward, trying to verify with the old secret will fail.
Use secret rotation periodically or immediately if you suspect your current secret has been compromised.
## Configuring Subscribed Events
You can configure which specific events they want to receive for each webhook endpoint.
### Accessing Event Configuration
Go to your Dodo Payments Dashboard and navigate to `Developer > Webhooks`.
Click on the webhook endpoint you want to configure.
In the webhook details page, you'll see a "Subscribed events" section. Click the **Edit** button to modify your event subscriptions.
### Managing Event Subscriptions
The interface displays all available webhook events organized in a hierarchical structure. Events are grouped by category (e.g., `dispute`, `payment`, `subscription`).
Use the search bar to quickly find specific events by typing event names or keywords.
Check the boxes next to the events you want to receive. You can:
* Select individual sub-events (e.g., `dispute.accepted`, `dispute.challenged`)
* Select parent events to receive all related sub-events
* Mix and match specific events based on your needs
Hover over the information icon (ⓘ) next to each event to see a description of when that event is triggered.
Click **Save** to apply your changes, or **Cancel** to discard modifications.
If you deselect all events, your webhook endpoint will not receive any notifications. Make sure to select at least the events your application needs to function properly.
## Webhook Delivery
### Timeouts
Webhooks have a **15-second timeout window** for both connection and read operations. Ensure your endpoint responds quickly to avoid timeouts.
Process webhooks asynchronously by acknowledging receipt immediately with a `200` status code, then handling the actual processing in the background.
### Automatic Retries
If a webhook delivery fails, Dodo Payments automatically retries with exponential backoff to prevent overwhelming your system.
| Attempt | Delay | Description |
| ------- | ----------- | ------------------------------------------------------------ |
| 1 | Immediately | First retry happens right away |
| 2 | 5 seconds | Second attempt after short delay |
| 3 | 5 minutes | Third attempt with increased backoff |
| 4 | 30 minutes | Fourth attempt continuing backoff |
| 5 | 2 hours | Fifth attempt with extended delay |
| 6 | 5 hours | Sixth attempt with longer delay |
| 7 | 10 hours | Seventh attempt with maximum delay |
| 8 | 10 hours | **Final attempt** - webhook marked as failed if unsuccessful |
**Maximum of 8 retry attempts** per webhook event. For example, if a webhook fails three times before succeeding, the total delivery time is approximately 35 minutes and 5 seconds from the first attempt.
Use the Dodo Payments dashboard to manually retry individual messages or bulk recover all failed messages at any time.
### Idempotency
Each webhook event includes a unique `webhook-id` header. Use this identifier to implement idempotency and prevent duplicate processing.
```javascript theme={null}
// Example: Storing webhook IDs to prevent duplicate processing
const processedWebhooks = new Set();
app.post('/webhook', (req, res) => {
const webhookId = req.headers['webhook-id'];
if (processedWebhooks.has(webhookId)) {
return res.status(200).json({ received: true });
}
processedWebhooks.add(webhookId);
// Process the webhook...
});
```
Always implement idempotency checks. Due to retries, you may receive the same event multiple times.
### Event Ordering
Webhook events may arrive out of order due to retries or network conditions. Design your system to handle events in any sequence.
You will receive the **latest payload at the time of delivery**, regardless of when the webhook event was originally emitted.
## Securing Webhooks
To ensure the security of your webhooks, always validate the payloads and use HTTPS.
### Verifying Signatures
Each webhook request includes a `webhook-signature` header, an HMAC SHA256 signature of the webhook payload and timestamp, signed with your secret key.
#### SDK verification (recommended)
All official SDKs include built‑in helpers to securely validate and parse incoming webhooks. Two methods are available:
* `unwrap()`: Verifies signatures using your webhook secret key
* `unsafe_unwrap()`: Parses payloads without verification
Provide your webhook secret via `DODO_PAYMENTS_WEBHOOK_KEY` when initializing the Dodo Payments client.
```typescript TypeScript/Node.js theme={null}
import DodoPayments from 'dodopayments';
import express from 'express';
const app = express();
app.use(express.raw({ type: 'application/json' }));
const client = new DodoPayments({
bearerToken: process.env.DODO_PAYMENTS_API_KEY,
environment: process.env.DODO_PAYMENTS_ENVIRONMENT,
webhookKey: process.env.DODO_PAYMENTS_WEBHOOK_KEY,
});
app.post('/webhook', async (req, res) => {
try {
const unwrapped = client.webhooks.unwrap(req.body.toString(), {
headers: {
'webhook-id': req.headers['webhook-id'] as string,
'webhook-signature': req.headers['webhook-signature'] as string,
'webhook-timestamp': req.headers['webhook-timestamp'] as string,
},
});
res.json({ received: true });
} catch (error) {
res.status(401).json({ error: 'Invalid signature' });
}
});
```
```python Python theme={null}
from fastapi import FastAPI, Request, HTTPException
from dodopayments import DodoPayments
import os
app = FastAPI()
client = DodoPayments(
bearer_token=os.getenv("DODO_PAYMENTS_API_KEY"),
environment=os.getenv("DODO_PAYMENTS_ENVIRONMENT"),
webhook_key=os.getenv("DODO_PAYMENTS_WEBHOOK_KEY"),
)
@app.post("/webhook")
async def handle_webhook(request: Request):
try:
unwrapped = client.webhooks.unwrap(
await request.body(),
headers={
"webhook-id": request.headers.get("webhook-id", ""),
"webhook-signature": request.headers.get("webhook-signature", ""),
"webhook-timestamp": request.headers.get("webhook-timestamp", ""),
},
)
return {"received": True}
except Exception:
raise HTTPException(status_code=401, detail="Invalid signature")
```
```go Go theme={null}
import (
"context"
"io"
"net/http"
"os"
"github.com/dodopayments/dodopayments-go"
"github.com/dodopayments/dodopayments-go/option"
)
func webhookHandler(w http.ResponseWriter, r *http.Request) {
client := dodopayments.NewClient(
option.WithBearerToken(os.Getenv("DODO_PAYMENTS_API_KEY")),
option.WithEnvironment(os.Getenv("DODO_PAYMENTS_ENVIRONMENT")),
option.WithWebhookKey(os.Getenv("DODO_PAYMENTS_WEBHOOK_KEY")),
)
rawBody, _ := io.ReadAll(r.Body)
if _, err := client.Webhooks.Unwrap(context.Background(), rawBody, map[string]string{
"webhook-id": r.Header.Get("webhook-id"),
"webhook-signature": r.Header.Get("webhook-signature"),
"webhook-timestamp": r.Header.Get("webhook-timestamp"),
}); err != nil {
http.Error(w, "Invalid signature", http.StatusUnauthorized)
return
}
w.WriteHeader(http.StatusOK)
}
```
#### Manual verification (alternative)
If you are not using an SDK, you can verify signatures yourself following the Standard Webhooks spec:
1. Build the signed message by concatenating `webhook-id`, `webhook-timestamp`, and the exact raw stringified `payload`, separated by periods (`.`).
2. Compute the HMAC SHA256 of that string using your webhook secret key from the Dashboard.
3. Compare the computed signature to the `webhook-signature` header. If they match, the webhook is authentic.
We follow the Standard Webhooks specification. You can use their libraries to verify signatures: [https://github.com/standard-webhooks/standard-webhooks/tree/main/libraries](https://github.com/standard-webhooks/standard-webhooks/tree/main/libraries). For event payload formats, see the [Webhook Payload](/developer-resources/webhooks/intents/payment).
### Responding to Webhooks
* Your webhook handler must return a `2xx status code` to acknowledge receipt of the event.
* Any other response will be treated as a failure, and the webhook will be retried.
### Best Practices
Always use HTTPS URLs for webhook endpoints. HTTP endpoints are vulnerable to man-in-the-middle attacks and expose your webhook data.
Return a `200` status code immediately upon receiving the webhook. Process the event asynchronously to avoid timeouts.
```javascript theme={null}
app.post('/webhook', async (req, res) => {
// Acknowledge receipt immediately
res.status(200).json({ received: true });
// Process asynchronously
processWebhookAsync(req.body).catch(console.error);
});
```
Implement idempotency using the `webhook-id` header to safely process the same event multiple times without side effects.
Store your webhook secret securely using environment variables or a secrets manager. Never commit secrets to version control.
## Webhook Payload Structure
Understanding the webhook payload structure helps you parse and process events correctly.
### Request Format
```http theme={null}
POST /your-webhook-url
Content-Type: application/json
```
### Headers
Unique identifier for this webhook event. Use this for idempotency checks.
HMAC SHA256 signature for verifying the webhook authenticity.
Unix timestamp (in seconds) when the webhook was sent.
### Request Body
Your Dodo Payments business identifier.
Event type that triggered this webhook (e.g., `payment.succeeded`, `subscription.active`).
ISO 8601 formatted timestamp of when the event occurred.
Event-specific payload containing detailed information about the event.
Type of resource. One of: `Payment`, `Subscription`, `Refund`, `Dispute`, `LicenseKey`, `CreditLedgerEntry`, `CreditBalanceLow`, `AbandonedCheckout`, `DunningAttempt`, or `EntitlementGrant`.
Additional fields vary by event type. See the event-specific documentation for complete schemas.
### Example Payload
```json theme={null}
{
"business_id": "string",
"type": "payment.succeeded | payment.failed |...",
"timestamp": "2024-01-01T12:00:00Z",
"data": {
"payload_type": "Payment | Subscription | Refund | Dispute | LicenseKey | CreditLedgerEntry | CreditBalanceLow | AbandonedCheckout | DunningAttempt | EntitlementGrant",
// ... event-specific fields (see below)
}
}
```
Browse all available webhook event types
View detailed payload schemas for each event
React to `payment.failed` and recover declined payments
## Testing Webhooks
You can test your webhook integration directly from the Dodo Payments dashboard to ensure your endpoint is working correctly before going live.
Enter the URL where you want to receive webhook events.
Choose the specific events your webhook endpoint should listen for by selecting them from the event list.
Only selected events will trigger webhooks to your endpoint, helping you avoid unnecessary traffic and processing.
Obtain your webhook `Secret Key` from the settings page. You'll use this to verify the authenticity of received webhooks.
Keep your webhook secret key secure and never expose it in client-side code or public repositories.
If needed, you can rotate your webhook secret for enhanced security. Click the **Rotate Secret** button in your webhook settings.
Rotating the secret will **expire it** and **replace it** with a new one. The old secret will only be valid for the next 24 hours. Afterward, trying to verify with the old secret will fail.
Use secret rotation periodically or immediately if you suspect your current secret has been compromised.
## Configuring Subscribed Events
You can configure which specific events they want to receive for each webhook endpoint.
### Accessing Event Configuration
Go to your Dodo Payments Dashboard and navigate to `Developer > Webhooks`.
Click on the webhook endpoint you want to configure.
In the webhook details page, you'll see a "Subscribed events" section. Click the **Edit** button to modify your event subscriptions.
### Managing Event Subscriptions
The interface displays all available webhook events organized in a hierarchical structure. Events are grouped by category (e.g., `dispute`, `payment`, `subscription`).
Use the search bar to quickly find specific events by typing event names or keywords.
Check the boxes next to the events you want to receive. You can:
* Select individual sub-events (e.g., `dispute.accepted`, `dispute.challenged`)
* Select parent events to receive all related sub-events
* Mix and match specific events based on your needs
Hover over the information icon (ⓘ) next to each event to see a description of when that event is triggered.
Click **Save** to apply your changes, or **Cancel** to discard modifications.
If you deselect all events, your webhook endpoint will not receive any notifications. Make sure to select at least the events your application needs to function properly.
## Webhook Delivery
### Timeouts
Webhooks have a **15-second timeout window** for both connection and read operations. Ensure your endpoint responds quickly to avoid timeouts.
Process webhooks asynchronously by acknowledging receipt immediately with a `200` status code, then handling the actual processing in the background.
### Automatic Retries
If a webhook delivery fails, Dodo Payments automatically retries with exponential backoff to prevent overwhelming your system.
| Attempt | Delay | Description |
| ------- | ----------- | ------------------------------------------------------------ |
| 1 | Immediately | First retry happens right away |
| 2 | 5 seconds | Second attempt after short delay |
| 3 | 5 minutes | Third attempt with increased backoff |
| 4 | 30 minutes | Fourth attempt continuing backoff |
| 5 | 2 hours | Fifth attempt with extended delay |
| 6 | 5 hours | Sixth attempt with longer delay |
| 7 | 10 hours | Seventh attempt with maximum delay |
| 8 | 10 hours | **Final attempt** - webhook marked as failed if unsuccessful |
**Maximum of 8 retry attempts** per webhook event. For example, if a webhook fails three times before succeeding, the total delivery time is approximately 35 minutes and 5 seconds from the first attempt.
Use the Dodo Payments dashboard to manually retry individual messages or bulk recover all failed messages at any time.
### Idempotency
Each webhook event includes a unique `webhook-id` header. Use this identifier to implement idempotency and prevent duplicate processing.
```javascript theme={null}
// Example: Storing webhook IDs to prevent duplicate processing
const processedWebhooks = new Set();
app.post('/webhook', (req, res) => {
const webhookId = req.headers['webhook-id'];
if (processedWebhooks.has(webhookId)) {
return res.status(200).json({ received: true });
}
processedWebhooks.add(webhookId);
// Process the webhook...
});
```
Always implement idempotency checks. Due to retries, you may receive the same event multiple times.
### Event Ordering
Webhook events may arrive out of order due to retries or network conditions. Design your system to handle events in any sequence.
You will receive the **latest payload at the time of delivery**, regardless of when the webhook event was originally emitted.
## Securing Webhooks
To ensure the security of your webhooks, always validate the payloads and use HTTPS.
### Verifying Signatures
Each webhook request includes a `webhook-signature` header, an HMAC SHA256 signature of the webhook payload and timestamp, signed with your secret key.
#### SDK verification (recommended)
All official SDKs include built‑in helpers to securely validate and parse incoming webhooks. Two methods are available:
* `unwrap()`: Verifies signatures using your webhook secret key
* `unsafe_unwrap()`: Parses payloads without verification
Provide your webhook secret via `DODO_PAYMENTS_WEBHOOK_KEY` when initializing the Dodo Payments client.
```typescript TypeScript/Node.js theme={null}
import DodoPayments from 'dodopayments';
import express from 'express';
const app = express();
app.use(express.raw({ type: 'application/json' }));
const client = new DodoPayments({
bearerToken: process.env.DODO_PAYMENTS_API_KEY,
environment: process.env.DODO_PAYMENTS_ENVIRONMENT,
webhookKey: process.env.DODO_PAYMENTS_WEBHOOK_KEY,
});
app.post('/webhook', async (req, res) => {
try {
const unwrapped = client.webhooks.unwrap(req.body.toString(), {
headers: {
'webhook-id': req.headers['webhook-id'] as string,
'webhook-signature': req.headers['webhook-signature'] as string,
'webhook-timestamp': req.headers['webhook-timestamp'] as string,
},
});
res.json({ received: true });
} catch (error) {
res.status(401).json({ error: 'Invalid signature' });
}
});
```
```python Python theme={null}
from fastapi import FastAPI, Request, HTTPException
from dodopayments import DodoPayments
import os
app = FastAPI()
client = DodoPayments(
bearer_token=os.getenv("DODO_PAYMENTS_API_KEY"),
environment=os.getenv("DODO_PAYMENTS_ENVIRONMENT"),
webhook_key=os.getenv("DODO_PAYMENTS_WEBHOOK_KEY"),
)
@app.post("/webhook")
async def handle_webhook(request: Request):
try:
unwrapped = client.webhooks.unwrap(
await request.body(),
headers={
"webhook-id": request.headers.get("webhook-id", ""),
"webhook-signature": request.headers.get("webhook-signature", ""),
"webhook-timestamp": request.headers.get("webhook-timestamp", ""),
},
)
return {"received": True}
except Exception:
raise HTTPException(status_code=401, detail="Invalid signature")
```
```go Go theme={null}
import (
"context"
"io"
"net/http"
"os"
"github.com/dodopayments/dodopayments-go"
"github.com/dodopayments/dodopayments-go/option"
)
func webhookHandler(w http.ResponseWriter, r *http.Request) {
client := dodopayments.NewClient(
option.WithBearerToken(os.Getenv("DODO_PAYMENTS_API_KEY")),
option.WithEnvironment(os.Getenv("DODO_PAYMENTS_ENVIRONMENT")),
option.WithWebhookKey(os.Getenv("DODO_PAYMENTS_WEBHOOK_KEY")),
)
rawBody, _ := io.ReadAll(r.Body)
if _, err := client.Webhooks.Unwrap(context.Background(), rawBody, map[string]string{
"webhook-id": r.Header.Get("webhook-id"),
"webhook-signature": r.Header.Get("webhook-signature"),
"webhook-timestamp": r.Header.Get("webhook-timestamp"),
}); err != nil {
http.Error(w, "Invalid signature", http.StatusUnauthorized)
return
}
w.WriteHeader(http.StatusOK)
}
```
#### Manual verification (alternative)
If you are not using an SDK, you can verify signatures yourself following the Standard Webhooks spec:
1. Build the signed message by concatenating `webhook-id`, `webhook-timestamp`, and the exact raw stringified `payload`, separated by periods (`.`).
2. Compute the HMAC SHA256 of that string using your webhook secret key from the Dashboard.
3. Compare the computed signature to the `webhook-signature` header. If they match, the webhook is authentic.
We follow the Standard Webhooks specification. You can use their libraries to verify signatures: [https://github.com/standard-webhooks/standard-webhooks/tree/main/libraries](https://github.com/standard-webhooks/standard-webhooks/tree/main/libraries). For event payload formats, see the [Webhook Payload](/developer-resources/webhooks/intents/payment).
### Responding to Webhooks
* Your webhook handler must return a `2xx status code` to acknowledge receipt of the event.
* Any other response will be treated as a failure, and the webhook will be retried.
### Best Practices
Always use HTTPS URLs for webhook endpoints. HTTP endpoints are vulnerable to man-in-the-middle attacks and expose your webhook data.
Return a `200` status code immediately upon receiving the webhook. Process the event asynchronously to avoid timeouts.
```javascript theme={null}
app.post('/webhook', async (req, res) => {
// Acknowledge receipt immediately
res.status(200).json({ received: true });
// Process asynchronously
processWebhookAsync(req.body).catch(console.error);
});
```
Implement idempotency using the `webhook-id` header to safely process the same event multiple times without side effects.
Store your webhook secret securely using environment variables or a secrets manager. Never commit secrets to version control.
## Webhook Payload Structure
Understanding the webhook payload structure helps you parse and process events correctly.
### Request Format
```http theme={null}
POST /your-webhook-url
Content-Type: application/json
```
### Headers
Unique identifier for this webhook event. Use this for idempotency checks.
HMAC SHA256 signature for verifying the webhook authenticity.
Unix timestamp (in seconds) when the webhook was sent.
### Request Body
Your Dodo Payments business identifier.
Event type that triggered this webhook (e.g., `payment.succeeded`, `subscription.active`).
ISO 8601 formatted timestamp of when the event occurred.
Event-specific payload containing detailed information about the event.
Type of resource. One of: `Payment`, `Subscription`, `Refund`, `Dispute`, `LicenseKey`, `CreditLedgerEntry`, `CreditBalanceLow`, `AbandonedCheckout`, `DunningAttempt`, or `EntitlementGrant`.
Additional fields vary by event type. See the event-specific documentation for complete schemas.
### Example Payload
```json theme={null}
{
"business_id": "string",
"type": "payment.succeeded | payment.failed |...",
"timestamp": "2024-01-01T12:00:00Z",
"data": {
"payload_type": "Payment | Subscription | Refund | Dispute | LicenseKey | CreditLedgerEntry | CreditBalanceLow | AbandonedCheckout | DunningAttempt | EntitlementGrant",
// ... event-specific fields (see below)
}
}
```
Browse all available webhook event types
View detailed payload schemas for each event
React to `payment.failed` and recover declined payments
## Testing Webhooks
You can test your webhook integration directly from the Dodo Payments dashboard to ensure your endpoint is working correctly before going live.
 ### Accessing the Testing Interface
Go to your Dodo Payments Dashboard and navigate to `Developer > Webhooks`.
Click on your webhook endpoint to access its details page.
Click on the **Testing** tab to access the webhook testing interface.
### Testing Your Webhook
The testing interface provides a comprehensive way to test your webhook endpoint:
Use the dropdown menu to select the specific event type you want to test (e.g., `payment.succeeded`, `payment.failed`, etc.).
The dropdown contains all available webhook event types that your endpoint can receive.
The interface displays both the **Schema** (data structure) and **Example** (sample payload) for the selected event type.
Click the **Send Example** button to send a test webhook to your endpoint.
**Important**: Failed messages sent through the testing interface will not be retried. This is for testing purposes only.
### Verifying Your Test
Monitor your webhook endpoint logs to confirm the test event was received.
Ensure your signature verification is working correctly with the test payload.
Confirm your endpoint returns a `2xx` status code to acknowledge receipt.
### Implementation Example
Here's a complete Express.js implementation showing webhook verification and handling:
```typescript Express.js Webhook Handler theme={null}
import { Webhook } from "standardwebhooks";
import express from "express";
const app = express();
app.use(express.json());
const webhook = new Webhook(process.env.DODO_WEBHOOK_SECRET);
app.post('/webhook/dodo-payments', async (req, res) => {
try {
// Extract webhook headers
const webhookHeaders = {
"webhook-id": req.headers["webhook-id"] as string,
"webhook-signature": req.headers["webhook-signature"] as string,
"webhook-timestamp": req.headers["webhook-timestamp"] as string,
};
// Verify the webhook signature
const payload = JSON.stringify(req.body);
await webhook.verify(payload, webhookHeaders);
// Acknowledge receipt immediately
res.status(200).json({ received: true });
// Process webhook asynchronously
processWebhookAsync(req.body).catch(console.error);
} catch (error) {
console.error('Webhook verification failed:', error);
res.status(400).json({ error: 'Invalid signature' });
}
});
async function processWebhookAsync(data: any) {
// Handle the webhook event based on type
switch (data.type) {
case 'payment.succeeded':
await handlePaymentSucceeded(data);
break;
case 'subscription.active':
await handleSubscriptionActive(data);
break;
// Add more event handlers...
}
}
```
```javascript Testing Webhooks Locally theme={null}
const { Webhook } = require("standardwebhooks");
const axios = require("axios");
const crypto = require("crypto");
// Generate test webhook
const timestamp = new Date();
const webhookId = crypto.randomUUID();
const payload = {
business_id: "biz_test123",
type: "payment.succeeded",
timestamp: timestamp.toISOString(),
data: {
payload_type: "Payment",
payment_id: "pay_test456",
amount: 2999
}
};
// Sign the payload
const webhookSecret = process.env.DODO_WEBHOOK_SECRET;
const webhookInstance = new Webhook(webhookSecret);
const payloadString = JSON.stringify(payload);
const signature = webhookInstance.sign(webhookId, timestamp, payloadString);
// Send test webhook
const response = await axios.post('http://localhost:3000/webhook/dodo-payments', payload, {
headers: {
"webhook-id": webhookId,
"webhook-timestamp": Math.floor(timestamp.getTime() / 1000),
"webhook-signature": signature,
"Content-Type": "application/json"
}
});
console.log("Test webhook sent successfully:", response.data);
```
Test your webhook handler thoroughly using the dashboard testing interface before processing production events. This helps identify and fix issues early.
## Testing Webhooks with the CLI
The [Dodo Payments CLI](/developer-resources/sdks/cli) provides two commands for testing webhooks during local development, without needing to leave your terminal.
### Listen for Live Webhooks Locally
Forward real webhook events from your test mode account to your local development server in real time:
```bash theme={null}
dodo wh listen
```
The CLI opens a WebSocket connection to Dodo Payments and forwards every webhook event to your local endpoint (e.g., `http://localhost:3000/webhook`), preserving all headers including signature headers for verification testing.
The listener only works with **test mode** API keys. Run `dodo login` and select Test Mode before using this command.
### Trigger Mock Webhook Events
Send mock webhook payloads to any endpoint without creating real transactions:
```bash theme={null}
dodo wh trigger
```
This interactive tool lets you select from all supported event types and sends realistic mock payloads to your endpoint. It loops so you can test multiple events in one session.
Mock webhook payloads from `dodo wh trigger` are not signed. Use `unsafe_unwrap()` instead of `unwrap()` in your webhook handler during testing only.
See the full CLI webhook testing documentation
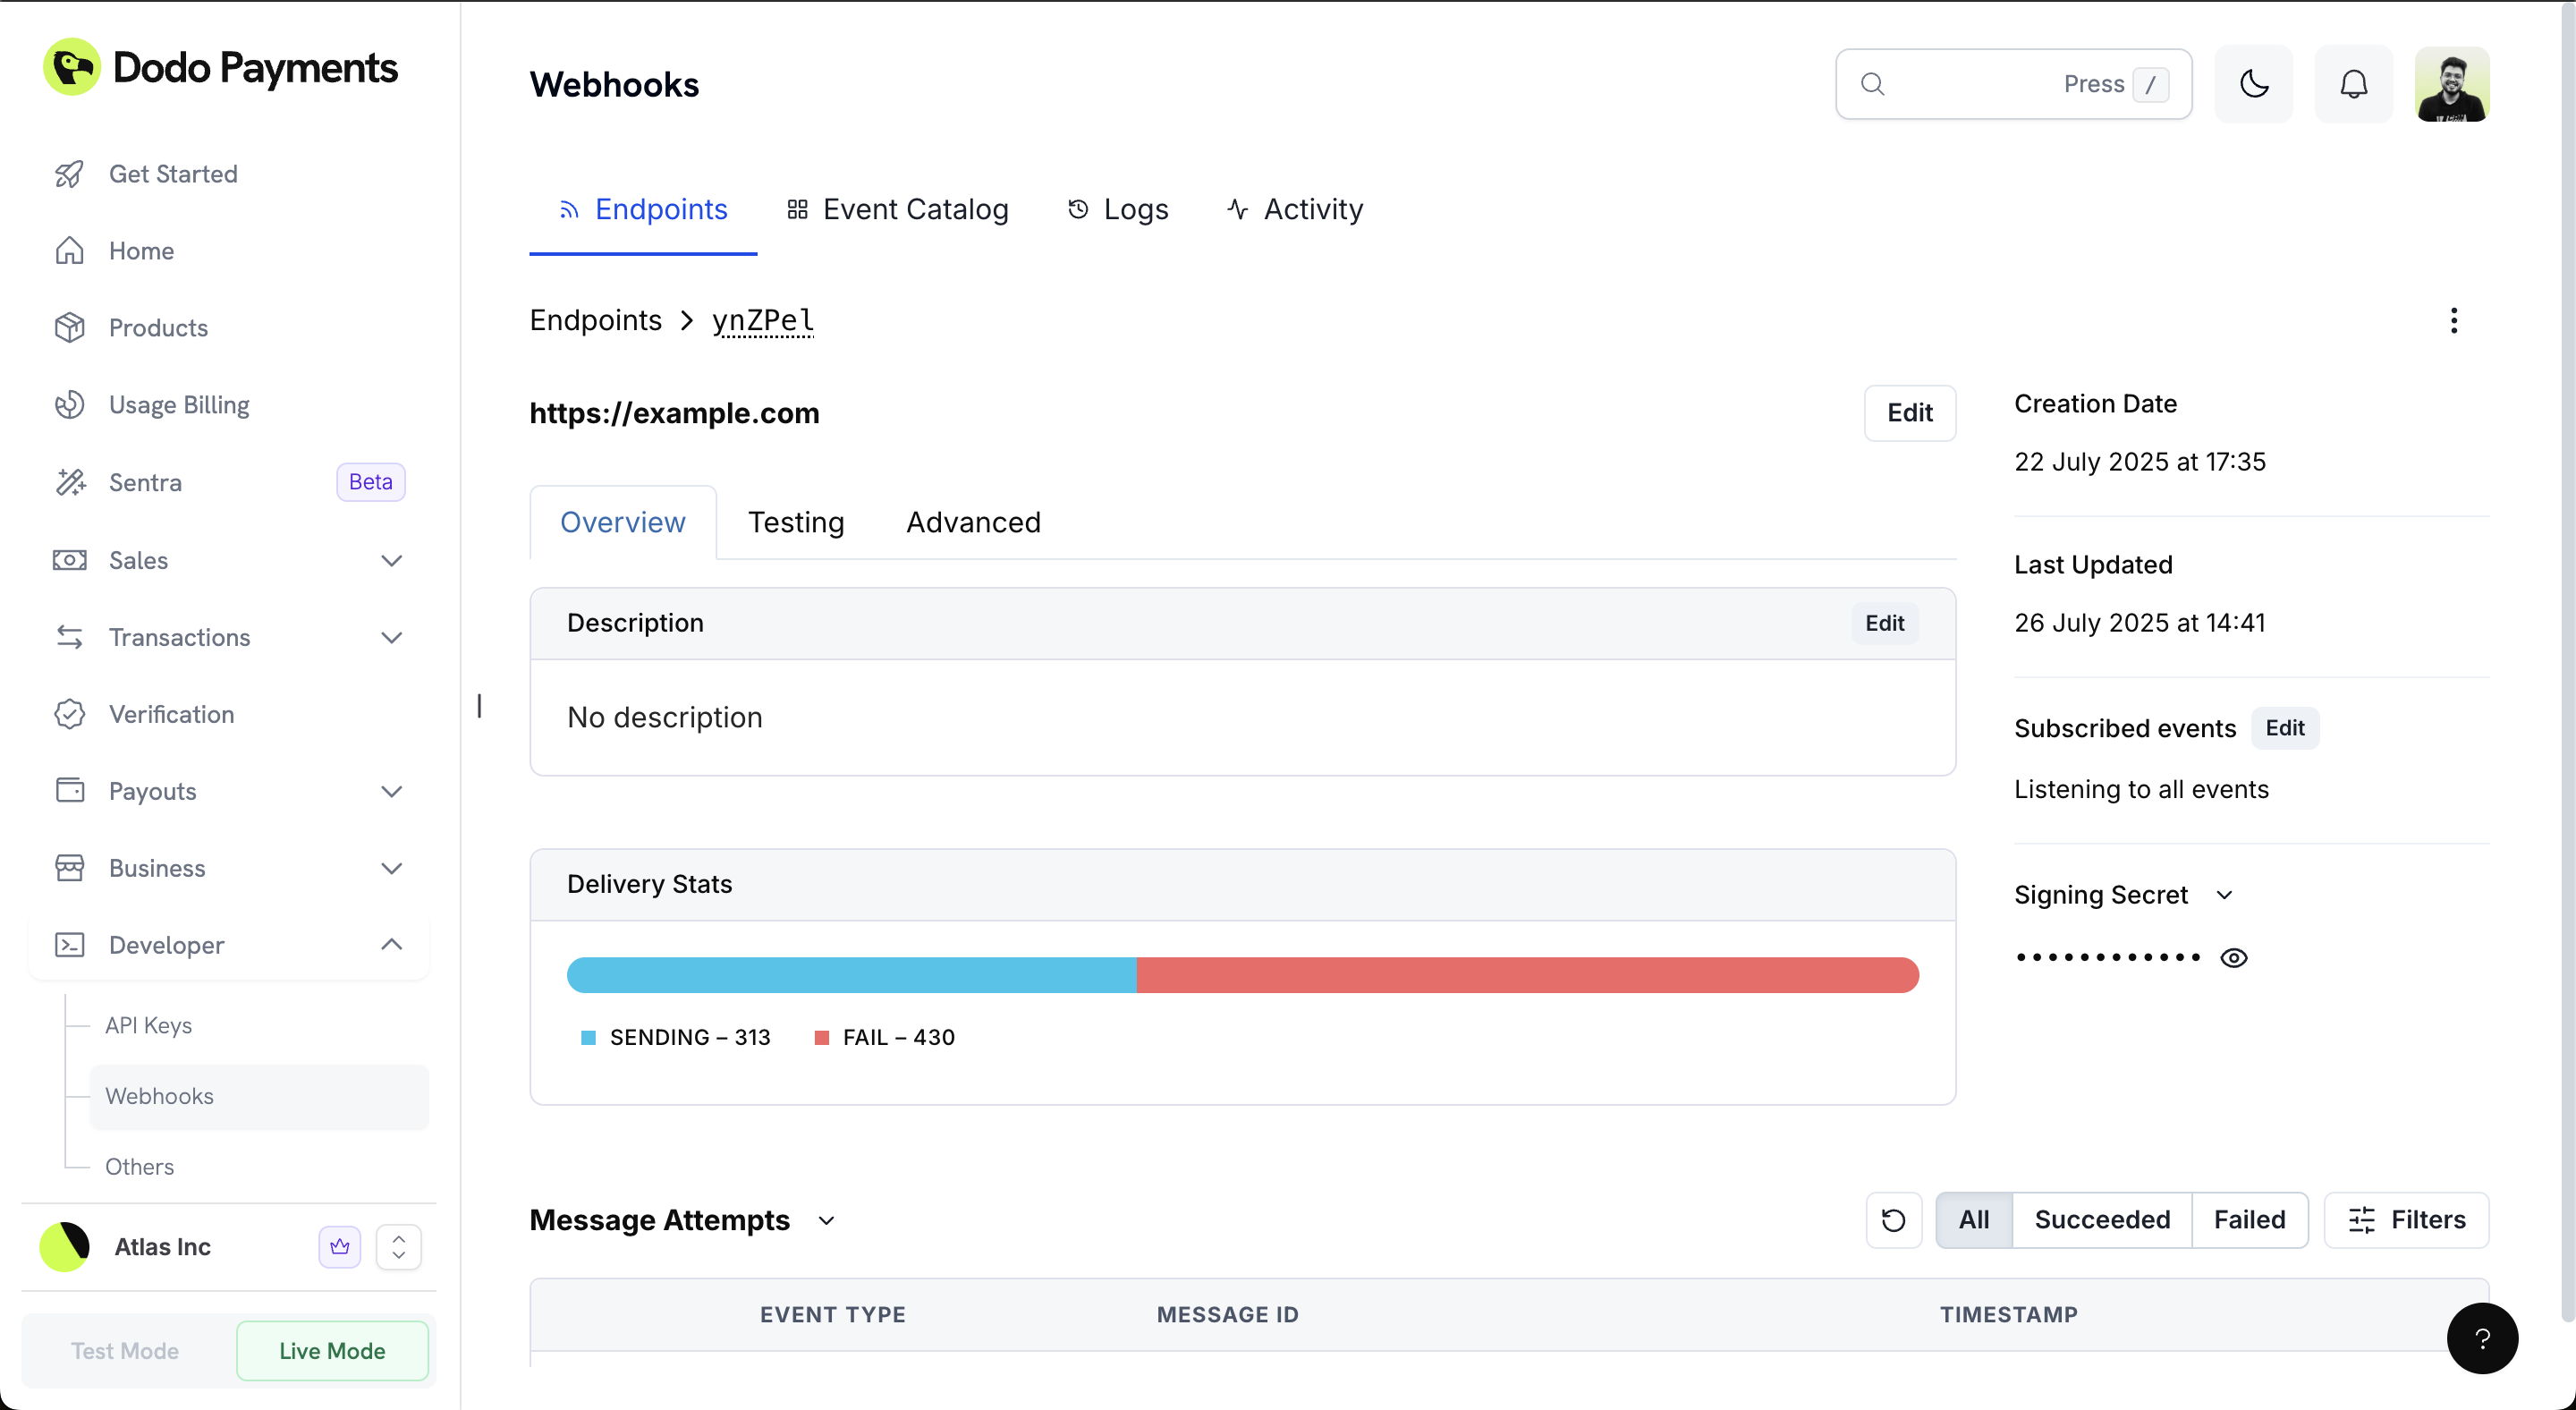
## Advanced Settings
The Advanced Settings tab provides additional configuration options for fine-tuning your webhook endpoint behavior.
### Rate Limiting (Throttling)
Control the rate at which webhook events are delivered to your endpoint to prevent overwhelming your system.
In the **Advanced** tab, locate the "Rate Limit (throttling)" section.
Click the **Edit** button to modify the rate limit settings.
By default, webhooks have "No rate limit" applied, meaning events are delivered as soon as they occur.
Configure your desired rate limit to control webhook delivery frequency and prevent system overload.
Use rate limiting when your webhook handler needs time to process events or when you want to batch multiple events together.
### Custom Headers
Add custom HTTP headers to all webhook requests sent to your endpoint. This is useful for authentication, routing, or adding metadata to your webhook requests.
In the "Custom Headers" section, enter a **Key** and **Value** for your custom header.
Click the **+** button to add additional custom headers as needed.
Your custom headers will be included in all webhook requests to this endpoint.
### Transformations
Transformations allow you to modify a webhook's payload and redirect it to a different URL. This powerful feature enables you to:
* Modify the payload structure before processing
* Route webhooks to different endpoints based on content
* Add or remove fields from the payload
* Transform data formats
Toggle the **Enabled** switch to activate the transformation feature.
Click **Edit transformation** to define your transformation rules.
You can use JavaScript to transform the webhook payload and specify a different target URL.
Use the testing interface to verify your transformation works correctly before going live.
Transformations can significantly impact webhook delivery performance. Test thoroughly and keep transformation logic simple and efficient.
Transformations are particularly useful for:
* Converting between different data formats
* Filtering events based on specific criteria
* Adding computed fields to the payload
* Routing events to different microservices
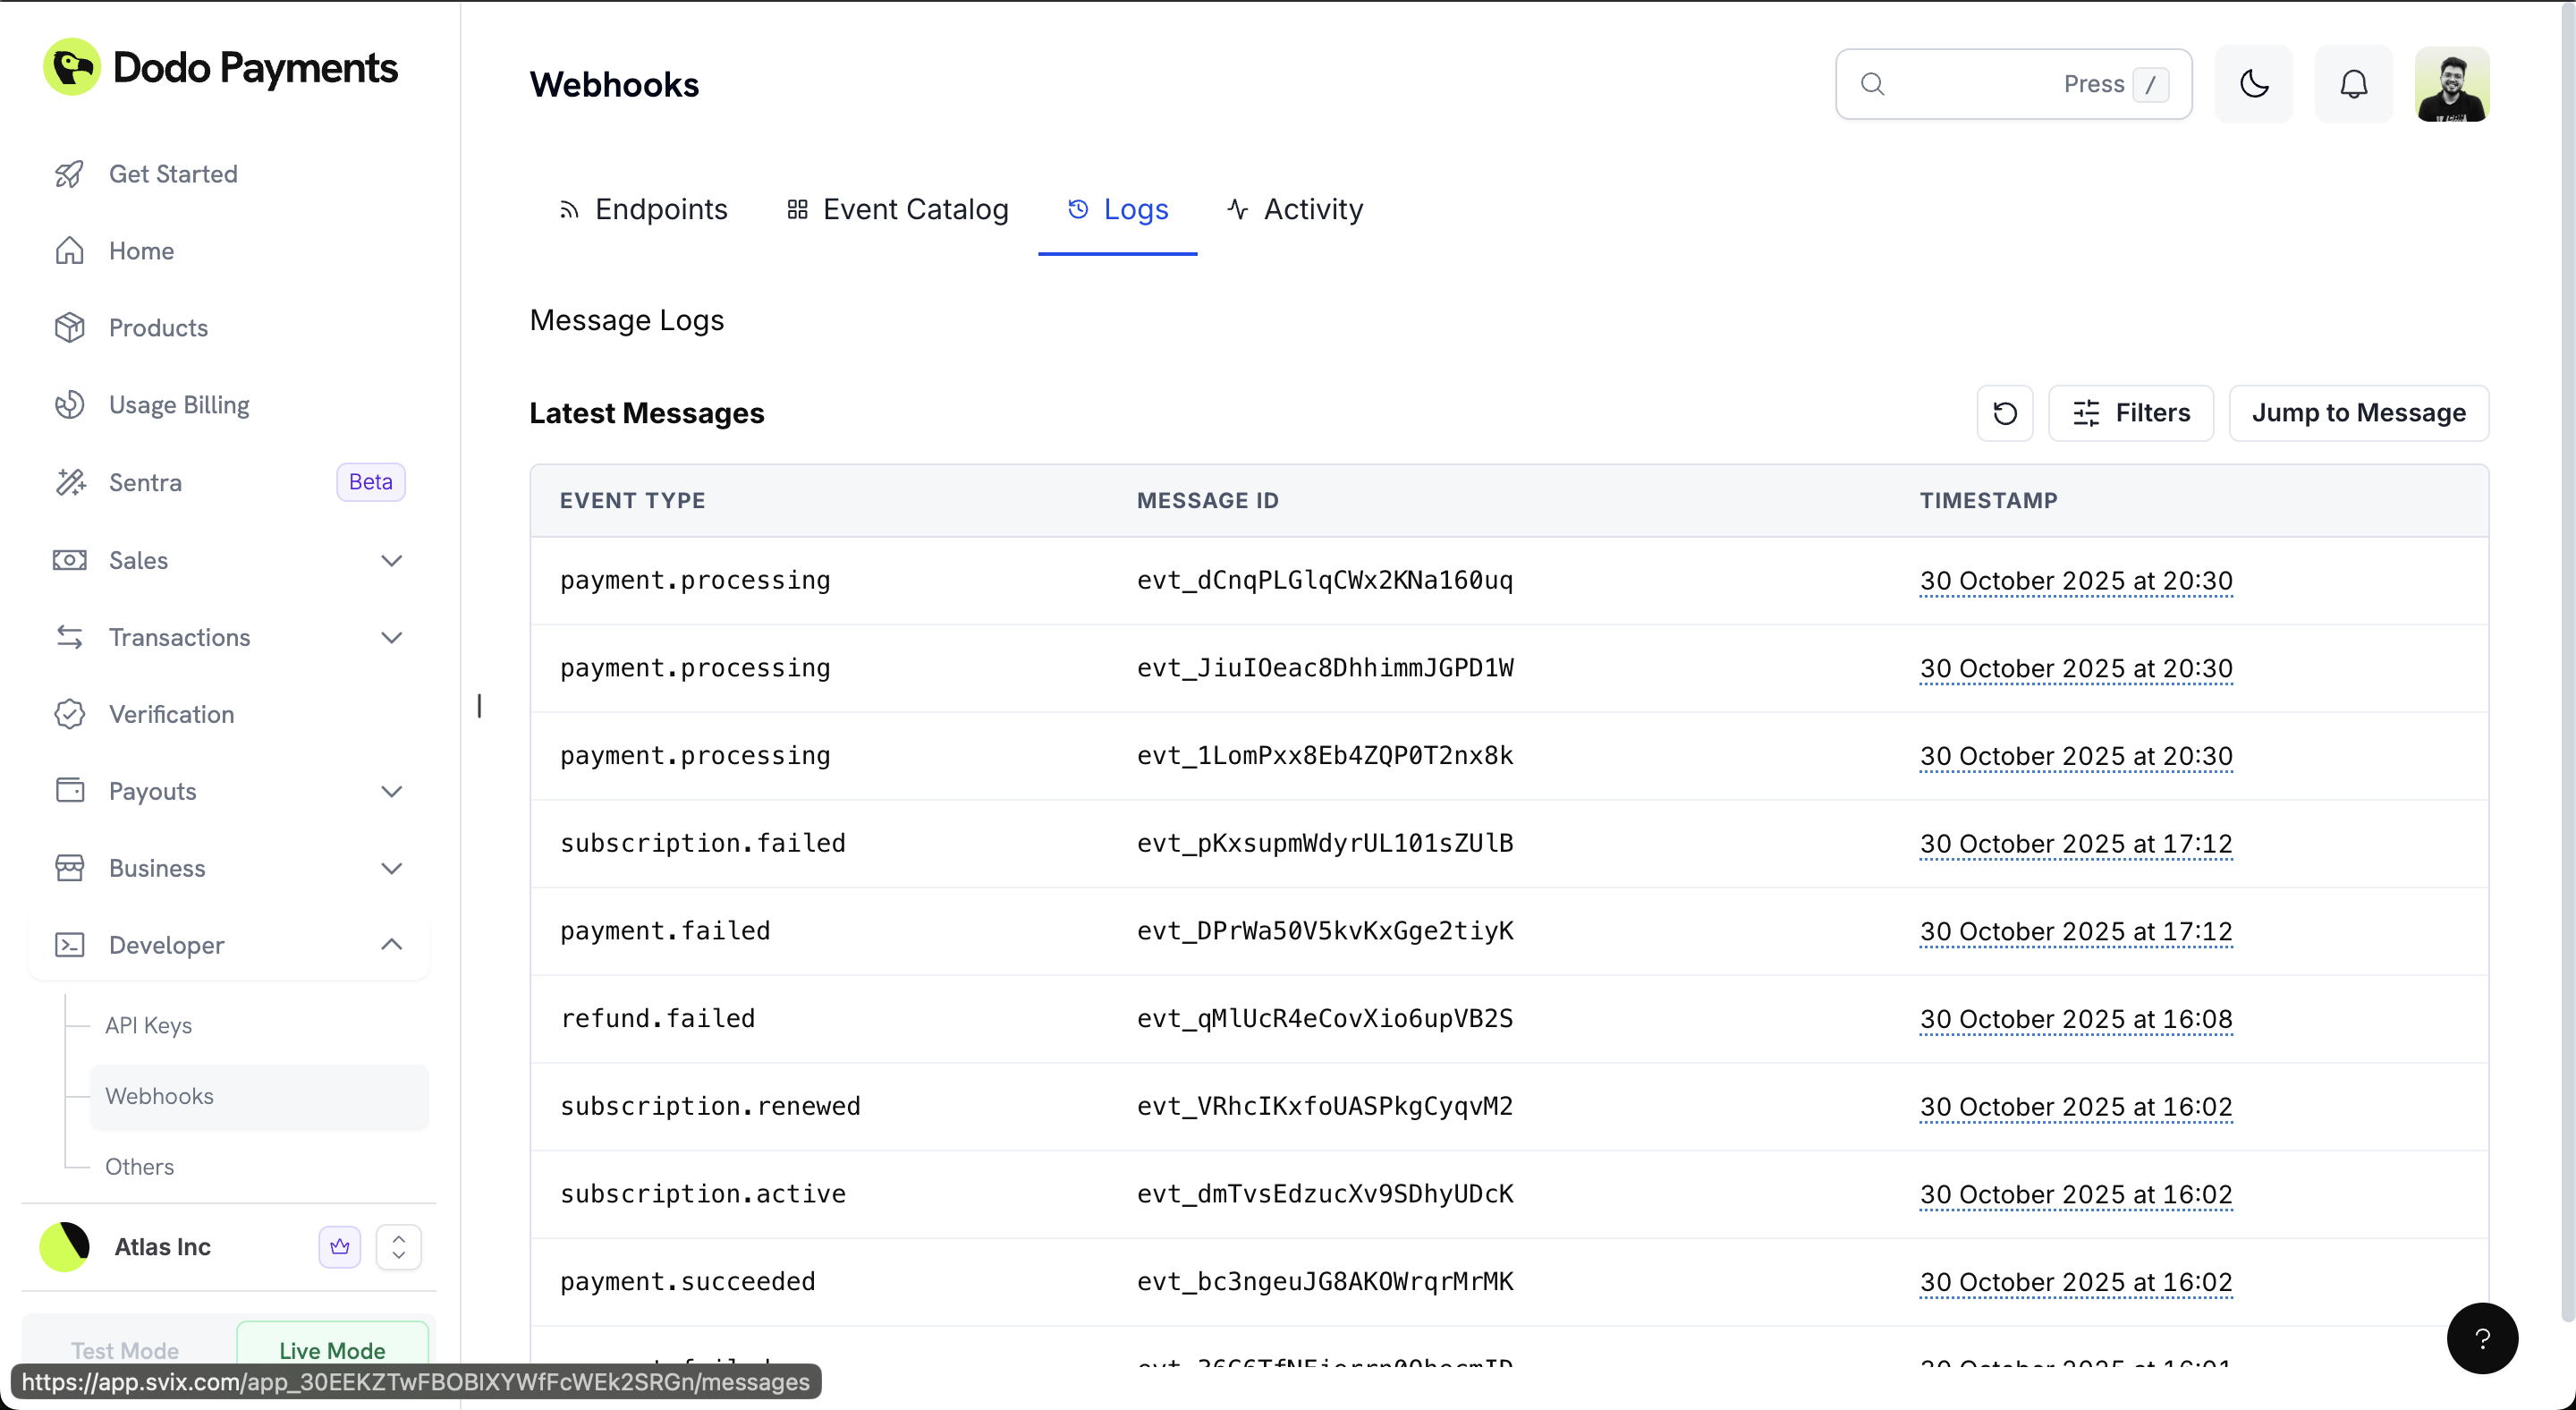
## Monitoring Webhook Logs
The Logs tab provides comprehensive visibility into your webhook delivery status, allowing you to monitor, debug, and manage webhook events effectively.
### Accessing the Testing Interface
Go to your Dodo Payments Dashboard and navigate to `Developer > Webhooks`.
Click on your webhook endpoint to access its details page.
Click on the **Testing** tab to access the webhook testing interface.
### Testing Your Webhook
The testing interface provides a comprehensive way to test your webhook endpoint:
Use the dropdown menu to select the specific event type you want to test (e.g., `payment.succeeded`, `payment.failed`, etc.).
The dropdown contains all available webhook event types that your endpoint can receive.
The interface displays both the **Schema** (data structure) and **Example** (sample payload) for the selected event type.
Click the **Send Example** button to send a test webhook to your endpoint.
**Important**: Failed messages sent through the testing interface will not be retried. This is for testing purposes only.
### Verifying Your Test
Monitor your webhook endpoint logs to confirm the test event was received.
Ensure your signature verification is working correctly with the test payload.
Confirm your endpoint returns a `2xx` status code to acknowledge receipt.
### Implementation Example
Here's a complete Express.js implementation showing webhook verification and handling:
```typescript Express.js Webhook Handler theme={null}
import { Webhook } from "standardwebhooks";
import express from "express";
const app = express();
app.use(express.json());
const webhook = new Webhook(process.env.DODO_WEBHOOK_SECRET);
app.post('/webhook/dodo-payments', async (req, res) => {
try {
// Extract webhook headers
const webhookHeaders = {
"webhook-id": req.headers["webhook-id"] as string,
"webhook-signature": req.headers["webhook-signature"] as string,
"webhook-timestamp": req.headers["webhook-timestamp"] as string,
};
// Verify the webhook signature
const payload = JSON.stringify(req.body);
await webhook.verify(payload, webhookHeaders);
// Acknowledge receipt immediately
res.status(200).json({ received: true });
// Process webhook asynchronously
processWebhookAsync(req.body).catch(console.error);
} catch (error) {
console.error('Webhook verification failed:', error);
res.status(400).json({ error: 'Invalid signature' });
}
});
async function processWebhookAsync(data: any) {
// Handle the webhook event based on type
switch (data.type) {
case 'payment.succeeded':
await handlePaymentSucceeded(data);
break;
case 'subscription.active':
await handleSubscriptionActive(data);
break;
// Add more event handlers...
}
}
```
```javascript Testing Webhooks Locally theme={null}
const { Webhook } = require("standardwebhooks");
const axios = require("axios");
const crypto = require("crypto");
// Generate test webhook
const timestamp = new Date();
const webhookId = crypto.randomUUID();
const payload = {
business_id: "biz_test123",
type: "payment.succeeded",
timestamp: timestamp.toISOString(),
data: {
payload_type: "Payment",
payment_id: "pay_test456",
amount: 2999
}
};
// Sign the payload
const webhookSecret = process.env.DODO_WEBHOOK_SECRET;
const webhookInstance = new Webhook(webhookSecret);
const payloadString = JSON.stringify(payload);
const signature = webhookInstance.sign(webhookId, timestamp, payloadString);
// Send test webhook
const response = await axios.post('http://localhost:3000/webhook/dodo-payments', payload, {
headers: {
"webhook-id": webhookId,
"webhook-timestamp": Math.floor(timestamp.getTime() / 1000),
"webhook-signature": signature,
"Content-Type": "application/json"
}
});
console.log("Test webhook sent successfully:", response.data);
```
Test your webhook handler thoroughly using the dashboard testing interface before processing production events. This helps identify and fix issues early.
## Testing Webhooks with the CLI
The [Dodo Payments CLI](/developer-resources/sdks/cli) provides two commands for testing webhooks during local development, without needing to leave your terminal.
### Listen for Live Webhooks Locally
Forward real webhook events from your test mode account to your local development server in real time:
```bash theme={null}
dodo wh listen
```
The CLI opens a WebSocket connection to Dodo Payments and forwards every webhook event to your local endpoint (e.g., `http://localhost:3000/webhook`), preserving all headers including signature headers for verification testing.
The listener only works with **test mode** API keys. Run `dodo login` and select Test Mode before using this command.
### Trigger Mock Webhook Events
Send mock webhook payloads to any endpoint without creating real transactions:
```bash theme={null}
dodo wh trigger
```
This interactive tool lets you select from all supported event types and sends realistic mock payloads to your endpoint. It loops so you can test multiple events in one session.
Mock webhook payloads from `dodo wh trigger` are not signed. Use `unsafe_unwrap()` instead of `unwrap()` in your webhook handler during testing only.
See the full CLI webhook testing documentation
## Advanced Settings
The Advanced Settings tab provides additional configuration options for fine-tuning your webhook endpoint behavior.
### Rate Limiting (Throttling)
Control the rate at which webhook events are delivered to your endpoint to prevent overwhelming your system.
In the **Advanced** tab, locate the "Rate Limit (throttling)" section.
Click the **Edit** button to modify the rate limit settings.
By default, webhooks have "No rate limit" applied, meaning events are delivered as soon as they occur.
Configure your desired rate limit to control webhook delivery frequency and prevent system overload.
Use rate limiting when your webhook handler needs time to process events or when you want to batch multiple events together.
### Custom Headers
Add custom HTTP headers to all webhook requests sent to your endpoint. This is useful for authentication, routing, or adding metadata to your webhook requests.
In the "Custom Headers" section, enter a **Key** and **Value** for your custom header.
Click the **+** button to add additional custom headers as needed.
Your custom headers will be included in all webhook requests to this endpoint.
### Transformations
Transformations allow you to modify a webhook's payload and redirect it to a different URL. This powerful feature enables you to:
* Modify the payload structure before processing
* Route webhooks to different endpoints based on content
* Add or remove fields from the payload
* Transform data formats
Toggle the **Enabled** switch to activate the transformation feature.
Click **Edit transformation** to define your transformation rules.
You can use JavaScript to transform the webhook payload and specify a different target URL.
Use the testing interface to verify your transformation works correctly before going live.
Transformations can significantly impact webhook delivery performance. Test thoroughly and keep transformation logic simple and efficient.
Transformations are particularly useful for:
* Converting between different data formats
* Filtering events based on specific criteria
* Adding computed fields to the payload
* Routing events to different microservices
## Monitoring Webhook Logs
The Logs tab provides comprehensive visibility into your webhook delivery status, allowing you to monitor, debug, and manage webhook events effectively.
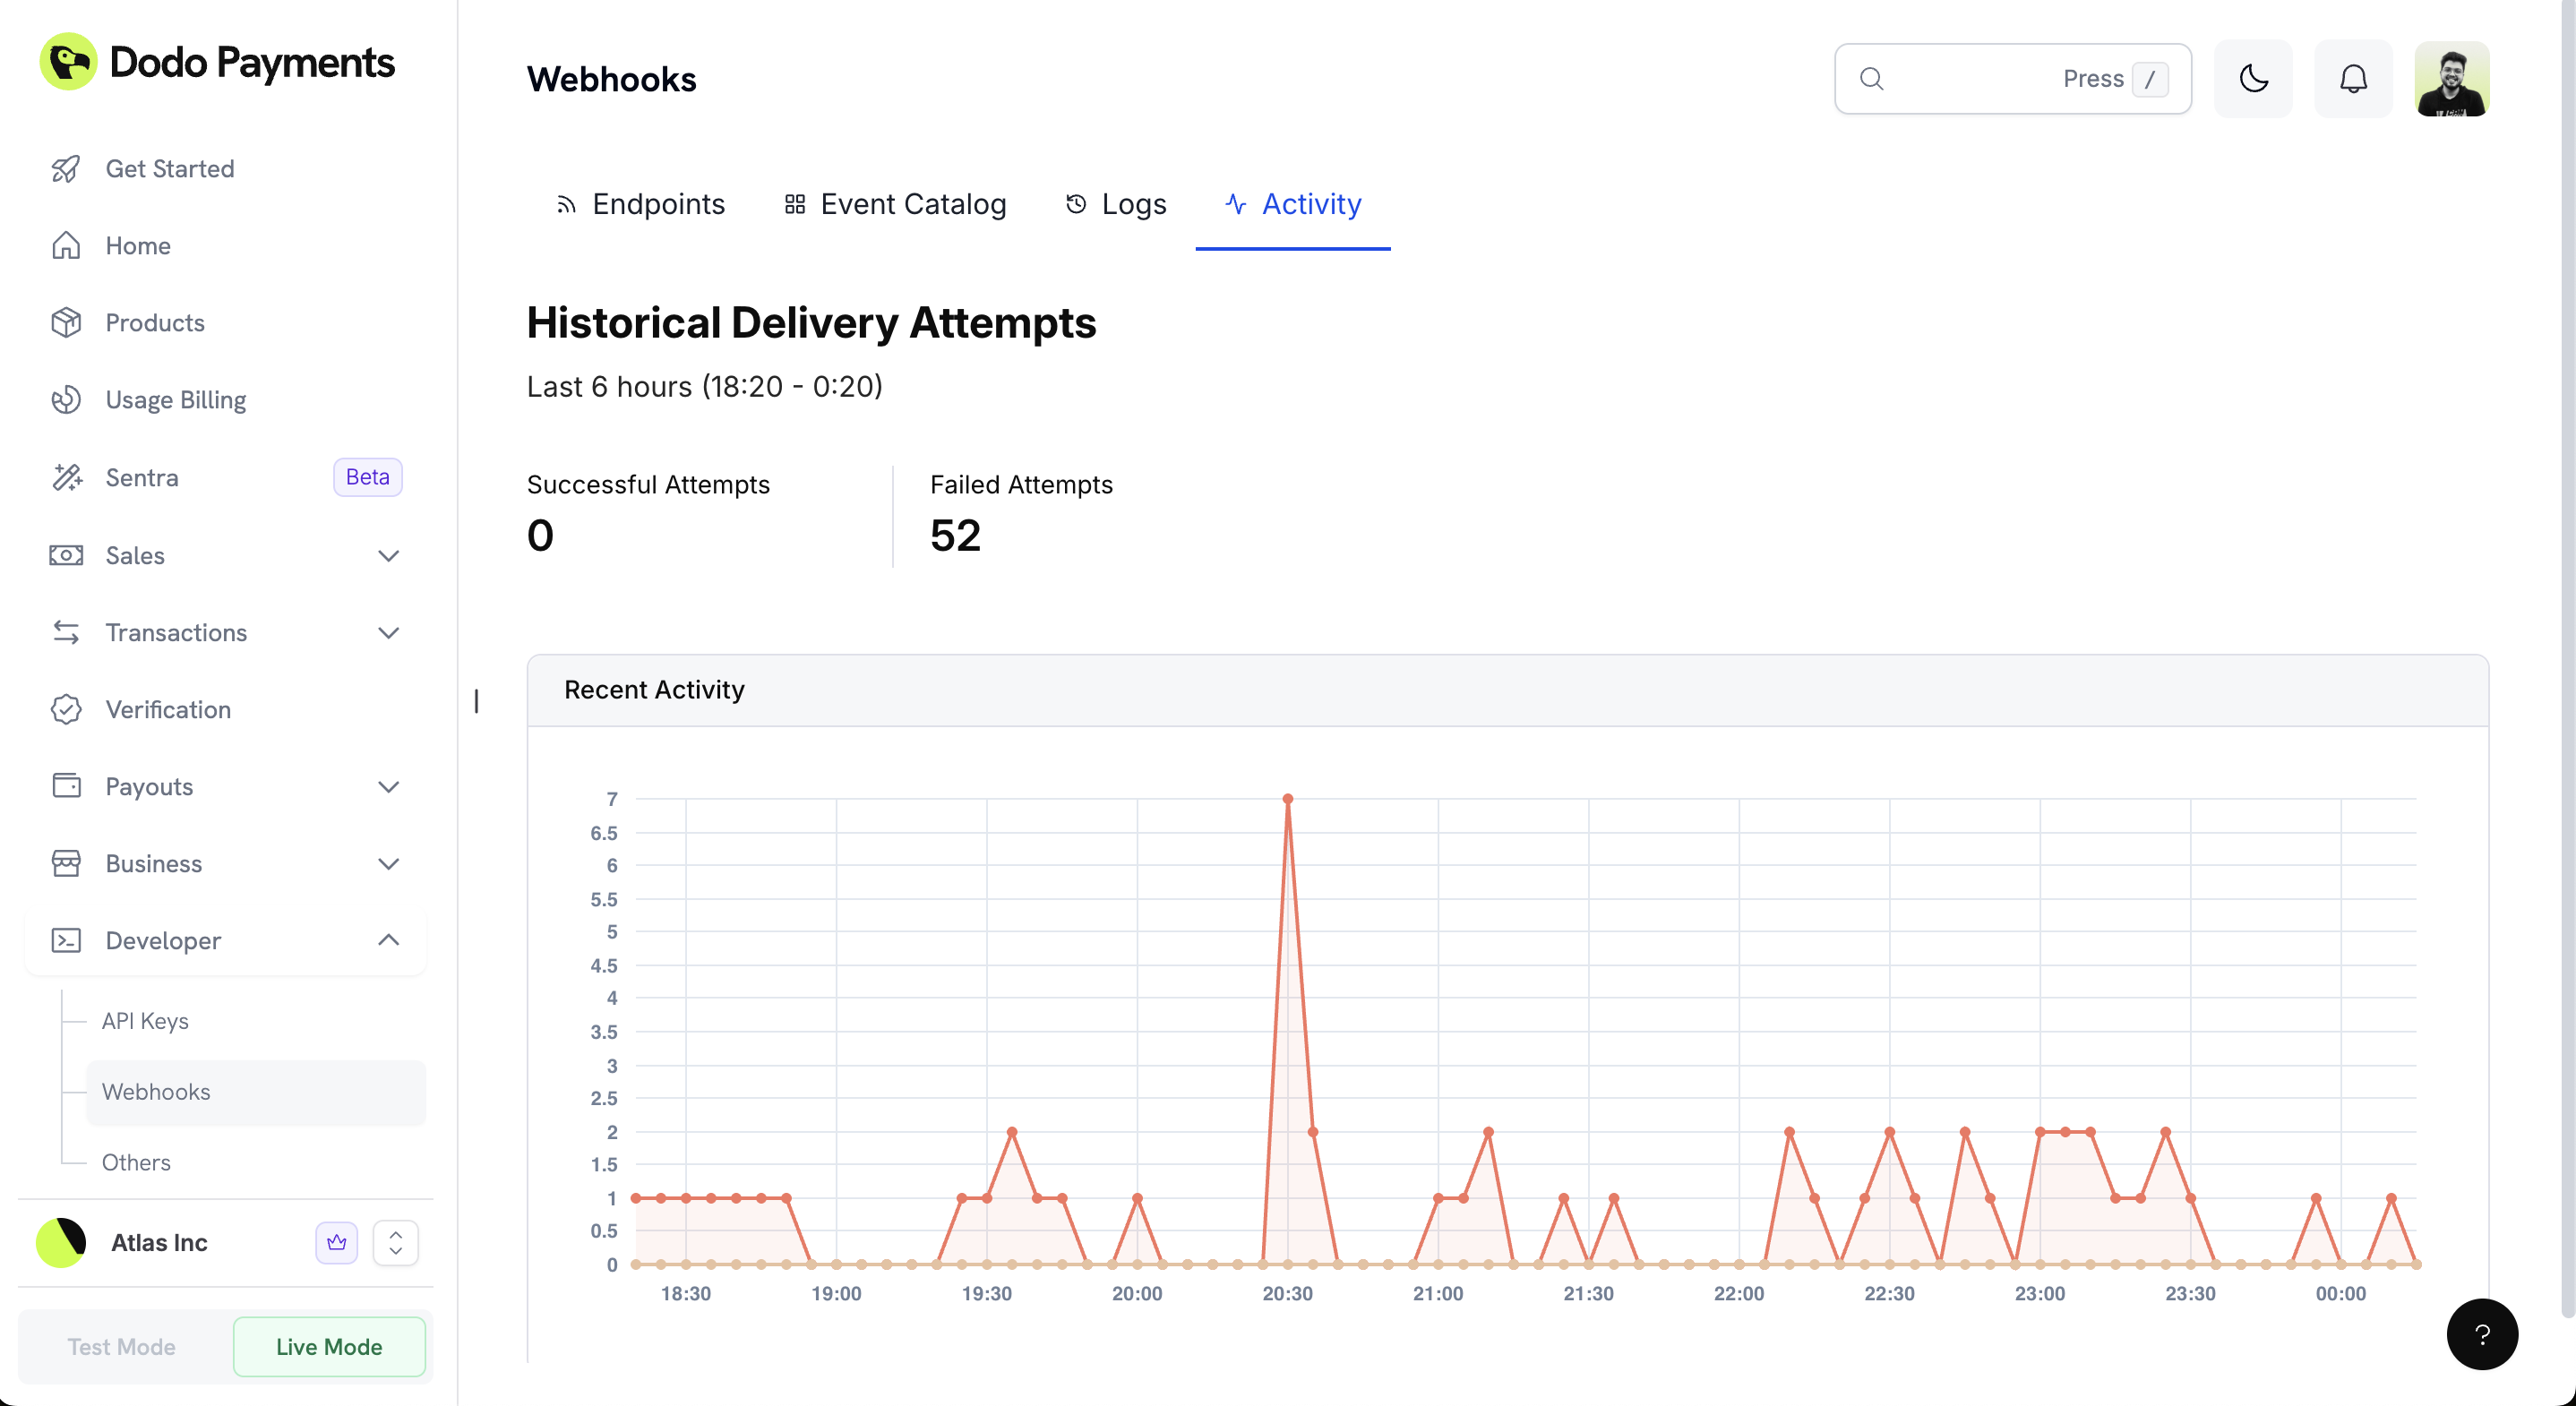
 ## Activity Monitoring
The Activity tab provides real-time insights into your webhook delivery performance with visual analytics.
## Activity Monitoring
The Activity tab provides real-time insights into your webhook delivery performance with visual analytics.
 ## Email Alerts
Stay informed about your webhook health with automatic email notifications. When webhook deliveries start failing or your endpoint stops responding, you'll receive email alerts so you can quickly address issues and keep your integrations running smoothly.
## Email Alerts
Stay informed about your webhook health with automatic email notifications. When webhook deliveries start failing or your endpoint stops responding, you'll receive email alerts so you can quickly address issues and keep your integrations running smoothly.
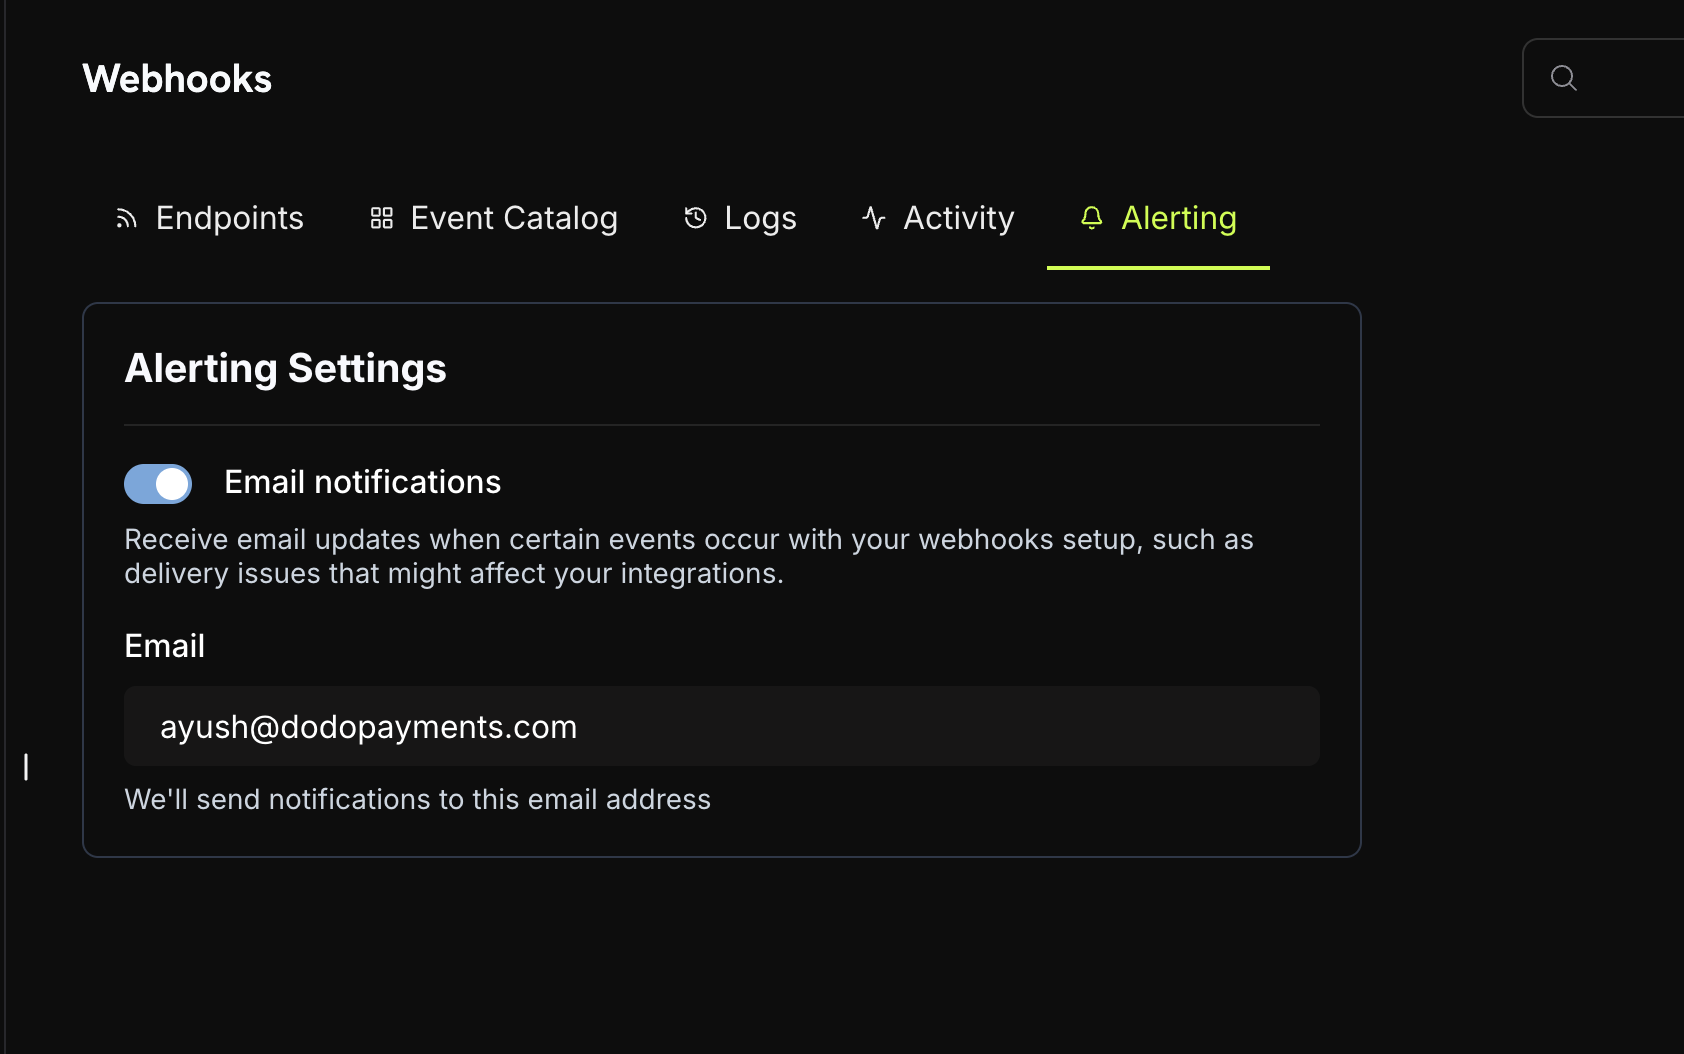 ### Enable Email Alerts
Go to your Dodo Payments Dashboard and navigate to **Dashboard → Webhooks → Alerting**.
Toggle on **Email notifications** to start receiving alerts about webhook delivery issues.
Enter the email address where you want to receive webhook alerts. We'll send notifications to this address when certain events occur with your webhooks setup, such as delivery issues that might affect your integrations.
Enable email alerts to catch webhook delivery problems early and maintain reliable integrations. You'll be notified when deliveries fail or your endpoint becomes unresponsive.
## Deploy to Cloud Platforms
Ready to deploy your webhook handler to production? We provide platform-specific guides to help you deploy webhooks to popular cloud providers with best practices for each platform.
Deploy webhooks to Vercel with serverless functions
Run webhooks on Cloudflare's edge network
Integrate webhooks with Supabase
Deploy webhooks as Netlify serverless functions
Each platform guide includes environment setup, signature verification, and deployment steps specific to that provider.
## Related API Reference
API reference for creating and configuring webhook endpoints programmatically
API reference for retrieving and managing your webhook endpoints
### Enable Email Alerts
Go to your Dodo Payments Dashboard and navigate to **Dashboard → Webhooks → Alerting**.
Toggle on **Email notifications** to start receiving alerts about webhook delivery issues.
Enter the email address where you want to receive webhook alerts. We'll send notifications to this address when certain events occur with your webhooks setup, such as delivery issues that might affect your integrations.
Enable email alerts to catch webhook delivery problems early and maintain reliable integrations. You'll be notified when deliveries fail or your endpoint becomes unresponsive.
## Deploy to Cloud Platforms
Ready to deploy your webhook handler to production? We provide platform-specific guides to help you deploy webhooks to popular cloud providers with best practices for each platform.
Deploy webhooks to Vercel with serverless functions
Run webhooks on Cloudflare's edge network
Integrate webhooks with Supabase
Deploy webhooks as Netlify serverless functions
Each platform guide includes environment setup, signature verification, and deployment steps specific to that provider.
## Related API Reference
API reference for creating and configuring webhook endpoints programmatically
API reference for retrieving and managing your webhook endpoints