> ## Documentation Index
> Fetch the complete documentation index at: https://docs.dodopayments.com/llms.txt
> Use this file to discover all available pages before exploring further.

# Seat-Based Pricing with Add-ons and Payment Links

> Learn how to create add-ons for seat-based pricing and generate payment links with custom add-on quantities using Dodo Payments

In this tutorial, you'll learn how to implement seat-based pricing using Dodo Payments add-ons. We'll create a subscription product with add-ons for additional seats and show you how to generate payment links with custom add-on quantities.

<Note>
  This tutorial provides sample implementation code for a Node.js/Express application. You can modify this code for your specific framework (Next.js, React, Vue, etc.) and customize the user interface according to your application's needs.
</Note>

By the end of this tutorial, you'll know how to:

* Create subscription products with seat-based pricing
* Set up add-ons for additional seats
* Generate payment links with custom add-on quantities
* Handle checkout sessions with dynamic seat counts

## What We're Building

Let's create a seat-based pricing model:

* **Base Plan**: \$49/month for up to 5 team members
* **Seat Add-on**: \$2/month per additional seat
* **Payment Links**: Dynamic checkout with custom seat quantities

<Info>
  Before we start, make sure you have:

  * A Dodo Payments account
  * Basic familiarity with TypeScript/Node.js
</Info>

## Step 1: Create Your Seat Add-On

Now we need to create an add-on that represents additional seats. This add-on will be attached to our base subscription and allow customers to purchase additional seats.

<Frame>
  <img src="https://mintcdn.com/dodopayments/ajOhO6Du1yNsg0hy/images/cookbooks/seat-based/seat-based-addons-creation.png?fit=max&auto=format&n=ajOhO6Du1yNsg0hy&q=85&s=d2c17b4a9f2f9a1b19f537f0507656a4" alt="Creating base subscription product" style={{ maxHeight: '500px', width: 'auto' }} width="2348" height="1606" data-path="images/cookbooks/seat-based/seat-based-addons-creation.png" />
</Frame>

<Tip>
  **What we're building**: An add-on that costs \$2/month per seat and can be added to any base subscription.
</Tip>

<Steps>
  <Step title="Navigate to Add-Ons">
    1. In your Dodo Payments dashboard, stay in the **Products** section
    2. Click on the **Add-Ons** tab
    3. Click **Create Add-On**

    This will open the add-on creation form.
  </Step>

  <Step title="Enter add-on details">
    Fill in these values for our seat add-on:

    **Add-On Name**: `Additional Team Seat`

    **Description**: `Add extra team members to your workspace with full access to all features`

    **Price**: Enter → `2.00`

    **Currency**: Must match your base subscription currency

    **Tax Category**: Select appropriate category for your product.
  </Step>

  <Step title="Save your add-on">
    1. Review all your settings:
       * Name: Additional Team Seat
       * Price: \$2.00/month
    2. Click **Create Add-On**

    <Check>
      **Add-on created!** Your seat add-on is now available to attach to subscriptions.
    </Check>
  </Step>
</Steps>

## Step 2: Create Your Base Subscription Product

We'll start by creating a base subscription product that includes 5 team members. This will be the foundation of our seat-based pricing model.

<Frame>
  <img src="https://mintcdn.com/dodopayments/ajOhO6Du1yNsg0hy/images/cookbooks/seat-based/seat-based-subscription.png?fit=max&auto=format&n=ajOhO6Du1yNsg0hy&q=85&s=f17e96f3d106b88b6dc32a00be535620" alt="Creating base subscription product" style={{ maxHeight: '500px', width: 'auto' }} width="2118" height="1580" data-path="images/cookbooks/seat-based/seat-based-subscription.png" />
</Frame>

<Steps>
  <Step title="Navigate to Products">
    1. Log into your Dodo Payments dashboard
    2. Click on **Products** in the left sidebar
    3. Click the **Create Product** button
    4. Select **Subscription** as the product type

    You should see a form where we'll configure our base subscription.
  </Step>

  <Step title="Fill in the subscription details">
    Now we'll enter the specific details for our base plan:

    **Product Name**: `Motion`

    **Description**: `Where your team's documentation lives.`

    **Recurring Price**: Enter → `49.00`

    **Billing Cycle**: Select → `Monthly`

    **Currency**: Select your preferred currency (e.g., `USD`)
  </Step>
</Steps>

## Step 3: Connect Add-On to Subscription

Now we need to associate our seat add-on with the base subscription so customers can purchase additional seats during checkout.

<Steps>
  <Step title="Attach the seat add-on">
    <Frame>
      <img src="https://mintcdn.com/dodopayments/ajOhO6Du1yNsg0hy/images/cookbooks/seat-based/seat-based-addons.png?fit=max&auto=format&n=ajOhO6Du1yNsg0hy&q=85&s=ea4ce0d437201c92590eea6c31a14e80" alt="Attaching add-on to subscription" style={{ maxHeight: '500px', width: 'auto' }} width="2338" height="1196" data-path="images/cookbooks/seat-based/seat-based-addons.png" />
    </Frame>

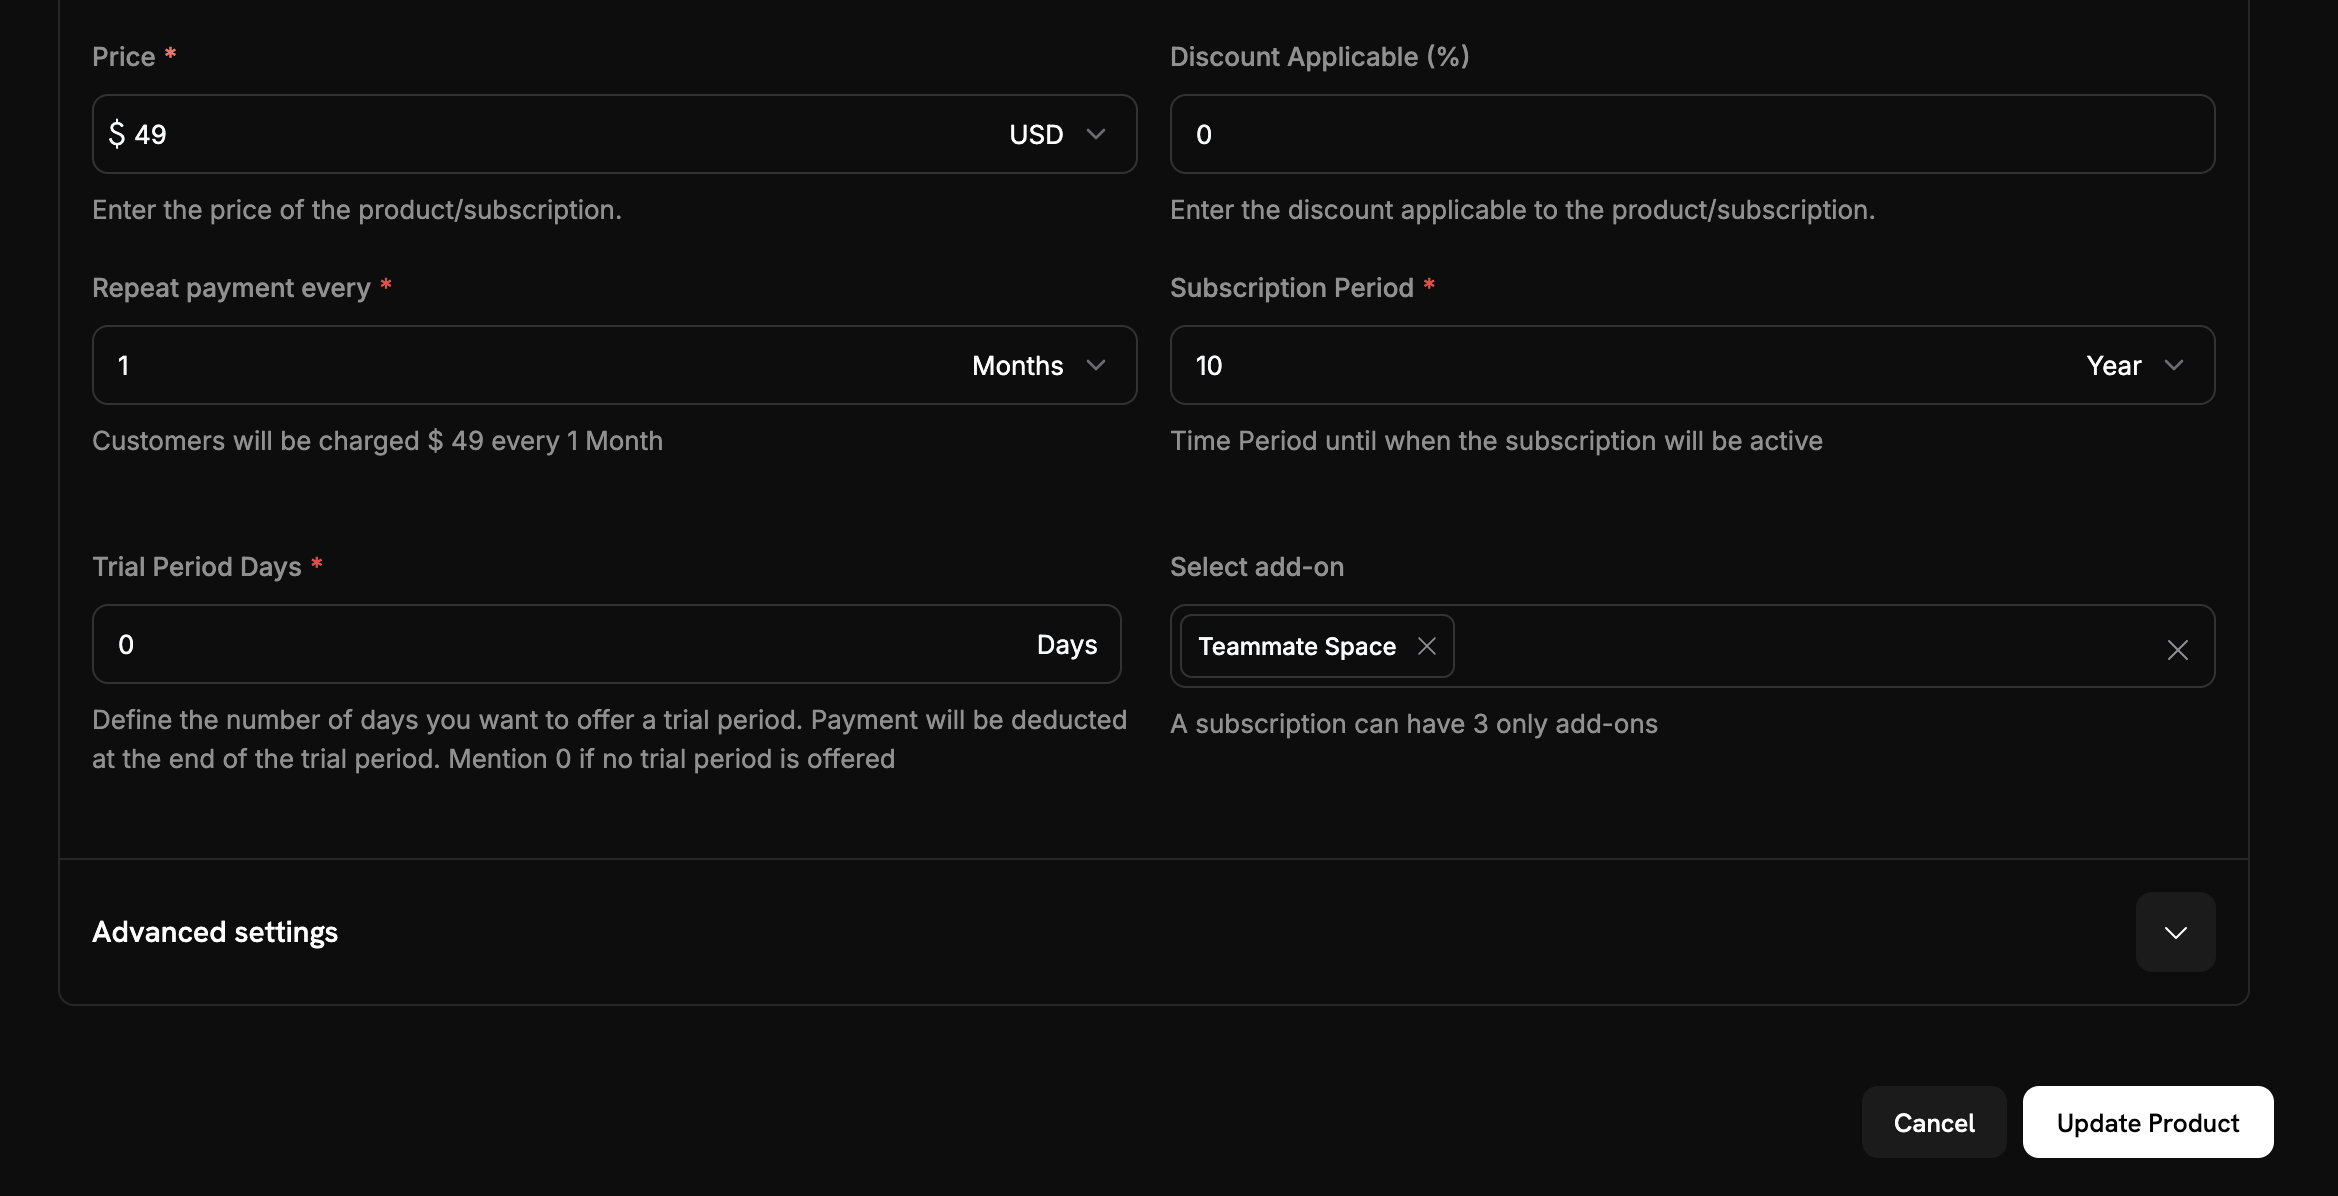
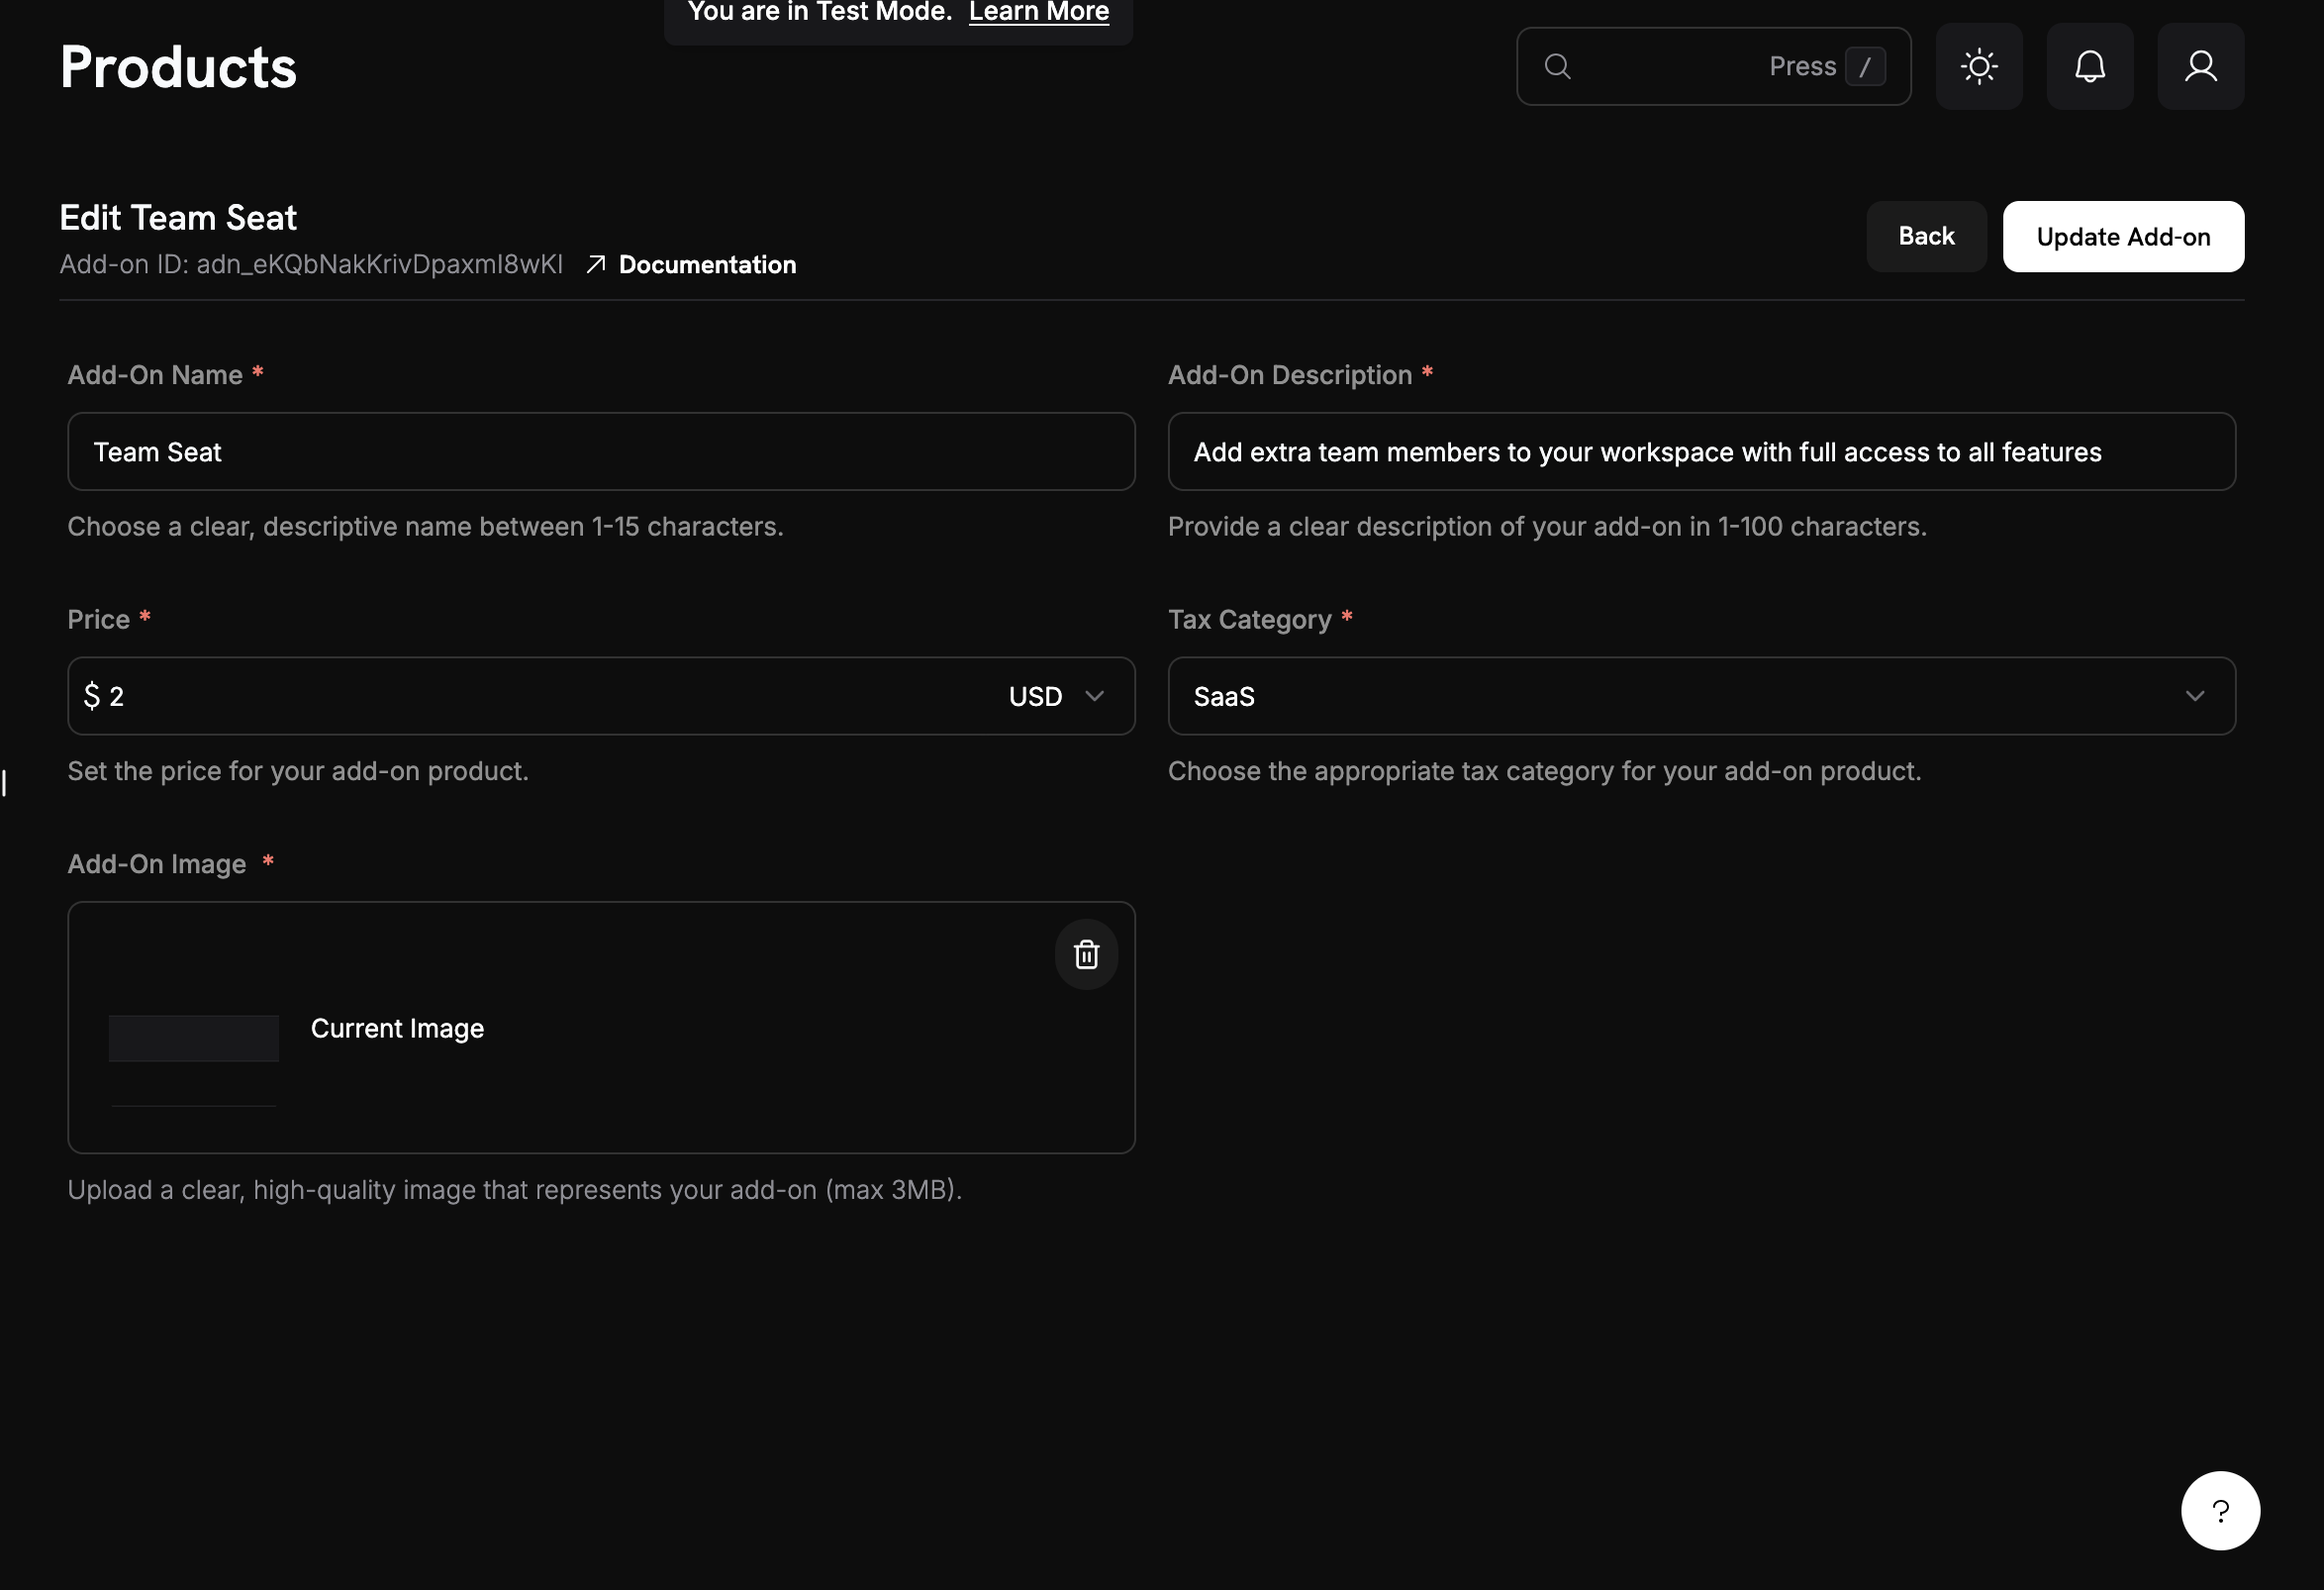
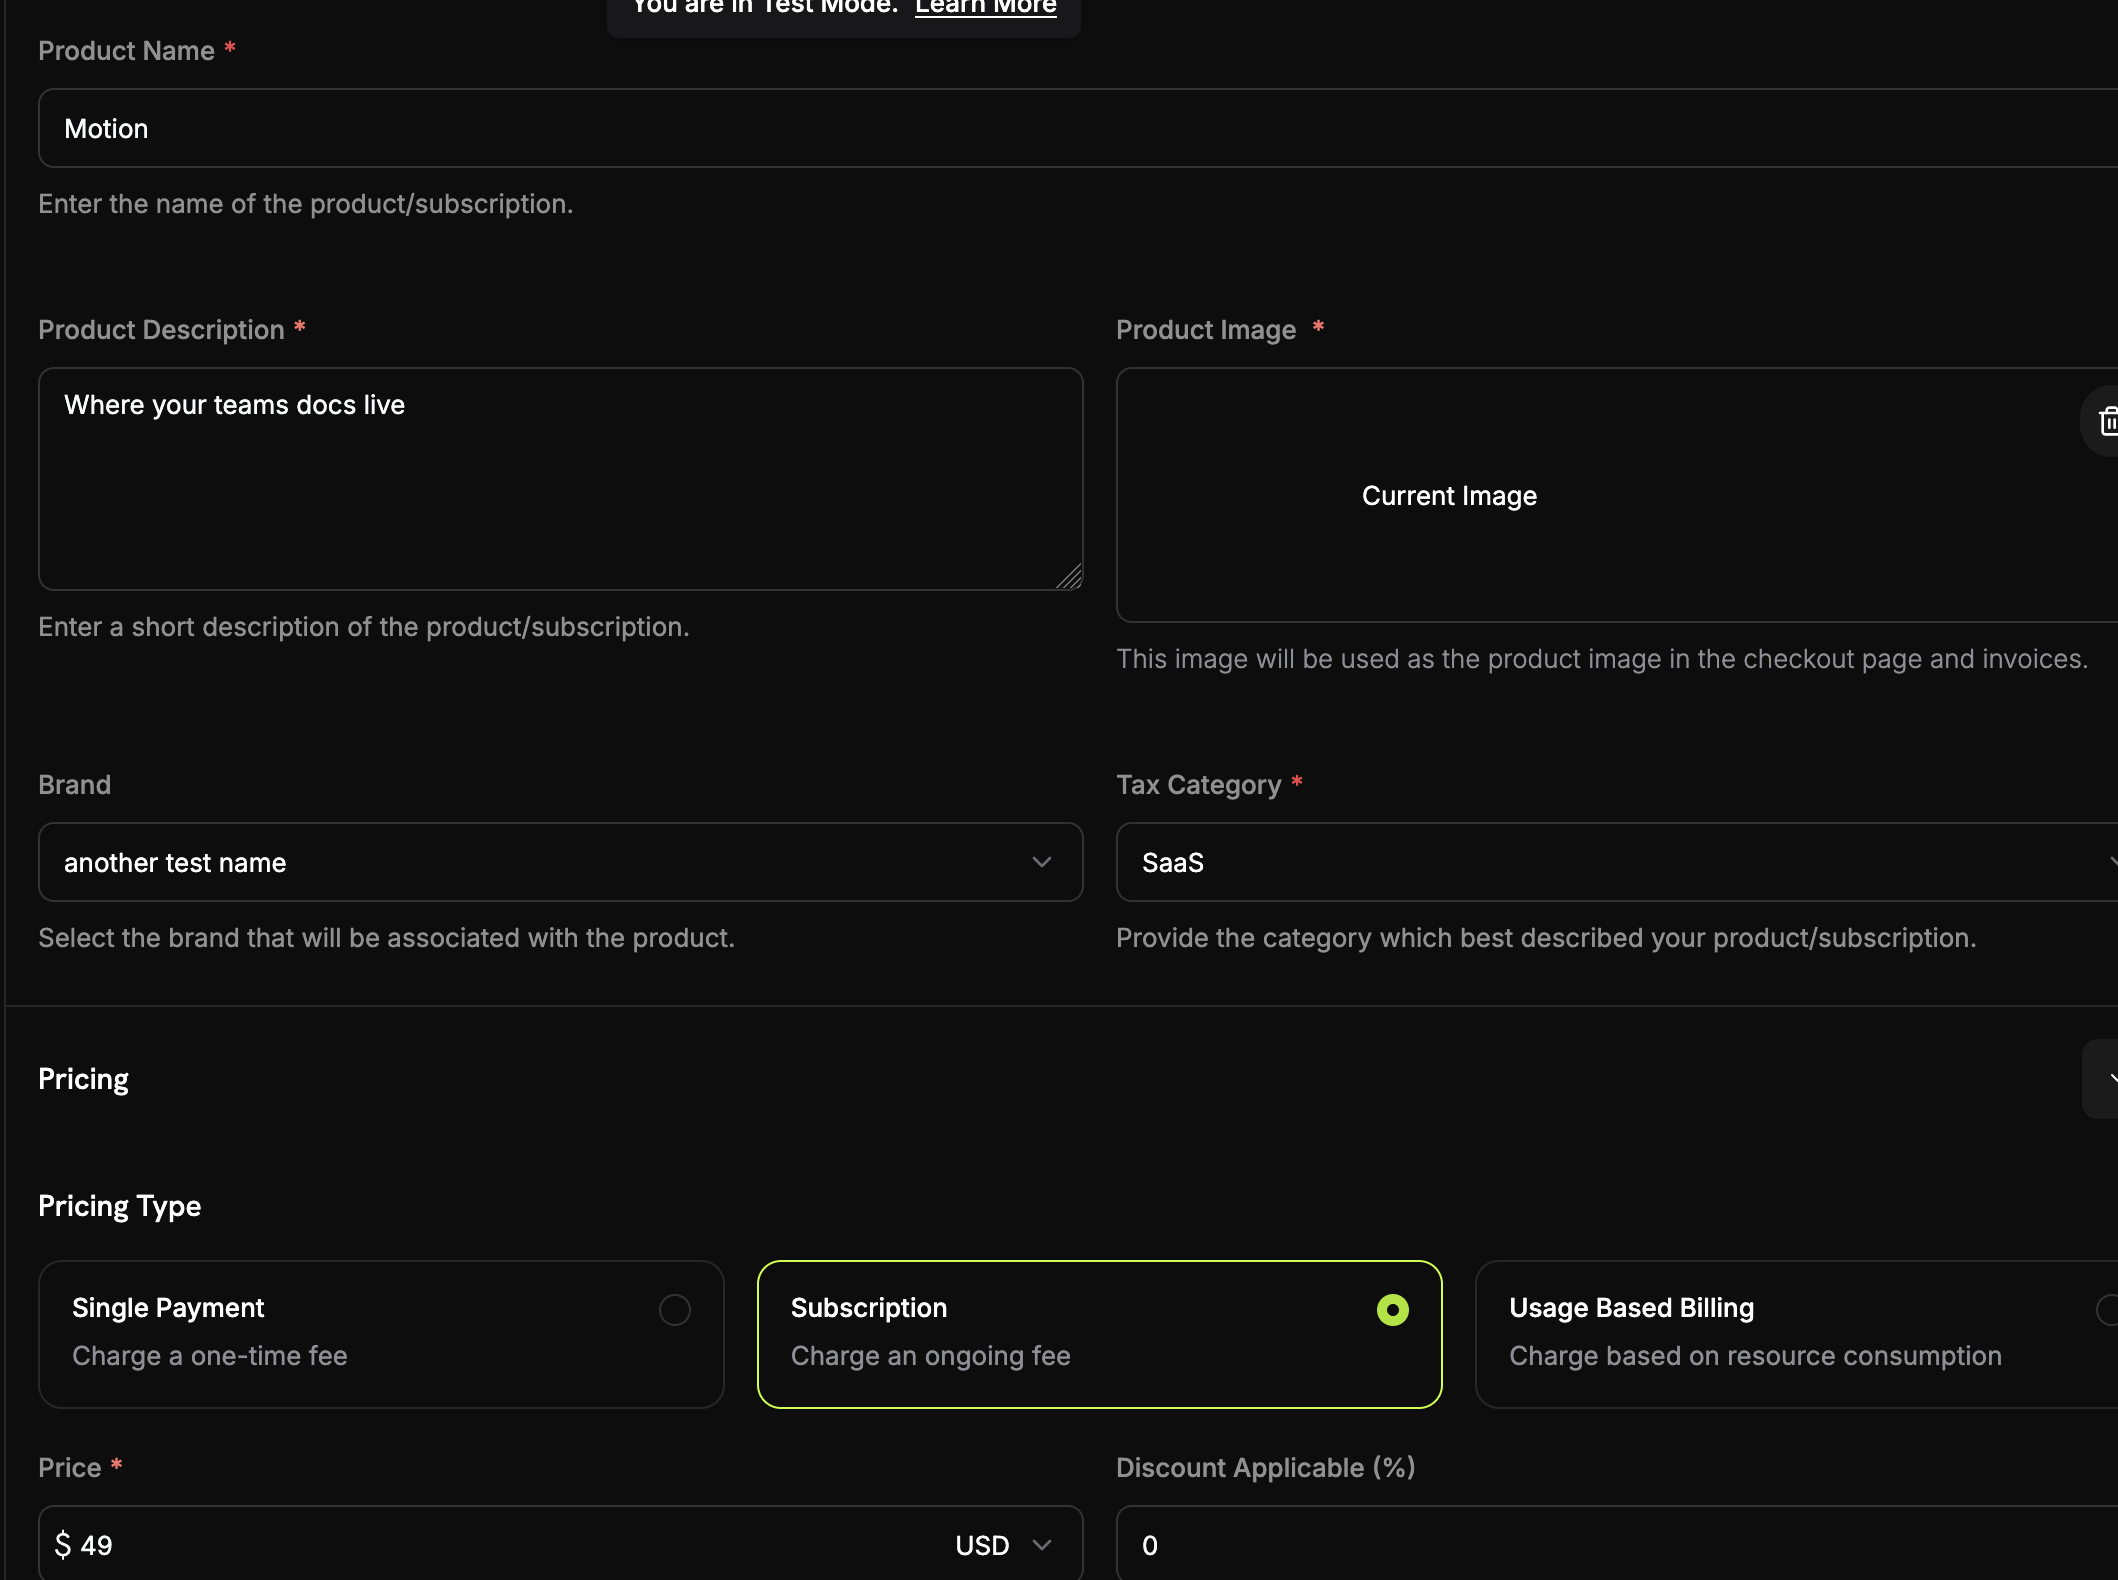
    1. Scroll down to the **Add-Ons** section
    2. Click **Add Add-Ons**
    3. From the dropdown, select your seat add-on
    4. Confirm that it appears in your subscription configuration
  </Step>

  <Step title="Save subscription changes">
    1. Review your complete subscription setup:
       * Base plan: \$49/month for 5 seats
       * Add-on: \$2/month per additional seat
       * Free trial: 14 days
    2. Click **Save Changes**

    <Check>
      **Seat-based pricing configured!** Customers can now purchase your base plan and add extra seats as needed.
    </Check>
  </Step>
</Steps>

## Step 4: Generate Payment Links with Custom Add-on Quantities

Now let's create an Express.js application that generates payment links with custom add-on quantities. This is where the real power of seat-based pricing comes in - you can dynamically create checkout sessions with any number of additional seats.

<Steps>
  <Step title="Set up your project">
    Create a new Node.js project and install the required dependencies:

    ```bash theme={null}
    mkdir seat-based-pricing
    cd seat-based-pricing
    npm init -y
    npm install dodopayments express dotenv
    npm install -D @types/node @types/express typescript ts-node
    ```

    Create a `tsconfig.json` file:

    ```json theme={null}
    {
      "compilerOptions": {
        "target": "ES2020",
        "module": "commonjs",
        "outDir": "./dist",
        "rootDir": "./src",
        "strict": true,
        "esModuleInterop": true,
        "skipLibCheck": true,
        "forceConsistentCasingInFileNames": true
      }
    }
    ```
  </Step>

  <Step title="Create your environment file">
    Create a `.env` file with your Dodo Payments API key:

    ```bash theme={null}
    DODO_PAYMENTS_API_KEY=your_actual_dodo_api_key_here
    ```

    <Warning>
      Never commit your API key to version control. Add `.env` to your `.gitignore` file.
    </Warning>
  </Step>

  <Step title="Implement the checkout session creation">
    Create a `src/server.ts` file with the following code:

    <CodeGroup>
      ```typescript server.ts expandable theme={null}
      // Add this new endpoint for dynamic seat quantities
      import 'dotenv/config';
      import DodoPayments from 'dodopayments';
      import express, { Request, Response } from 'express';

      const app = express();

      // Initialize the Dodo Payments client
      const client = new DodoPayments({
        bearerToken: process.env.DODO_PAYMENTS_API_KEY,
        environment: 'test_mode'
      });

      async function createCheckoutSession(seatCount: number) {
        try {
          const session = await client.checkoutSessions.create({
            // Products to sell - use IDs from your Dodo Payments dashboard
            product_cart: [
              {
                product_id: 'pdt_7Rl9OWT2Mz4wwUTKz74iZ', // Replace with your actual product ID
                quantity: 1,
                addons: [
                  {
                    addon_id: 'adn_eKQbNakKrivDpaxmI8wKI', // Replace with your actual addon ID
                    quantity: seatCount
                  }
                ]
              }
            ],
            
            // Pre-fill customer information to reduce friction
            customer: {
              email: 'steve@example.com',
              name: 'Steve Irwin',
            },
            // Where to redirect after successful payment
            return_url: 'https://example.com/checkout/success',
          });

          // Redirect your customer to this URL to complete payment
          console.log('Checkout URL:', session.checkout_url);
          console.log('Session ID:', session.session_id);
          
          return session;
          
        } catch (error) {
          console.error('Failed to create checkout session:', error);
          throw error;
        }
      }

      // Example usage in an Express.js route
      app.post('/create-checkout/:seatCount', async (req: Request, res: Response) => {
        try {
          const seatCount = parseInt(req.params.seatCount);
          const session = await createCheckoutSession(seatCount);
          res.json({ checkout_url: session.checkout_url });
        } catch (error) {
          res.status(500).json({ error: 'Failed to create checkout session' });
        }
      });

      // Add this line after your other middleware
      app.use(express.static('public'));

      // Add this route to serve the demo page
      app.get('/', (req, res) => {
        res.sendFile(__dirname + '/../public/index.html');
      });

      app.listen(3000, () => {
        console.log('Server is running on port 3000');
      });
      ```
    </CodeGroup>
  </Step>

  <Step title="Add a simple web interface">
    Create a `public/index.html` file for easy testing:

    <CodeGroup>
      ```html index.html expandable theme={null}
      <!DOCTYPE html>
      <html>
      <head>
          <title>Seat-Based Pricing Demo</title>
          <style>
              body { font-family: Arial, sans-serif; max-width: 600px; margin: 50px auto; padding: 20px; }
              .form-group { margin: 20px 0; }
              label { display: block; margin-bottom: 5px; font-weight: bold; }
              input { width: 100%; padding: 10px; border: 1px solid #ddd; border-radius: 4px; }
              button { background: #007bff; color: white; padding: 10px 20px; border: none; border-radius: 4px; cursor: pointer; }
              button:hover { background: #0056b3; }
              .result { margin-top: 20px; padding: 15px; background: #f8f9fa; border-radius: 4px; }
          </style>
      </head>
      <body>
          <h1>Seat-Based Pricing Demo</h1>
          <p>Generate checkout links with custom seat quantities:</p>
          
          <div class="form-group">
              <label for="seatCount">Number of Additional Seats:</label>
              <input type="number" id="seatCount" value="3" min="0" max="50">
          </div>
          
          <button onclick="createCheckout()">Generate Checkout Link</button>
          
          <div id="result" class="result" style="display: none;">
              <h3>Checkout Link Generated!</h3>
              <p><strong>Seat Count:</strong> <span id="seatCountDisplay"></span></p>
              <p><strong>Total Cost:</strong> $<span id="totalCost"></span>/month</p>
              <p><strong>Checkout URL:</strong></p>
              <a id="checkoutUrl" href="#" target="_blank">Click here to checkout</a>
          </div>

          <script>
              async function createCheckout() {
                  const seatCount = document.getElementById('seatCount').value;
                  
                  try {
                      const response = await fetch(`/create-checkout/${seatCount}`, {
                          method: 'POST'
                      });
                      
                      const data = await response.json();
                      
                      if (response.ok) {
                          document.getElementById('seatCountDisplay').textContent = seatCount;
                          document.getElementById('totalCost').textContent = data.total_cost;
                          document.getElementById('checkoutUrl').href = data.checkout_url;
                          document.getElementById('result').style.display = 'block';
                      } else {
                          alert('Error: ' + data.error);
                      }
                  } catch (error) {
                      alert('Error creating checkout session');
                  }
              }
          </script>
      </body>
      </html>
      ```
    </CodeGroup>

    <Check>
      **Web interface created!** You now have a simple UI to test different seat quantities.
    </Check>
  </Step>

  <Step title="Serve static files">
    Add this to your `src/server.ts` to serve the HTML file:

    ```typescript theme={null}
    // Add this line after your other middleware
    app.use(express.static('public'));

    // Add this route to serve the demo page
    app.get('/', (req, res) => {
      res.sendFile(__dirname + '/../public/index.html');
    });
    ```

    <Check>
      **Static files configured!** Visit `http://localhost:3000` to see your demo interface.
    </Check>
  </Step>
</Steps>

## Step 5: Test Your Implementation

Let's test our seat-based pricing implementation to make sure everything works correctly.

<Steps>
  <Step title="Start your server">
    1. Make sure you have your `.env` file with the correct API key
    2. Update the product and add-on IDs in your code with the actual values from your Dodo Payments dashboard
    3. Start your server:

    ```bash theme={null}
    npm run dev
    ```

    <Check>
      Your server should start successfully and show "Server running on [http://localhost:3000](http://localhost:3000)"
    </Check>
  </Step>

  <Step title="Test the web interface">
    <Frame>
      <img src="https://mintcdn.com/dodopayments/ajOhO6Du1yNsg0hy/images/cookbooks/seat-based/seat-based-billing-ui.png?fit=max&auto=format&n=ajOhO6Du1yNsg0hy&q=85&s=37d166d8e76b0bfbb4959bc9a3eff1f8" alt="Creating base subscription product" style={{ maxHeight: '500px', width: 'auto' }} width="1806" height="1416" data-path="images/cookbooks/seat-based/seat-based-billing-ui.png" />
    </Frame>

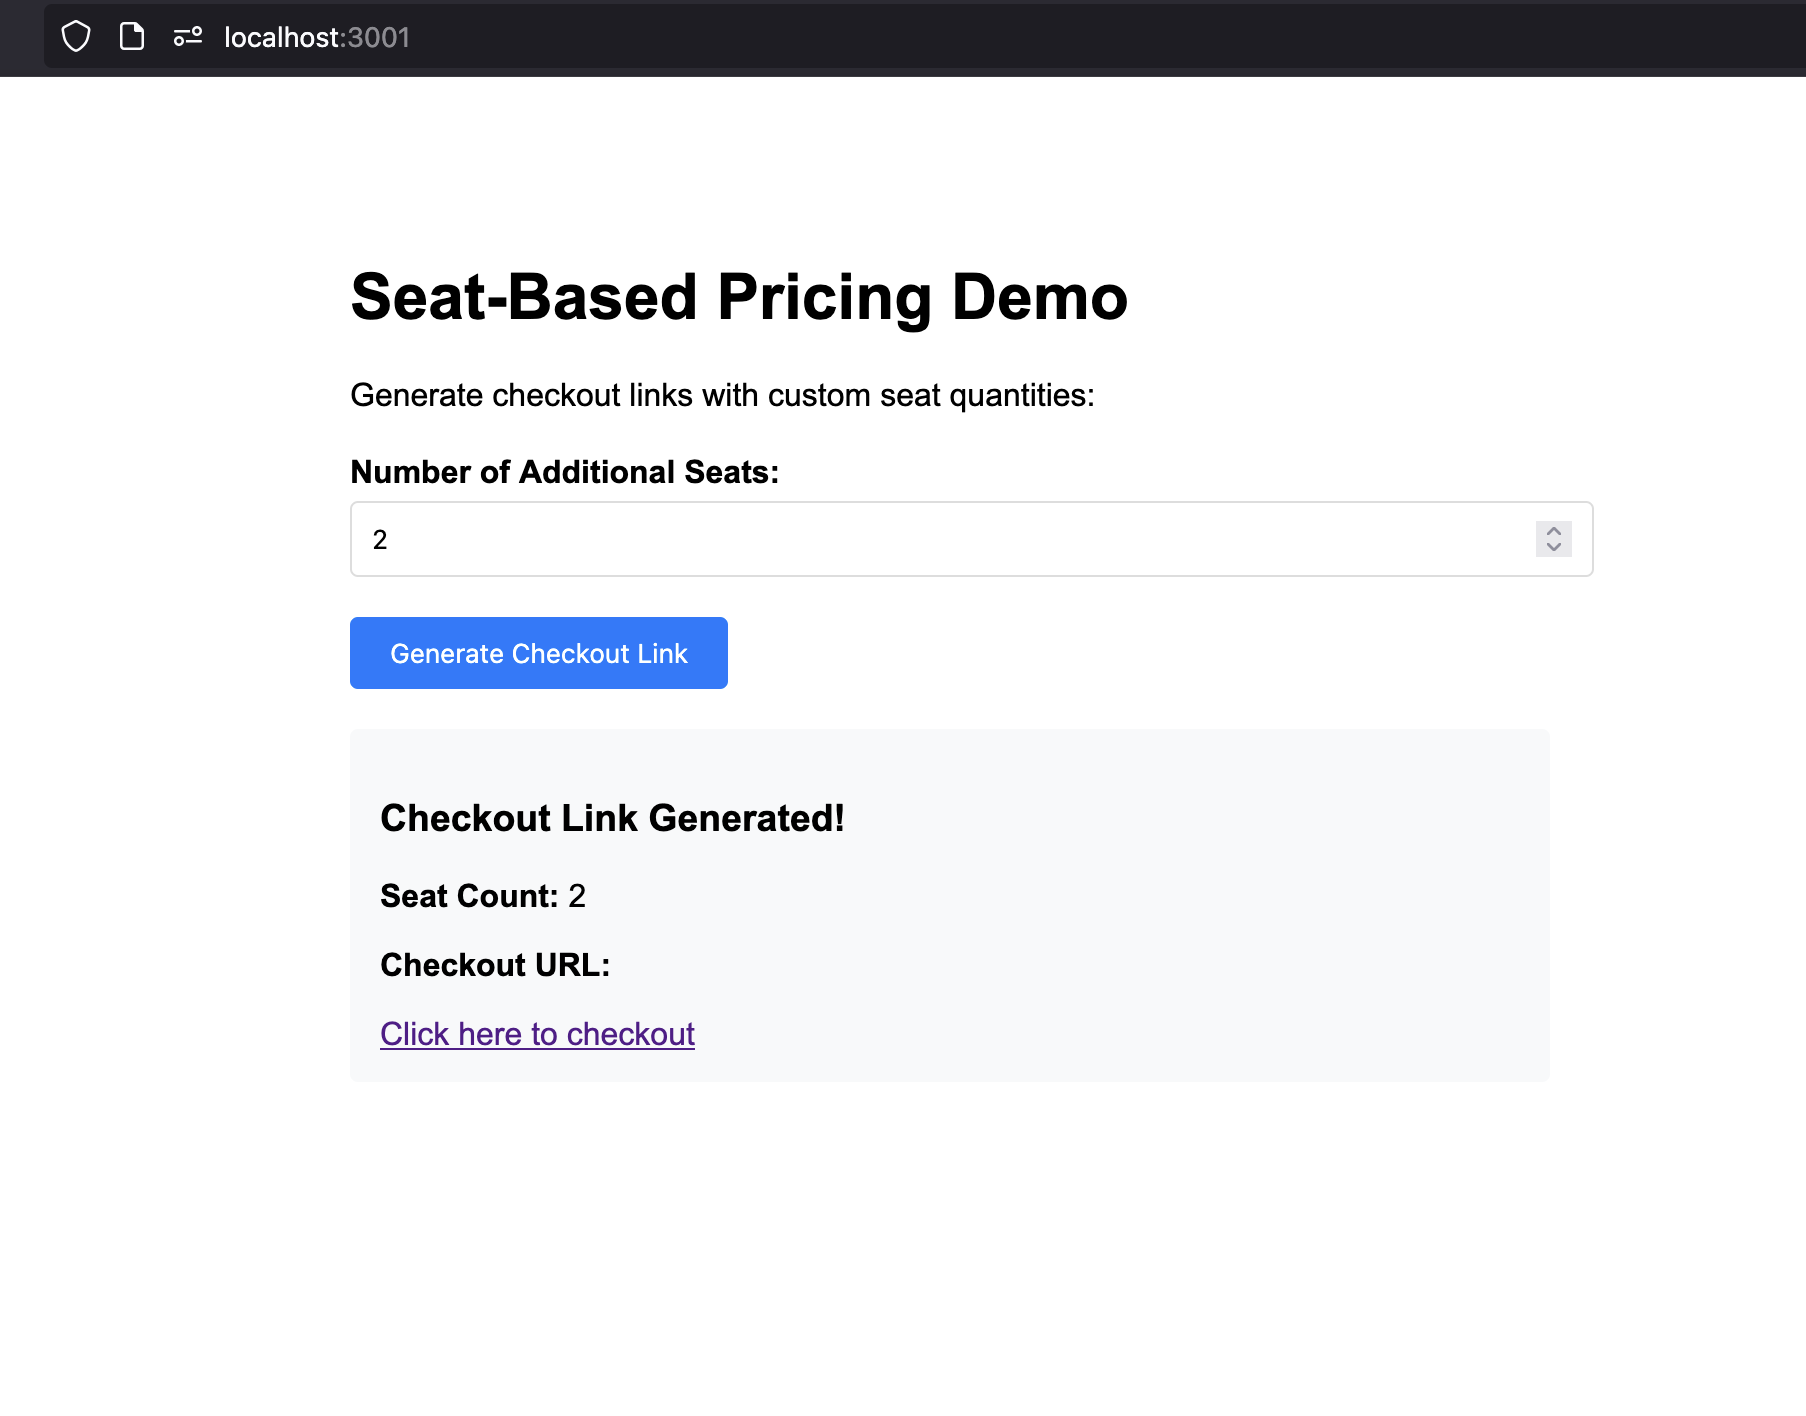
    1. Open your browser and go to `http://localhost:3000`
    2. You should see the seat-based pricing demo interface
    3. Try different seat quantities (0, 3, 10, etc.)
    4. Click "Generate Checkout Link" for each quantity
    5. Verify that the checkout URLs are generated correctly
  </Step>

  <Step title="Test a checkout session">
    1. Generate a checkout link with 3 additional seats
    2. Click the checkout URL to open the Dodo Payments checkout
    3. Verify that the checkout shows:
       * Base plan: \$49/month
       * Additional seats: 3 × 2 dollars = \$6/month
    4. Complete the test purchase

    <Check>
      The checkout should display the correct pricing breakdown and allow you to complete the purchase.
    </Check>
  </Step>

  <Step title="Listen for webhooks and update your DB">
    To keep your database in sync with subscription and seat changes, you need to listen for webhook events from Dodo Payments. Webhooks notify your backend when a customer completes checkout, updates their subscription, or changes seat counts.

    Follow the official Dodo Payments webhooks guide for step-by-step instructions on setting up webhook endpoints and handling events:

    <Card title="Dodo Payments Webhooks Documentation" icon="bell" href="/developer-resources/webhooks">
      Learn how to securely receive and process webhook events for subscription and seat management.
    </Card>
  </Step>
</Steps>

## Troubleshooting

Common issues and their solutions:

<AccordionGroup>
  <Accordion title="Checkout creation failing">
    **Possible causes:**

    * Invalid product ID or add-on ID
    * API key doesn't have sufficient permissions
    * Add-on not properly associated with subscription
    * Network connectivity issues

    **Solutions:**

    1. Verify product and add-on IDs exist in your Dodo Payments dashboard
    2. Check that add-on is properly attached to the subscription
    3. Ensure API key has checkout session creation permissions
    4. Test API connectivity with a simple GET request
  </Accordion>
</AccordionGroup>

## Congratulations! You've Implemented Seat-Based Pricing

You've successfully created a seat-based pricing system with Dodo Payments! Here's what you accomplished:

<CardGroup cols={2}>
  <Card title="Base Subscription">
    Created a subscription product with 5 included seats at \$49/month
  </Card>

  <Card title="Seat Add-ons">
    Configured add-ons for additional seats at \$2/month per seat
  </Card>

  <Card title="Checkout">
    Built an API that generates checkout sessions with custom seat quantities
  </Card>

  <Card title="Web Interface">
    Created a simple web interface for testing different seat quantities
  </Card>
</CardGroup>

<Info>
  This example demonstrates only a minimal implementation of seat-based pricing. For production use, you should add robust error handling, authentication, data validation, security measures, and adapt the logic to fit your application's requirements.
</Info>
