> ## Documentation Index
> Fetch the complete documentation index at: https://docs.dodopayments.com/llms.txt
> Use this file to discover all available pages before exploring further.
# Product Collections
> Group related products together for unified checkout experiences, plan selection, and seamless upgrade/downgrade paths within the Customer Portal.
Product Collections let you group related products (e.g., Starter, Pro, Enterprise plans) under one umbrella. Display all options in a single checkout, define upgrade/downgrade paths, and give customers the flexibility to switch plans directly from the Customer Portal.
 ## Key Highlights
* **Collection-based structure**: Group related products (plans, tiers, pricing options) under a single collection for organized management.
* **One collection, many products**: Include multiple products like Starter, Pro, Lifetime, etc., each with its own pricing model.
* **Dynamic checkout experience**: Display all products from a collection in one checkout view, letting customers choose their preferred plan.
* **Merchant-level control**: Enable, disable, and reorder products within each collection. The first product is automatically pre-selected at checkout.
* **Lifecycle awareness**: Enable customers to upgrade or downgrade between products in the same collection via the Customer Portal.
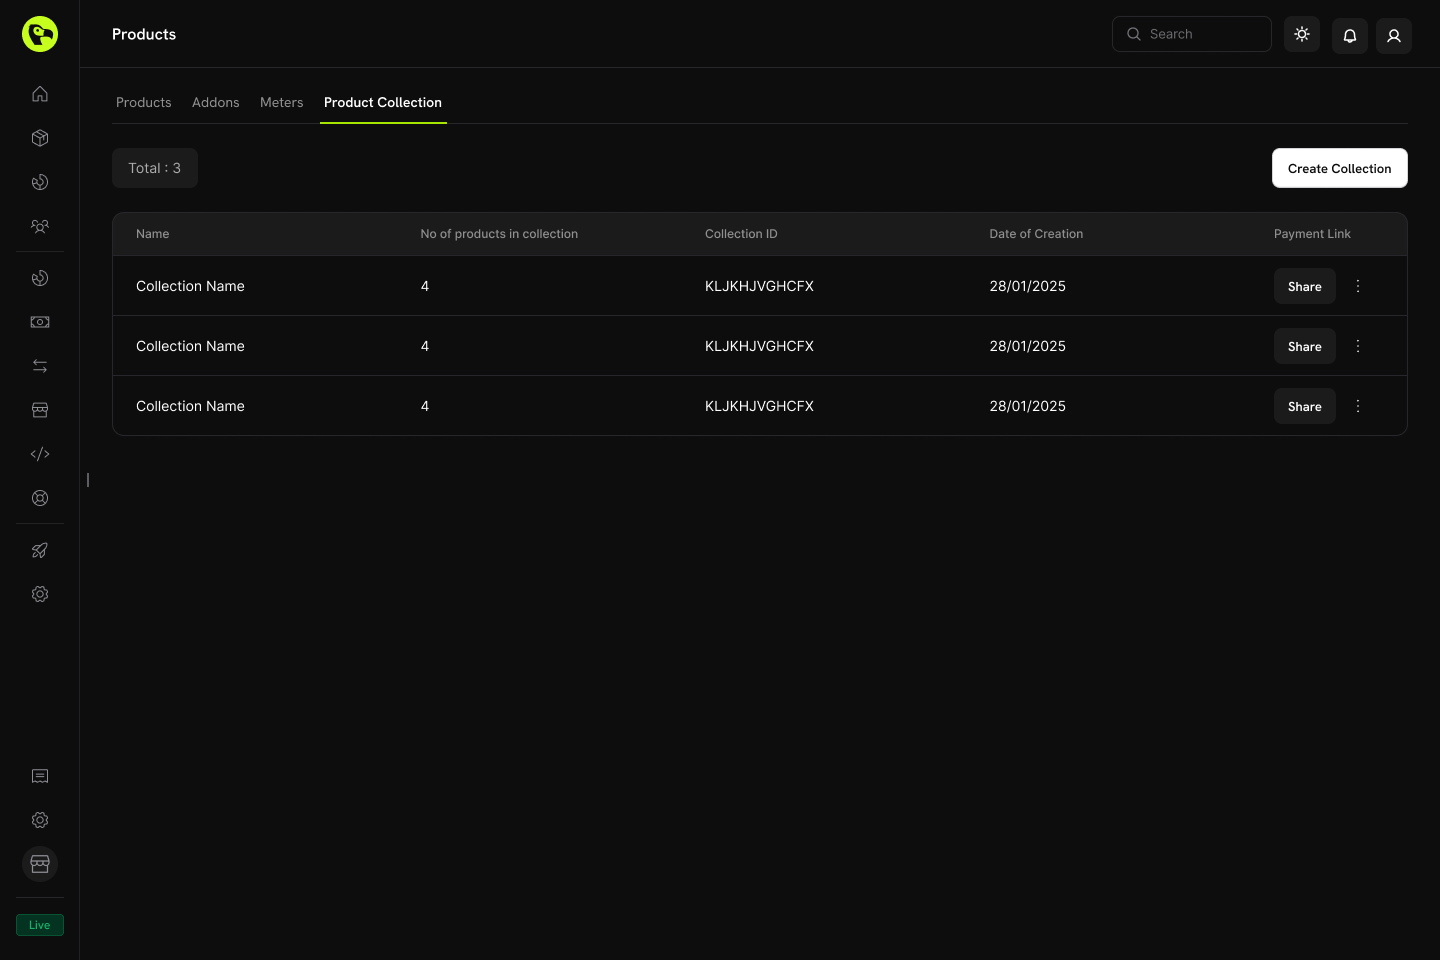
## Creating a Product Collection
Product Collections are created and managed from the dashboard or via API. Each collection acts as a container for related products.
Define the collection with a name and optional description. Upload an image to visually represent the collection in checkout.
## Key Highlights
* **Collection-based structure**: Group related products (plans, tiers, pricing options) under a single collection for organized management.
* **One collection, many products**: Include multiple products like Starter, Pro, Lifetime, etc., each with its own pricing model.
* **Dynamic checkout experience**: Display all products from a collection in one checkout view, letting customers choose their preferred plan.
* **Merchant-level control**: Enable, disable, and reorder products within each collection. The first product is automatically pre-selected at checkout.
* **Lifecycle awareness**: Enable customers to upgrade or downgrade between products in the same collection via the Customer Portal.
## Creating a Product Collection
Product Collections are created and managed from the dashboard or via API. Each collection acts as a container for related products.
Define the collection with a name and optional description. Upload an image to visually represent the collection in checkout.
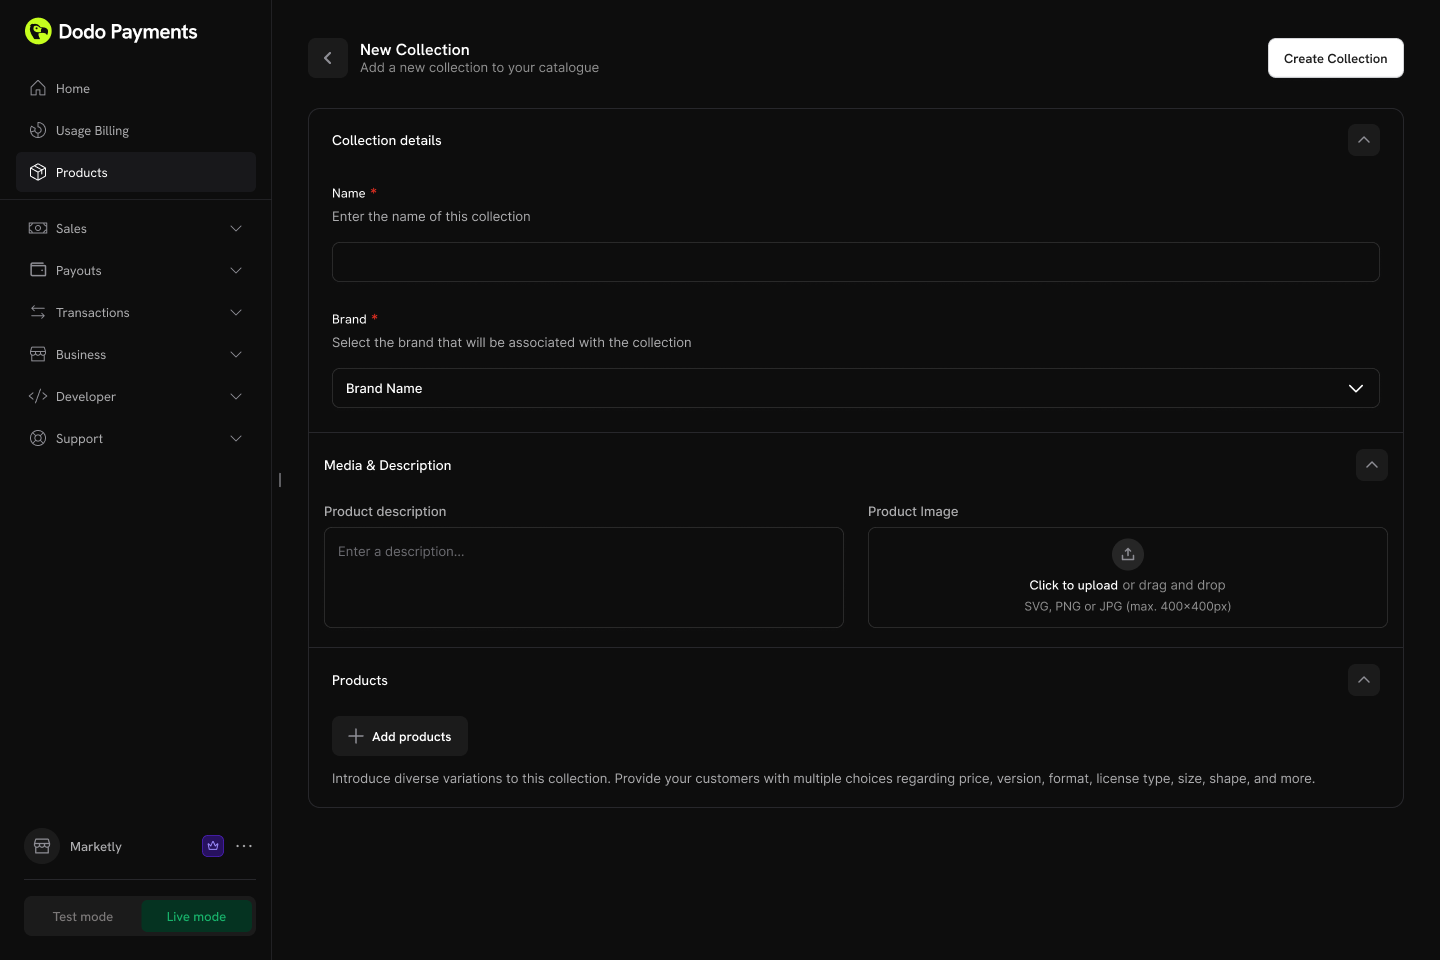 **Collection fields:**
* **Name** (required): Display name for the collection (e.g., "SaaS Plans", "License Tiers")
* **Description** (optional): Brief explanation shown in checkout
* **Image** (optional): Visual branding for the collection
Add existing products to your collection. Products can be organized into groups for better structure.
**Collection fields:**
* **Name** (required): Display name for the collection (e.g., "SaaS Plans", "License Tiers")
* **Description** (optional): Brief explanation shown in checkout
* **Image** (optional): Visual branding for the collection
Add existing products to your collection. Products can be organized into groups for better structure.
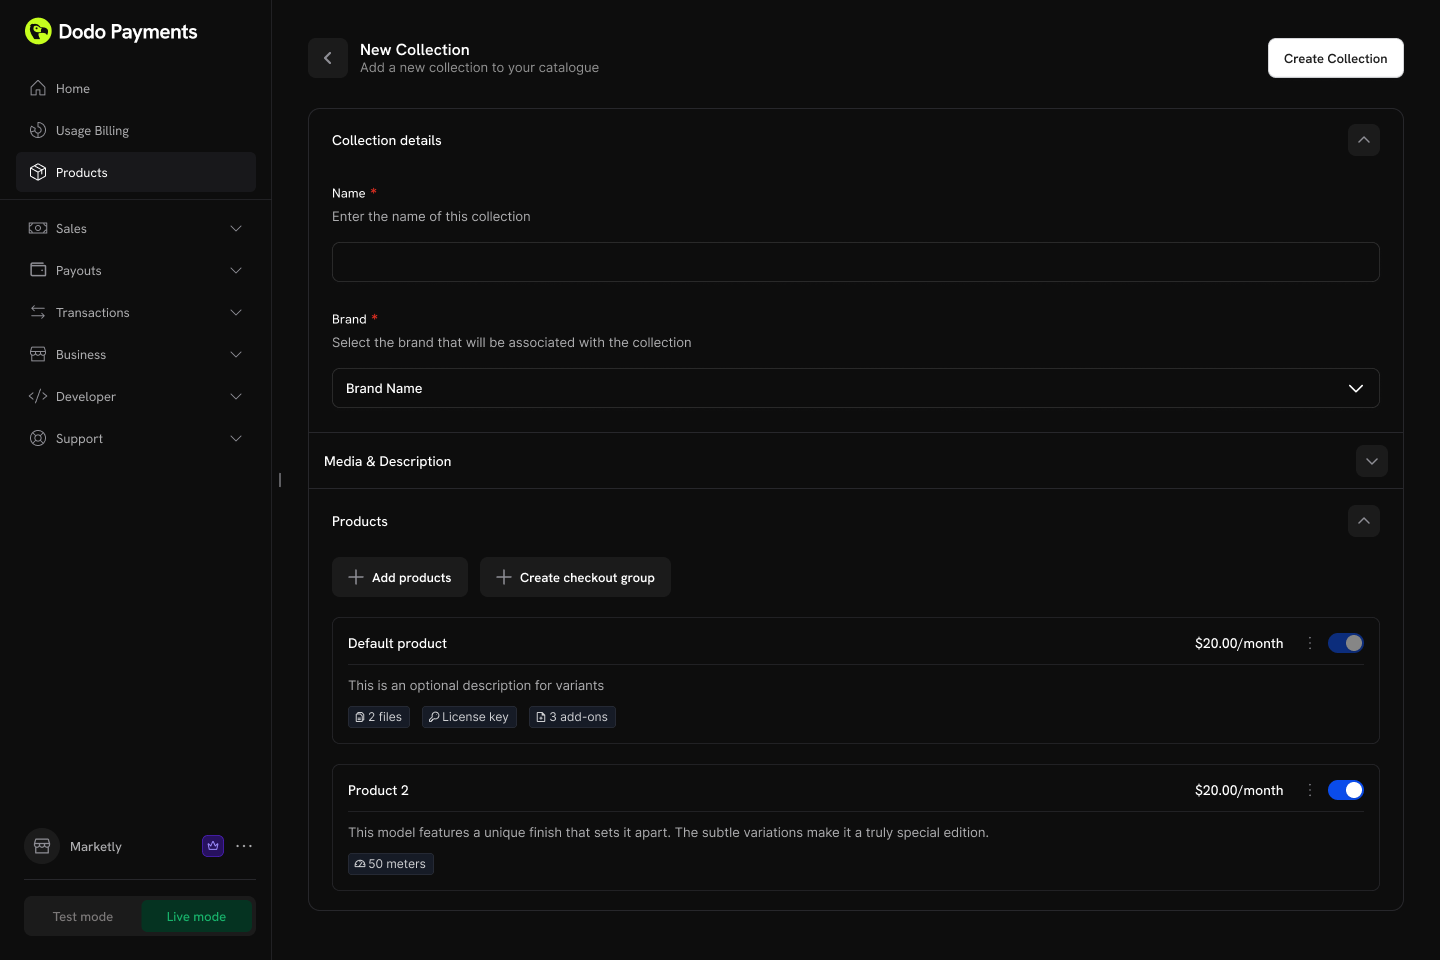 **Product organization:**
* **Groups**: Optionally organize products into named groups (e.g., "Monthly Plans", "Annual Plans")
* **Ungrouped products**: Products without a group appear at the collection level
* **Ordering**: Drag and drop to set the display order
Each product can only belong to one collection. If a product is already in another collection, you'll need to remove it first.
Control the display order and visibility of products within the collection.
**Configuration options:**
* **Product status**: Enable or disable individual products within the collection
* **Display order**: Drag and drop to set the sequence products appear in checkout
The first product in the collection is automatically pre-selected as the default at checkout. Reorder products to change which one is selected by default.
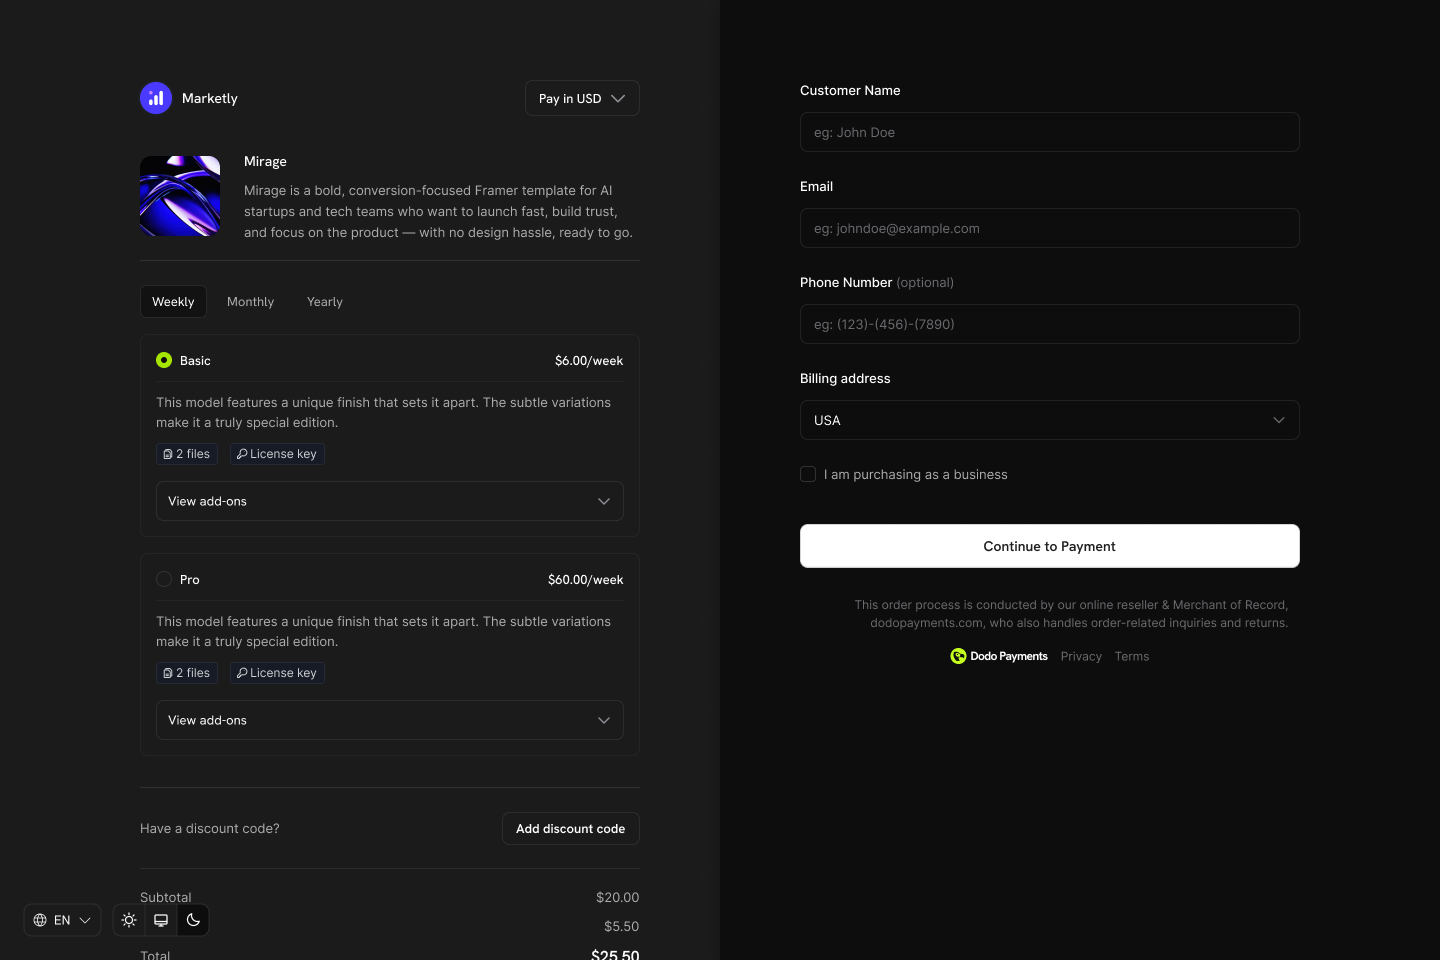
## Collection Checkout
Collections enable a unified checkout experience where customers can view and select from all available products in one place.
### Checkout Types
| Type | Description | Use Case |
| --------------------------- | ------------------------------------------------ | ------------------------------------------- |
| **Collection Checkout** | Displays all active products within a collection | Subscription plan selection, tiered pricing |
| **Single Product Checkout** | Displays only one specific product | Direct purchase, promotional links |
### Collection Checkout Experience
When using a collection checkout:
1. **All active products displayed**: Customers see every enabled product in the collection
2. **First product pre-selected**: The first product in the collection order is automatically selected
3. **Product details shown**: Each product displays its name, description, and pricing
4. **Single selection**: Customer selects one product to purchase
5. **Standard flow continues**: After selection, the checkout proceeds with the chosen product's pricing and billing settings
Collection checkout is ideal for subscription businesses where you want customers to compare plans side-by-side before purchasing.
### API Integration
Create a checkout session for a collection:
```typescript theme={null}
const session = await client.checkoutSessions.create({
product_collection_id: 'pdc_abc123',
product_cart: [], // Required: pass an empty array for collection checkout
return_url: 'https://yoursite.com/return'
});
// Redirect customer to the checkout
window.location.href = session.checkout_url;
```
When using `product_collection_id`, discount codes cannot be applied at session creation. Customers can still enter discount codes during checkout if enabled.
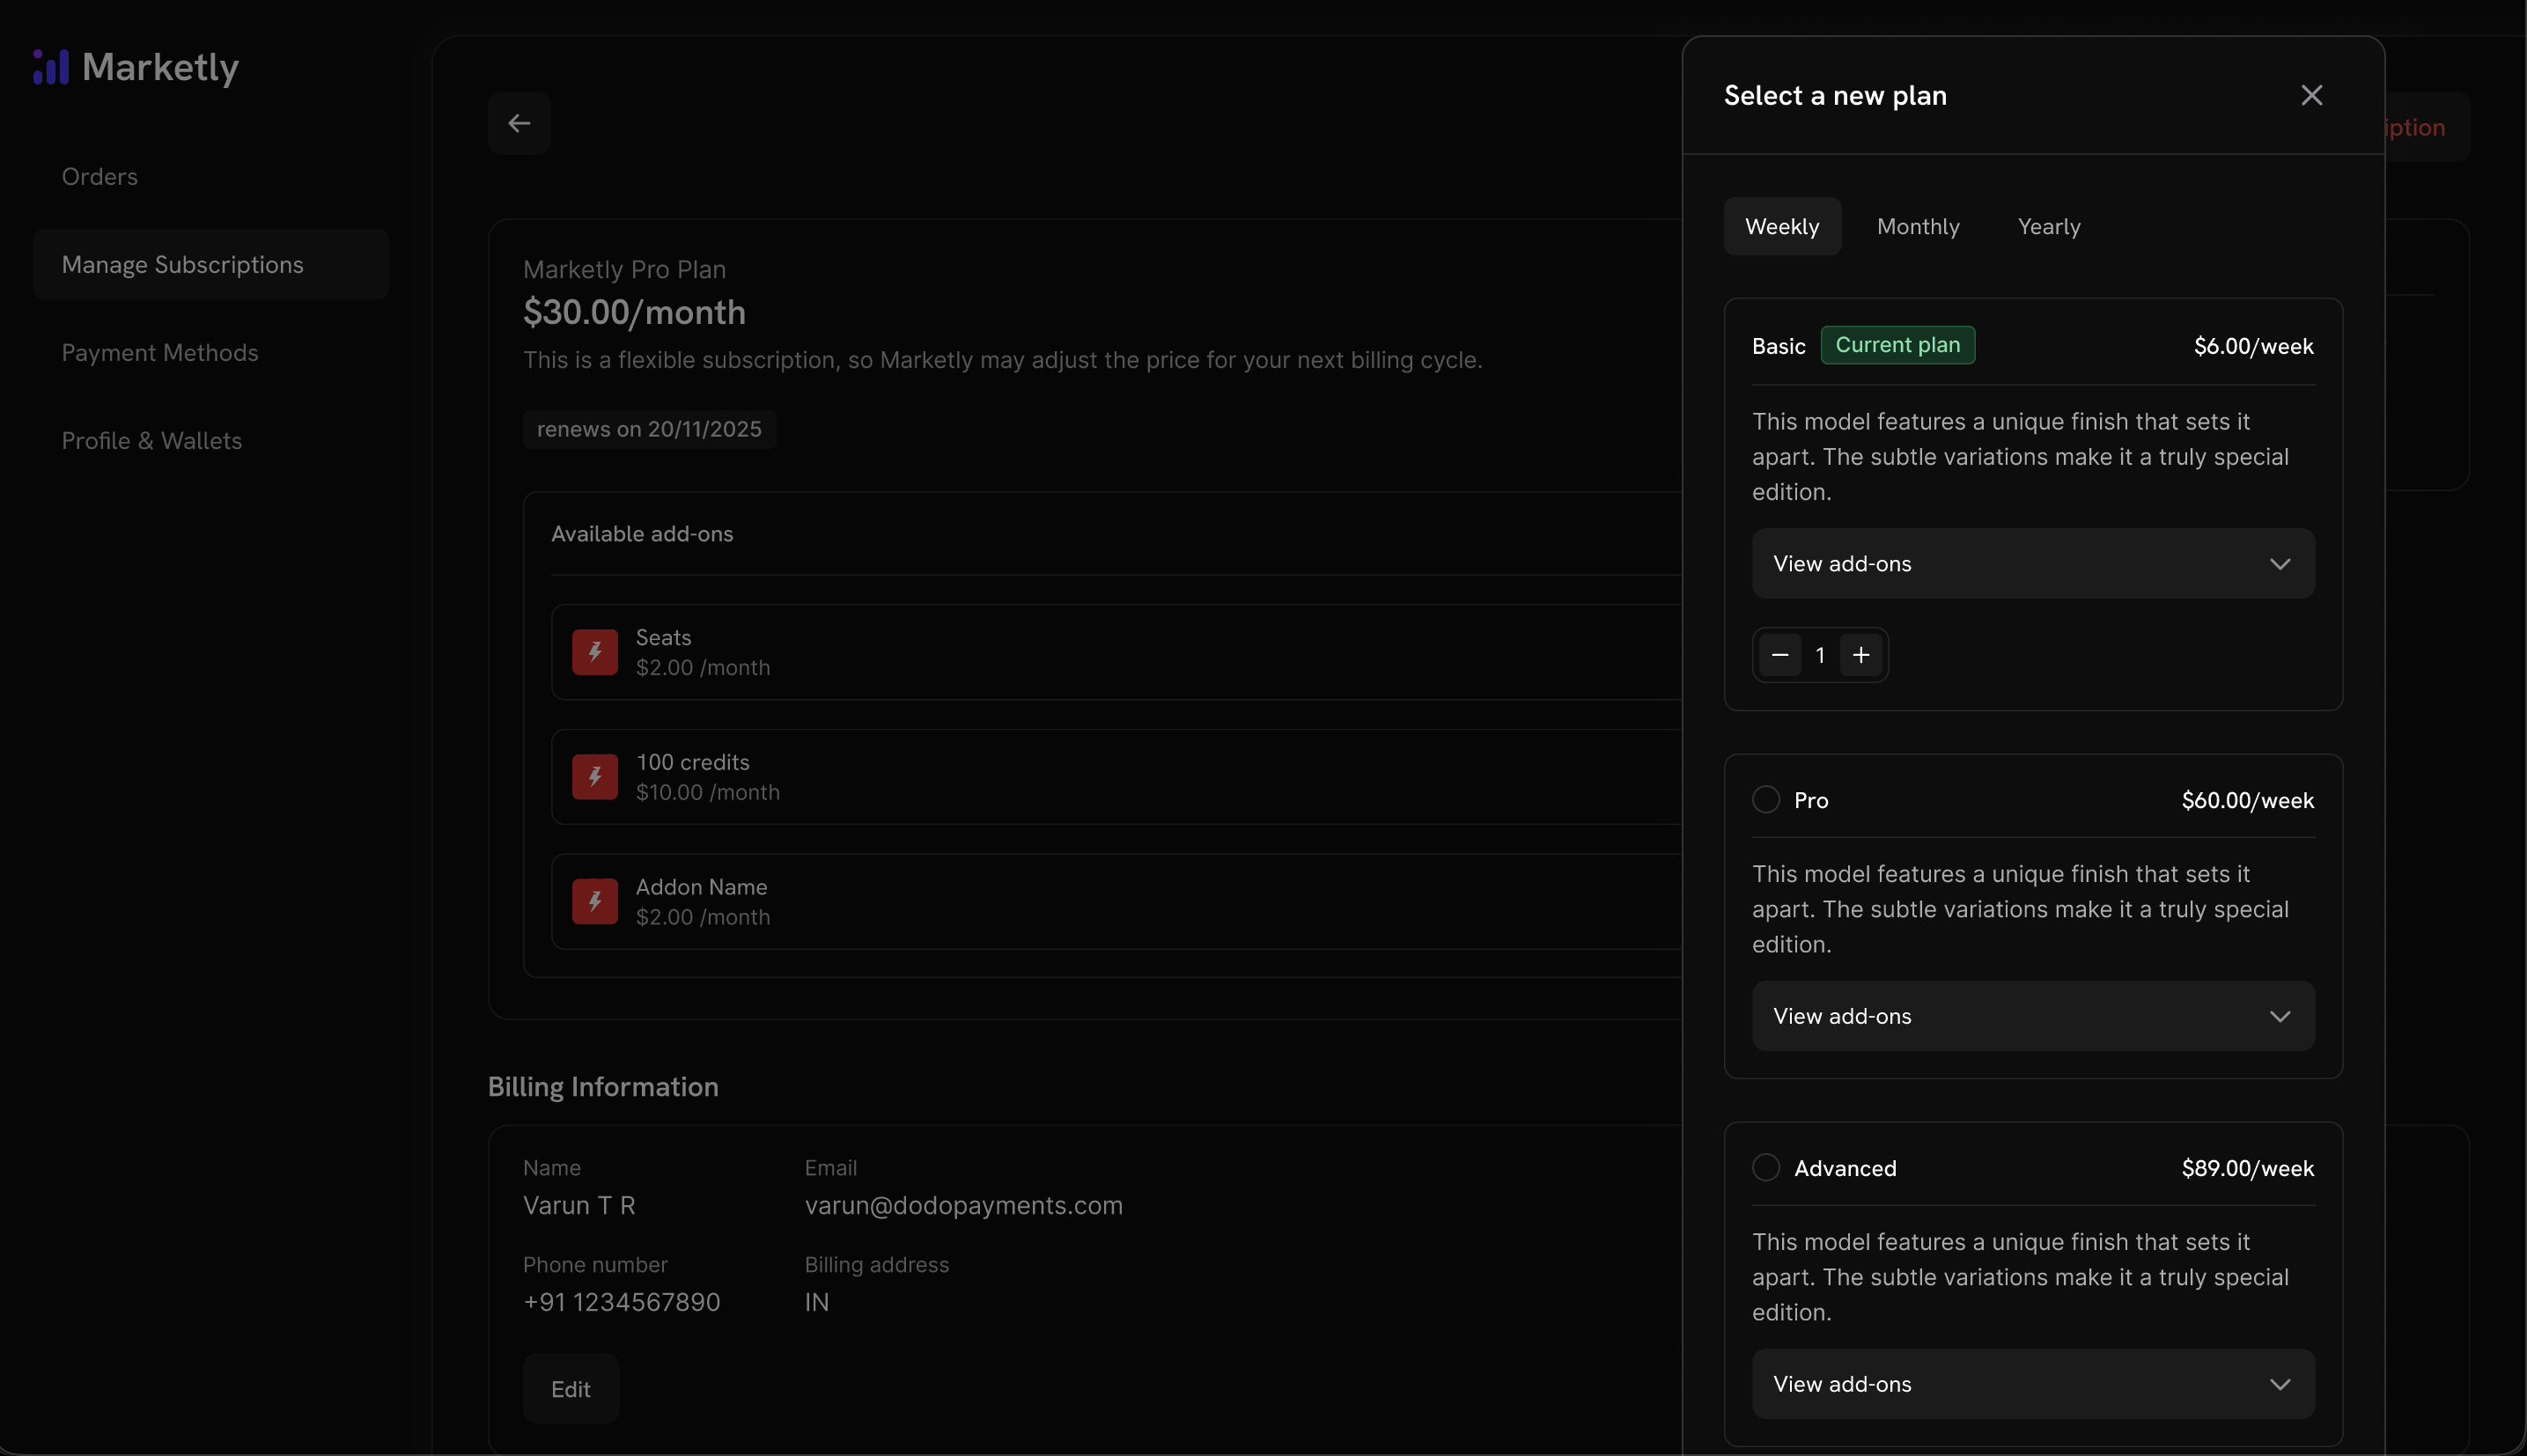
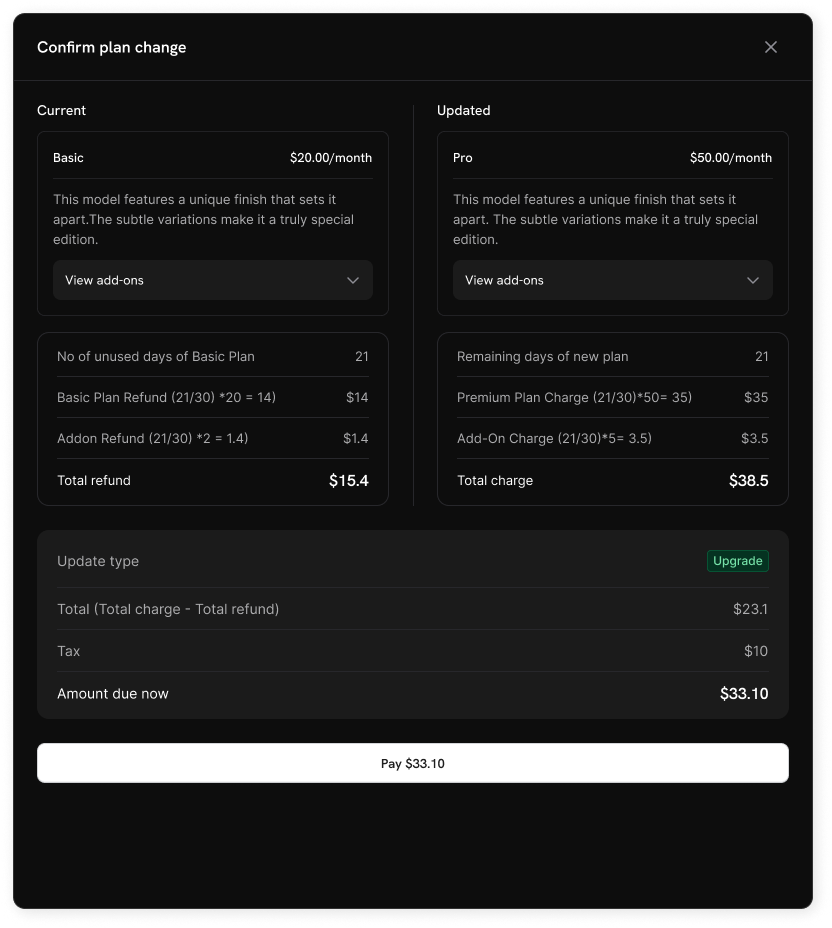
## Customer Portal Integration
Customers can upgrade or downgrade between products within the same collection directly from the Customer Portal.
**Already have subscription products?** Simply add them to a Product Collection to enable upgrade/downgrade flows in the Customer Portal. No need to recreate your products.
### Plan Management Actions
| Action | Description | Merchant Control |
| --------------------- | ----------------------------------------------------- | ------------------------------- |
| **View Current Plan** | Display current product name, price, and renewal date | Always available |
| **Upgrade Plan** | Move to a higher-tier product in the same collection | Configurable (default: allowed) |
| **Downgrade Plan** | Move to a lower-tier product in the same collection | Configurable (default: allowed) |
| **Cancel** | Cancel the subscription entirely | Always available |
**Product organization:**
* **Groups**: Optionally organize products into named groups (e.g., "Monthly Plans", "Annual Plans")
* **Ungrouped products**: Products without a group appear at the collection level
* **Ordering**: Drag and drop to set the display order
Each product can only belong to one collection. If a product is already in another collection, you'll need to remove it first.
Control the display order and visibility of products within the collection.
**Configuration options:**
* **Product status**: Enable or disable individual products within the collection
* **Display order**: Drag and drop to set the sequence products appear in checkout
The first product in the collection is automatically pre-selected as the default at checkout. Reorder products to change which one is selected by default.
## Collection Checkout
Collections enable a unified checkout experience where customers can view and select from all available products in one place.
### Checkout Types
| Type | Description | Use Case |
| --------------------------- | ------------------------------------------------ | ------------------------------------------- |
| **Collection Checkout** | Displays all active products within a collection | Subscription plan selection, tiered pricing |
| **Single Product Checkout** | Displays only one specific product | Direct purchase, promotional links |
### Collection Checkout Experience
When using a collection checkout:
1. **All active products displayed**: Customers see every enabled product in the collection
2. **First product pre-selected**: The first product in the collection order is automatically selected
3. **Product details shown**: Each product displays its name, description, and pricing
4. **Single selection**: Customer selects one product to purchase
5. **Standard flow continues**: After selection, the checkout proceeds with the chosen product's pricing and billing settings
Collection checkout is ideal for subscription businesses where you want customers to compare plans side-by-side before purchasing.
### API Integration
Create a checkout session for a collection:
```typescript theme={null}
const session = await client.checkoutSessions.create({
product_collection_id: 'pdc_abc123',
product_cart: [], // Required: pass an empty array for collection checkout
return_url: 'https://yoursite.com/return'
});
// Redirect customer to the checkout
window.location.href = session.checkout_url;
```
When using `product_collection_id`, discount codes cannot be applied at session creation. Customers can still enter discount codes during checkout if enabled.
## Customer Portal Integration
Customers can upgrade or downgrade between products within the same collection directly from the Customer Portal.
**Already have subscription products?** Simply add them to a Product Collection to enable upgrade/downgrade flows in the Customer Portal. No need to recreate your products.
### Plan Management Actions
| Action | Description | Merchant Control |
| --------------------- | ----------------------------------------------------- | ------------------------------- |
| **View Current Plan** | Display current product name, price, and renewal date | Always available |
| **Upgrade Plan** | Move to a higher-tier product in the same collection | Configurable (default: allowed) |
| **Downgrade Plan** | Move to a lower-tier product in the same collection | Configurable (default: allowed) |
| **Cancel** | Cancel the subscription entirely | Always available |
 ### Upgrade/Downgrade Rules
* Upgrades and downgrades are only available between products **within the same collection**
* Proration is applied based on your subscription settings
* Email notifications are sent to the business on every upgrade, downgrade, or cancellation
### Upgrade/Downgrade Rules
* Upgrades and downgrades are only available between products **within the same collection**
* Proration is applied based on your subscription settings
* Email notifications are sent to the business on every upgrade, downgrade, or cancellation
 Customers cannot change to products outside their current collection. Create separate collections for distinct product lines.
## Subscription Settings
Konfigurieren Sie, wie Abonnements und Planänderungen in Ihrem Unternehmen funktionieren, von **Einstellungen → Abonnements** in Ihrem Dashboard aus.
Customers cannot change to products outside their current collection. Create separate collections for distinct product lines.
## Subscription Settings
Konfigurieren Sie, wie Abonnements und Planänderungen in Ihrem Unternehmen funktionieren, von **Einstellungen → Abonnements** in Ihrem Dashboard aus.
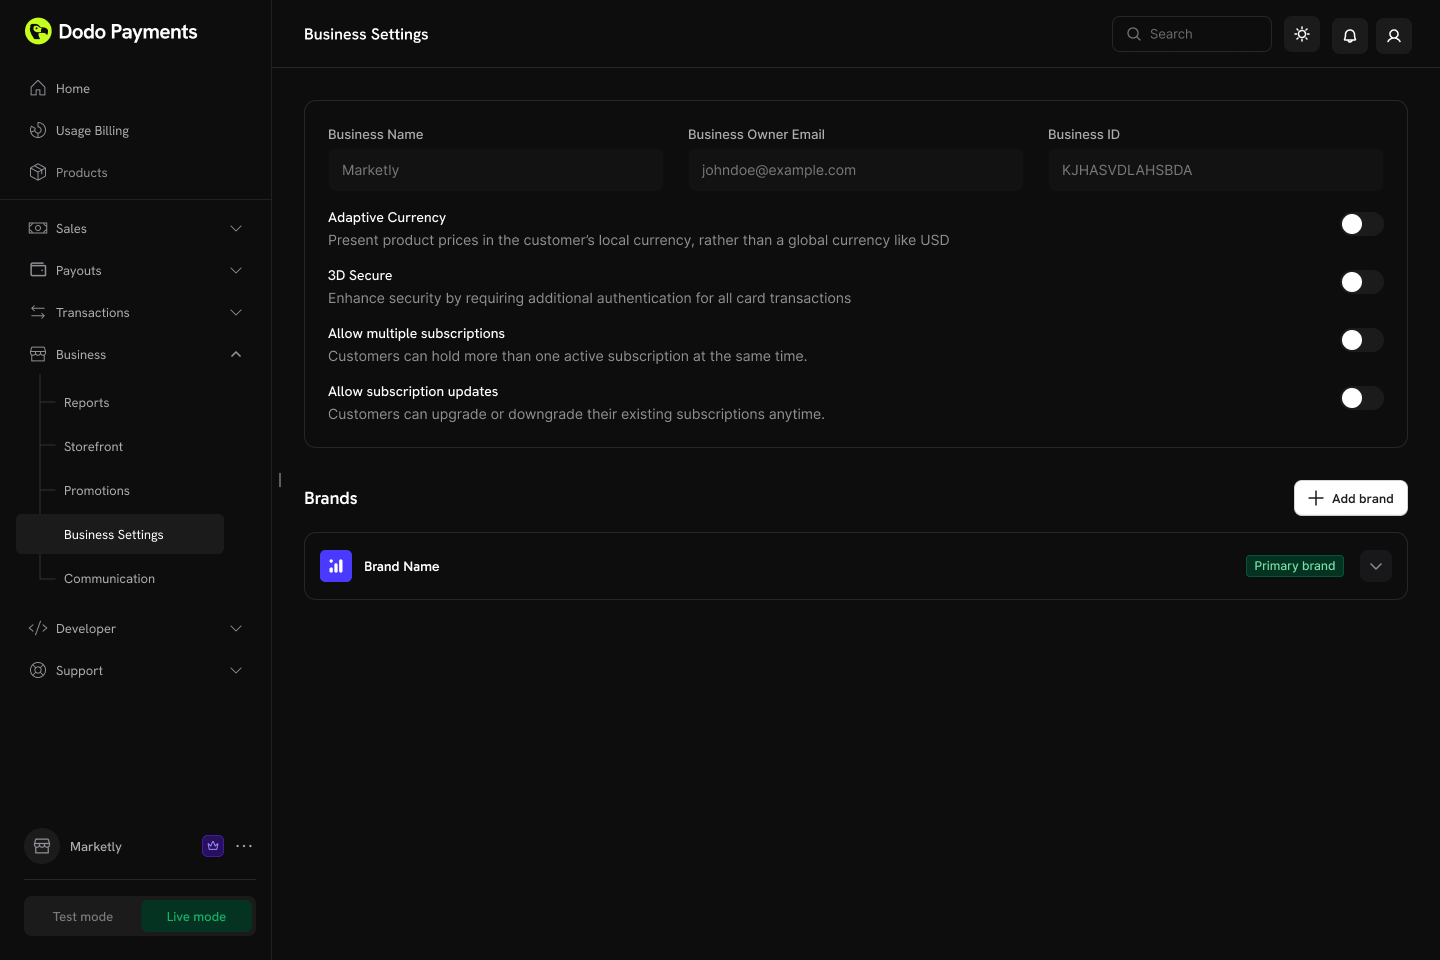 ### Available Settings
| Setting | Description | Default |
| -------------------------------- | ------------------------------------------------------------------------------------------- | -------- |
| **Allow Multiple Subscriptions** | Customers can hold more than one active subscription at the same time | Enabled |
| **Allow Subscription Updates** | Customers can upgrade or downgrade their existing subscriptions anytime via Customer Portal | Disabled |
Planänderungen über das Kundenportal sind standardmäßig deaktiviert. Aktivieren Sie "Abonnement-Aktualisierungen zulassen" in **Einstellungen → Abonnements**, um Kunden das Upgrade oder Downgrade zwischen Produkten in derselben Kollektion zu ermöglichen.
Learn more about proration modes and plan change behavior.
## Managing Collections
Produktkollektionen können entweder über das Dodo Payments-Dashboard oder programmatisch über die API verwaltet werden. Die API bietet volle Kontrolle über die Erstellung, Aktualisierung, den Bild-Upload, das Archivieren sowie die Verwaltung verschachtelter Gruppen und Produkte.
### Dashboard-Operationen
* **Erstellen**: Neue Kollektionen mit Produkten und Gruppen einrichten
* **Aktualisieren**: Name, Beschreibung, Bild und Produktorganisation ändern
* **Neu anordnen**: Per Drag-and-Drop die Anzeigereihenfolge der Produkte ändern
* **Produkte aktivieren/deaktivieren**: Steuern, welche Produkte im Checkout erscheinen
* **Archivieren**: Eine Kollektion verbergen, ohne sie dauerhaft zu löschen (kann später wiederhergestellt werden)
### Available Settings
| Setting | Description | Default |
| -------------------------------- | ------------------------------------------------------------------------------------------- | -------- |
| **Allow Multiple Subscriptions** | Customers can hold more than one active subscription at the same time | Enabled |
| **Allow Subscription Updates** | Customers can upgrade or downgrade their existing subscriptions anytime via Customer Portal | Disabled |
Planänderungen über das Kundenportal sind standardmäßig deaktiviert. Aktivieren Sie "Abonnement-Aktualisierungen zulassen" in **Einstellungen → Abonnements**, um Kunden das Upgrade oder Downgrade zwischen Produkten in derselben Kollektion zu ermöglichen.
Learn more about proration modes and plan change behavior.
## Managing Collections
Produktkollektionen können entweder über das Dodo Payments-Dashboard oder programmatisch über die API verwaltet werden. Die API bietet volle Kontrolle über die Erstellung, Aktualisierung, den Bild-Upload, das Archivieren sowie die Verwaltung verschachtelter Gruppen und Produkte.
### Dashboard-Operationen
* **Erstellen**: Neue Kollektionen mit Produkten und Gruppen einrichten
* **Aktualisieren**: Name, Beschreibung, Bild und Produktorganisation ändern
* **Neu anordnen**: Per Drag-and-Drop die Anzeigereihenfolge der Produkte ändern
* **Produkte aktivieren/deaktivieren**: Steuern, welche Produkte im Checkout erscheinen
* **Archivieren**: Eine Kollektion verbergen, ohne sie dauerhaft zu löschen (kann später wiederhergestellt werden)
 ### API-Verwaltung
Die folgenden Endpunkte ermöglichen es, Produktkollektionen programmatisch zu erstellen, zu aktualisieren, abzurufen, zu archivieren und zu organisieren — einschließlich der Verwaltung verschachtelter Gruppen und der darin enthaltenen Produkte.
Rufen Sie alle mit Ihrem Konto verknüpften Produktkollektionen ab, indem Sie eine `GET`-Anfrage an den `/product-collections`-Endpunkt senden. Unterstützt Paginierung, Filterung nach Marke und das Einbeziehen archivierter Kollektionen.
Sehen Sie sich die detaillierte Anfragstruktur und Antwortstruktur in der List Product Collections API-Dokumentation an.
Erstellen Sie eine neue Produktkollektion, indem Sie eine `POST`-Anfrage an den `/product-collections`-Endpunkt mit Details wie Name, Beschreibung und Marke senden.
Sehen Sie sich die detaillierte Anfragstruktur und Antwortstruktur in der Create Product Collection API-Dokumentation an.
Erhalten Sie detaillierte Informationen über eine bestimmte Produktkollektion — einschließlich ihrer Gruppen und Produktelemente — indem Sie eine `GET`-Anfrage an den `/product-collections/{id}`-Endpunkt senden.
Sehen Sie sich die detaillierte Anfragstruktur und Antwortstruktur in der Get Product Collection API-Dokumentation an.
Ändern Sie die Details einer Produktkollektion (Name, Beschreibung, Marke, etc.), indem Sie eine `PATCH`-Anfrage an den `/product-collections/{id}`-Endpunkt senden.
Sehen Sie sich die detaillierte Anfragstruktur und Antwortstruktur in der Update Product Collection API-Dokumentation an.
Verknüpfen Sie ein Bild mit einer Kollektion, indem Sie es über eine vorab signierte URL hochladen. Fordern Sie eine Upload-URL vom `/product-collections/{id}/images`-Endpunkt an und senden Sie das Bild innerhalb von 60 Sekunden an die zurückgegebene URL.
Die vorab signierte URL läuft nach 60 Sekunden ab, daher muss das Bild innerhalb dieses Zeitrahmens hochgeladen werden.
Sehen Sie sich die detaillierte Anfragstruktur und Antwortstruktur in der Update Collection Images API-Dokumentation an.
Archivieren Sie eine Kollektion, indem Sie eine `DELETE`-Anfrage an den `/product-collections/{id}`-Endpunkt senden. Dies verbirgt die Kollektion für neue Verwendungen, entfernt sie jedoch nicht dauerhaft.
Sehen Sie sich die detaillierte Anfragstruktur und Antwortstruktur in der Archive Product Collection API-Dokumentation an.
Stellen Sie eine archivierte Kollektion wieder her, indem Sie eine `POST`-Anfrage an den `/product-collections/{id}/unarchive`-Endpunkt senden.
Sehen Sie sich die detaillierte Anfragstruktur und Antwortstruktur in der Unarchive Product Collection API-Dokumentation an.
Gruppen ermöglichen es Ihnen, Produkte innerhalb einer Kollektion zu organisieren (z. B. "Monatspläne" vs. "Jahrespläne"). Verwenden Sie die Gruppenendpunkte, um Gruppen innerhalb einer Kollektion hinzuzufügen, zu aktualisieren oder zu entfernen.
* **Eine Gruppe erstellen**: `POST /product-collections/{id}/groups`
* **Eine Gruppe aktualisieren**: `PATCH /product-collections/{id}/groups/{group_id}`
* **Eine Gruppe löschen**: `DELETE /product-collections/{id}/groups/{group_id}`
Fügen Sie einer Produktkollektion eine neue Gruppe hinzu.
Ändern Sie den Namen oder die Attribute einer Gruppe.
Entfernen Sie eine Gruppe aus einer Kollektion.
Verwalten Sie die einzelnen Produktelemente innerhalb einer Gruppe — fügen Sie neue Produkte hinzu, aktualisieren Sie vorhandene Elemente (wie die Anzeigereihenfolge) oder entfernen Sie sie vollständig.
* **Produkte zu einer Gruppe hinzufügen**: `POST /product-collections/{id}/groups/{group_id}/items`
* **Ein Gruppenelement aktualisieren**: `PATCH /product-collections/{id}/groups/{group_id}/items/{item_id}`
* **Ein Gruppenelement löschen**: `DELETE /product-collections/{id}/groups/{group_id}/items/{item_id}`
Fügen Sie einer Gruppe innerhalb einer Kollektion ein oder mehrere Produkte hinzu.
Aktualisieren Sie ein Produkt innerhalb einer Gruppe.
Entfernen Sie ein Produkt aus einer Gruppe.
## Beste Praktiken
* **Logisch gruppieren**: Produkte nach Abrechnungsintervall (monatlich/jährlich) oder Funktionsstufe (Starter/Pro/Enterprise) organisieren
* **Strategisch anordnen**: Platzieren Sie Ihren beliebtesten oder empfohlenen Plan zuerst, da dieser im Checkout vorselektiert wird
* **Klare Benennung verwenden**: Produktnamen sollten die Unterschiede im Wert klar kommunizieren
* **Beide Richtungen ermöglichen**: Erlauben Sie sowohl Upgrades als auch Downgrades, um den Kunden Flexibilität zu geben
* **Proration berücksichtigen**: Wählen Sie einen Prorationsmodus, der zu Ihrem Geschäftsmodell passt
* **Gründlich testen**: Überprüfen Sie die Checkout- und Planänderungsflüsse im Testmodus, bevor Sie live gehen
Sie sind bereit, Produktkollektionen zu erstellen und Ihren Kunden ein einheitliches Plan-Auswahlerlebnis zu bieten.
Erstellen Sie Einmal-, Abonnement- oder nutzungsbasierte Produkte, die Sie zu Kollektionen hinzufügen können.
Zeigen Sie Kollektionsprodukte in einem einheitlichen Checkouterlebnis an.
Lassen Sie Kunden innerhalb derselben Kollektion upgraden oder downgraden.
Verwalten Sie wiederkehrende Pläne mit Proration und Planänderungen.
### API-Verwaltung
Die folgenden Endpunkte ermöglichen es, Produktkollektionen programmatisch zu erstellen, zu aktualisieren, abzurufen, zu archivieren und zu organisieren — einschließlich der Verwaltung verschachtelter Gruppen und der darin enthaltenen Produkte.
Rufen Sie alle mit Ihrem Konto verknüpften Produktkollektionen ab, indem Sie eine `GET`-Anfrage an den `/product-collections`-Endpunkt senden. Unterstützt Paginierung, Filterung nach Marke und das Einbeziehen archivierter Kollektionen.
Sehen Sie sich die detaillierte Anfragstruktur und Antwortstruktur in der List Product Collections API-Dokumentation an.
Erstellen Sie eine neue Produktkollektion, indem Sie eine `POST`-Anfrage an den `/product-collections`-Endpunkt mit Details wie Name, Beschreibung und Marke senden.
Sehen Sie sich die detaillierte Anfragstruktur und Antwortstruktur in der Create Product Collection API-Dokumentation an.
Erhalten Sie detaillierte Informationen über eine bestimmte Produktkollektion — einschließlich ihrer Gruppen und Produktelemente — indem Sie eine `GET`-Anfrage an den `/product-collections/{id}`-Endpunkt senden.
Sehen Sie sich die detaillierte Anfragstruktur und Antwortstruktur in der Get Product Collection API-Dokumentation an.
Ändern Sie die Details einer Produktkollektion (Name, Beschreibung, Marke, etc.), indem Sie eine `PATCH`-Anfrage an den `/product-collections/{id}`-Endpunkt senden.
Sehen Sie sich die detaillierte Anfragstruktur und Antwortstruktur in der Update Product Collection API-Dokumentation an.
Verknüpfen Sie ein Bild mit einer Kollektion, indem Sie es über eine vorab signierte URL hochladen. Fordern Sie eine Upload-URL vom `/product-collections/{id}/images`-Endpunkt an und senden Sie das Bild innerhalb von 60 Sekunden an die zurückgegebene URL.
Die vorab signierte URL läuft nach 60 Sekunden ab, daher muss das Bild innerhalb dieses Zeitrahmens hochgeladen werden.
Sehen Sie sich die detaillierte Anfragstruktur und Antwortstruktur in der Update Collection Images API-Dokumentation an.
Archivieren Sie eine Kollektion, indem Sie eine `DELETE`-Anfrage an den `/product-collections/{id}`-Endpunkt senden. Dies verbirgt die Kollektion für neue Verwendungen, entfernt sie jedoch nicht dauerhaft.
Sehen Sie sich die detaillierte Anfragstruktur und Antwortstruktur in der Archive Product Collection API-Dokumentation an.
Stellen Sie eine archivierte Kollektion wieder her, indem Sie eine `POST`-Anfrage an den `/product-collections/{id}/unarchive`-Endpunkt senden.
Sehen Sie sich die detaillierte Anfragstruktur und Antwortstruktur in der Unarchive Product Collection API-Dokumentation an.
Gruppen ermöglichen es Ihnen, Produkte innerhalb einer Kollektion zu organisieren (z. B. "Monatspläne" vs. "Jahrespläne"). Verwenden Sie die Gruppenendpunkte, um Gruppen innerhalb einer Kollektion hinzuzufügen, zu aktualisieren oder zu entfernen.
* **Eine Gruppe erstellen**: `POST /product-collections/{id}/groups`
* **Eine Gruppe aktualisieren**: `PATCH /product-collections/{id}/groups/{group_id}`
* **Eine Gruppe löschen**: `DELETE /product-collections/{id}/groups/{group_id}`
Fügen Sie einer Produktkollektion eine neue Gruppe hinzu.
Ändern Sie den Namen oder die Attribute einer Gruppe.
Entfernen Sie eine Gruppe aus einer Kollektion.
Verwalten Sie die einzelnen Produktelemente innerhalb einer Gruppe — fügen Sie neue Produkte hinzu, aktualisieren Sie vorhandene Elemente (wie die Anzeigereihenfolge) oder entfernen Sie sie vollständig.
* **Produkte zu einer Gruppe hinzufügen**: `POST /product-collections/{id}/groups/{group_id}/items`
* **Ein Gruppenelement aktualisieren**: `PATCH /product-collections/{id}/groups/{group_id}/items/{item_id}`
* **Ein Gruppenelement löschen**: `DELETE /product-collections/{id}/groups/{group_id}/items/{item_id}`
Fügen Sie einer Gruppe innerhalb einer Kollektion ein oder mehrere Produkte hinzu.
Aktualisieren Sie ein Produkt innerhalb einer Gruppe.
Entfernen Sie ein Produkt aus einer Gruppe.
## Beste Praktiken
* **Logisch gruppieren**: Produkte nach Abrechnungsintervall (monatlich/jährlich) oder Funktionsstufe (Starter/Pro/Enterprise) organisieren
* **Strategisch anordnen**: Platzieren Sie Ihren beliebtesten oder empfohlenen Plan zuerst, da dieser im Checkout vorselektiert wird
* **Klare Benennung verwenden**: Produktnamen sollten die Unterschiede im Wert klar kommunizieren
* **Beide Richtungen ermöglichen**: Erlauben Sie sowohl Upgrades als auch Downgrades, um den Kunden Flexibilität zu geben
* **Proration berücksichtigen**: Wählen Sie einen Prorationsmodus, der zu Ihrem Geschäftsmodell passt
* **Gründlich testen**: Überprüfen Sie die Checkout- und Planänderungsflüsse im Testmodus, bevor Sie live gehen
Sie sind bereit, Produktkollektionen zu erstellen und Ihren Kunden ein einheitliches Plan-Auswahlerlebnis zu bieten.
Erstellen Sie Einmal-, Abonnement- oder nutzungsbasierte Produkte, die Sie zu Kollektionen hinzufügen können.
Zeigen Sie Kollektionsprodukte in einem einheitlichen Checkouterlebnis an.
Lassen Sie Kunden innerhalb derselben Kollektion upgraden oder downgraden.
Verwalten Sie wiederkehrende Pläne mit Proration und Planänderungen.