> ## Documentation Index
> Fetch the complete documentation index at: https://docs.dodopayments.com/llms.txt
> Use this file to discover all available pages before exploring further.
# AutoSend
> 了解如何使用 AutoSend 的电子邮件 API 发送自动化的交易电子邮件,以处理您的 Dodo Payments 交易、退款和支付事件。
## 介绍
AutoSend 和 Dodo Payments 的集成使您能够自动发送实时电子邮件通知,涵盖所有支付事件,从成功交易到失败尝试和退款确认。
使用 AutoSend 强大的电子邮件 API 发送支付事件的交易电子邮件。
此集成需要使用 AutoSend API 密钥进行身份验证。您可以在 AutoSend 仪表板的 设置 > API 密钥 中找到您的 API 密钥。
## 开始使用
按照以下步骤将 AutoSend 与 Dodo Payments 集成:
前往您的 Dodo Payments 仪表板中的 Webhooks 部分。
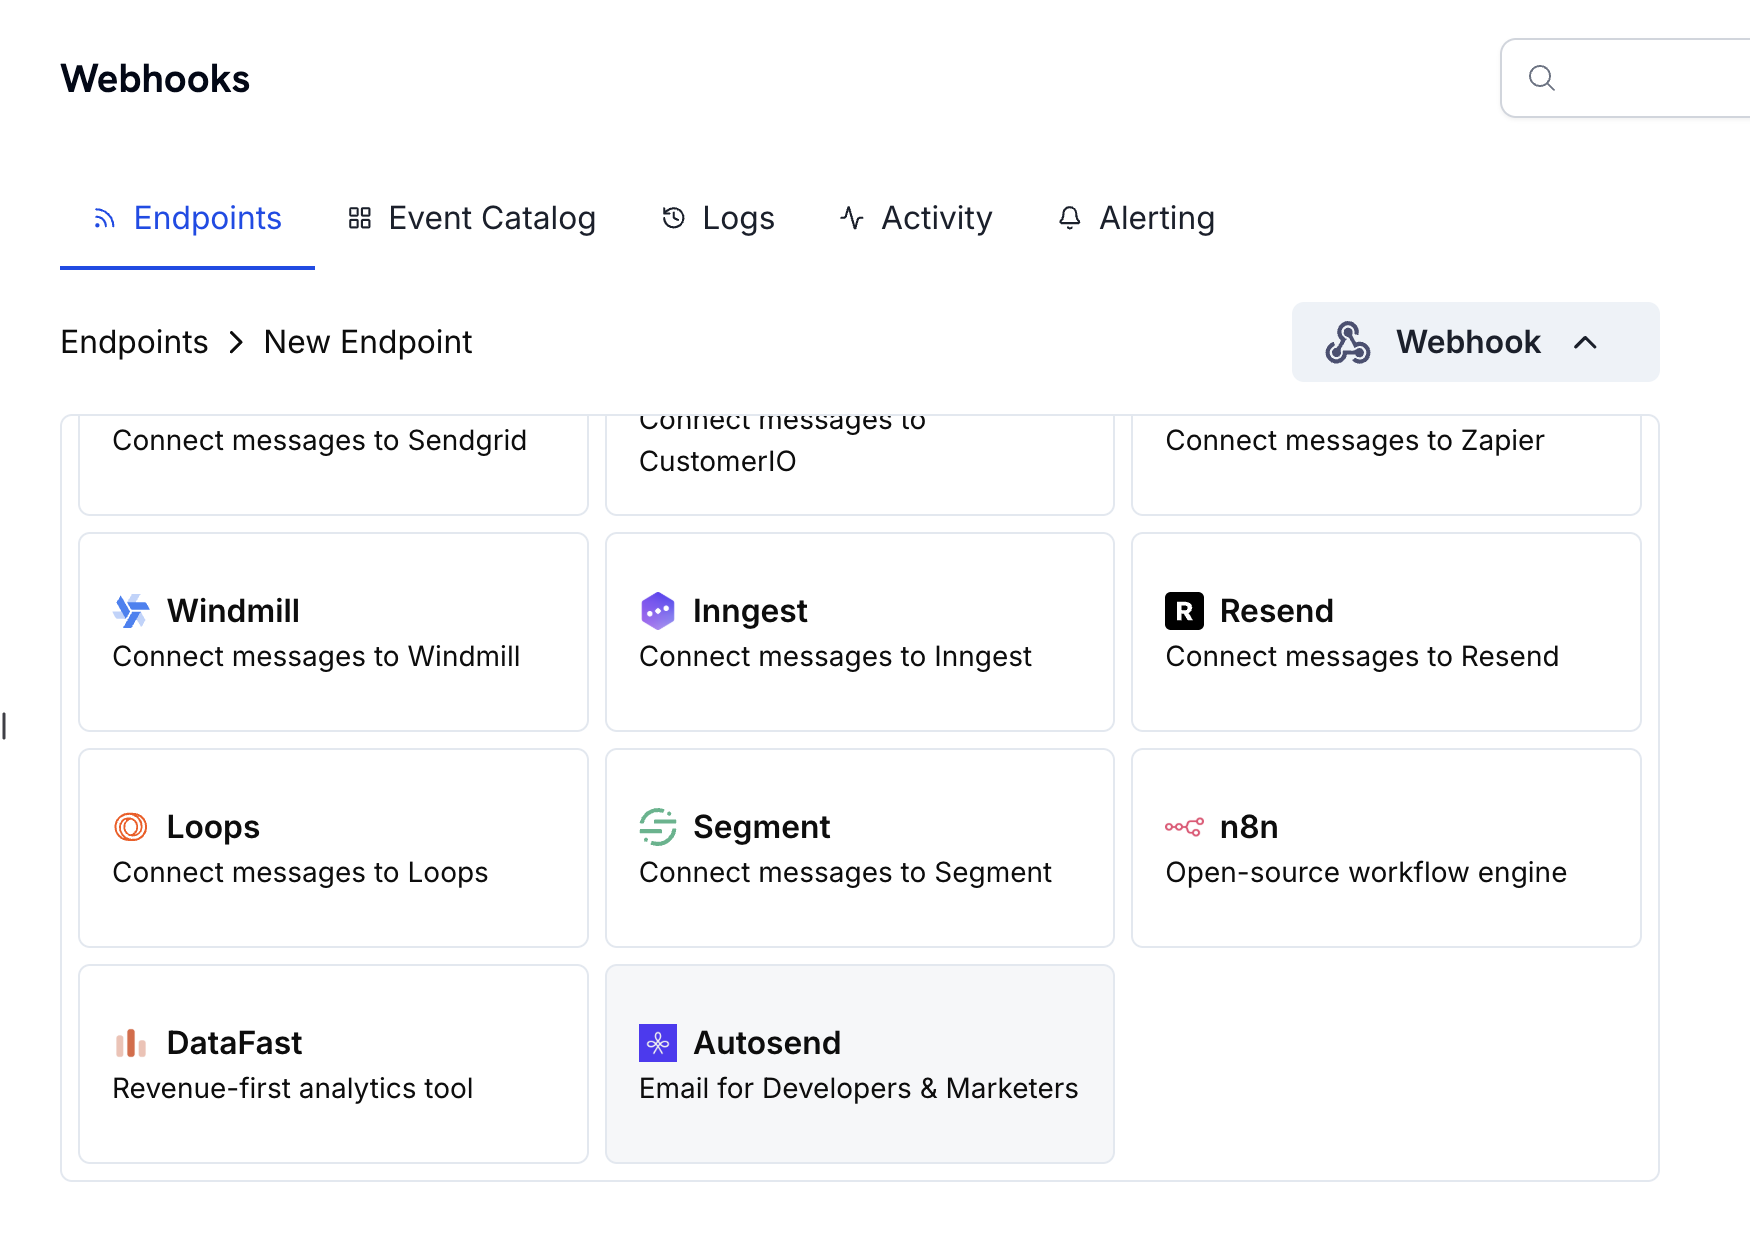 从可用集成列表中选择 AutoSend。
提供您的 AutoSend API 密钥以进行身份验证。您可以在 AutoSend 仪表板的 设置 > API 密钥 中找到您的 API 密钥。
访问 AutoSend 文档,了解有关创建和管理 API 密钥的详细说明。
配置 JavaScript 转换处理程序,以便根据支付事件自定义电子邮件内容。
测试您的 Webhook 配置,确保电子邮件发送正确,然后创建集成。
🎉 您的 AutoSend 集成现已启用,并将自动为配置的支付事件发送电子邮件。
## 代码示例
### 支付确认电子邮件
在支付成功处理时发送确认电子邮件:
```javascript payment_confirmation.js icon="js" expandable theme={null}
function handler(webhook) {
if (webhook.eventType === "payment.succeeded") {
const p = webhook.payload.data;
webhook.url = "https://api.autosend.com/v1/mails/send";
webhook.payload = {
to: {
email: p.customer.email,
name: p.customer.name,
},
from: {
email: "payments@mail.yourdomain.com",
name: "Your Company",
},
subject: "Payment Successful - Thank you for your purchase!",
templateId: "A-61522f2xxxxxxxxx",
dynamicData: {
customerName: p.customer.name,
amount: p.amount,
currency: p.currency,
paymentId: p.payment_id,
paymentDate: new Date(p.created_at).toLocaleDateString(),
},
replyTo: {
email: "support@yourdomain.com",
name: "Support Team",
},
};
}
return webhook;
}
```
### 订阅欢迎电子邮件
在创建新订阅时发送欢迎电子邮件:
```javascript subscription_welcome.js icon="js" expandable theme={null}
function handler(webhook) {
if (webhook.eventType === "subscription.active") {
const s = webhook.payload.data;
webhook.url = "https://api.autosend.com/v1/mails/send";
webhook.payload = {
to: {
email: s.customer.email,
name: s.customer.name,
},
from: {
email: "subscriptions@mail.yourdomain.com",
name: "Your Company",
},
subject: "Welcome to your subscription!",
templateId: "A-61522f2xxxxxxxxx",
dynamicData: {
customerName: s.customer.name,
planName: s.plan.name,
billingInterval: s.billing_interval,
nextBillingDate: new Date(s.next_billing_at).toLocaleDateString(),
subscriptionId: s.subscription_id,
},
replyTo: {
email: "support@yourdomain.com",
name: "Support Team",
},
};
}
return webhook;
}
```
### 支付失败通知
在支付失败时发送通知电子邮件:
```javascript payment_failure.js icon="js" expandable theme={null}
function handler(webhook) {
if (webhook.eventType === "payment.failed") {
const p = webhook.payload.data;
webhook.url = "https://api.autosend.com/v1/mails/send";
webhook.payload = {
to: {
email: p.customer.email,
name: p.customer.name,
},
from: {
email: "billing@mail.yourdomain.com",
name: "Your Company Billing",
},
subject: "Payment Failed - Action Required",
templateId: "A-61522f2xxxxxxxxx",
dynamicData: {
customerName: p.customer.name,
amount: p.amount,
currency: p.currency,
failureReason: p.failure_reason,
paymentId: p.payment_id,
retryUrl: `https://yourdomain.com/billing/retry/${p.payment_id}`,
},
replyTo: {
email: "billing@yourdomain.com",
name: "Billing Support",
},
};
}
return webhook;
}
```
## 最佳实践
* **验证您的发件人域名**:确保您的发件人电子邮件域名在 AutoSend 中已验证,以提高投递率并避免身份验证问题。经过验证的域名有助于防止电子邮件进入垃圾邮件文件夹。
* **使用动态数据进行个性化**:使用 `dynamicData` 字段来根据客户特定信息(如姓名、付款金额和订阅详情)个性化电子邮件。个性化电子邮件具有更高的参与率。
* **撰写清晰的主题行**:撰写描述性主题行,清楚地表明电子邮件的目的。避免使用垃圾邮件触发词,并保持主题简洁(50 个字符以内)。
* **在生产前进行测试**:在生产中发送电子邮件之前,始终进行测试。这确保您的电子邮件内容正确呈现,并且所有动态数据都正确映射。
## API 参考
有关 AutoSend API 的完整详细信息,包括所有可用参数和错误代码,请访问 [AutoSend API 文档](https://docs.autosend.com/api-reference/mails/send)。
## 故障排除
* 验证 API 密钥是否正确且处于激活状态
* 检查发送域是否在 AutoSend 中完成验证
* 确保收件人电子邮件地址有效
* 审核 AutoSend 的发送限制和配额
* 验证 API 端点 URL 是否正确:`https://api.autosend.com/v1/mails/send`
* 检查有效载荷中是否存在所需参数
* 验证 JSON 结构是否符合 AutoSend API 格式
* 检查所有必填字段是否存在(`to`、`from`、`templateId` 或 `html`/`text`)
* 确保电子邮件地址格式正确
* 如果使用模板,请验证 `templateId` 是否有效
* 检查 `dynamicData` 键是否与模板变量匹配
* 验证您的模板 ID 在 AutoSend 中是否正确且处于激活状态
* 确保 `dynamicData` 键与模板中使用的变量匹配
* 检查是否提供了所有必需的模板变量
* 在 AutoSend 仪表板中独立测试您的模板
从可用集成列表中选择 AutoSend。
提供您的 AutoSend API 密钥以进行身份验证。您可以在 AutoSend 仪表板的 设置 > API 密钥 中找到您的 API 密钥。
访问 AutoSend 文档,了解有关创建和管理 API 密钥的详细说明。
配置 JavaScript 转换处理程序,以便根据支付事件自定义电子邮件内容。
测试您的 Webhook 配置,确保电子邮件发送正确,然后创建集成。
🎉 您的 AutoSend 集成现已启用,并将自动为配置的支付事件发送电子邮件。
## 代码示例
### 支付确认电子邮件
在支付成功处理时发送确认电子邮件:
```javascript payment_confirmation.js icon="js" expandable theme={null}
function handler(webhook) {
if (webhook.eventType === "payment.succeeded") {
const p = webhook.payload.data;
webhook.url = "https://api.autosend.com/v1/mails/send";
webhook.payload = {
to: {
email: p.customer.email,
name: p.customer.name,
},
from: {
email: "payments@mail.yourdomain.com",
name: "Your Company",
},
subject: "Payment Successful - Thank you for your purchase!",
templateId: "A-61522f2xxxxxxxxx",
dynamicData: {
customerName: p.customer.name,
amount: p.amount,
currency: p.currency,
paymentId: p.payment_id,
paymentDate: new Date(p.created_at).toLocaleDateString(),
},
replyTo: {
email: "support@yourdomain.com",
name: "Support Team",
},
};
}
return webhook;
}
```
### 订阅欢迎电子邮件
在创建新订阅时发送欢迎电子邮件:
```javascript subscription_welcome.js icon="js" expandable theme={null}
function handler(webhook) {
if (webhook.eventType === "subscription.active") {
const s = webhook.payload.data;
webhook.url = "https://api.autosend.com/v1/mails/send";
webhook.payload = {
to: {
email: s.customer.email,
name: s.customer.name,
},
from: {
email: "subscriptions@mail.yourdomain.com",
name: "Your Company",
},
subject: "Welcome to your subscription!",
templateId: "A-61522f2xxxxxxxxx",
dynamicData: {
customerName: s.customer.name,
planName: s.plan.name,
billingInterval: s.billing_interval,
nextBillingDate: new Date(s.next_billing_at).toLocaleDateString(),
subscriptionId: s.subscription_id,
},
replyTo: {
email: "support@yourdomain.com",
name: "Support Team",
},
};
}
return webhook;
}
```
### 支付失败通知
在支付失败时发送通知电子邮件:
```javascript payment_failure.js icon="js" expandable theme={null}
function handler(webhook) {
if (webhook.eventType === "payment.failed") {
const p = webhook.payload.data;
webhook.url = "https://api.autosend.com/v1/mails/send";
webhook.payload = {
to: {
email: p.customer.email,
name: p.customer.name,
},
from: {
email: "billing@mail.yourdomain.com",
name: "Your Company Billing",
},
subject: "Payment Failed - Action Required",
templateId: "A-61522f2xxxxxxxxx",
dynamicData: {
customerName: p.customer.name,
amount: p.amount,
currency: p.currency,
failureReason: p.failure_reason,
paymentId: p.payment_id,
retryUrl: `https://yourdomain.com/billing/retry/${p.payment_id}`,
},
replyTo: {
email: "billing@yourdomain.com",
name: "Billing Support",
},
};
}
return webhook;
}
```
## 最佳实践
* **验证您的发件人域名**:确保您的发件人电子邮件域名在 AutoSend 中已验证,以提高投递率并避免身份验证问题。经过验证的域名有助于防止电子邮件进入垃圾邮件文件夹。
* **使用动态数据进行个性化**:使用 `dynamicData` 字段来根据客户特定信息(如姓名、付款金额和订阅详情)个性化电子邮件。个性化电子邮件具有更高的参与率。
* **撰写清晰的主题行**:撰写描述性主题行,清楚地表明电子邮件的目的。避免使用垃圾邮件触发词,并保持主题简洁(50 个字符以内)。
* **在生产前进行测试**:在生产中发送电子邮件之前,始终进行测试。这确保您的电子邮件内容正确呈现,并且所有动态数据都正确映射。
## API 参考
有关 AutoSend API 的完整详细信息,包括所有可用参数和错误代码,请访问 [AutoSend API 文档](https://docs.autosend.com/api-reference/mails/send)。
## 故障排除
* 验证 API 密钥是否正确且处于激活状态
* 检查发送域是否在 AutoSend 中完成验证
* 确保收件人电子邮件地址有效
* 审核 AutoSend 的发送限制和配额
* 验证 API 端点 URL 是否正确:`https://api.autosend.com/v1/mails/send`
* 检查有效载荷中是否存在所需参数
* 验证 JSON 结构是否符合 AutoSend API 格式
* 检查所有必填字段是否存在(`to`、`from`、`templateId` 或 `html`/`text`)
* 确保电子邮件地址格式正确
* 如果使用模板,请验证 `templateId` 是否有效
* 检查 `dynamicData` 键是否与模板变量匹配
* 验证您的模板 ID 在 AutoSend 中是否正确且处于激活状态
* 确保 `dynamicData` 键与模板中使用的变量匹配
* 检查是否提供了所有必需的模板变量
* 在 AutoSend 仪表板中独立测试您的模板