> ## Documentation Index
> Fetch the complete documentation index at: https://docs.dodopayments.com/llms.txt
> Use this file to discover all available pages before exploring further.

# 基于座位的定价与附加组件和支付链接

> 学习如何为基于座位的定价创建附加组件，并使用自定义附加组件数量生成支付链接，使用 Dodo Payments

在本教程中，您将学习如何使用 Dodo Payments 附加组件实现基于座位的定价。我们将创建一个带有附加组件的订阅产品，以便增加额外的座位，并向您展示如何生成带有自定义附加组件数量的支付链接。

<Note>
  本教程提供了一个 Node.js/Express 应用的示例实现代码。您可以根据所使用的框架（Next.js、React、Vue 等）修改此代码，并根据应用需求自定义用户界面。
</Note>

到本教程结束时，您将知道如何：

* 创建基于座位的订阅产品
* 设置额外座位的附加组件
* 生成带有自定义附加组件数量的支付链接
* 处理具有动态座位数量的结账会话

## 我们要构建的内容

让我们创建一个基于座位的定价模型：

* **基础计划**：每月 \$49，最多 5 名团队成员
* **座位附加组件**：每个额外座位每月 \$2
* **支付链接**：动态结账，带有自定义座位数量

<Info>
  开始之前，请确保您具备以下条件：

  * Dodo Payments 帐户
  * TypeScript/Node.js 的基本熟悉程度
</Info>

## 第 1 步：创建您的座位附加组件

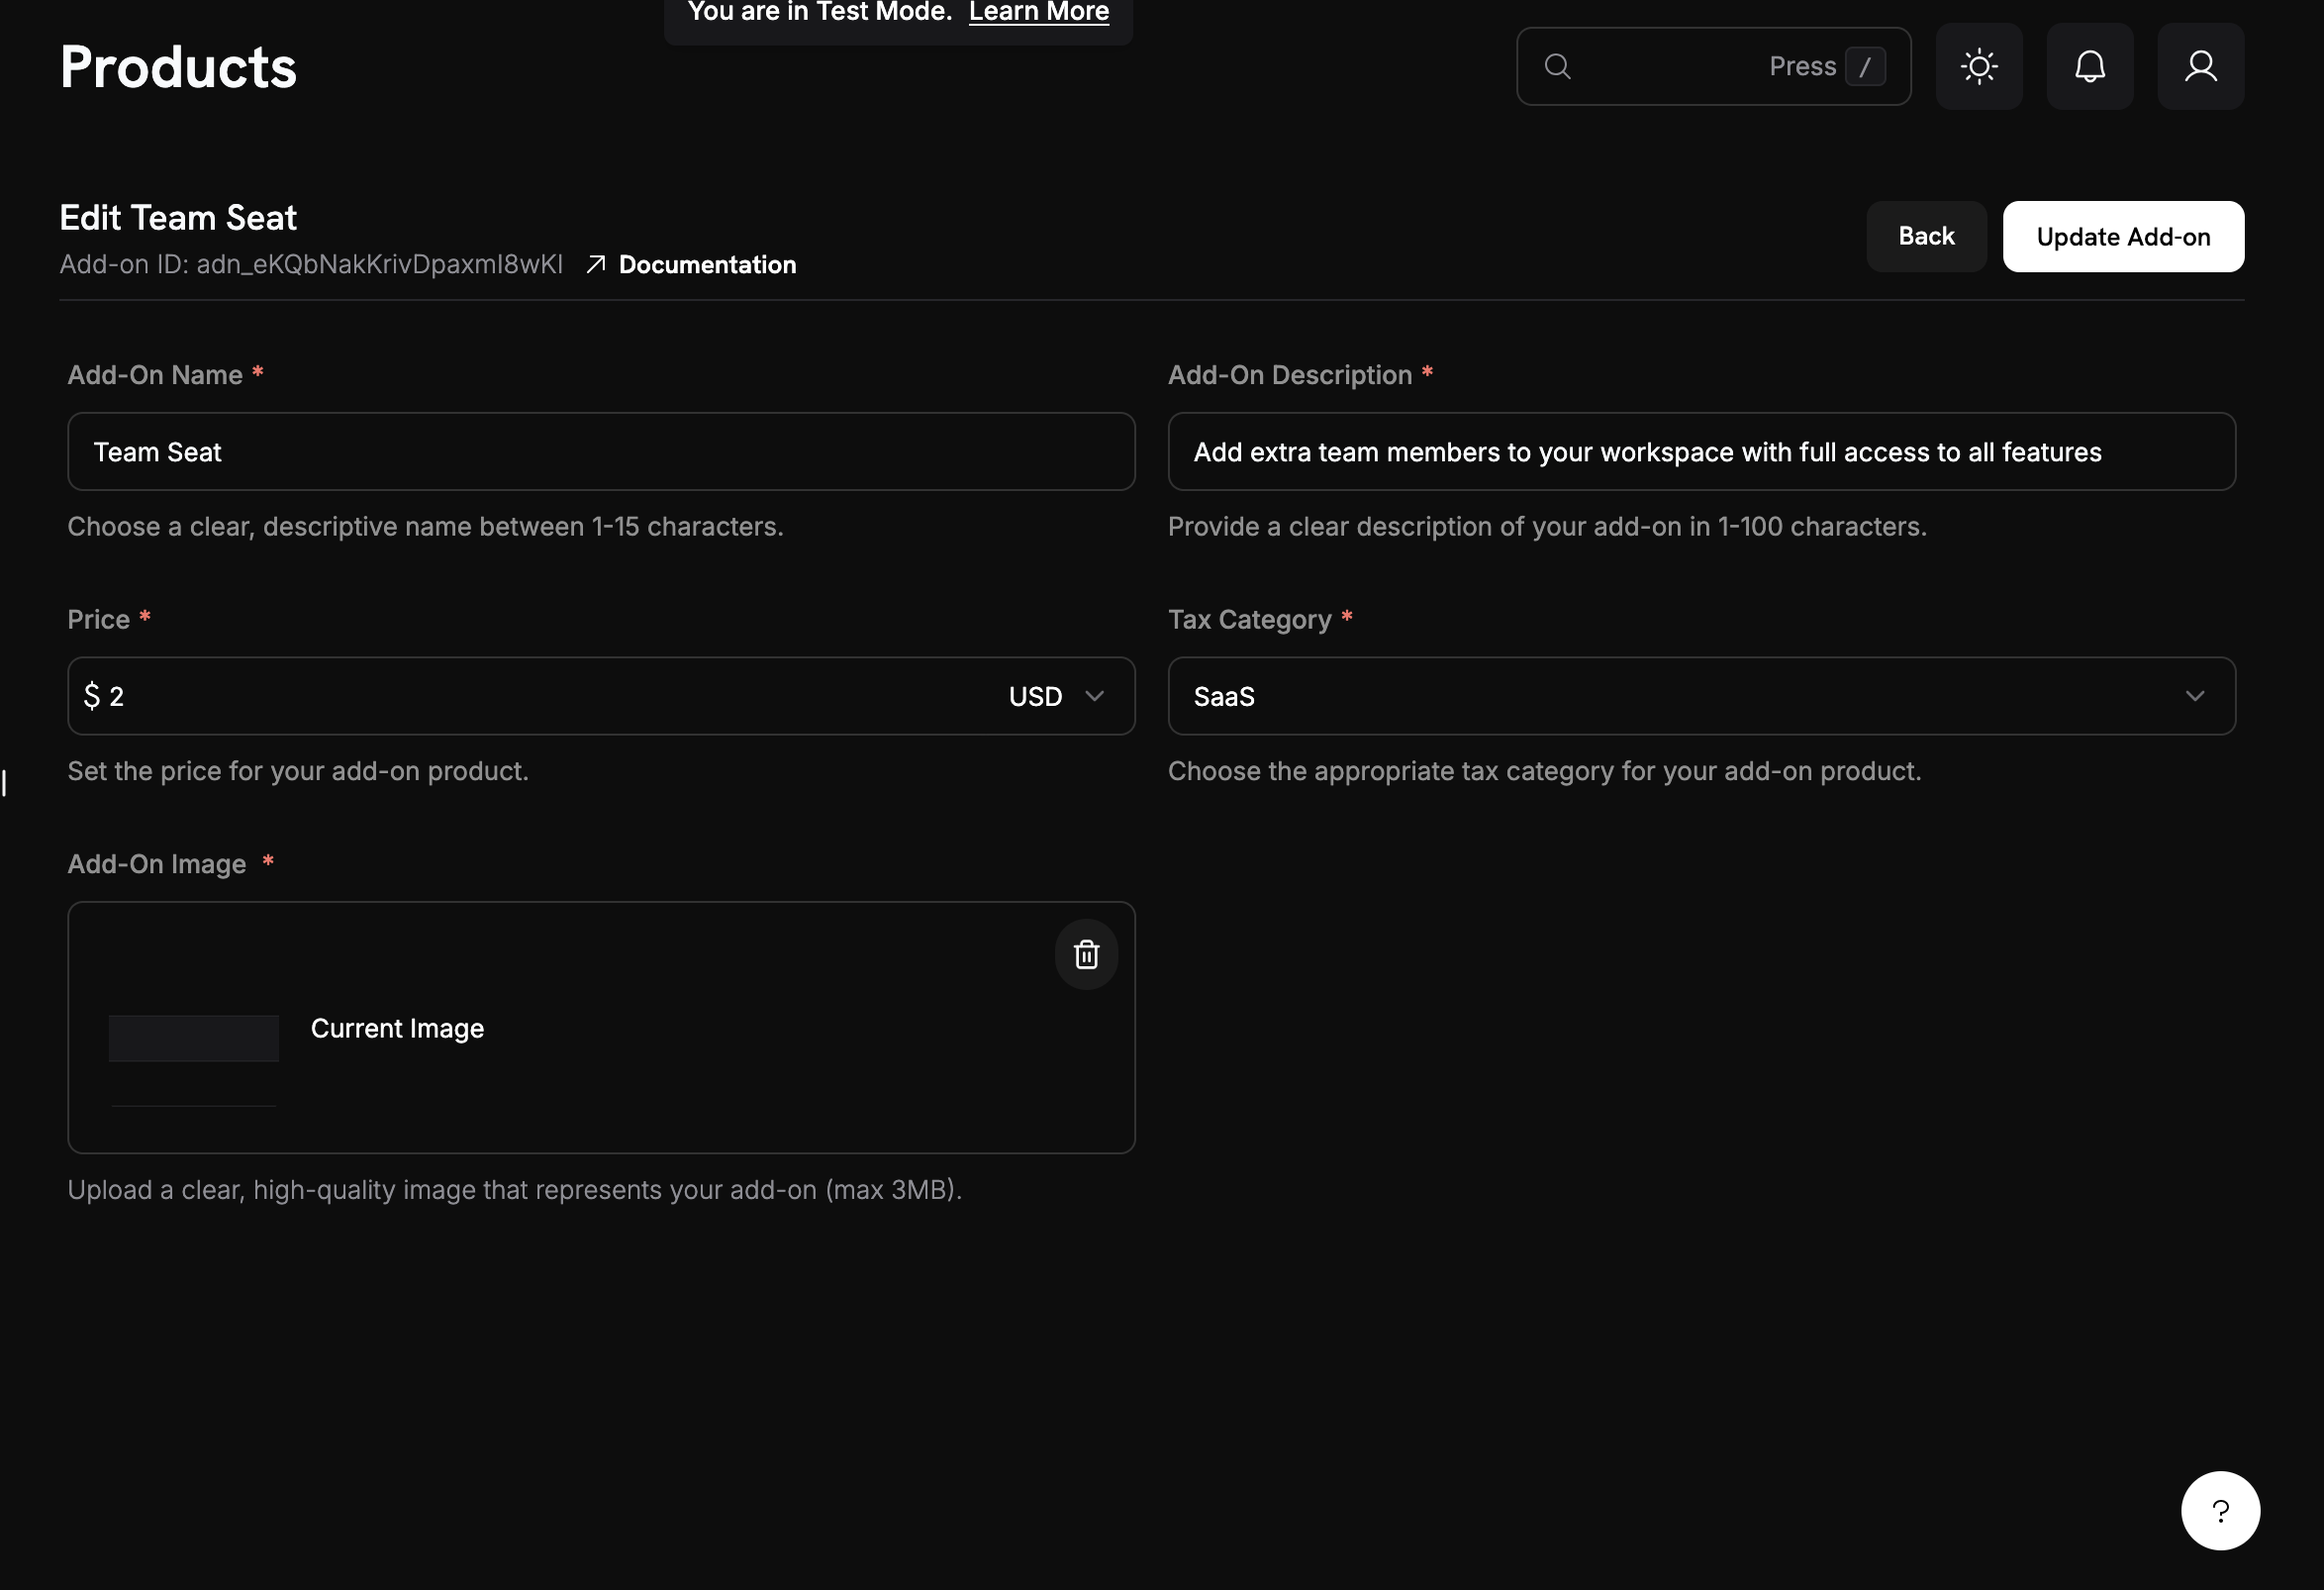
现在我们需要创建一个表示额外座位的附加组件。此附加组件将附加到我们的基础订阅上，并允许客户购买额外的座位。

<Frame>
  <img src="https://mintcdn.com/dodopayments/ajOhO6Du1yNsg0hy/images/cookbooks/seat-based/seat-based-addons-creation.png?fit=max&auto=format&n=ajOhO6Du1yNsg0hy&q=85&s=d2c17b4a9f2f9a1b19f537f0507656a4" alt="创建基础订阅产品" style={{ maxHeight: '500px', width: 'auto' }} width="2348" height="1606" data-path="images/cookbooks/seat-based/seat-based-addons-creation.png" />
</Frame>

<Tip>
  **我们的目标**：创建一个每个席位每月收费 2 美元的附加组件，可添加至任何基础订阅。
</Tip>

<Steps>
  <Step title="Navigate to Add-Ons">
    1. 在 Dodo Payments 仪表板中，保持在 **产品（Products）** 部分
    2. 点击 **附加组件（Add-Ons）** 选项卡
    3. 点击 **创建附加组件（Create Add-On）**

    这将打开附加组件创建表单。
  </Step>

  <Step title="Enter add-on details">
    为我们的席位附加组件填写以下内容：

    **附加组件名称**：`Additional Team Seat`

    **描述**：`Add extra team members to your workspace with full access to all features`

    **价格**：输入 → `2.00`

    **货币**：必须与您的基础订阅货币匹配

    **税务类别**：选择适合您产品的类别。
  </Step>

  <Step title="Save your add-on">
    1. 审查所有设置：
       * 名称：额外团队席位（Additional Team Seat）
       * 价格：\$2.00/月
    2. 点击 **创建附加组件（Create Add-On）**

    <Check>
      **附加组件已创建！** 现在您可以将席位附加组件附加到订阅中。
    </Check>
  </Step>
</Steps>

## 第 2 步：创建您的基础订阅产品

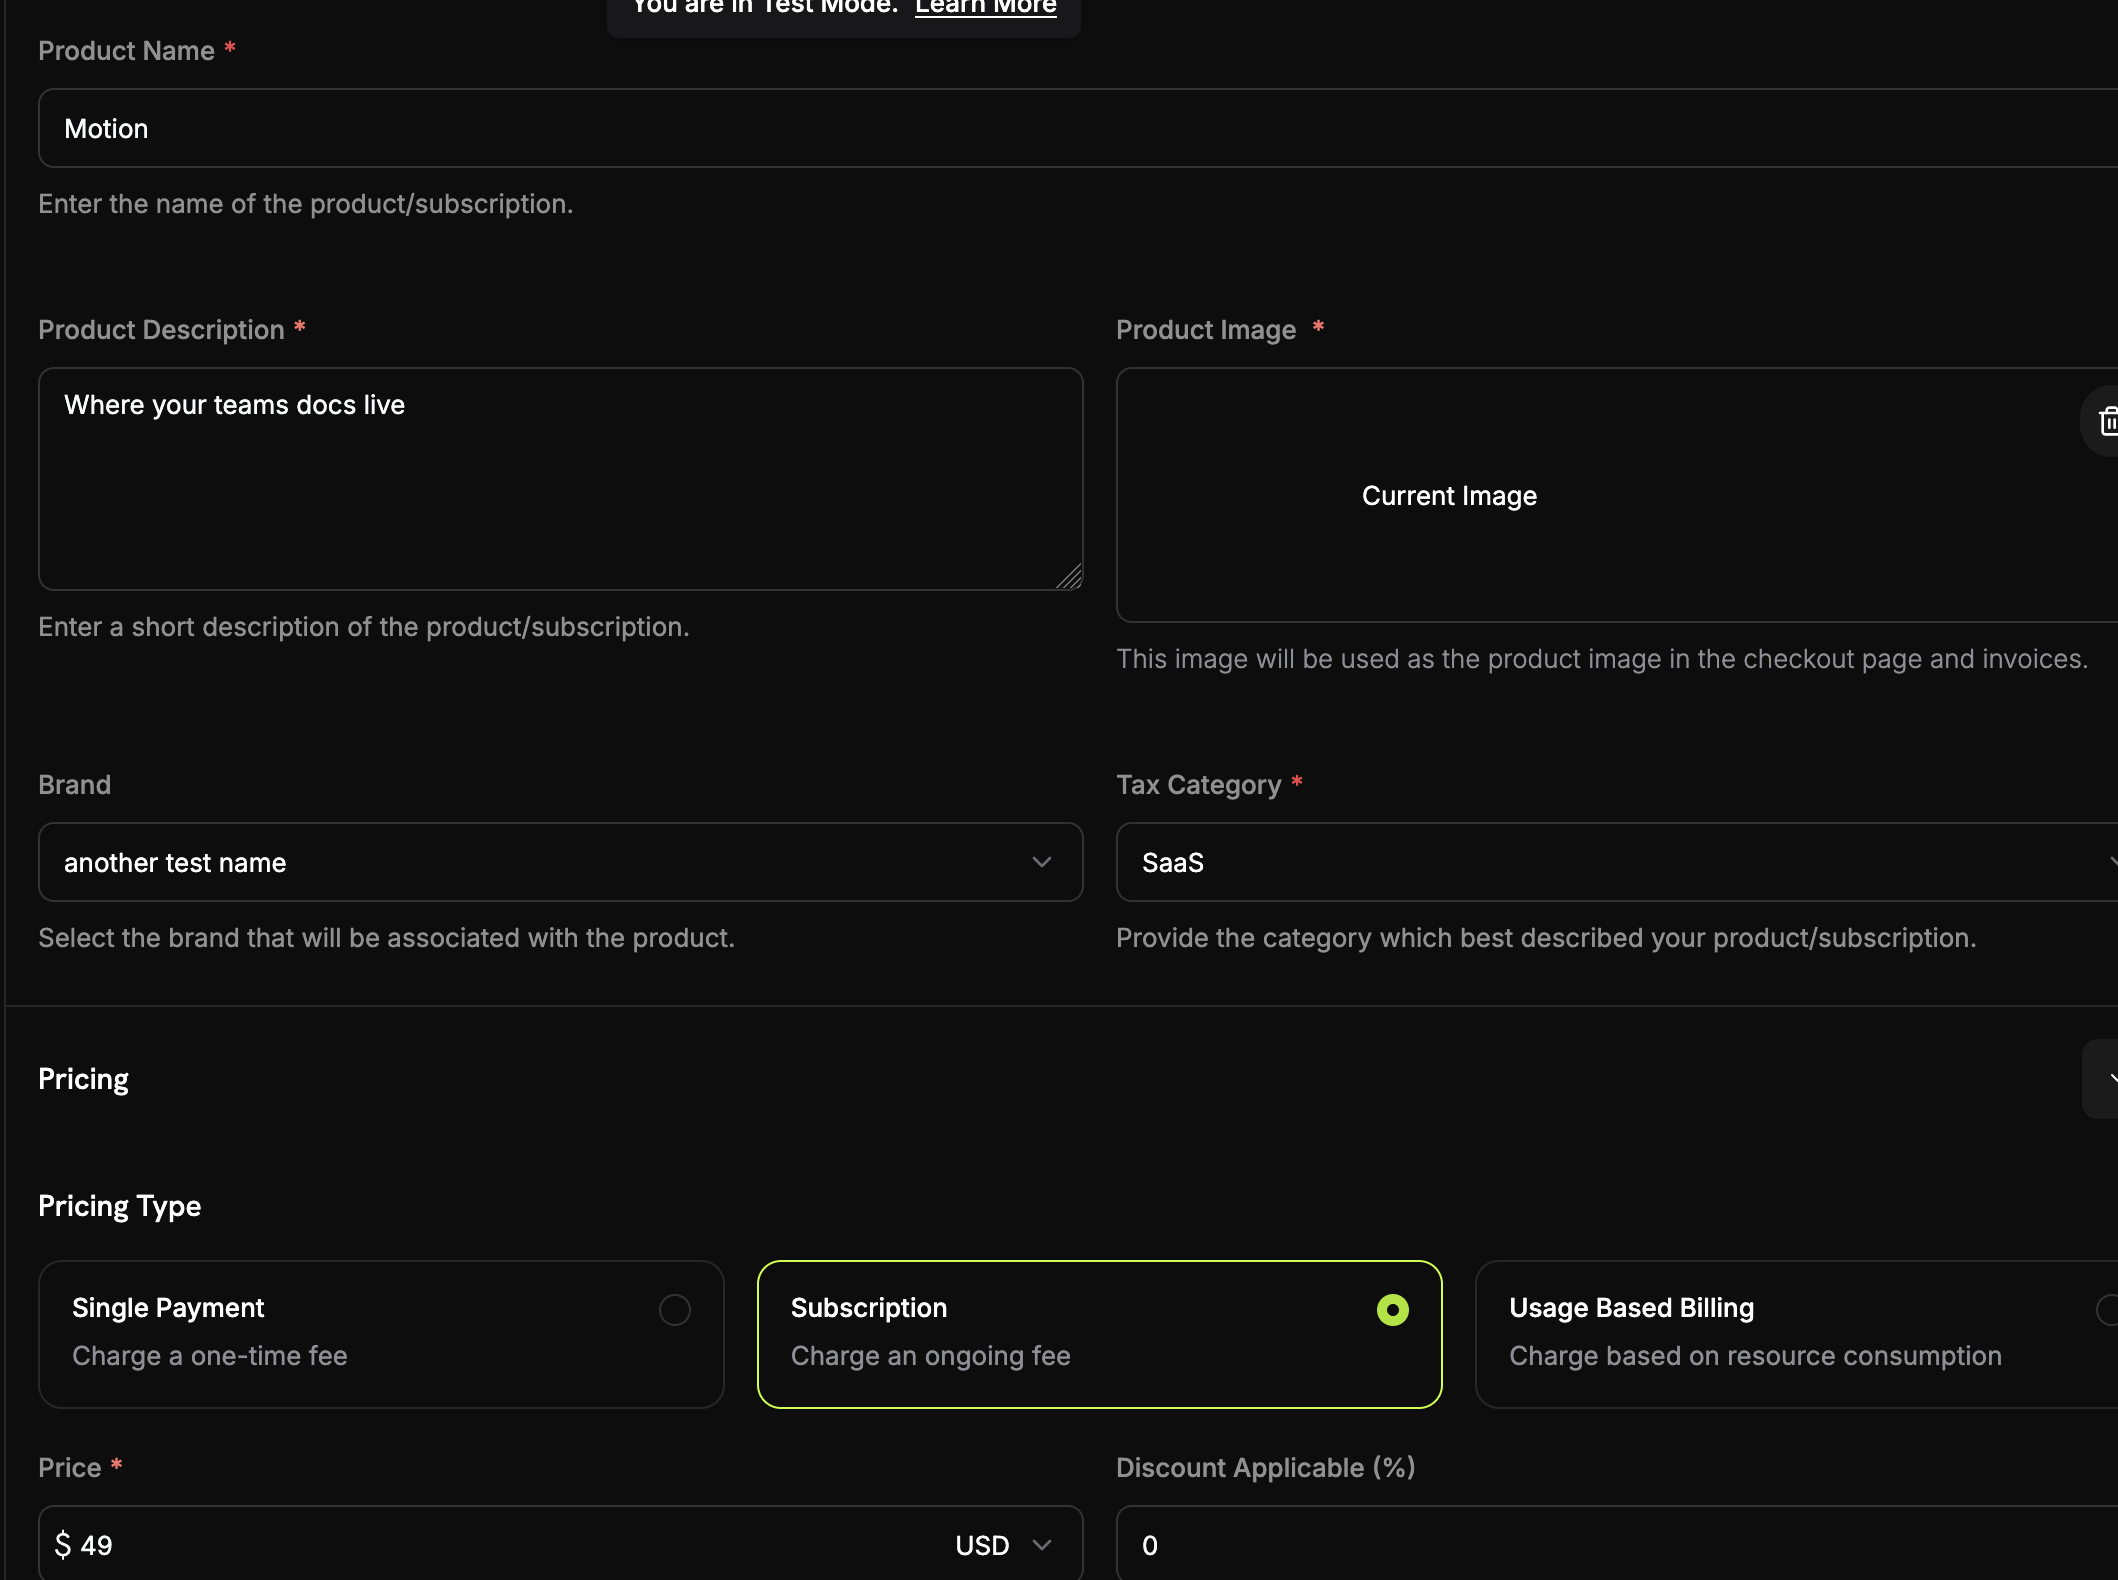
我们将首先创建一个包含 5 名团队成员的基础订阅产品。这将是我们基于座位的定价模型的基础。

<Frame>
  <img src="https://mintcdn.com/dodopayments/ajOhO6Du1yNsg0hy/images/cookbooks/seat-based/seat-based-subscription.png?fit=max&auto=format&n=ajOhO6Du1yNsg0hy&q=85&s=f17e96f3d106b88b6dc32a00be535620" alt="创建基础订阅产品" style={{ maxHeight: '500px', width: 'auto' }} width="2118" height="1580" data-path="images/cookbooks/seat-based/seat-based-subscription.png" />
</Frame>

<Steps>
  <Step title="Navigate to Products">
    1. 登录您的 Dodo Payments 仪表板
    2. 在左侧边栏中点击 **产品（Products）**
    3. 点击 **创建产品（Create Product）** 按钮
    4. 选择 **订阅（Subscription）** 作为产品类型

    您将看到一个用于配置基础订阅的表单。
  </Step>

  <Step title="Fill in the subscription details">
    接下来我们为基础方案输入具体信息：

    **产品名称**：`Motion`

    **描述**：`Where your team's documentation lives.`

    **定期价格**：输入 → `49.00`

    **计费周期**：选择 → `Monthly`

    **货币**：选择您偏好的货币（例如：`USD`）
  </Step>
</Steps>

## 第 3 步：将附加组件连接到订阅

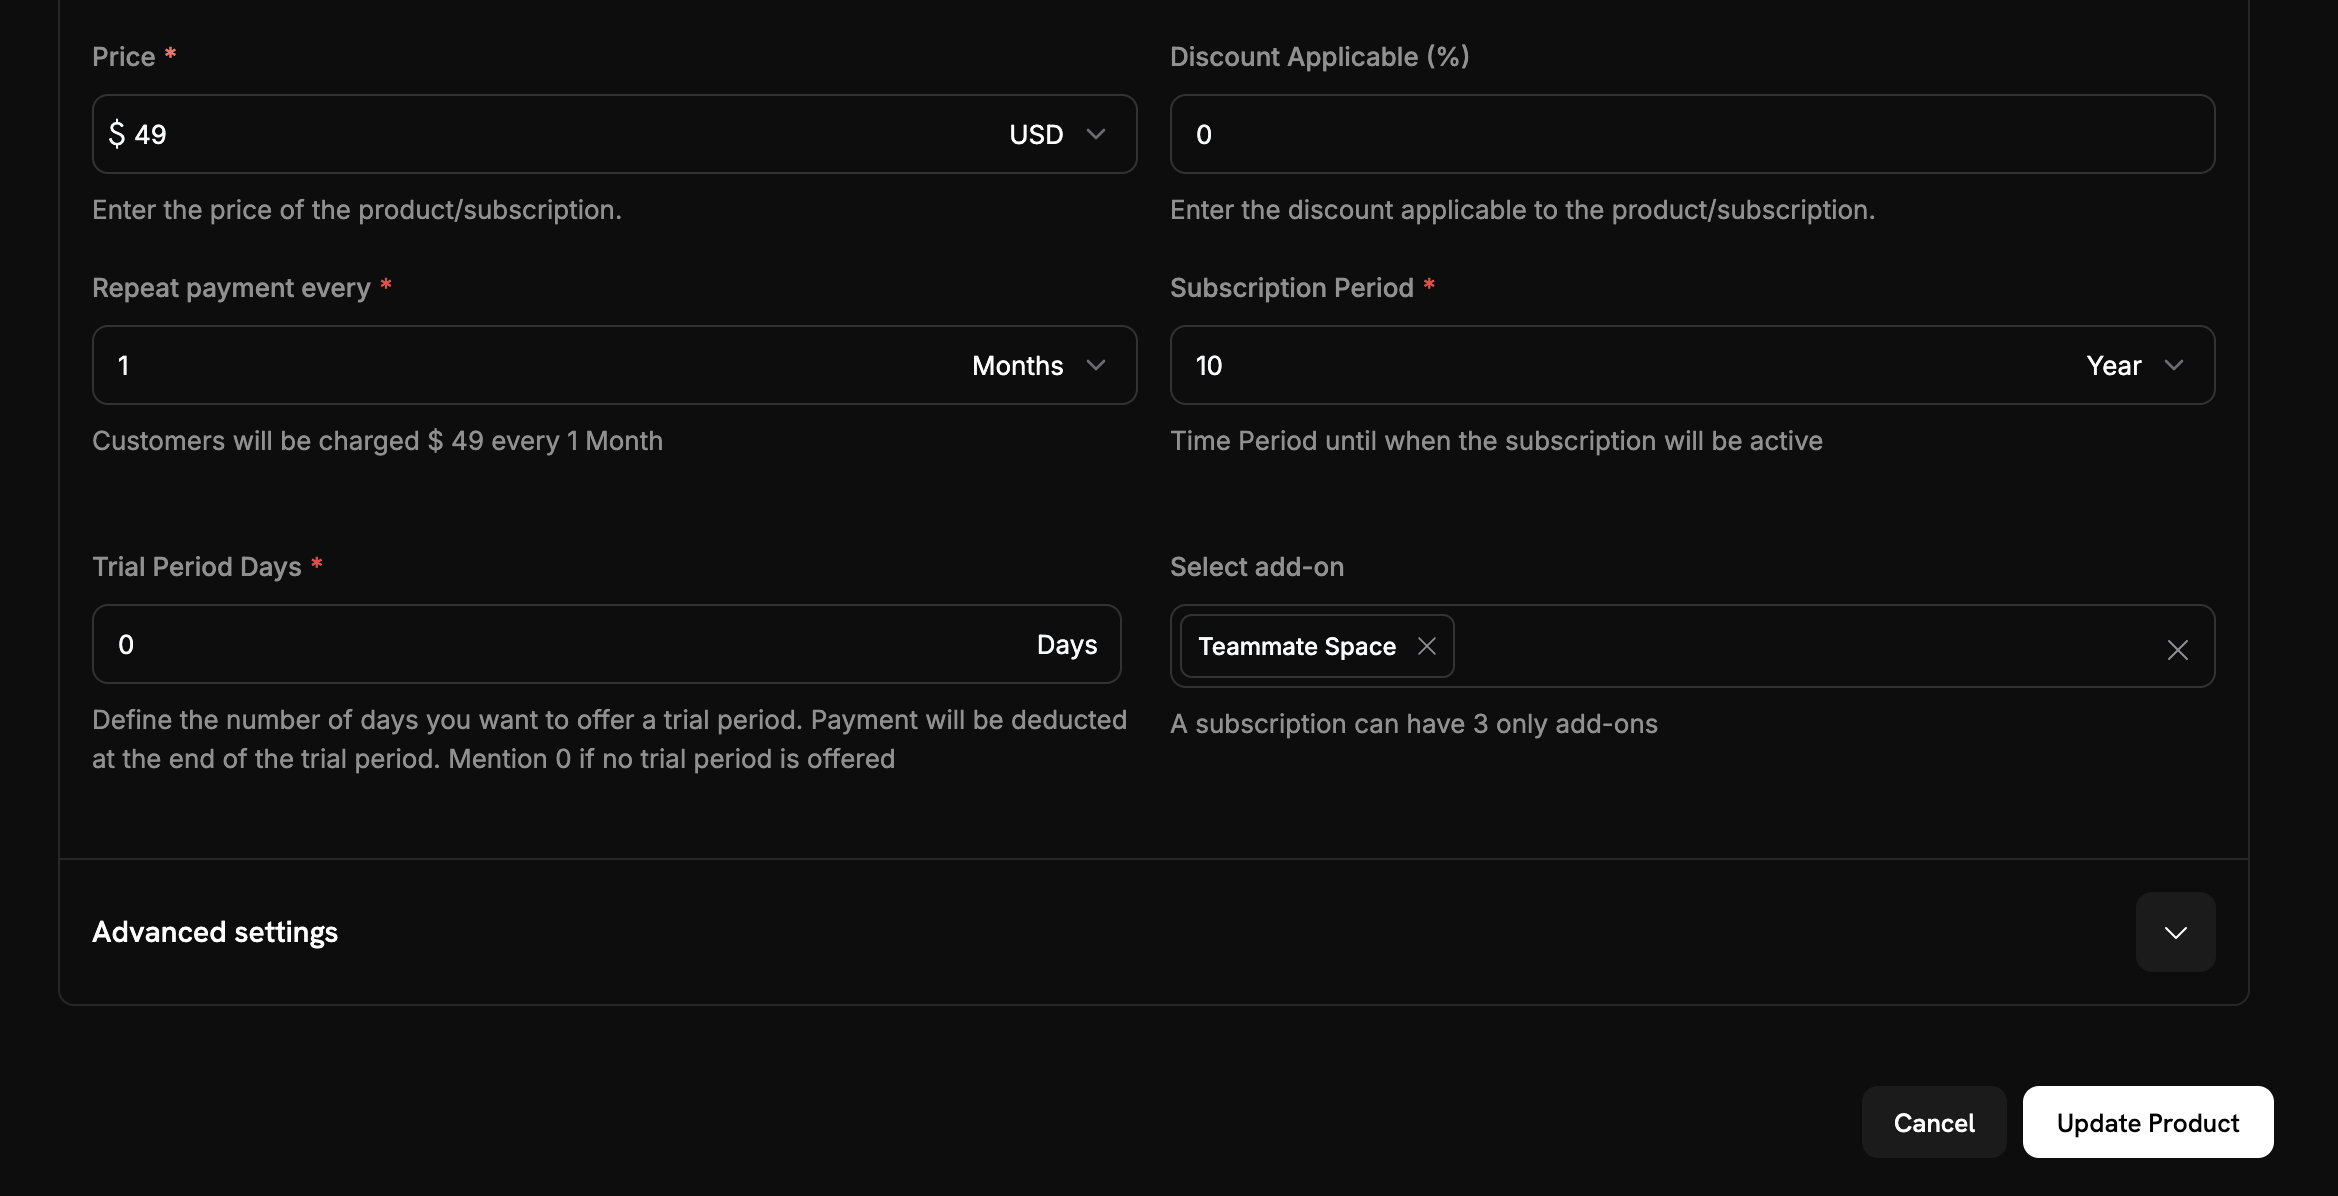
现在我们需要将我们的座位附加组件与基础订阅关联，以便客户在结账时可以购买额外的座位。

<Steps>
  <Step title="Attach the seat add-on">
    <Frame>
      <img src="https://mintcdn.com/dodopayments/ajOhO6Du1yNsg0hy/images/cookbooks/seat-based/seat-based-addons.png?fit=max&auto=format&n=ajOhO6Du1yNsg0hy&q=85&s=ea4ce0d437201c92590eea6c31a14e80" alt="将附加组件附加到订阅" style={{ maxHeight: '500px', width: 'auto' }} width="2338" height="1196" data-path="images/cookbooks/seat-based/seat-based-addons.png" />
    </Frame>

    1. 向下滚动到 **附加组件** 部分
    2. 点击 **添加附加组件**
    3. 从下拉菜单中选择您的座位附加组件
    4. 确认它出现在您的订阅配置中
  </Step>

  <Step title="Save subscription changes">
    1. 审查完整订阅设置：
       * 基础方案：\$49/月，包含 5 个席位
       * 附加组件：每个额外席位 \$2/月
       * 免费试用：14 天
    2. 点击 **保存更改（Save Changes）**

    <Check>
      **席位定价配置完成！** 现在客户可以购买基础方案并根据需求添加额外席位。
    </Check>
  </Step>
</Steps>

## 第 4 步：生成带有自定义附加组件数量的支付链接

现在让我们创建一个 Express.js 应用程序，生成带有自定义附加组件数量的支付链接。这就是基于座位的定价的真正力量所在 - 您可以动态创建具有任意数量额外座位的结账会话。

<Steps>
  <Step title="Set up your project">
    创建新的 Node.js 项目并安装所需依赖：

    ```bash theme={null}
    mkdir seat-based-pricing
    cd seat-based-pricing
    npm init -y
    npm install dodopayments express dotenv
    npm install -D @types/node @types/express typescript ts-node
    ```

    创建一个 `tsconfig.json` 文件：

    ```json theme={null}
    {
      "compilerOptions": {
        "target": "ES2020",
        "module": "commonjs",
        "outDir": "./dist",
        "rootDir": "./src",
        "strict": true,
        "esModuleInterop": true,
        "skipLibCheck": true,
        "forceConsistentCasingInFileNames": true
      }
    }
    ```
  </Step>

  <Step title="Create your environment file">
    创建一个 `.env` 文件，存放您的 Dodo Payments API 密钥：

    ```bash theme={null}
    DODO_PAYMENTS_API_KEY=your_actual_dodo_api_key_here
    ```

    <Warning>
      切勿将您的 API 密钥提交到版本控制系统。将 `.env` 添加到 `.gitignore` 文件中。
    </Warning>
  </Step>

  <Step title="Implement the checkout session creation">
    创建一个 `src/server.ts` 文件，并写入以下代码：

    <CodeGroup>
      ```typescript server.ts expandable theme={null}
      // Add this new endpoint for dynamic seat quantities
      import 'dotenv/config';
      import DodoPayments from 'dodopayments';
      import express, { Request, Response } from 'express';

      const app = express();

      // Initialize the Dodo Payments client
      const client = new DodoPayments({
        bearerToken: process.env.DODO_PAYMENTS_API_KEY,
        environment: 'test_mode'
      });

      async function createCheckoutSession(seatCount: number) {
        try {
          const session = await client.checkoutSessions.create({
            // Products to sell - use IDs from your Dodo Payments dashboard
            product_cart: [
              {
                product_id: 'pdt_7Rl9OWT2Mz4wwUTKz74iZ', // Replace with your actual product ID
                quantity: 1,
                addons: [
                  {
                    addon_id: 'adn_eKQbNakKrivDpaxmI8wKI', // Replace with your actual addon ID
                    quantity: seatCount
                  }
                ]
              }
            ],
            
            // Pre-fill customer information to reduce friction
            customer: {
              email: 'steve@example.com',
              name: 'Steve Irwin',
            },
            // Where to redirect after successful payment
            return_url: 'https://example.com/checkout/success',
          });

          // Redirect your customer to this URL to complete payment
          console.log('Checkout URL:', session.checkout_url);
          console.log('Session ID:', session.session_id);
          
          return session;
          
        } catch (error) {
          console.error('Failed to create checkout session:', error);
          throw error;
        }
      }

      // Example usage in an Express.js route
      app.post('/create-checkout/:seatCount', async (req: Request, res: Response) => {
        try {
          const seatCount = parseInt(req.params.seatCount);
          const session = await createCheckoutSession(seatCount);
          res.json({ checkout_url: session.checkout_url });
        } catch (error) {
          res.status(500).json({ error: 'Failed to create checkout session' });
        }
      });

      // Add this line after your other middleware
      app.use(express.static('public'));

      // Add this route to serve the demo page
      app.get('/', (req, res) => {
        res.sendFile(__dirname + '/../public/index.html');
      });

      app.listen(3000, () => {
        console.log('Server is running on port 3000');
      });
      ```
    </CodeGroup>
  </Step>

  <Step title="Add a simple web interface">
    创建一个 `public/index.html` 文件，便于测试：

    <CodeGroup>
      ```html index.html expandable theme={null}
      <!DOCTYPE html>
      <html>
      <head>
          <title>Seat-Based Pricing Demo</title>
          <style>
              body { font-family: Arial, sans-serif; max-width: 600px; margin: 50px auto; padding: 20px; }
              .form-group { margin: 20px 0; }
              label { display: block; margin-bottom: 5px; font-weight: bold; }
              input { width: 100%; padding: 10px; border: 1px solid #ddd; border-radius: 4px; }
              button { background: #007bff; color: white; padding: 10px 20px; border: none; border-radius: 4px; cursor: pointer; }
              button:hover { background: #0056b3; }
              .result { margin-top: 20px; padding: 15px; background: #f8f9fa; border-radius: 4px; }
          </style>
      </head>
      <body>
          <h1>Seat-Based Pricing Demo</h1>
          <p>Generate checkout links with custom seat quantities:</p>
          
          <div class="form-group">
              <label for="seatCount">Number of Additional Seats:</label>
              <input type="number" id="seatCount" value="3" min="0" max="50">
          </div>
          
          <button onclick="createCheckout()">Generate Checkout Link</button>
          
          <div id="result" class="result" style="display: none;">
              <h3>Checkout Link Generated!</h3>
              <p><strong>Seat Count:</strong> <span id="seatCountDisplay"></span></p>
              <p><strong>Total Cost:</strong> $<span id="totalCost"></span>/month</p>
              <p><strong>Checkout URL:</strong></p>
              <a id="checkoutUrl" href="#" target="_blank">Click here to checkout</a>
          </div>

          <script>
              async function createCheckout() {
                  const seatCount = document.getElementById('seatCount').value;
                  
                  try {
                      const response = await fetch(`/create-checkout/${seatCount}`, {
                          method: 'POST'
                      });
                      
                      const data = await response.json();
                      
                      if (response.ok) {
                          document.getElementById('seatCountDisplay').textContent = seatCount;
                          document.getElementById('totalCost').textContent = data.total_cost;
                          document.getElementById('checkoutUrl').href = data.checkout_url;
                          document.getElementById('result').style.display = 'block';
                      } else {
                          alert('Error: ' + data.error);
                      }
                  } catch (error) {
                      alert('Error creating checkout session');
                  }
              }
          </script>
      </body>
      </html>
      ```
    </CodeGroup>

    <Check>
      **网页界面已创建！** 现在您有了一个简单的 UI，用于测试不同的席位数量。
    </Check>
  </Step>

  <Step title="Serve static files">
    将以下内容添加到您的 `src/server.ts` 中以提供 HTML 文件服务：

    ```typescript theme={null}
    // Add this line after your other middleware
    app.use(express.static('public'));

    // Add this route to serve the demo page
    app.get('/', (req, res) => {
      res.sendFile(__dirname + '/../public/index.html');
    });
    ```

    <Check>
      **静态文件配置完成！** 访问 `http://localhost:3000` 即可查看演示界面。
    </Check>
  </Step>
</Steps>

## 第 5 步：测试您的实现

让我们测试我们的基于座位的定价实现，以确保一切正常工作。

<Steps>
  <Step title="Start your server">
    1. 确保您的 `.env` 文件中包含正确的 API 密钥
    2. 在代码中使用 Dodo Payments 仪表板中的实际值更新产品与附加组件 ID
    3. 启动服务器：

    ```bash theme={null}
    npm run dev
    ```

    <Check>
      服务器应成功启动，并显示 "Server running on `http://localhost:3000`"
    </Check>
  </Step>

  <Step title="Test the web interface">
    <Frame>
      <img src="https://mintcdn.com/dodopayments/ajOhO6Du1yNsg0hy/images/cookbooks/seat-based/seat-based-billing-ui.png?fit=max&auto=format&n=ajOhO6Du1yNsg0hy&q=85&s=37d166d8e76b0bfbb4959bc9a3eff1f8" alt="创建基础订阅产品" style={{ maxHeight: '500px', width: 'auto' }} width="1806" height="1416" data-path="images/cookbooks/seat-based/seat-based-billing-ui.png" />
    </Frame>

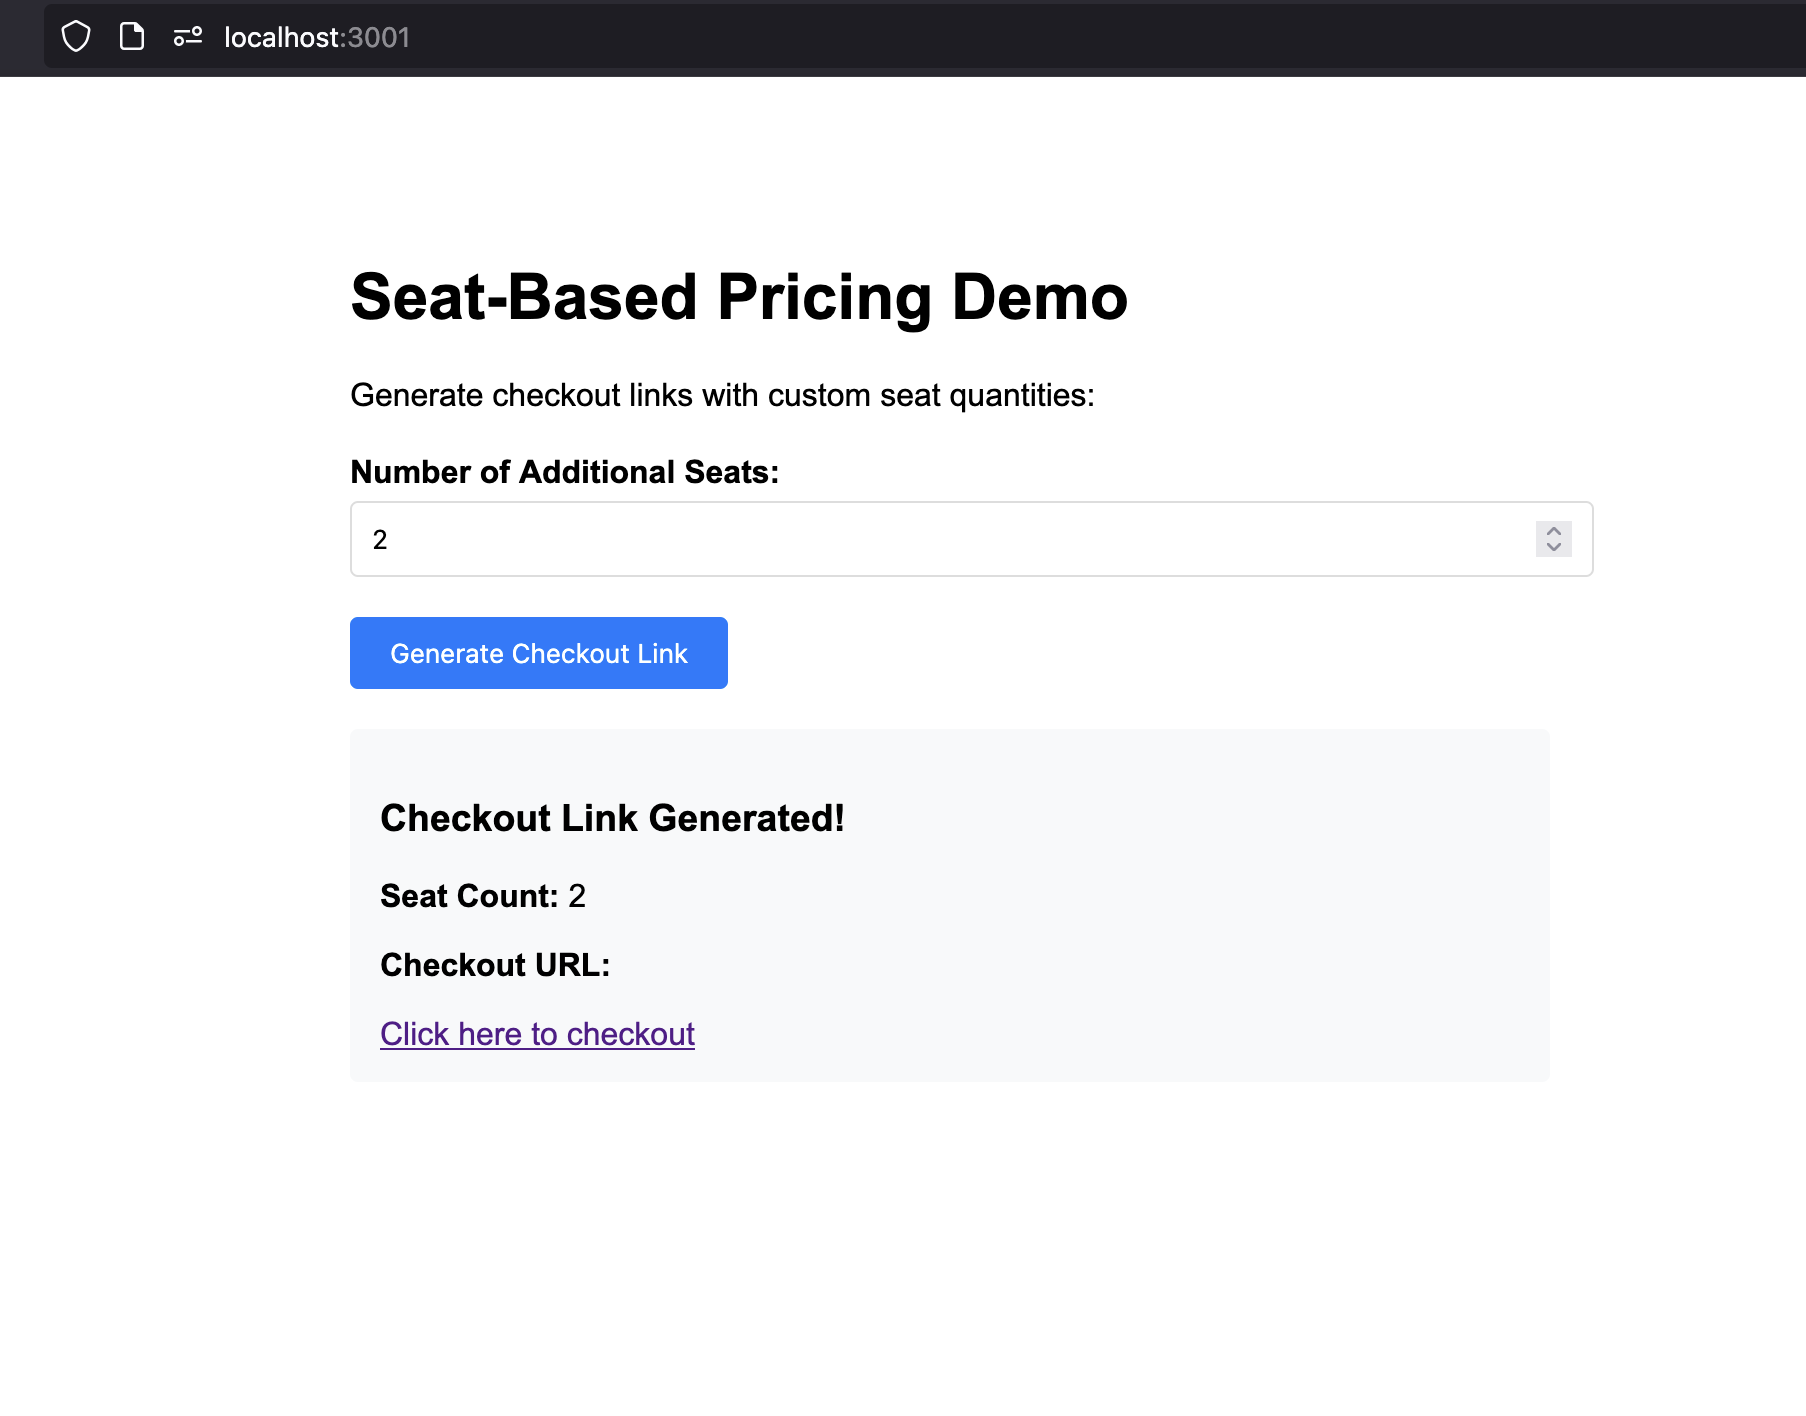
    1. 在浏览器中打开 `http://localhost:3000`
    2. 您应该会看到席位定价演示界面
    3. 尝试不同的席位数量（0、3、10 等）
    4. 为每个数量点击 “生成结账链接（Generate Checkout Link）”
    5. 验证结账 URL 是否生成正确
  </Step>

  <Step title="Test a checkout session">
    1. 生成一个包含 3 个额外席位的结账链接
    2. 点击该结账 URL 打开 Dodo Payments 结账页面
    3. 验证结账页面显示：
       * 基础方案：\$49/月
       * 额外席位：3 × 2 美元 = \$6/月
    4. 完成测试购买

    <Check>
      结账页面应显示正确的定价明细，并允许您完成购买。
    </Check>
  </Step>

  <Step title="Listen for webhooks and update your DB">
    为了让数据库与订阅及席位更改保持同步，您需要监听来自 Dodo Payments 的 Webhook 事件。当客户完成结账、更新订阅或更改席位数量时，Webhook 会通知您的后端。

    请遵循官方 Dodo Payments webhook 指南，获取设置 webhook 端点和处理事件的逐步说明：

    <Card title="Dodo Payments Webhooks Documentation" icon="bell" href="/developer-resources/webhooks">
      了解如何安全地接收并处理订阅与席位管理的 Webhook 事件。
    </Card>
  </Step>
</Steps>

## 故障排除

常见问题及其解决方案：

<AccordionGroup>
  <Accordion title="Checkout creation failing">
    **可能的原因：**

    * 产品 ID 或附加组件 ID 无效
    * API 密钥权限不足
    * 附加组件未正确关联到订阅
    * 网络连接问题

    **解决方案：**

    1. 确认 Dodo Payments 仪表板中存在相应的产品与附加组件 ID
    2. 检查附加组件是否正确附加到订阅中
    3. 确保 API 密钥具有创建结账会话的权限
    4. 通过简单的 GET 请求测试 API 连通性
  </Accordion>
</AccordionGroup>

## 恭喜！您已实现基于座位的定价

您已成功创建了一个基于座位的定价系统，使用 Dodo Payments！以下是您完成的内容：

<CardGroup cols={2}>
  <Card title="Base Subscription">
    创建了一个每月 \$49、含 5 个席位的订阅产品
  </Card>

  <Card title="Seat Add-ons">
    配置了每个额外席位 \$2/月的附加组件
  </Card>

  <Card title="Checkout">
    构建了一个可根据自定义席位数量生成结账会话的 API
  </Card>

  <Card title="Web Interface">
    创建了一个用于测试不同席位数量的简单网页界面
  </Card>
</CardGroup>

<Info>
  此示例仅展示了席位定价的最小实现。用于生产环境时，您应添加健全的错误处理、身份验证、数据验证、安全措施，并根据应用需求调整逻辑。
</Info>